上一篇ReactNative小项目——(二)已经把项目的主题UI框架搭起来啦。然后每个页面在填充东西吧。
数据是从 干货网中拿来的 感谢干货网。
先在第二个界面picture中添加点图片吧。
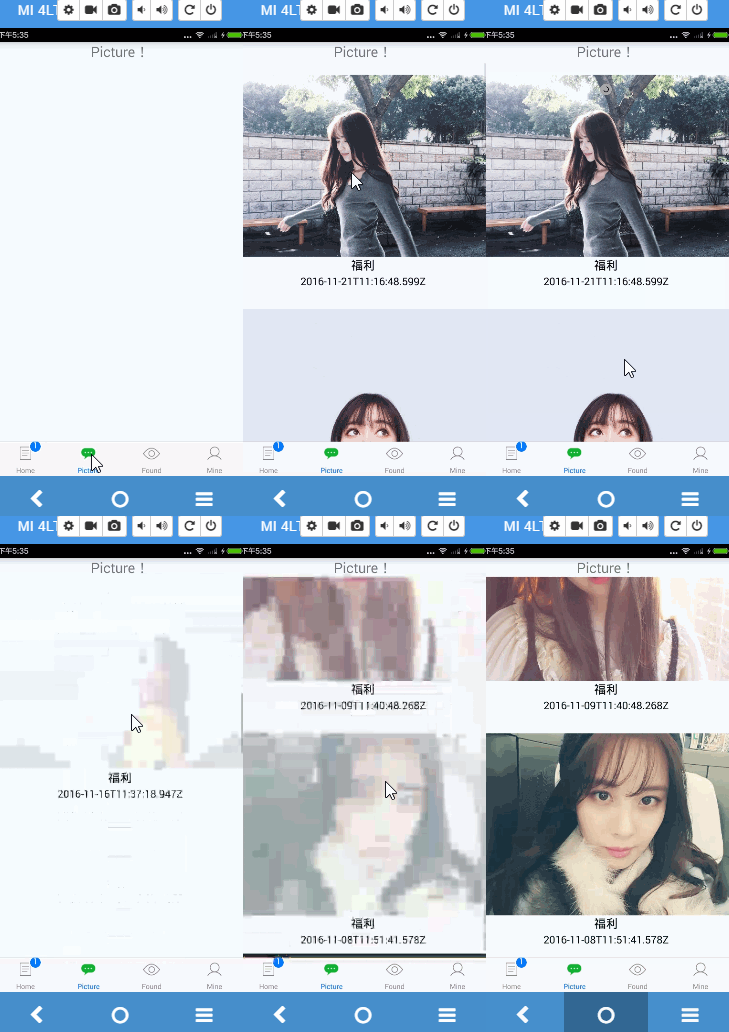
效果图:

picuture.js代码:
/**
 * Sample React Native App
 * https://github.com/facebook/react-native
 * @flow
 */

import React, { Component } from 'react';
import {
  AppRegistry,
  StyleSheet,
  Text,
  View,
  TextInput,
  Image,
  TouchableHighlight,
  ListView,
  RefreshControl
} from 'react-native';
import MainPage from './MainPage'
import Animation from './Animation'
let SERVER_URI = "http://gank.io/api/data/%E7%A6%8F%E5%88%A9/10/";
export default class Picture extends Component {
  constructor(props) {
    super(props)
    this.pageIndex = 1;
    this.state = {
      dataSource: new ListView.DataSource({ rowHasChanged: (r1, r2) => r1 !== r2 }),
      dataArry: [],
      loadMore: false,
      isRefreshing: false,
      isError: false
    }
  }
  componentDidMount() {
    this.getFromApiAsyncRefresh();
  }
  //刷新的时候调用 pageIndex置一
  getFromApiAsyncRefresh() {
    this.pageIndex = 1
    fetch(SERVER_URI + this.pageIndex)
      .then((response) => response.json())
      .then((responseJson) => {
        this.setState({
          dataArry: responseJson.results,
          loadMore: false,
        });
        console.log(responseJson);
        this.pageIndex++;
      })
      .catch((error) => {
        console.error(error);
      });
  };
  //loadMore 的时候调用
  getListFromApiAsync() {
    this.setState({ loadMore: true })
    fetch(SERVER_URI + this.pageIndex)
      .then((response) => response.json())
      .then((responseJson) => {
        this.setState({
          dataArry: this.state.dataArry.concat(responseJson.results),
          loadMore: false,
        });
        console.log(responseJson);
        this.pageIndex++;
      })
      .catch((error) => {
        console.error(error);
      });
  };

  render() {
    return (
      <View style={styles.container}>
        <Text style={styles.welcome}>Picture!</Text>
        <ListView
          dataSource={this.state.dataSource.cloneWithRows(this.state.dataArry)}
          // renderRow={(rowData) => <Text>{rowData}</Text>}
          // dataSource={this.state.dataSource}
          renderRow={this._renderItem.bind(this)}
          enableEmptySections={true}
          onEndReached={this.getListFromApiAsync.bind(this)}
          renderFooter={this._renderFooter.bind(this)}
          onEndReachedThreshold={29}
          refreshControl={
            <RefreshControl
              refreshing={this.state.isRefreshing}
              onRefresh={this.getFromApiAsyncRefresh.bind(this)}
              tintColor='#aaaaaa'
              title='Loading...'
              progressBackgroundColor='#aaaaaa' />
          }
          />
      </View>
    );
  }
  //Listview 的条目
  _renderItem(results) {
    return (
      <TouchableHighlight onPress={() => this._skipIntoContent(contentData)
      }>
        <View style={styles.itemContainer}>
          <Image source={{ uri: results.url }}
            style={styles.thumbnail} />
          <Text style={styles.date}>{results.type}</Text>
          <Text style={[styles.title]}>{results.publishedAt}</Text>
        </View>
      </TouchableHighlight>
    )
  }
  //滑到底部加载 显示的加载动画
  _renderFooter() {
    return (
      this.state.loadMore
        ? (<View style={[styles.indicatorWrapper]}>
          <Animation timingLength={50} duration={500} bodyColor={'#aaaaaa'} />
        </View>)
        : null
    )
  }
}

const styles = StyleSheet.create({
  container: {
    flex: 1,
    // justifyContent: 'center',
    // alignItems: 'center',
    backgroundColor: '#F5FCFF',
  },
  welcome: {
    fontSize: 20,
    textAlign: 'center',
  },

  header: {
    height: 70,
    width: 70,

  },
  itemContainer: {
    flexDirection: 'column',
    // height: 30,
    justifyContent: 'center',
    alignItems: 'center',
    paddingTop: 20
  },
  thumbnail: {
    width: null, // 配合alignSelf实现宽度上 match_parent
    height: 260,
    alignSelf: 'stretch'
  },
  title: {// alignSelf 默认是center
    fontSize: 15,
    marginBottom: 10,
    marginRight: 35,
    marginLeft: 35,
    // letterSpacing: 10,//字间距
    lineHeight: 22, // 行距+字高,0表示和字高一样,没效果
    color: 'black',
    textAlign: 'center' // 字的对其方式:center每行都居中;left,right;auto === justify === left
  },
  date: {
    fontSize: 17,
    color: 'black',
    textAlign: 'center'
  },
  indicatorWrapper: {
    height: 45,
    alignItems: 'center',
    justifyContent: 'center',
    backgroundColor: '#252528'
  },
});
module.exports = Picture
// AppRegistry.registerComponent('Leisure', () => Leisure);
其中用到了ListView, RefreshControl 。RefreshControl 用来做下拉刷新。


 被折叠的 条评论
为什么被折叠?


