


目录
(1) 在 profile 文件底部添加如下配置,保存后退出
(3) 查看环境变量(/usr/local/mysql/bin)
(1)将启动脚本添加至/etc/rc.d/init.d/mysqld
(2) 注意:密码为MySQL数据库密码,非Linux系统密码
一.MySQL数据库下载:
1.官方网站:
https://dev.mysql.com/downloads/mysql/
2.镜像:
https://mirrors.aliyun.com/mysql/?spm=a2c6h.13651104.mirror-free-trial.1.2db35dc8AymhvV
笔者下载的版本:
mysql-5.7.31-linux-glibc2.12-x86_64.tar.gz
二.安装:
1.上传:
将mysql-5.7.31-linux-glibc2.12-x86_64.tar.gz压缩文件上传至/opt目录,利用windows的cmd自带的scp命令即可
scp命令:将文件从一个主机复制到另一个主机
#格式:要上传的文件路径 用户名@服务器ip:目标路径

scp C:\Users\49581\Desktop\mysql-5.7.31-linux-glibc2.12-x86_64.tar.gz root@192.168.88.128:/opt

#输入linux系统密码

root@192.168.88.128's password:
2.解压:
将压缩文件解压至/usr/local目录
[root@localhost ~]# tar -zxvf /opt/mysql-5.7.31-linux-glibc2.12-x86_64.tar.gz -C /usr/local3.重命名:
将解压后的文件重命名(必须重命名为mysql,否则无法启动服务)
[root@localhost ~]# mv /usr/local/mysql-5.7.31-linux-glibc2.12-x86_64 /usr/local/mysql4.删除[可选]:
删除原压缩文件
[root@localhost ~]# rm -f /opt/mysql-5.7.31-linux-glibc2.12-x86_64.tar.gz
5.创建目录:
在/usr/local/mysql下创建一个名为data的目录(用于存放数据库的数据)
[root@localhost ~]# mkdir /usr/local/mysql/data6.添加用户与组:
保证MySQL服务的独立性
(1)添加组
[root@localhost ~]# groupadd mysql
(2)添加用户
[root@localhost ~]# useradd -r -g mysql mysql(3)更改MySQL的所属组与用户
[root@localhost ~]# chown -R mysql:mysql /usr/local/mysql7.初始化数据库:
MySQL安装完成后,必须初始化数据目录
[root@localhost ~]# chown -R mysql:mysql /usr/local/mysql
2023-04-15T11:57:44.321668Z 0 [Warning] TIMESTAMP with implicit DEFAULT value is deprecated. Please use --explicit_defaults_for_timestamp server option (see documentation for more details).
2023-04-15T11:57:44.583165Z 0 [Warning] InnoDB: New log files created, LSN=45790
2023-04-15T11:57:44.618582Z 0 [Warning] InnoDB: Creating foreign key constraint system tables.
2023-04-15T11:57:44.677805Z 0 [Warning] No existing UUID has been found, so we assume that this is the first time that this server has been started. Generating a new UUID: bb88185b-db84-11ed-9e85-000c29a3a90d.
2023-04-15T11:57:44.678947Z 0 [Warning] Gtid table is not ready to be used. Table 'mysql.gtid_executed' cannot be opened.
2023-04-15T11:57:45.268540Z 0 [Warning] CA certificate ca.pem is self signed.
2023-04-15T11:57:45.318559Z 1 [Note] A temporary password is generated for root@localhost: mTVy?Og(J8NW
注意:该段的末尾 mTVy?Og(J8NW 为登录mysql的临时密码,需要先保存以便后面更改密码
8.修改配置:
对my.cnf文件进行配置
(1) 打开文件
vi /etc/my.cnf(2) 编辑文件
将以下代码替换原文件代码并保存
[mysql]
default-character-set=utf8

[mysqld]
port=3306

datadir=/usr/local/mysql/data

basedir=/usr/local/mysql

socket=/tmp/mysql.sock

character-set-server=UTF8MB4

default-storage-engine=INNODB

default_password_lifetime=0

max_allowed_packet=16M
9.配置环境变量:
对/etc/profile文件进行编辑
(1) 在 profile 文件底部添加如下配置,保存后退出
export PATH=/usr/local/mysql/bin:$PATH(2) 设置环境变量立即生效
source /etc/profile(3) 查看环境变量(/usr/local/mysql/bin)
source /etc/profile三.配置:
1.自启动:
(1)将启动脚本添加至/etc/rc.d/init.d/mysqld
[root@localhost ~]# cp /usr/local/mysql/support-files/mysql.server /etc/rc.d/init.d/mysqld(2)将 mysqld文件添加执行权限
[root@localhost ~]# chmod +x /etc/rc.d/init.d/mysqld(3)将 mysqld服务添加至系统服务
[root@localhost ~]# chkconfig --add mysqld(4)启动 mysqld服务
[root@localhost ~]# service mysqld start(5)查看 mysqld服务状态
[root@localhost ~]# service mysqld status
 SUCCESS! MySQL running (2880)
2.防火墙:
防火墙启动时会引发一些访问不通的情况,有以下两种解决方法:
关闭防火墙或开放端口
(1)第一种办法:关闭防火墙(不推荐)
a.查看防火墙状态(当前状态正在运行)
[root@localhost ~]# systemctl status firewalld
● firewalld.service - firewalld - dynamic firewall daemon
   Loaded: loaded (/usr/lib/systemd/system/firewalld.service; enabled; vendor preset: enabled)
   Active: active (running) since 六 2023-04-15 02:32:31 PDT; 6h ago
     Docs: man:firewalld(1)
 Main PID: 6526 (firewalld)
    Tasks: 2
   CGroup: /system.slice/firewalld.service
           └─6526 /usr/bin/python -Es /usr/sbin/firewalld --nofork --nopid
b.关闭防火墙
[root@localhost ~]# systemctl stop firewalldc.禁用防火墙开机自启
[root@localhost ~]# systemctl disable firewalld(2)第二种办法:防火墙开放端口
a.添加端口
[root@localhost ~]# firewall-cmd --zone=public --add-port=3306/tcp --permanentb.重新加载配置文件
[root@localhost ~]# firewall-cmd --reload(3)修改mysql密码
a.启动 mysqld服务(若在1.(4)中已启动可忽略此步骤)
[root@localhost ~]# service mysqld startb.登录(临时密码在 7 中所保存)
[root@localhost ~]# mysql -uroot -p
Enter password: 输入临时密码
c.修改密码
mysql> alter user 'root'@'localhost' identified by '123321';(4)开启远程连接服务
MySQL数据库默认不允许远程连接,根据以下步骤可开启远程连接
a.登录
[root@localhost ~]# mysql -uroot -p
Enter password: 输入密码
b.切换数据库至mysql
mysql> use mysql;c.允许远程连接
mysql> update user set host = '%' where user = 'root';d.刷新MySQL的系统权限相关表
mysql> flush privileges;四.Navicat远程连接Linux.MySQL数据库:
1.Navicat下载官网网站:
2.新建MySQL连接:
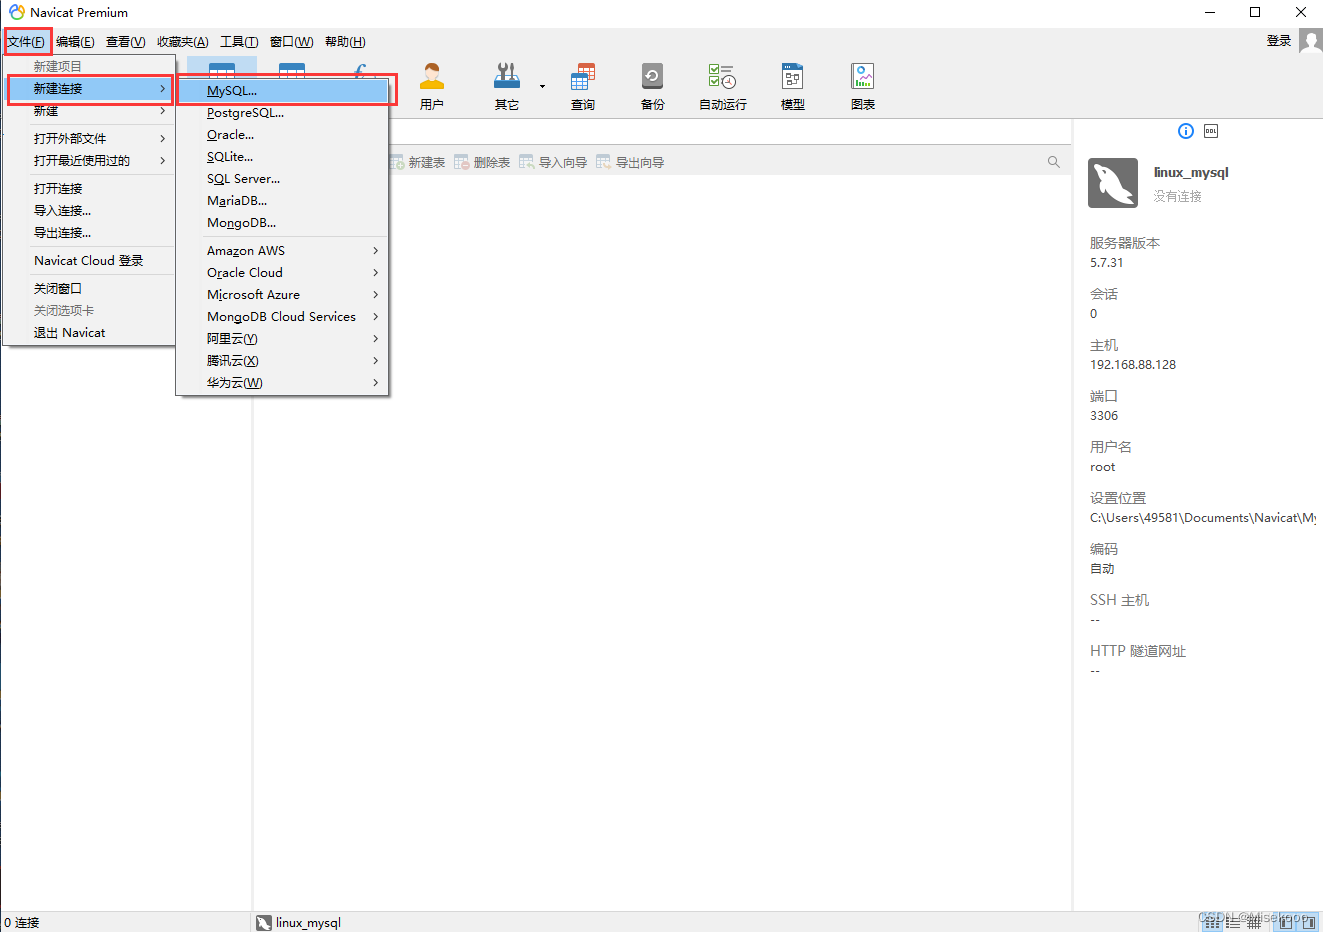
3.连接配置:
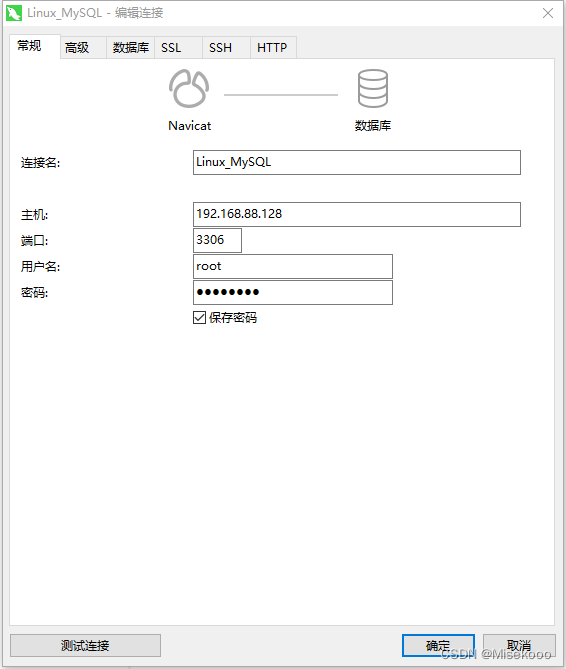
(1)主机为Linux系统的ip地址
Linux系统查看ip地址(例:VMware虚拟机的网卡为ens33)
[root@localhost ~]# ifconfig
(2) 注意:密码为MySQL数据库密码,非Linux系统密码(123321)
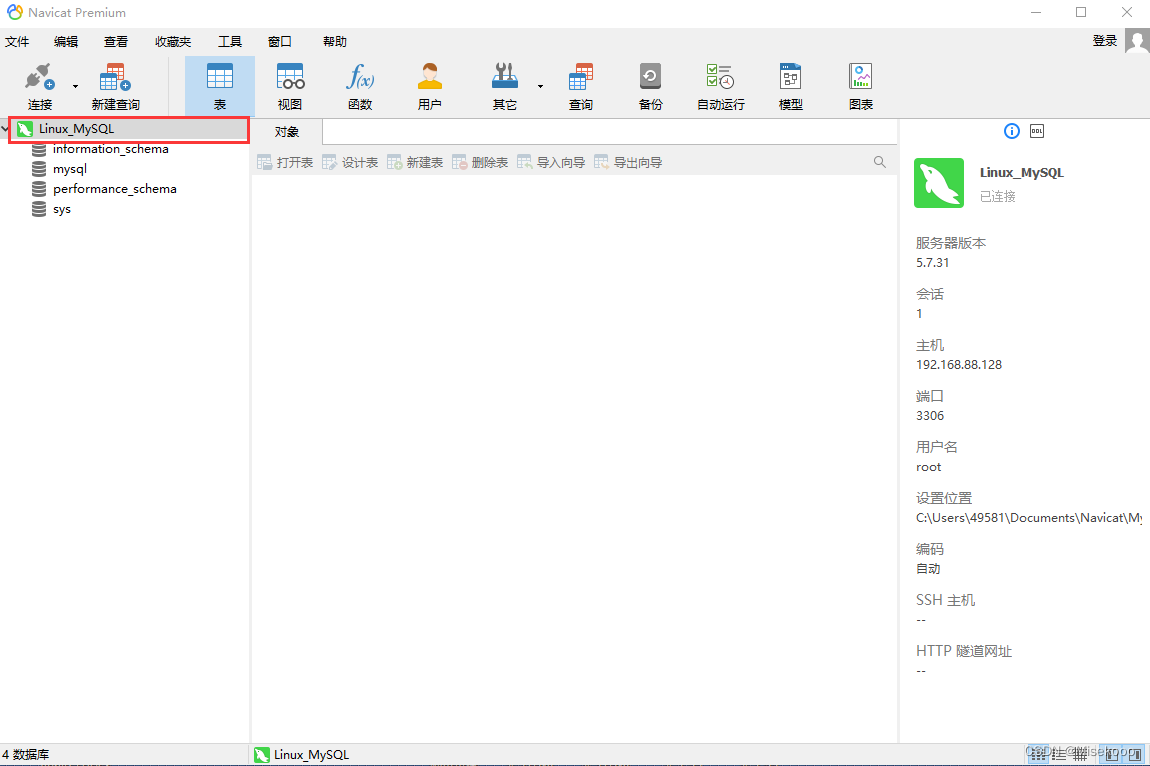
3.连接成功:


 255
255


 被折叠的 条评论
为什么被折叠?
被折叠的 条评论
为什么被折叠?
 到【灌水乐园】发言


