


ES 集群搭建
集群 Cluster
一、相关概念
集群
一个集群就是由一个或多个节点组织在一起,它们共同持有你整个的数据,并一起提供索引和搜索功能。一个集群由一个唯一的名字标识,这个名字默认就是elasticsearch。这个名字是重要的,因为一个节点只能通过指定某个集群的名字,来加入这个集群。
节点
一个节点是你集群中的一个服务器,作为集群的一部分,它存储你的数据,参与集群的索引和搜索功能。和集群类似,一个节点也是由一个名字来标识的,默认情况下,这个名字是一个随机的漫威漫画角色的名字,这个名字会在启动的时候赋予节点。
索引
一组相似文档的集合
映射
用来定义索引存储文档的结构如:字段、类型等。
文档
索引中一条记录,可以被索引的最小单元
分片
Elasticsearch提供了将索引划分成多份的能力,这些份就叫做分片。当你创建一个索引的时候,你可以指定你想要的分片的数量。每个分片本身也是一个功能完善并且独立的“索引”,这个“索引”可以被放置 到集群中的任何节点上。
复制
Index的分片中一份或多份副本。
二、搭建集群
1. 集群规划
硬件配置:共十一台服务器172.16.4.71 - 172.16.4.81 服务器名称为 glnode01-glnode11
# 1.准11个ES节点和一个kibana 节点  ES 9200 9300
- web: 9200 tcp:9300  node01  elasticsearch.yml
- web: 9200 tcp:9300  node02  elasticsearch.yml
- web: 9200 tcp:9300  node03  elasticsearch.yml
- web: 9200 tcp:9300  node04  elasticsearch.yml
- web: 9200 tcp:9300  node05  elasticsearch.yml
- web: 9200 tcp:9300  node06  elasticsearch.yml
- web: 9200 tcp:9300  node07  elasticsearch.yml
- web: 9200 tcp:9300  node08  elasticsearch.yml
- web: 9200 tcp:9300  node09  elasticsearch.yml
- web: 9200 tcp:9300  node10  elasticsearch.yml
- web: 9200 tcp:9300  node11  elasticsearch.yml
- kibana: 5602	glnode07
- 注意
- 所有节点集群名称必须一致 cluster.name
- 每个节点必须有一个唯一名字 node.name
- 开启每个节点远程连接 network.host: 0.0.0.0
- 指定集群中所有节点通信列表 discovery.seed_hosts: node01 node02 node03 相同
- 允许集群初始化 master 节点节点数: cluster.initial_master_nodes: [“node01”, “node02”,“node03”]
2. 前置准备
新增用户
为我们的所有节点增加用户
(base) [root@glnode01 ~]# useradd es
(base) [root@glnode01 ~]# passwd es
Changing password for user es.
New password:
BAD PASSWORD: The password is shorter than 8 characters
Retype new password:
Sorry, passwords do not match.
New password:
BAD PASSWORD: The password is shorter than 8 characters
Retype new password:
passwd: all authentication tokens updated successfully.
可以使用 xshell 的工具,将命令发送到所有机器上同时执行

创建数据目录和日志目录
由于我的磁盘都是挂载到 /home 路径下,所以我这里要修改数据目录和日志目录,如果磁盘空间满足要求可以不自己新建数据目录,会默认在你的es安装目录下新建data和logs目录。
(base) [root@glnode01 ~]# mkdir -p /home/es/{data,logs}
(base) [root@glnode01 ~]# cd /home/es
(base) [root@glnode01 es]# ls
data  logs
最后修改文件拥有者
(base) [root@glnode01 home]# ll
drwx------ 4 es               es                86 Jan 30 18:07 es
(base) [root@glnode01 home]# chown -R es:es /home/es
(base) [root@glnode01 home]# ll
drwx------ 4 es               es                86 Jan 30 18:07 es
(base) [root@glnode01 home]#
3. 配置文件
到安装目录的config目录下修改配置文件
[root@glnode07 ~]# cd /export/servers/elasticsearch-8.12.0/config/
[root@glnode07 config]# vim elasticsearch.yml
# node07 配置文件
# ======================== Elasticsearch Configuration =========================
#
# NOTE: Elasticsearch comes with reasonable defaults for most settings.
#       Before you set out to tweak and tune the configuration, make sure you
#       understand what are you trying to accomplish and the consequences.
#
# The primary way of configuring a node is via this file. This template lists
# the most important settings you may want to configure for a production cluster.
#
# Please consult the documentation for further information on configuration options:
# https://www.elastic.co/guide/en/elasticsearch/reference/index.html
#
# ---------------------------------- Cluster -----------------------------------
#
# Use a descriptive name for your cluster:
#
cluster.name: es-cluster
#
# ------------------------------------ Node ------------------------------------
#
# Use a descriptive name for the node:
#
node.name: node07
#
# Add custom attributes to the node:
#
#node.attr.rack: r1
#
# ----------------------------------- Paths ------------------------------------
#
# Path to directory where to store the data (separate multiple locations by comma):
#
path.data: /home/es/data
#
# Path to log files:
#
path.logs: /home/es/logs
#
# ----------------------------------- Memory -----------------------------------
#
# Lock the memory on startup:
#
#bootstrap.memory_lock: true
#
# Make sure that the heap size is set to about half the memory available
# on the system and that the owner of the process is allowed to use this
# limit.
#
# Elasticsearch performs poorly when the system is swapping the memory.
#
# ---------------------------------- Network -----------------------------------
#
# By default Elasticsearch is only accessible on localhost. Set a different
# address here to expose this node on the network:
#
network.host: 0.0.0.0
#
# By default Elasticsearch listens for HTTP traffic on the first free port it
# finds starting at 9200. Set a specific HTTP port here:
#
http.port: 9200
#
# For more information, consult the network module documentation.
#
# --------------------------------- Discovery ----------------------------------
#
# Pass an initial list of hosts to perform discovery when this node is started:
# The default list of hosts is ["127.0.0.1", "[::1]"]
#
discovery.seed_hosts: ["glnode01", "glnode02", "glnode03", "glnode04", "glnode05", "glnode06", "glnode07", "glnode08", "glnode09", "glnode10", "glnode11"]
#
# Bootstrap the cluster using an initial set of master-eligible nodes:
#
cluster.initial_master_nodes: ["node07", "node08", "node09", "node01" , "node02", "node03", "node04", "node05", "node06", "node10", "node11"]
#
# For more information, consult the discovery and cluster formation module documentation.
#
# ---------------------------------- Various -----------------------------------
#
#The Elastic Stack monitoring features provide a way to keep a pulse on the health and performance of your Elasticsearch cluster. Allow wildcard deletion of indices:
#
#action.destructive_requires_name: false

#----------------------- BEGIN SECURITY AUTO CONFIGURATION -----------------------
#
# The following settings, TLS certificates, and keys have been automatically
# generated to configure Elasticsearch security features on 20-01-2024 12:33:49
#
# --------------------------------------------------------------------------------

# Enable security features
xpack.security.enabled: false

xpack.security.enrollment.enabled: true

# Enable encryption for HTTP API client connections, such as Kibana, Logstash, and Agents
xpack.security.http.ssl:
  enabled: false
  keystore.path: certs/http.p12

# Enable encryption and mutual authentication between cluster nodes
xpack.security.transport.ssl:
  enabled: true
  verification_mode: certificate
  keystore.path: certs/transport.p12
  truststore.path: certs/transport.p12
# Create a new cluster with the current node only
# Additional nodes can still join the cluster later
#cluster.initial_master_nodes: ["glnode07"]

# Allow HTTP API connections from anywhere
# Connections are encrypted and require user authentication
http.host: 0.0.0.0

# Allow other nodes to join the cluster from anywhere
# Connections are encrypted and mutually authenticated
#transport.host: 0.0.0.0

#----------------------- END SECURITY AUTO CONFIGURATION -------------------------
在其它节点的配置文件中你只需要修改
node.name: node07
4. 分发 es 安装文件
脚本文件会在最后附录给出,调整路径为你自己的安装路径
[root@glnode07 config]# cd /export/AutoShell/
[root@glnode07 config]# ./07to11s.sh /export/servers/elasticsearch-8.12.0 /export/servers
只分发配置文件
[root@glnode07 config]# ./07to11s.sh /export/servers/elasticsearch-8.12.0/config/elasticsearch.yml /export/servers/elasticsearch-8.12.0/config/
分发后记得修改权限
(base) [root@glnode01 servers]# chown -R es:es /export/servers/elasticsearch-8.12.0/
5. 运行
首先切换为 es 用户
[root@glnode07 bin]# su es
然后进入 es 安装文件夹下的 bin
[es@glnode07 bin]$ ./elasticsearch -d
如果报错can’t move to stopped state when not started ,切换root执行
sysctl -w vm.max_map_count=262144
6. 查看集群状态
访问集群中任意一个节点的 restful api
http://glnode07:9200/_cat/nodes
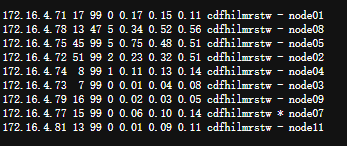
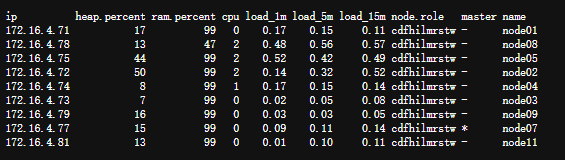
显示每一个数据项意义
http://glnode07:9200/_cat/nodes?v
三、配置 kibana 连接集群
# kibana配置文件 连接到ES
server.host: "0"
server.shutdownTimeout: "5s"
elasticsearch.hosts: [ "http://192.168.124.3:9201" ] #链接任意节点即可
monitoring.ui.container.elasticsearch.enabled: true
访问5601端口,并测试

四、安装cerebro插件
1. 安装
项目地址,直接下载最新版的tgz文件就可以,然后上传到服务器。
解压缩
[root@glnode07 servers]# tar -zxvf cerebro-0.9.4.tgz
进入bin目录下执行
[root@glnode07 servers]# cd cerebro-0.9.4
[root@glnode07 cerebro-0.9.4]# ls
bin  conf  lib  README.md
[root@glnode07 cerebro-0.9.4]# cd bin/
[root@glnode07 bin]# ls
cerebro  cerebro.bat
[root@glnode07 bin]# ./cerebro &
访问9000端口号,然后输入任一节点就可以查看集群状态
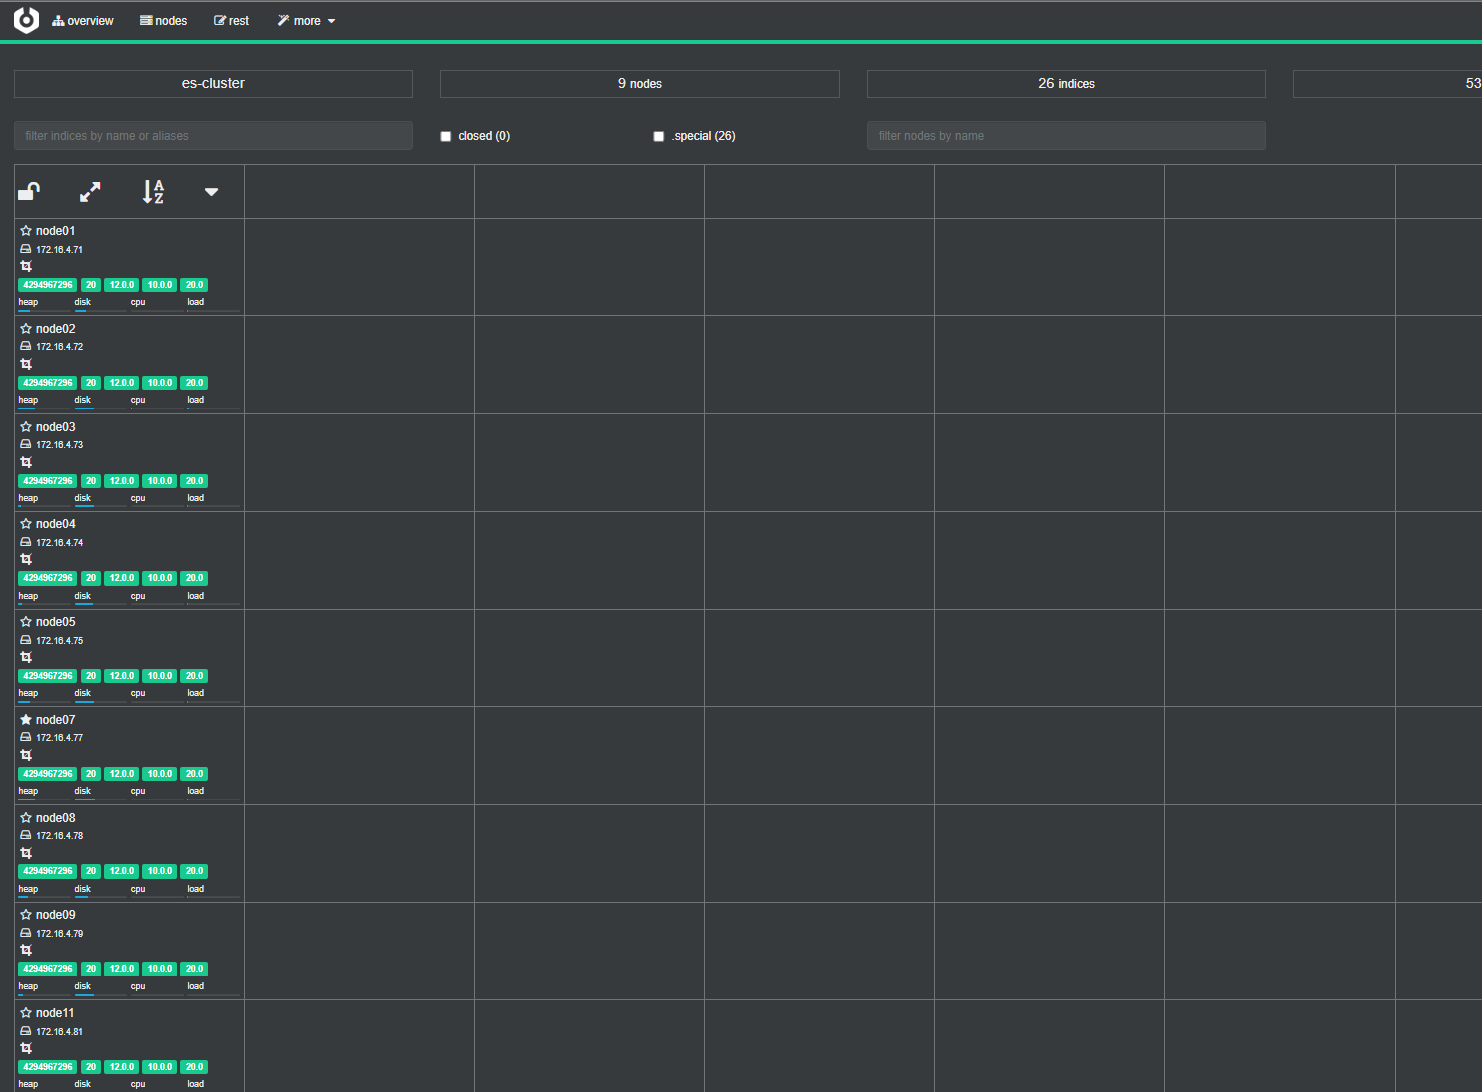
2. 创建一个索引查看分片效果
创建索引
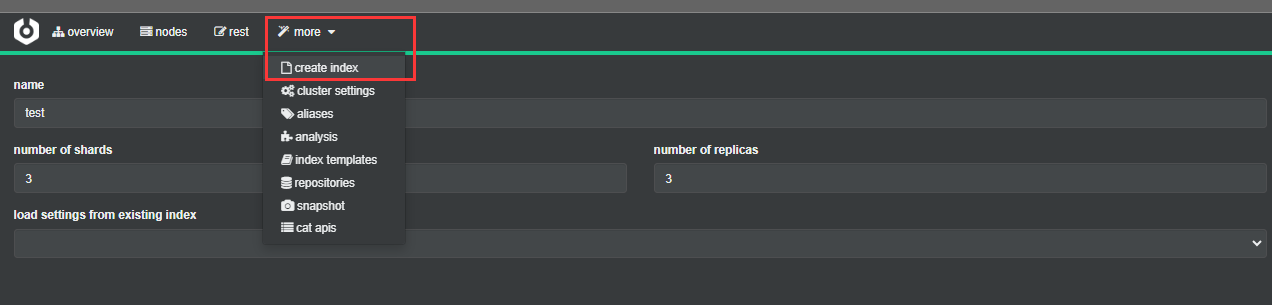
查看分片效果

附录
1. 07to11s.sh 脚本代码
if [ $# -ne 2 ]
then
	echo -e "usage:\n    1to11.sh srcFile targetDir\n\n  srcFile: 需要被分发的文件(夹)\n  targetDir: 被分发的主机的目的路径\n\n  该命令将源文件分发至处本机外的11台主机\n"
	exit;
fi

for i in "01" "02" "03" "04" "05" "06" "08" "09" "10" "11" "12"
do
	echo ==================== "glnode"$i ====================

	# 检查目标目录是否存在,如果不存在则创建
   	ssh root@glnode${i} "[ -d ${2} ] || mkdir -p ${2}"

  	# 使用 scp 命令将源文件(或文件夹)复制到目标主机的指定目录
	scp -r $1 root@glnode${i}:${2}
	# echo scp -r $1 root@glnode${i}:${2}
done


 1252
1252


 被折叠的 条评论
为什么被折叠?
被折叠的 条评论
为什么被折叠?
 到【灌水乐园】发言


