


案例环境:
主机 操作系统 IP地址 主要的软件
Haproxy CentOS7 x86_64 192.168.100.10 haproxy-1.5.19.tar.gz
Nginx1 CentOS7 x86_64 192.168.100.11 nginx-1.6.2.tar.gz
Nginx2 CentOS7 x86_64 192.168.100.12 nginx-1.6.2.tar.gz
1.安装配置Haproxy
1.1安装Haproxy依赖包及源码包编译安装
[root@Haproxy ~]# yum -y install gcc gcc-c++ make pcre-devel bzip2-devel
#yum安装需要的依赖包
[root@Haproxy ~]# tar xf haproxy-1.5.19.tar.gz -C /usr/src/ #tar 解压
[root@Haproxy ~]# cd /usr/src/haproxy-1.5.19/ #到haproxy-1.5.19/目录下
[root@Haproxy haproxy-1.5.19]# make TARGET=linux26 && make install##编译安装
1.2建立haproxy的配置目录及文件
[root@Haproxy haproxy-1.5.19]# mkdir /etc/haproxy #创建配置目录
[root@Haproxy haproxy-1.5.19]# cp examples/haproxy.cfg /etc/haproxy/ #cp复制文件到配置目录
1.3haproxy配置项的介绍
###########全局配置#########
global
log 127.0.0.1 local0 #日志输出配置,所有日志都记录在本机系统日志,通过local0输出
log 127.0.0.1 local1 notice #notice为日志级别,通常有24个级别(error warringinfo debug)
nbproc 1 #设置进程数量,通常是CPU核心数或者2倍
pidfile /etc/haproxy/haproxy.pid #haproxy 进程PID文件
maxconn 4096 #最大连接数(需考虑ulimit-n限制 )
#chroot /usr/share/haproxy #chroot运行路径
uid 99 #用户uid
gid 99 #用户gid
daemon #守护进程模式,以后台服务形式允许
#debug #haproxy 调试级别,建议只在开启单进程的时候调试
###########默认配置#########
defaults
log global #定义日志为global配置中的日志定义
mode http #默认的模式mode { tcp|http|health },tcp是4层,http是7层,health只会返回OK
option httplog #日志类别,采用http日志格式记录日志
#option dontlognull #不记录健康检查日志信息
retries 3 #检查节点服务器失败次数,连续达到三次失败,则认为节点不可用
#option forwardfor #如果后端服务器需要获得客户端真实ip需要配置的参数,可以从Http Header中获得客户端i
#option httpclose #每次请求完毕后主动关闭http通道,haproxy不支持keep-alive,只能模拟这种模式的实现
maxconn 4096 #最大连接数
contimeout 5000 #连接超时时间
clitimeout 50000 #客户端超时时间
srvtimeout 50000 #服务器超时时间
#timeout check 2000 #心跳检测超时
#timeout http-keep-alive10s #默认持久连接超时时间
#timeout http-request 10s #默认http请求超时时间
#timeoutqueue 1m #默认队列超时时间
###########统计页面配置#########
listen admin_stats
bind 0.0.0.0:1080 #设置Frontend和Backend的组合体,监控组的名称,按需要自定义名称
mode http #http的7层模式
option httplog #采用http日志格式
#log 127.0.0.1 local0 err #错误日志记录
maxconn 10 #默认的最大连接数
stats refresh 30s #统计页面自动刷新时间
stats uri /stats #统计页面url
stats realm Crushlinux\ Haproxy #统计页面密码框上提示文本
stats auth admin:admin #设置监控页面的用户和密码:admin,可以设置多个用户名
stats hide-version #隐藏统计页面上HAProxy的版本信息
#stats admin if TRUE #设置手工启动/禁用,后端服务器(haproxy-1.4.9以后版本)
########设置haproxy 错误页面#####
errorfile 403 /home/haproxy/haproxy/errorfiles/403.http
errorfile 500 /home/haproxy/haproxy/errorfiles/500.http
errorfile 502 /home/haproxy/haproxy/errorfiles/502.http
errorfile 503 /home/haproxy/haproxy/errorfiles/503.http
errorfile 504 /home/haproxy/haproxy/errorfiles/504.http
########frontend前端配置##############
bibind *:80
#这里建议使用bind *:80的方式,要不然做集群高可用的时候有问题,vip切换到其他机器就不能访问了。
acl web hdr(host) -i www.abc.com
#acl后面是规则名称,-i是要访问的域名,
acl img hdr(host) -i img.abc.com
#如果访问www.abc.com这个域名就分发到下面的webserver 的作用域。
#如果访问img.abc.com.cn就分发到imgserver这个作用域。
use_backend webserver if web
use_backend imgserver if img
########backend后端配置##############
backend webserver #webserver作用域
mode http
balance roundrobin #banlance roundrobin 轮询,balance source 保存session值,支持static-rr,leastconn,first,uri等参数
option httpchk /index.html HTTP/1.0#健康检查,检测文件,如果分发到后台index.html访问不到就不再分发给它
server web1 192.168.100.20:80 cookie 1 weight 1 check inter 2000 rise 2 fall 3
server web2 192.168.100.30:80 cookie 2 weight 1 check inter 2000 rise 2 fall 3
#cookie 1表示serverid为1,check inter 1500 是检测心跳频率
#rise 2是2次正确认为服务器可用,fall 3是3次失败认为服务器不可用,weight代表权重
backend imgserver
mode http
option httpchk /index.php
balance roundrobin
server img01 192.168.100.20:80 check inter 2000 fall 3
server img02 192.168.100.30:80 check inter 2000 fall 3
########tcp配置#################
listen test1
bind 0.0.0.0:90
mode tcp
option tcplog #日志类别,采用tcplog
maxconn 4086
#log 127.0.0.1 local0 debug
server s1 192.168.100.20:80 weight 1
server s2 192.168.100.30:80 weight 1
1.4haproxy配置文件修改
[root@Haproxy ~]# vim /etc/haproxy/haproxy.cfg
global
log /dev/log local0 info
log /dev/log local0 notice
maxconn 4096
uid 99
gid 99
daemon
defaults
log global
mode http
option httplog
retries 3
maxconn 4096
contimeout 5000
clitimeout 50000
srvtimeout 50000
listen webcluster 0.0.0.0:80
option httpchk GET /index.html
balance roundrobin
server inst1 192.168.100.11:80 check inter 2000 fall 3 ##Nginx1 IP地址
server inst2 192.168.100.12:80 check inter 2000 fall 3 ##Nginx2 IP地址
listen admin_stats
bind 0.0.0.0:80
mode http
option httplog
maxconn 100
stats refresh 30s
stats uri /stats
stats realm Crushlinux\ Haproxy
stats auth admin:admin
stats hide-version
1.5准备启动脚本
[root@Haproxy ~]# cp /usr/src/haproxy-1.5.19/examples/haproxy.init /etc/init.d/haproxy
[root@Haproxy ~]# ln -s /usr/local/sbin/haproxy /usr/sbin/haproxy
[root@Haproxy ~]# chmod +x /etc/init.d/haproxy ##赋权X执行权限
[root@Haproxy ~]# /etc/init.d/haproxy start ##启动脚本
Reloading systemd: [ 确定 ]
Starting haproxy (via systemctl): [ 确定 ] ##启动成功
2.安装配置web服务nginx
2.1首先搭建Nginx1
[root@Nginx1 ~]# yum -y install gcc gcc-c++ make pcre-devel zlib-devel openssl-devel ##yum安装
[root@Nginx1 ~]# useradd -M -s /sbin/nologin nginx
[root@Nginx1 ~]# tar xf nginx-1.16.0.tar.gz -C /usr/src/
[root@Nginx1 ~]# cd /usr/src/nginx-1.16.0/
[root@Nginx1 nginx-1.16.0]# ./configure --prefix=/usr/local/nginx --user=nginx --group=nginx && make && make install
[root@Nginx1 nginx-1.16.0]# cd /usr/local/nginx/html/
[root@Nginx1 html]# echo "server 192.168.100.11" > index.html
[root@Nginx1 html]# /usr/local/nginx/sbin/nginx
[root@Nginx1 html]# netstat -anpt |grep nginx
tcp 0 0 0.0.0.0:80 0.0.0.0:* LISTEN 9169/nginx: master
6.2搭建Nginx2,同Nginx1搭建方式是一样的。
[root@Nginx2 ~]# yum -y install gcc gcc-c++ make pcre-devel zlib-devel openssl-devel
[root@Nginx2 ~]# useradd -M -s /sbin/nologin nginx
[root@Nginx2 ~]# tar xf nginx-1.16.0.tar.gz -C /usr/src/
[root@Nginx2 ~]# cd /usr/src/nginx-1.16.0/
[root@Nginx2 nginx-1.16.0]# ./configure --prefix=/usr/local/nginx --user=nginx --group=nginx && make && make install
[root@Nginx2 nginx-1.16.0]# cd /usr/local/nginx/html/
[root@Nginx2 html]# echo "server 192.168.100.12" > index.html ##与Nginx1的不同点
[root@Nginx2 html]# /usr/local/nginx/sbin/nginx
[root@Nginx2 html]# netstat -anpt |grep nginx
tcp 0 0 0.0.0.0:80 0.0.0.0:* LISTEN 64792/nginx: master
注意:nginx服务控制方式
/usr/local/nginx/sbin/nginx 启动服务
killall -s HUP nginx 重新加载服务
killall -s QUIT nginx 退出服务
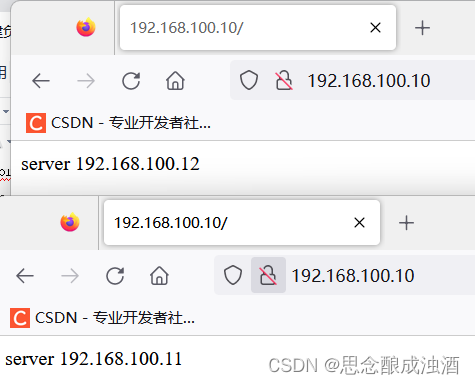
7、客户端访问测试:
用浏览器打开 http://192.168.100.10
打开一个新的浏览器再次访问 http://192.168.100.10
可以验证两次访问到的结果分别为:
- Haproxy日志分离
[root@Haproxy ~]# vim /etc/haproxy/haproxy.cfg
log 127.0.0.1 local3 info ##添加
server inst1 192.168.100.13:80 cookie inst1 check inter 2000 fall 3 ##添加红色
[root@Haproxy ~]# systemctl restart haproxy
[root@Haproxy ~]# vim /etc/rsyslog.conf
$ModLoad imudp ##文档中取消该行注释
$UDPServerRun 514 ##文档中取消该行注释
local3.* /var/log/haproxy.log
[root@Haproxy ~]# systemctl restart rsyslog
[root@Haproxy ~]# tail -50 /var/log/haproxy.log ##查询失败刷新几下网页就行了
2023-05-31T15:45:02+08:00 localhost haproxy[64164]: 192.168.100.1:55500 [31/May/2023:15:45:02.371] webcluster webcluster/inst2 285/0/0/1/286 200 258 - - ---- 1/1/0/1/0 0/0 "GET / HTTP/1.1"
2023-05-31T15:45:02+08:00 localhost haproxy[64164]: 192.168.100.1:55500 [31/May/2023:15:45:02.657] webcluster webcluster/inst1 145/0/1/0/146 200 258 - - ---- 1/1/0/1/0 0/0 "GET / HTTP/1.1"##显示的结果


 3439
3439


 被折叠的 条评论
为什么被折叠?
被折叠的 条评论
为什么被折叠?
 到【灌水乐园】发言


