1 简介
Activity (活动) 即应用程序 显示的 界面。可以通过两种方式 设置显示的内容 1:纯代码方式
2:xml 布局方式
无论哪一种方式,都是通过 setContentView 来设置显示的内容。
使用步骤
基本上四大组件创建步骤都一样
1:自定义 组件(Activity)
2:注册
3:使用
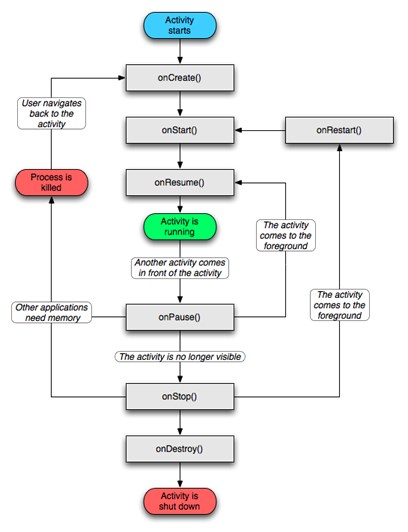
2 生命周期图
3 新建一个自定义的Activity
index.java
package com.demo;
import android.app.Activity;
import android.content.Intent;
import android.os.Bundle;
import android.widget.TextView;
public class index extends Activity{
    @Override
    protected void onCreate(Bundle savedInstanceState) {
        // TODO 自动生成的方法存根
        super.onCreate(savedInstanceState);
        Intent intent=this.getIntent();
        TextView text=new TextView(this);
        text.setText(intent.getStringExtra("str"));
        setContentView(text);//设置显示的内容,这里是代码生成的 TextView 对象
    }
    @Override
    public void onBackPressed() {
        // 拦截返回按钮
        Intent intent=new Intent();创建 intent 绑定要传送的数据
        Bundle bundle=new Bundle();
        bundle.putString("s1", "恭喜你跳成功了");
        bundle.putString("s2", "然后赶紧回家睡觉吧");
        intent.putExtra("bundle", bundle);
        setResult(0, intent);//通过 intent 返回数据
        this.finish();
    }
}
4 注册Activity
AndroidManifest.xml
<?xml version="1.0" encoding="utf-8"?>
<manifest xmlns:android="http://schemas.android.com/apk/res/android"
    package="com.myprovider"
    android:versionCode="1"
    android:versionName="1.0" >

    <uses-sdk
        android:minSdkVersion="11"
        android:targetSdkVersion="18" />

    <application
        android:allowBackup="true"
        android:icon="@drawable/ic_launcher"
        android:label="@string/app_name"
        android:theme="@style/AppTheme" >
        <activity
            android:name="com.myprovider.MainActivity"
            android:label="@string/app_name" >
            <intent-filter>
                <action android:name="android.intent.action.MAIN" />

                <category android:name="android.intent.category.LAUNCHER" />
            </intent-filter>
        </activity>
        <provider
            android:name="com.myprovider.MyProvider"
            android:authorities="com.michael"
            android:exported="true"/>
    </application>

</manifest>
4 注册Activity
<?xml version="1.0" encoding="utf-8"?>
<manifest xmlns:android="http://schemas.android.com/apk/res/android"
package="com.myprovider"
android:versionCode="1"
android:versionName="1.0" >
<uses-sdk
android:minSdkVersion="11"
android:targetSdkVersion="18" />
<application
android:allowBackup="true"
android:icon="@drawable/ic_launcher"
android:label="@string/app_name"
android:theme="@style/AppTheme" >
<activity
android:name="com.myprovider.MainActivity"
android:label="@string/app_name" >
<intent-filter>
<action android:name="android.intent.action.MAIN" />
<category android:name="android.intent.category.LAUNCHER" />
</intent-filter>
</activity>
<provider
android:name="com.myprovider.MyProvider"
android:authorities="com.michael"
android:exported="true"/>
</application>
</manifest>
5 MainActivity (主 Activity)
MainActivity.java
package com.demo;
import android.app.Activity;
import android.content.Intent;
import android.os.Bundle;
import android.util.Log;
import android.view.View;
import android.view.View.OnClickListener;
import android.widget.Button;
import android.widget.EditText;
public class MainActivity extends Activity {
    EditText edit1;
    String str;
    @Override
    protected void onCreate(Bundle savedInstanceState) {
        super.onCreate(savedInstanceState);
        setContentView(R.layout.activity_main);

        edit1=(EditText)findViewById(R.id.edit1);
        edit1.setText(str);

        Button btn=(Button)findViewById(R.id.btn1);
        btn.setOnClickListener(new OnClickListener() {

            @Override
            public void onClick(View v) {
                // TODO 自动生成的方法存根
                Intent intent=new Intent();
                intent.putExtra("str", "我跳跃成功!哈哈");
                intent.setClass(MainActivity.this, index.class);
                //startActivity(intent);
                startActivityForResult(intent, 0);
            }
        });
    }
    @Override
    protected void onActivityResult(int requestCode, int resultCode, Intent data) {
        // TODO 自动生成的方法存根
        super.onActivityResult(requestCode, resultCode, data);
        Bundle bundle=data.getBundleExtra("bundle");
        edit1.setText(bundle.getString("s1")+bundle.getString("s2"));
    }

    @Override
    protected void onStart() {
        // TODO 自动生成的方法存根
        super.onStart();
        Log.i("demo", "onStart");
    }
    @Override
    protected void onRestart() {
        // TODO 自动生成的方法存根
        super.onRestart();
        Log.i("demo", "onRestart");
    }
    @Override
    protected void onResume() {
        // TODO 自动生成的方法存根
        super.onResume();
        Log.i("demo", "onResume");
    }
    @Override
    protected void onPause() {
        // TODO 自动生成的方法存根
        super.onPause();
        Log.i("demo", "onPause");
    }
    @Override
    protected void onStop() {
        // TODO 自动生成的方法存根
        super.onStop();
        Log.i("demo", "onStop");
    }
    @Override
    protected void onDestroy() {
        // TODO 自动生成的方法存根
        super.onDestroy();
        Log.i("demo", "onDestroy");

        str=edit1.getText().toString();
    }
}
注:转载请注明出处 :) 毕竟代码是一个一个敲出来的啊,O(∩_∩)O~


 1465
1465

 被折叠的 条评论
为什么被折叠?


