请尊重个人劳动成果,转载注明出处,谢谢!
http://blog.csdn.net/amazing7/article/details/51918623
1. CoordinatorLayout
我们通常把CoordinatorLayout作为顶层布局来协调其子布局之间的动画效果。
子view1在布局中通过设置behavior属性与子view2关联,当移动view2的时候view1产生相应的效果,而这个效果具体是怎么样的由behavior类来决定。我们把view1叫做Child,view2叫做Dependency,Child跟随Dependency的变化而变化(CoordinatorLayout通过设置子View的 Behaviors来调度子View,使两个互相关联的view之间高度解耦)。
系统控件中往往把behavior作为内部类自己实现,比如AppBarLayout.Behavior, AppBarLayout.ScrollingViewBehavior,和FloatingActionButton.Behavior等。
当然我们也可以自定义Behavior,步骤非常简单:
- 首先在代码中自定义Behavior,一般实现如下两个方法,注意泛型参数传Child的类型。
public class MyBehavior extends CoordinatorLayout.Behavior<View>{
/**
* Determine whether the supplied child view has another specific sibling view as a
* layout dependency.
* @param parent the parent view of the given child
* @param child the child view to test
* @param dependency the proposed dependency of child
* @return true if child's layout depends on the proposed dependency's layout,
* false otherwise
*/
@Override
public boolean layoutDependsOn(CoordinatorLayout parent, View child, View dependency) {
return dependency instanceof xxView;
}
/**
* Respond to a change in a child's dependent view
* @return true if the Behavior changed the child view's size or position, false otherwise
*
* 当dependency发生改变时(位置、宽高等),执行这个函数
* 返回true表示child的位置或者是宽高要发生改变,否则就返回false
*/
@Override
public boolean onDependentViewChanged(CoordinatorLayout parent, View child, View dependency) {
return true;
}
}
- 1
- 2
- 3
- 4
- 5
- 6
- 7
- 8
- 9
- 10
- 11
- 12
- 13
- 14
- 15
- 16
- 17
- 18
- 19
- 20
- 21
- 22
- 23
- 24
- 25
- 26
- 27
- 28
- 29
- 30
- 1
- 2
- 3
- 4
- 5
- 6
- 7
- 8
- 9
- 10
- 11
- 12
- 13
- 14
- 15
- 16
- 17
- 18
- 19
- 20
- 21
- 22
- 23
- 24
- 25
- 26
- 27
- 28
- 29
- 30
<?xml version="1.0" encoding="utf-8"?>
<android.support.design.widget.CoordinatorLayout
 .......
  >

 <View
    .......
     app:layout_behavior="xxx.xx.xxx.MyBehavior" />

    <xxView
        .......
         />
</>
FloatingActionButton把它当成一个自带阴影和填充颜色的ImageView来使用皆可.
Snackbar是Android Support Design Library库支持的来替代Toast的一个控件。Snackbar使用的时候需要一个控件容器用来容纳Snackbar.官方推荐使用CoordinatorLayout。
像Toast一样使用:
Snackbar.make(view, "SnackbarTest", Snackbar.LENGTH_LONG).show()
Snackbar还支持添加一个按钮的,其可以如下构造:
Snackbar.make(view, "SnackbarTest",Snackbar.LENGTH_LONG).setAction("Action", new View.OnClickListener() {
@Override
public void onClick(View v) {
Snackbar.make(view,"ActionClick",Snackbar.LENGTH_LONG).show()
}
}).show()
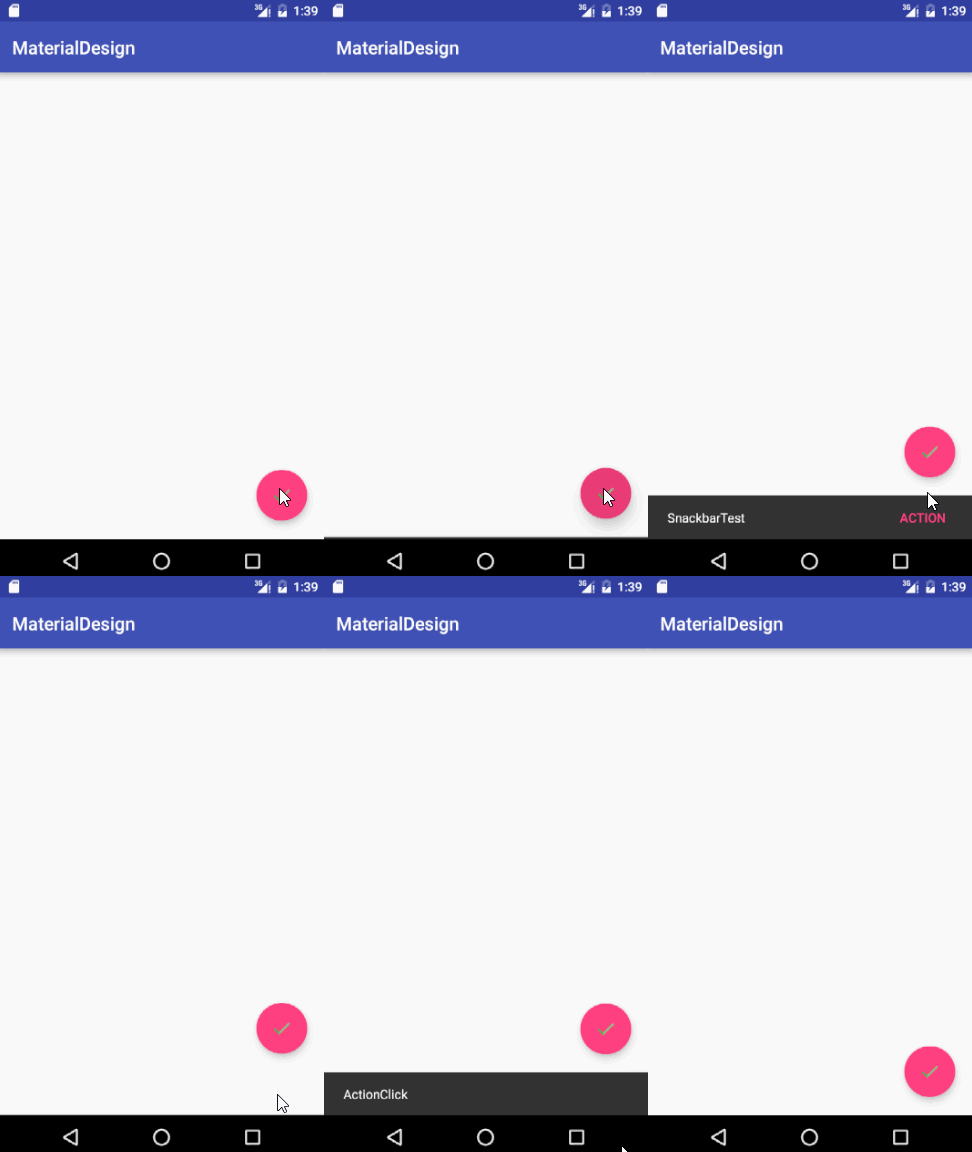
FloatingActionButton默认使用FloatingActionButton.Behavior,FloatingActionButton会随着snackbar向上移动,下面看效果:

布局:
<android.support.design.widget.CoordinatorLayout
    xmlns:android="http://schemas.android.com/apk/res/android"
    android:id="@+id/coordinatorLayout"
    android:layout_width="match_parent"
    android:layout_height="match_parent">

    <android.support.design.widget.FloatingActionButton
        android:id="@+id/floatingActionButton"
        android:layout_width="wrap_content"
        android:layout_height="wrap_content"
        android:layout_gravity="end|bottom"
        android:layout_margin="20dp"
        android:src="@drawable/ic_right"
        >
    </android.support.design.widget.FloatingActionButton>
</android.support.design.widget.CoordinatorLayout>
代码:
 @InjectView(R.id.floatingActionButton)
    FloatingActionButton floatingActionButton;
    @InjectView(R.id.coordinatorLayout)
    CoordinatorLayout coordinatorLayout;
    @Override
    protected void onCreate(Bundle savedInstanceState) {
        super.onCreate(savedInstanceState);
        setContentView(R.layout.activity_main);
        ButterKnife.inject(this);
    }
    @OnClick(R.id.floatingActionButton)
    public void onClick() {
        Snackbar.make(coordinatorLayout, "SnackbarTest",Snackbar.LENGTH_LONG).setAction("Action", new View.OnClickListener() {
            @Override
            public void onClick(View v) {
                Snackbar.make(coordinatorLayout,"ActionClick",Snackbar.LENGTH_LONG).show();
            }
        }).show();
    }
- 1
- 2
- 3
- 4
- 5
- 6
- 7
- 8
- 9
- 10
- 11
- 12
- 13
- 14
- 15
- 16
- 17
- 18
- 19
- 1
- 2
- 3
- 4
- 5
- 6
- 7
- 8
- 9
- 10
- 11
- 12
- 13
- 14
- 15
- 16
- 17
- 18
- 19
2. AppBarLayout
AppBarLayout继承自LinearLayout,布局方向为垂直方向。所以你可以把它当成垂直布局的LinearLayout来使用。当CoordinatorLayout发生滚动手势的时候,AppBarLayout的子View通过在布局中设置app:layout_scrollFlags属性,来发生相应的滚动。
简单的来说,AppBarLayout可以协调其子view随着同为CoordinatorLayout子view的兄弟view发生滚动手势的时候发生相应滚动。app:layout_scrollFlags属性有四个枚举值:
- scroll:
this flag should be set for all views that want to scroll off the screen - for views that do not use this flag, they’ll remain pinned to the top of the screen (所有想滚动出屏幕的view都需要设置这个flag, 没有设置这个flag的view将被固定在屏幕顶部) - enterAlways:
this flag ensures that any downward scroll will cause this view to become visible, enabling the ‘quick return’ pattern (设置这个flag时,向下的滚动都会导致该view变为可见,启用快速“返回模式”) - enterAlwaysCollapsed:
When your view has declared a minHeight and you use this flag, your View will only enter at its minimum height , only re-expanding to its full height when the scrolling view has reached it’stop.(当你的视图已经设置minHeight属性又使用此标志时,你的视图只能已最小高度进入,只有当滚动视图到达顶部时才扩大到完整高度) - exitUntilCollapsed:
this flag causes the view to scroll off until it is ‘collapsed’ (its minHeight) before exiting(滚动退出屏幕,最后折叠在顶端)
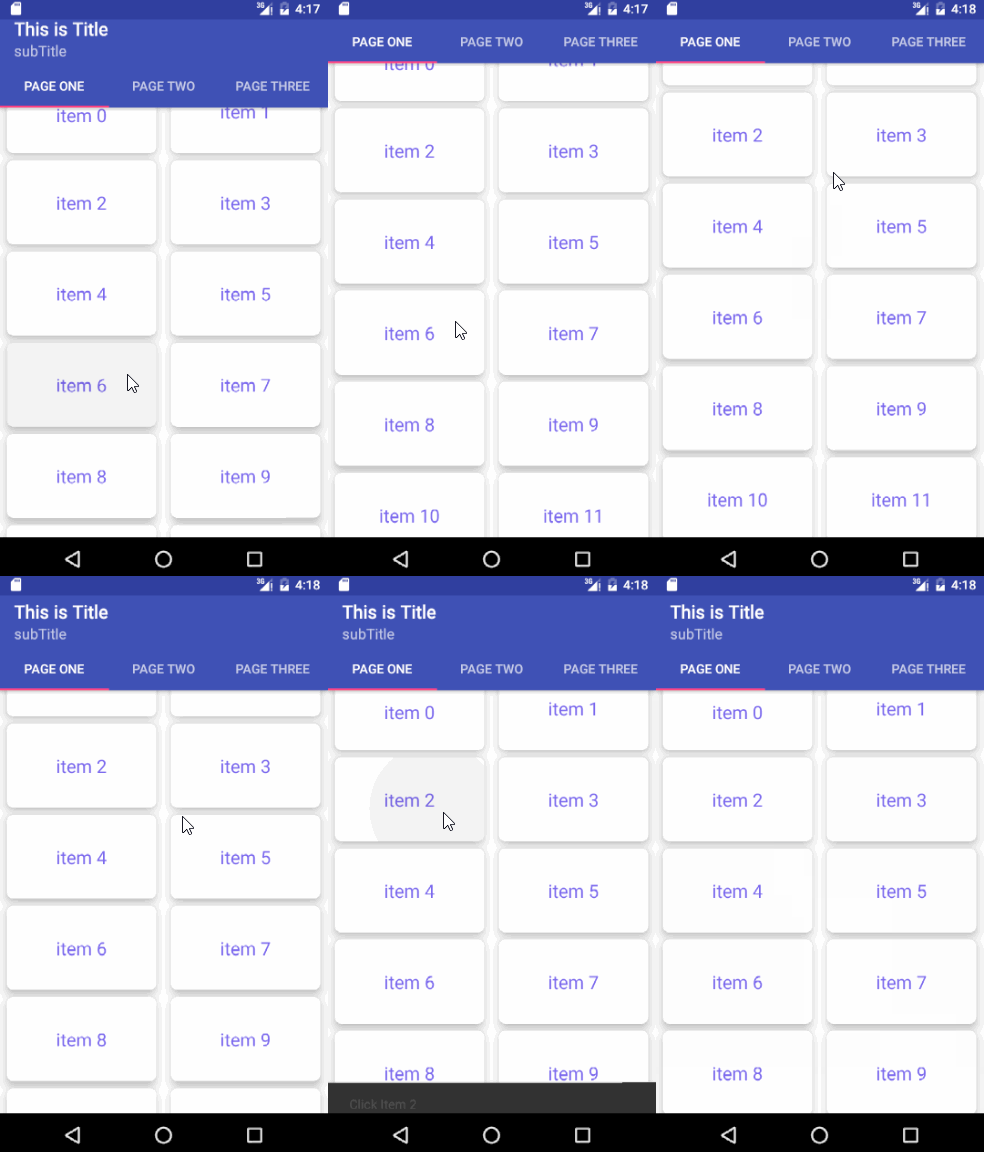
效果图:

在AppBarLayout中嵌套Toolbar和TabLayout,与ViewPager协调滚动。
activity_main.xml
<android.support.design.widget.CoordinatorLayout
    xmlns:android="http://schemas.android.com/apk/res/android"
    xmlns:app="http://schemas.android.com/apk/res-auto"
    android:id="@+id/coordinatorLayout"
    android:layout_width="match_parent"
    android:layout_height="match_parent">

    <android.support.design.widget.AppBarLayout
        android:id="@+id/appBarLayout"
        android:layout_width="match_parent"
        android:layout_height="wrap_content"
                 android:theme="@style/ThemeOverlay.AppCompat.Dark.ActionBar">
        <android.support.v7.widget.Toolbar
            android:id="@+id/toolbar"
            android:layout_width="match_parent"
            android:layout_height="?attr/actionBarSize"
            android:background="?attr/colorPrimary"
            app:layout_scrollFlags="scroll|enterAlways"
            />
            <android.support.design.widget.TabLayout
            android:id="@+id/tabLayout"
            android:layout_width="match_parent"
            android:layout_height="wrap_content" />

    </android.support.design.widget.AppBarLayout>

    <android.support.v4.view.ViewPager
        android:id="@+id/viewpager"
        android:layout_width="match_parent"
        android:layout_height="match_parent"
        app:layout_behavior="@string/appbar_scrolling_view_behavior" />
</android.support.design.widget.CoordinatorLayout>
- 1
- 2
- 3
- 4
- 5
- 6
- 7
- 8
- 9
- 10
- 11
- 12
- 13
- 14
- 15
- 16
- 17
- 18
- 19
- 20
- 21
- 22
- 23
- 24
- 25
- 26
- 27
- 28
- 29
- 30
- 31
- 32
- 1
- 2
- 3
- 4
- 5
- 6
- 7
- 8
- 9
- 10
- 11
- 12
- 13
- 14
- 15
- 16
- 17
- 18
- 19
- 20
- 21
- 22
- 23
- 24
- 25
- 26
- 27
- 28
- 29
- 30
- 31
- 32
MainActivity.Java
public class MainActivity extends AppCompatActivity {

    @InjectView(R.id.toolbar)
    Toolbar toolbar;
    @InjectView(R.id.tabLayout)
    TabLayout tabLayout;
    @InjectView(R.id.viewpager)
    ViewPager viewpager;
    @Override
    protected void onCreate(Bundle savedInstanceState) {
        super.onCreate(savedInstanceState);
        setContentView(R.layout.activity_main);
        ButterKnife.inject(this);

        toolbar.setTitle("This is Title");
        toolbar.setSubtitle("subTitle");
        setSupportActionBar(toolbar);

        viewpager.setAdapter(new FragmentPagerAdapter(getSupportFragmentManager()) {
            @Override
            public int getCount() {
                return 3;
            }

            @Override
            public Fragment getItem(int position) {
                switch (position) {
                    case 0:
                        return new Fragment_a();
                    case 1:
                        return new Fragment_a();
                    case 2:
                        return new Fragment_a();
                    default:
                        return new Fragment_a();
                }
            }

            @Override
            public CharSequence getPageTitle(int position) {
                switch (position) {
                    case 0:
                        return "page one";
                    case 1:
                        return "page two";
                    case 2:
                        return "page three";
                    default:
                        return "page one";
                }
            }
        });
        tabLayout.setupWithViewPager(viewpager);
    }
}
- 1
- 2
- 3
- 4
- 5
- 6
- 7
- 8
- 9
- 10
- 11
- 12
- 13
- 14
- 15
- 16
- 17
- 18
- 19
- 20
- 21
- 22
- 23
- 24
- 25
- 26
- 27
- 28
- 29
- 30
- 31
- 32
- 33
- 34
- 35
- 36
- 37
- 38
- 39
- 40
- 41
- 42
- 43
- 44
- 45
- 46
- 47
- 48
- 49
- 50
- 51
- 52
- 53
- 54
- 55
- 1
- 2
- 3
- 4
- 5
- 6
- 7
- 8
- 9
- 10
- 11
- 12
- 13
- 14
- 15
- 16
- 17
- 18
- 19
- 20
- 21
- 22
- 23
- 24
- 25
- 26
- 27
- 28
- 29
- 30
- 31
- 32
- 33
- 34
- 35
- 36
- 37
- 38
- 39
- 40
- 41
- 42
- 43
- 44
- 45
- 46
- 47
- 48
- 49
- 50
- 51
- 52
- 53
- 54
- 55
Fragment_a.java
public class Fragment_a extends Fragment {

    @InjectView(R.id.recyclerView)
    RecyclerView recyclerView;
    List<String> datas;
    @Override
    public View onCreateView(LayoutInflater inflater, ViewGroup container, Bundle savedInstanceState) {
        View view = inflater.inflate(R.layout.fragment, container, false);
        ButterKnife.inject(this, view);

        recyclerView.setLayoutManager(new StaggeredGridLayoutManager(2,StaggeredGridLayoutManager.VERTICAL));
        initData();
        RecyclerViewAdapter adapter=new RecyclerViewAdapter(datas);
        recyclerView.setAdapter(adapter);

        SpacesItemDecoration decoration=new SpacesItemDecoration(16);
        recyclerView.addItemDecoration(decoration);

        adapter.setOnItemClickListener(new RecyclerViewAdapter.OnRecyclerViewItemClickListener() {
            @Override
            public void onItemClick(View v) {
                Snackbar.make(v, "Click Item "+v.getTag(), Snackbar.LENGTH_LONG).show();
            }
        });
        return view;
    }
    public class SpacesItemDecoration extends RecyclerView.ItemDecoration {
        private int space;
        public SpacesItemDecoration(int space) {
            this.space=space;
        }
        @Override
        public void getItemOffsets(Rect outRect, View view, RecyclerView parent, RecyclerView.State state) {
            outRect.left=space;
            outRect.right=space;
            outRect.bottom=space;
            if(parent.getChildAdapterPosition(view)==0){
                outRect.top=space;
            }
        }
    }
    public void initData(){
        datas = new ArrayList<String>();
        for(int i =0;i<17;i++){
            datas.add("item "+i);
        }
    }
    @Override
    public void onDestroyView() {
        super.onDestroyView();
        ButterKnife.reset(this);
    }
}
- 1
- 2
- 3
- 4
- 5
- 6
- 7
- 8
- 9
- 10
- 11
- 12
- 13
- 14
- 15
- 16
- 17
- 18
- 19
- 20
- 21
- 22
- 23
- 24
- 25
- 26
- 27
- 28
- 29
- 30
- 31
- 32
- 33
- 34
- 35
- 36
- 37
- 38
- 39
- 40
- 41
- 42
- 43
- 44
- 45
- 46
- 47
- 48
- 49
- 50
- 51
- 52
- 53
- 1
- 2
- 3
- 4
- 5
- 6
- 7
- 8
- 9
- 10
- 11
- 12
- 13
- 14
- 15
- 16
- 17
- 18
- 19
- 20
- 21
- 22
- 23
- 24
- 25
- 26
- 27
- 28
- 29
- 30
- 31
- 32
- 33
- 34
- 35
- 36
- 37
- 38
- 39
- 40
- 41
- 42
- 43
- 44
- 45
- 46
- 47
- 48
- 49
- 50
- 51
- 52
- 53
RecyclerViewAdapter.java
public  class RecyclerViewAdapter extends RecyclerView.Adapter<RecyclerViewAdapter.ViewHolder>{

    private List<String> datas;

    public static interface OnRecyclerViewItemClickListener {
        void onItemClick(View view);
    }
    private OnRecyclerViewItemClickListener mOnItemClickListener = null;
    public void setOnItemClickListener(OnRecyclerViewItemClickListener listener) {
        mOnItemClickListener = listener;
    }
    public RecyclerViewAdapter(List<String> datas) {
        this.datas=datas;
    }

    @Override
    public ViewHolder onCreateViewHolder(ViewGroup parent, int viewType)
    {
        View v = LayoutInflater.from(parent.getContext()).inflate(R.layout.recyclerview_item,parent,false);
        v.setOnClickListener(new View.OnClickListener(){
            @Override
            public void onClick(View v) {
                mOnItemClickListener.onItemClick(v);
            }
        });
        ViewHolder vh = new ViewHolder(v);
        return vh;
    }

    @Override
    public void onBindViewHolder(ViewHolder holder, int position) {
        holder.item.setTag(position);
        holder.tv.setText(datas.get(position));
    }

    class ViewHolder extends RecyclerView.ViewHolder
    {
        public View item;
        public TextView tv;
        public ViewHolder(View view){
            super(view);
            item = view;
            tv = (TextView) view.findViewById(R.id.text);
        }
    }
    @Override
    public int getItemCount()
    {
        return datas.size();
    }

    public void addItem(String s, int position) {
        datas.add(position, s);
        notifyItemInserted(position);
    }

    public void removeItem(final int position) {
        datas.remove(position);
        notifyItemRemoved(position);
    }
}
- 1
- 2
- 3
- 4
- 5
- 6
- 7
- 8
- 9
- 10
- 11
- 12
- 13
- 14
- 15
- 16
- 17
- 18
- 19
- 20
- 21
- 22
- 23
- 24
- 25
- 26
- 27
- 28
- 29
- 30
- 31
- 32
- 33
- 34
- 35
- 36
- 37
- 38
- 39
- 40
- 41
- 42
- 43
- 44
- 45
- 46
- 47
- 48
- 49
- 50
- 51
- 52
- 53
- 54
- 55
- 56
- 57
- 58
- 59
- 60
- 61
- 1
- 2
- 3
- 4
- 5
- 6
- 7
- 8
- 9
- 10
- 11
- 12
- 13
- 14
- 15
- 16
- 17
- 18
- 19
- 20
- 21
- 22
- 23
- 24
- 25
- 26
- 27
- 28
- 29
- 30
- 31
- 32
- 33
- 34
- 35
- 36
- 37
- 38
- 39
- 40
- 41
- 42
- 43
- 44
- 45
- 46
- 47
- 48
- 49
- 50
- 51
- 52
- 53
- 54
- 55
- 56
- 57
- 58
- 59
- 60
- 61
recyclerview_item.xml
<?xml version="1.0" encoding="utf-8"?>
<android.support.v7.widget.CardView xmlns:android="http://schemas.android.com/apk/res/android"
    xmlns:app="http://schemas.android.com/apk/res-auto"
    android:foreground="?android:attr/selectableItemBackground"
    android:layout_width="match_parent"
    android:layout_height="100dp"
    app:cardCornerRadius="7dp"
    app:cardElevation="7dp"
    android:clickable="true"
    >
        <TextView
            android:text="TextView"
            android:textColor="#7A67EE"
            android:layout_gravity="center"
            android:id="@+id/text"
            android:layout_width="wrap_content"
            android:layout_height="wrap_content"
            android:textSize="20sp" />

</android.support.v7.widget.CardView>
- 1
- 2
- 3
- 4
- 5
- 6
- 7
- 8
- 9
- 10
- 11
- 12
- 13
- 14
- 15
- 16
- 17
- 18
- 19
- 20
- 1
- 2
- 3
- 4
- 5
- 6
- 7
- 8
- 9
- 10
- 11
- 12
- 13
- 14
- 15
- 16
- 17
- 18
- 19
- 20
Toolbar可以看做是android 5.0以后用来替代ActionBar的控件,所以我们在使用Toolbar的时候,需要先在styles.xml文件中的AppTheme标签中设置不使用主题自带的ActionBar,加入如下两行代码:
<item name="windowActionBar">false</item>
<item name="windowNoTitle">true</item>
CoordinatorLayout中带有滚动属性的子View(这里的ViewPager)需要设置app:layout_behavior属性。
app:layout_behavior="@string/appbar_scrolling_view_behavior"
把ViewPager的滚动和AppBarLayout相关联起来。然后给AppBarLayout中需要产生相应滚动的子view(这里的Toolbar)设置app:layout_scrollFlags属性。
本demo下载: http://download.csdn.net/detail/amazing7/9577677
CollapsingToolbarLayout主要是用于实现折叠效果。它需要放在AppBarLayout布局里面,并且作为AppBarLayout的直接子View。它继承至FrameLayout,给它设置layout_scrollFlags,它可以控制包含在CollapsingToolbarLayout中的控件在响应layout_behavior事件时作出相应的scrollFlags滚动事件(通过给CollapsingToolbarLayout的子view设置app:layout_collapseMode属性)。
CollapsingToolbarLayout的几个属性:
app:collapsedTitleTextAppearance 在收缩时Title文字外形设置
app:expandedTitleTextAppearance 展开时Title文字外形的设置
app:contentScrim 标题文字停留在顶部时候背景的设置
app:expandedTitleMarginStart 展开时title向左填充的距离
app:expandedTitleMarginEnd 收缩时title向左填充的距离
CollapsingToolbarLayout的子View中通过设置layout_collapseMode属性来响应折叠模式,该属性有两个枚举值:
“pin”:固定模式,在折叠的时候最后固定在顶端
“parallax”:视差模式,在折叠的时候会有个视差折叠的效果
在FloatingActionButton中通过设置以下两个属性,可以使FloatingActionButton跟随CollapsingToolbarLayout的收缩而显示隐藏(所依赖的AppBarLayout的id和相对AppBarLayout的摆放位置)。
app:layout_anchor="@id/appBarLayout"
app:layout_anchorGravity="bottom|right|end"
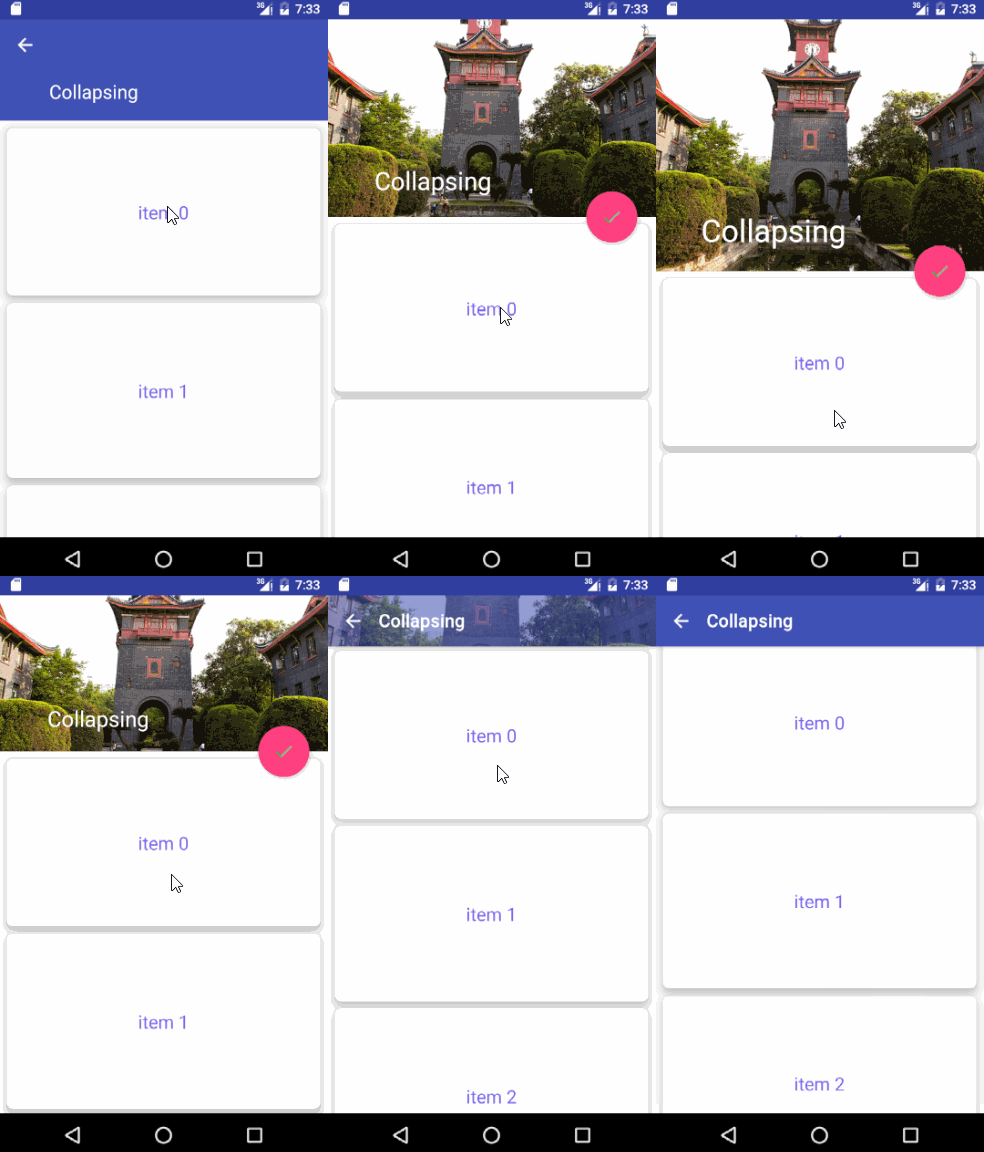
效果图:

activity_main.xml
<?xml version="1.0" encoding="utf-8"?>

<android.support.design.widget.CoordinatorLayout xmlns:android="http://schemas.android.com/apk/res/android"
    xmlns:app="http://schemas.android.com/apk/res-auto"
    android:id="@+id/coordinatorLayout"
    android:layout_width="match_parent"
    android:layout_height="match_parent"
    android:fitsSystemWindows="true">

    <android.support.design.widget.AppBarLayout
        android:id="@+id/appBarLayout"
        android:layout_width="match_parent"
        android:layout_height="wrap_content"
        android:fitsSystemWindows="true"
        android:theme="@style/ThemeOverlay.AppCompat.Dark.ActionBar">

        <android.support.design.widget.CollapsingToolbarLayout
            android:id="@+id/collapsing_toolbar"
            android:layout_width="match_parent"
            android:layout_height="wrap_content"
            app:contentScrim="?attr/colorPrimary"
            app:expandedTitleMarginEnd="70dp"
            app:expandedTitleMarginStart="50dp"
            app:layout_scrollFlags="scroll|exitUntilCollapsed">

            <ImageView
                android:layout_width="match_parent"
                android:layout_height="300dp"
                android:fitsSystemWindows="true"
                android:scaleType="centerCrop"
                android:src="@drawable/ic_scu"
                app:layout_collapseMode="parallax" />

            <android.support.v7.widget.Toolbar
                android:id="@+id/toolbar"
                android:layout_width="match_parent"
                android:layout_height="?attr/actionBarSize"
                app:layout_collapseMode="pin"
                app:popupTheme="@style/ThemeOverlay.AppCompat.Light" />

        </android.support.design.widget.CollapsingToolbarLayout>

    </android.support.design.widget.AppBarLayout>

    <android.support.v4.widget.NestedScrollView
        android:layout_width="match_parent"
        android:layout_height="match_parent"
        app:layout_behavior="@string/appbar_scrolling_view_behavior">

        <android.support.v7.widget.RecyclerView
            android:id="@+id/recyclerView"
            android:layout_width="match_parent"
            android:layout_height="match_parent" />
    </android.support.v4.widget.NestedScrollView>


    <android.support.design.widget.FloatingActionButton
        android:layout_width="wrap_content"
        android:layout_height="wrap_content"
        android:layout_margin="20dp"
        android:clickable="true"
        android:src="@drawable/ic_done"
        app:layout_anchor="@id/appBarLayout"
        app:layout_anchorGravity="bottom|right|end" />
</android.support.design.widget.CoordinatorLayout>
- 1
- 2
- 3
- 4
- 5
- 6
- 7
- 8
- 9
- 10
- 11
- 12
- 13
- 14
- 15
- 16
- 17
- 18
- 19
- 20
- 21
- 22
- 23
- 24
- 25
- 26
- 27
- 28
- 29
- 30
- 31
- 32
- 33
- 34
- 35
- 36
- 37
- 38
- 39
- 40
- 41
- 42
- 43
- 44
- 45
- 46
- 47
- 48
- 49
- 50
- 51
- 52
- 53
- 54
- 55
- 56
- 57
- 58
- 59
- 60
- 61
- 62
- 63
- 64
- 65
MainActivity.java
public class MainActivity extends AppCompatActivity {

    @InjectView(R.id.toolbar)
    Toolbar toolbar;
    @InjectView(R.id.collapsing_toolbar)
    CollapsingToolbarLayout collapsingToolbar;
    @InjectView(R.id.recyclerView)
    RecyclerView recyclerView;
    List<String> datas;
    @Override
    protected void onCreate(Bundle savedInstanceState) {
        super.onCreate(savedInstanceState);
        setContentView(R.layout.activity_main);
        ButterKnife.inject(this);

        setSupportActionBar(toolbar);
        getSupportActionBar().setDisplayHomeAsUpEnabled(true);

        collapsingToolbar.setTitle("Collapsing");

        InitRecyclerView();
     }
    public void InitRecyclerView(){
        recyclerView.setLayoutManager(new StaggeredGridLayoutManager(1,StaggeredGridLayoutManager.VERTICAL));
        initData();
        RecyclerViewAdapter adapter=new RecyclerViewAdapter(datas);
        recyclerView.setAdapter(adapter);

        SpacesItemDecoration decoration=new SpacesItemDecoration(16);
        recyclerView.addItemDecoration(decoration);

        adapter.setOnItemClickListener(new RecyclerViewAdapter.OnRecyclerViewItemClickListener() {
            @Override
            public void onItemClick(View v) {
                Snackbar.make(v, "Click Item "+v.getTag(), Snackbar.LENGTH_LONG).show();
            }
        });
    }
    public class SpacesItemDecoration extends RecyclerView.ItemDecoration {
        private int space;
        public SpacesItemDecoration(int space) {
            this.space=space;
        }
        @Override
        public void getItemOffsets(Rect outRect, View view, RecyclerView parent, RecyclerView.State state) {
            outRect.left=space;
            outRect.right=space;
            outRect.bottom=space;
            if(parent.getChildAdapterPosition(view)==0){
                outRect.top=space;
            }
        }
    }
    public void initData(){
        datas = new ArrayList<String>();
        for(int i =0;i<17;i++){
            datas.add("item "+i);
        }
    }
}
- 1
- 2
- 3
- 4
- 5
- 6
- 7
- 8
- 9
- 10
- 11
- 12
- 13
- 14
- 15
- 16
- 17
- 18
- 19
- 20
- 21
- 22
- 23
- 24
- 25
- 26
- 27
- 28
- 29
- 30
- 31
- 32
- 33
- 34
- 35
- 36
- 37
- 38
- 39
- 40
- 41
- 42
- 43
- 44
- 45
- 46
- 47
- 48
- 49
- 50
- 51
- 52
- 53
- 54
- 55
- 56
- 57
- 58
- 59
- 60
- 61
- 1
- 2
- 3
- 4
- 5
- 6
- 7
- 8
- 9
- 10
- 11
- 12
- 13
- 14
- 15
- 16
- 17
- 18
- 19
- 20
- 21
- 22
- 23
- 24
- 25
- 26
- 27
- 28
- 29
- 30
- 31
- 32
- 33
- 34
- 35
- 36
- 37
- 38
- 39
- 40
- 41
- 42
- 43
- 44
- 45
- 46
- 47
- 48
- 49
- 50
- 51
- 52
- 53
- 54
- 55
- 56
- 57
- 58
- 59
- 60
- 61
NestedScrollView也可以与AppBarLayout协调滚动,可以把它看出自带Behavior的ScrollView来使用,但是它并没有继承ScrollView,而是继承的FrameLayout。
NestedScrollView通过设置layout_behavior来使AppBarLayout产生滚动关联,CollapsingToolbarLayout作为AppBarLayout的子view通过设置layout_scrollFlags属性来产生滚动响应,CollapsingToolbarLayout的子view通过设置layout_collapseMode属性来响应滚动模式。
本例demo地址:http://download.csdn.net/detail/amazing7/9577751


 6785
6785

 被折叠的 条评论
为什么被折叠?


