往期推文全新看点(文中附带全新鸿蒙5.0全栈学习笔录)
✏️ 鸿蒙应用开发与鸿蒙系统开发哪个更有前景?
✏️ 嵌入式开发适不适合做鸿蒙南向开发?看完这篇你就了解了~
✏️ 对于大前端开发来说,转鸿蒙开发究竟是福还是祸?
✏️ 鸿蒙岗位需求突增!移动端、PC端、IoT到底该怎么选?
✏️ 记录一场鸿蒙开发岗位面试经历~
✏️ 持续更新中……
概述
本场景主要实现社交通讯类应用的图文内容编创流程,在该过程中接入自由流转、服务互动等HarmonyOS特性能力。
整体场景介绍
图文编创流程主要通过Photo Picker选取本地图片,然后对图片进行智能处理,同时也可使用自定义相机拍摄动图,最后进行文字编创时可进行自由流转接续编辑和跨端获取相册或者相机拍摄内容。
演示效果
运行效果图

场景适用说明
适用范围
本场景适用于社交通讯类应用,在图文内容编辑过程中,接入HarmonyOS特性能力,本文给出了详细的技术实现方案,为开发者降低学习成本,提高接入速度。
场景优势
本场景的优势主要体现在功能方面,应用结合HarmonyOS提供的服务互通、鸿蒙智能、自由流转等能力,可以带给用户更加便捷高效的内容发布体验。具体优势如下:
(1)服务互通能力的加持,使多设备用户可以灵活地选择存储在不同设备上的媒体资源和使用不同设备的拍摄能力获取新的图像,免去了过往不同设备之间数据传输的流程,给用户提供了更便捷的体验。
(2)鸿蒙智能的使用,为用户提供了更加强大的编创能力支撑。用户可以从图上提取有效信息参与文字编辑,可以从候选图中提取目标去除背景进行二次创作,这些技术的使用为用户提供了更丰富的编创选择。
(3)自由流转的接入,可自由流转其他设备,且同步最新编辑状态至新设备,用户可以灵活选择合适设备,实现接续编辑。
场景分析
典型场景分析
| 子场景名称 | 描述 | 实现方案 |
|---|---|---|
| 图片视图选择 | 发布首页资源文件类型选择 | 使用Photo Picker能力实现图片选择 |
| 相机拍摄 | 自定义相机页面,可拍摄和预览Moving Photo图片 | 使用Camera相机组件能力自定义相机 |
| 图片文字识别、抠取与HDR Vivid图片的展示 | 图片浏览页支持选定图片的目标抠取、复制图上文字信息获取,参与创作编辑,自动识别HDR模式并展示高亮 | 使用Image组件的智能识别能力,实现OCR文字识别与抠图 |
| 跨端相册选取 | 从其他设备的相册中选取图片,回传到本端设备 | 基于CollaborationService服务互通组件 |
| 编辑页流转接续 | 编创内容支持多设备之间的接续,可在不同设备上接续编辑 | 基于Ability的自由流转能力,使用ArkData数据管理和分布式文件管理实现本地创作内容的多设备之间接续编辑 |
场景实现
Photo Picker的使用
子场景描述
用户在首页点击进入发布流程时,将直接跳转半模态窗口的Picker页面,同时该页面支持自定义,为开发者提供更多的选择。
关键点说明
使用系统Picker能力,可以免申请权限读写权限"READ_IMAGEVIDEO"和“WRITE_IMAGEVIDEO”,给开发者提供了极大的便利。
关键代码
首先在使用前,需要先创建PhotoViewPicker实例。
const photoViewPicker = new photoAccessHelper.PhotoViewPicker();
根据业务逻辑需要进行图片选择环节的属性设置,如设置可选择的媒体资源类型、资源数量上限。
const photoSelectOptions = new photoAccessHelper.PhotoSelectOptions();
photoSelectOptions.MIMEType = photoAccessHelper.PhotoViewMIMETypes.IMAGE_TYPE;
photoSelectOptions.maxSelectNumber = CommonConstants.LIMIT_PICKER_NUM - selectedNum;
发起调用,获取图片。
photoViewPicker.select(photoSelectOptions).then((photoSelectResult: photoAccessHelper.PhotoSelectResult) => {
  let uriArr = photoSelectResult.photoUris;
  callback(uriArr);
}).catch((err: BusinessError) => {
  Logger.error(UIUtils.tag,
    `Invoke photoViewPicker.select failed, code is ${err.code}, message is ${err.message}`);
});
OCR文字识别、智能抠图与HDR vivid的使用
子场景描述
选取图片之后,可以浏览这些图片,并长按物体实现抠图,也可识别图片中的文字,用于后续文本内容编辑使用,如果图片是HDR Vivid的拍摄模式,将展示其效果。
演示效果
长按识别文字与物体抠图

关键点说明
(1)在Image组件设置enableAnalyzer属性,将实现文字识别和智能抠图,设置dynamicRangeMode属性,可展示HDR高亮,需配合image.DecodingOptions配置动态范围模式使用。
(2)文字识别:图片可文字识别时,通过点击图片内出现的识别按钮或者长按文字移动,会出现复制文本菜单与文字框选区域。
(3)智能抠图:长按图片中的物体,将出现抠图效果,菜单中可进行复制与分享。
关键代码
开启图片智能分析属性、和设置图像的动态模式。
Image(item)
  .objectFit(ImageFit.Contain)
  .enableAnalyzer(true)
  .dynamicRangeMode(DynamicRangeMode.HIGH)
设置图片解码选项,配合动态模式使用。
static options: image.DecodingOptions = {
  index: 0,
  editable: false,
  desiredPixelFormat: image.PixelMapFormat.RGBA_8888,
};

static async createPixelMapFromUri(uri: string): Promise<PixelMap | undefined> {
  if (uri === '') {
    return undefined;
  }
  let pixelMap: PixelMap | undefined;
  try {
    let file = fs.openSync(uri, fs.OpenMode.READ_ONLY);
    let imageResource = image.createImageSource(file.fd);
    pixelMap = imageResource.createPixelMapSync(FileUtils.options);
    fs.closeSync(file);
  } catch (error) {
    Logger.error(FileUtils.tag, `createPixelMapFromUri error: ${JSON.stringify(error)}`);
  }
  return pixelMap;
}
Moving Photo的拍摄与展示
子场景描述
在编辑图片页,增加一个自定义相机tab项,开发者可以根据自身需求,设置并拍摄更多模式的照片,用于内容展示。
关键点说明
(1)相机在初始化后,可设置Moving Photo属性开关,默认关闭,当前场景设置为开启,可点击live photo按钮进行切换。
(2)获取拍摄的最新图片,需要执行拍摄之后,延迟一段时间,才可获取到最新图片。
(3)Moving Photo图片预览需要使用MovingPhotoView视图,长按可播放。
(4) 申请对应权限,同意后才可初始化相机。
关键代码
申请对应权限。
private permissions: Array<Permissions> = [
  'ohos.permission.CAMERA',
  'ohos.permission.MICROPHONE',
  'ohos.permission.MEDIA_LOCATION',
  'ohos.permission.READ_IMAGEVIDEO',
  'ohos.permission.WRITE_IMAGEVIDEO',
];

abilityAccessCtrl.createAtManager().requestPermissionsFromUser(getContext(this), this.permissions).then(() => {
  this.surfaceId = this.mXComponentController.getXComponentSurfaceId();
  this.initCamera();
  this.getThumbnail();
})
相机设置Moving Photo属性。
setEnableLivePhoto(isMovingPhoto: boolean) {
  if (this.photoOutput?.isMovingPhotoSupported()) {
    this.photoOutput?.enableMovingPhoto(isMovingPhoto);
  }
}
获取媒体库中最新图片地址与缩略图。
async getThumbnail(): Promise<void> {
  let photoAsset: photoAccessHelper.PhotoAsset =
    AppStorage.get(CommonConstants.KEY_PHOTO_ASSET) as photoAccessHelper.PhotoAsset;
  if (photoAsset === undefined) {
    return;
  }
  this.currentImg = await photoAsset.getThumbnail();
}
引入Moving Photo相关库。
import { MovingPhotoView, MovingPhotoViewController, MovingPhotoViewAttribute } from '@ohos.multimedia.movingphotoview';
通过拍摄后获取的photoAccessHelper.PhotoAsset请求Moving Photo。
@StorageLink(CommonConstants.KEY_MOVING_DATA) src: photoAccessHelper.MovingPhoto | undefined = undefined;
@State isMuted: boolean = false;

async aboutToAppear(): Promise<void> {
  // ...
  this.requestMovingPhoto();
}

private requestMovingPhoto() {
  let photoAsset: photoAccessHelper.PhotoAsset =
    AppStorage.get(CommonConstants.KEY_PHOTO_ASSET) as photoAccessHelper.PhotoAsset;
  if (photoAsset === undefined) {
    return;
  }
  let requestOptions: photoAccessHelper.RequestOptions = {
    deliveryMode: photoAccessHelper.DeliveryMode.FAST_MODE,
  }
  photoAccessHelper.MediaAssetManager.requestMovingPhoto(context, photoAsset, requestOptions,
    new MediaDataHandlerMovingPhoto());
}

class MediaDataHandlerMovingPhoto implements photoAccessHelper.MediaAssetDataHandler<photoAccessHelper.MovingPhoto> {
  async onDataPrepared(movingPhoto: photoAccessHelper.MovingPhoto): Promise<void> {
    AppStorage.setOrCreate(CommonConstants.KEY_MOVING_DATA, movingPhoto);
  }
}
添加Moving Photo展示图。
private controller: MovingPhotoViewController = new MovingPhotoViewController();

build() {
  Flex({
    direction: new BreakpointType(
      {
        sm: FlexDirection.Column,
        md: FlexDirection.Column,
        lg: FlexDirection.Row,
      }
    ).getValue(this.currentBreakpoint),
    wrap: FlexWrap.NoWrap,
    justifyContent: FlexAlign.Start,
    alignItems: ItemAlign.Start,
    alignContent: FlexAlign.Start
  }) {
    // ...
    MovingPhotoView({
      movingPhoto: this.src,
      controller: this.controller
    })
    // ...
  }
  .backgroundColor(Color.Black)
  .width($r('app.string.full_screen'))
  .height($r('app.string.full_screen'))
}
说明
本章节只介绍主干流程的关键代码,要实现自定义相机实际上还有很多配置,可详细关注封装模块CameraService文件 。
服务互通组件的使用
演示效果
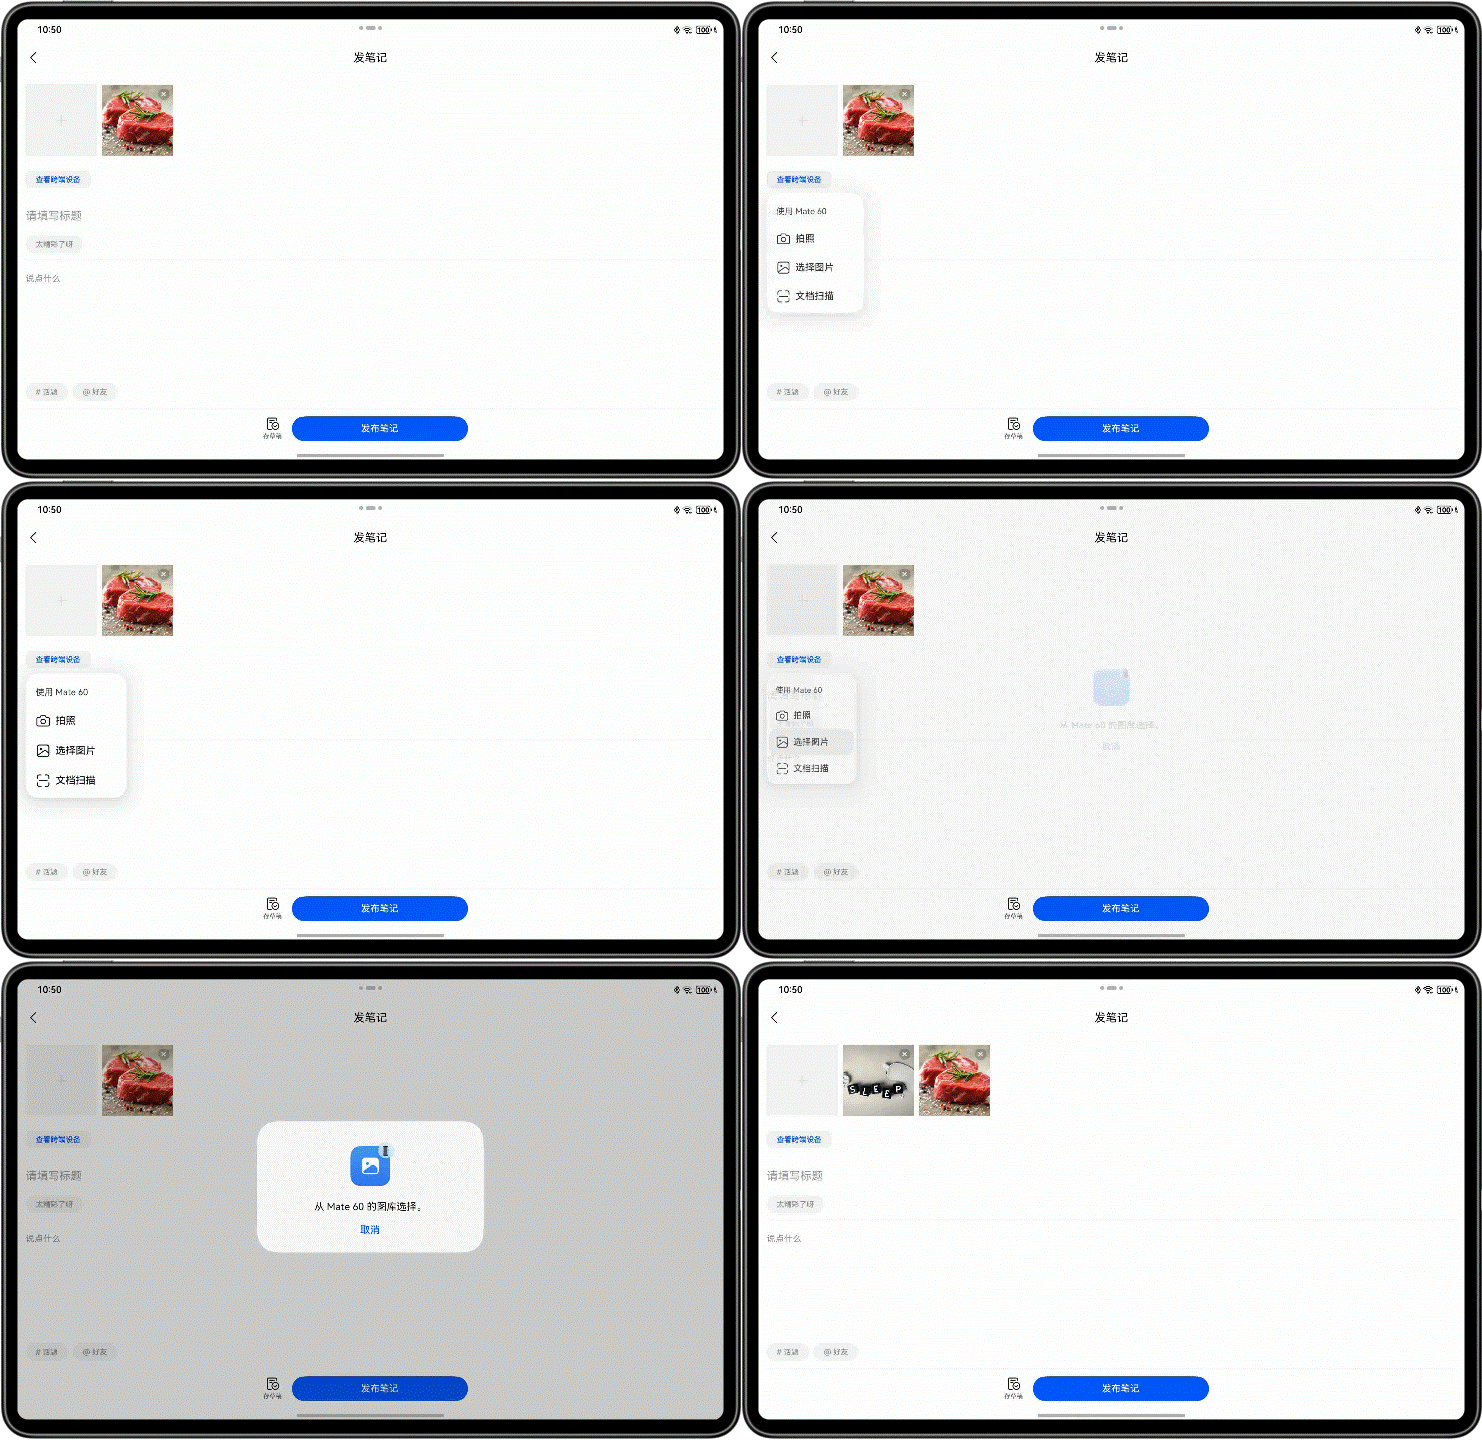
跨端相册获取新的图片

子场景描述
通过服务互通组件的能力,实现跨端相册访问、跨端相机拍照,从其他设备上获取新的图像内容,让设备之间的图像传输更加快捷与便利。
关键点说明
(1)服务互通组件,使用前提:需要连接网络,并且登录相同账号。
注意
当前服务互通能力只能“重”设备调用“轻”设备,此处“重”和“轻”表示在重量与便携程度上给用户带来的主观感受,设备间可跨端调用关系如下说明:
(1)平板可调用手机,平板无法调用平板;
(2)手机无法调用平板,手机也无法调用手机;
关键代码
跨端拍照与跨端相册访问:
借助createCollaborationCameraMenuItems定义设备列表选择器,该组件需要在Menu组件内调用。用于显示组网内具有对应相机能力的设备列表。
import {
  CollaborationServiceFilter,
  CollaborationServiceStateDialog,
  createCollaborationServiceMenuItems
} from '@kit.ServiceCollaborationKit';

@Builder
CollaborationMenu() {
  Menu() {
    createCollaborationServiceMenuItems([CollaborationServiceFilter.ALL]);
  }
}
使用CollaborationCameraStateDialog弹窗组件,用于提示对端相机拍摄状态。
该组件可在build()函数内直接调用,开发者需要实现其中的onState方法,当拍摄完成之后,将通过onState方法回传返回内容。
onstate方法有的回调函数有两个参数,分别是stateCode业务完成状态和buffer成功返回的数据。
@Builder
setCollaborationDialog() {
  CollaborationServiceStateDialog({
    onState: (stateCode: number, bufferType: string, buffer: ArrayBuffer): void => this.doInsertPicture(stateCode,
      bufferType, buffer)
  });
}

doInsertPicture(stateCode: number, bufferType: string, buffer: ArrayBuffer): void {
  if (stateCode !== 0) {
    Logger.error(this.tag, `doInsertPicture stateCode: ${stateCode}}`);
    return;
  }
  Logger.info(this.tag, `doInsertPicture bufferType: ${bufferType}}`);
  if (bufferType === CommonConstants.BUFFER_TYPE) {
    if (this.photoUriArr.length === CommonConstants.LIMIT_PICKER_NUM) {
      promptAction.showToast({
        message: $r('app.string.toast_picker_limit'),
        duration: DataUtils.fromResToNumber($r('app.float.show_DELAY_TIME')),
      });
      return;
    }
    FileUtils.saveFile(getContext(this), buffer).then(async (uri: string) => {
      let pixelMap = await FileUtils.createPixelMapFromUri(uri);
      if (pixelMap === undefined) {
        return;
      }
      this.selectedData.unshiftData(pixelMap);
      FileUtils.copyToDistributedDir(getContext(this), uri);
      FileUtils.unshiftFiles(uri);
      this.photoUriArr.unshift(uri);
    });
  }
}
应用接续的实现
子场景描述
在图文编创场景中,使用Ability的自由流转能力,使得编辑内容可以流转到其他更方便的设备上进行接续编辑,这样方便用户,在不同设备上进行内容编辑。
演示效果
自由流转,接续编辑图文内容

关键点说明
接续的使用条件
(1)两端设备登录同一华为账号;
(2)两端设备打开Wi-Fi和蓝牙开关,连接相同局域网,可提升数据传输的速度;
(3)应用接续只能在同应用(UIAbility)之间触发,双端设备都需要有该应用;
(4)在onContinue回调中使用wantParam传输的数据需要控制在100KB以下,大需数据的情况,要使用分布式数据对象或分布式文件系统。例如图片文件。
申请权限,需要在module.json5里的module对象的requestPermissions如下申请:
"requestPermissions": [
  {
    "name": "ohos.permission.DISTRIBUTED_DATASYNC",
    "reason": "$string:distributed_desc",
    "usedScene": {
      "abilities": [
        "EntryAbility"
      ],
      "when": "always"
    }
  }
  // ...
]
打开应用接续开关,在module.json5文件里的module对象的abilities字段内设置"continuable"的值为true。
"abilities": [
  {
    // ...
    "continuable": true,
    // ...
  }
]
关键代码
迁移端实现onContinue接口
onContinue(wantParam: Record<string, Object | undefined>): AbilityConstant.OnContinueResult {
  wantParam[CommonConstants.KEY_TITLE] = AppStorage.get(CommonConstants.KEY_TITLE);
  wantParam[CommonConstants.KEY_DESCRIPTION] = AppStorage.get(CommonConstants.KEY_DESCRIPTION);
  // ...
  wantParam[CommonConstants.KEY_PICTURE_PATHS] = nameArr.join(this.splitSymbol);
  return AbilityConstant.OnContinueResult.AGREE;
}
说明
这部分代码是写在EntryAbility中,不是在Page页中,与Page页中的数据交互,使用AppStorage可持续保存,双向绑定数据,当数据变化时改变视图。
接收端实现onCreate接口和onNewWant接口,onCreate接口:冷启动或多实例热启动时调用,onNewWant接口:单实例热启动。
onCreate(want: Want, launchParam: AbilityConstant.LaunchParam): void {
  DataUtils.context = this.context;
  if (launchParam.launchReason === AbilityConstant.LaunchReason.CONTINUATION) {
    this.setWantData(want);
  }
  Logger.info(this.tag, '%{public}s', 'Ability onCreate');
}
onNewWant(want: Want, launchParam: AbilityConstant.LaunchParam): void {
  if (launchParam.launchReason === AbilityConstant.LaunchReason.CONTINUATION) {
    this.setWantData(want);
  }
}
private setWantData(want: Want) {
  if (want.parameters !== undefined) {
    let title = want.parameters[CommonConstants.KEY_TITLE];
    let description = want.parameters[CommonConstants.KEY_DESCRIPTION];
    let filesName = want.parameters[CommonConstants.KEY_PICTURE_PATHS] as string;
    AppStorage.setOrCreate(CommonConstants.KEY_TITLE, title);
    AppStorage.setOrCreate(CommonConstants.KEY_DESCRIPTION, description);
    let filesArr = filesName.split(this.splitSymbol);
    if (filesArr === undefined) {
      filesArr = [];
    }
    AppStorage.setOrCreate(CommonConstants.KEY_PICTURE_PATHS, filesArr);
  } else {
    Logger.warn(this.tag, 'want.parameters is undefined!');
  }
  this.context.restoreWindowStage(new LocalStorage());
}
受限于文件大小,图片的流转需要借助分布式文件系统,以下是文件的发生与接收方式:
发送侧:
static sendCloudFile(context: Context, uriArr: string[]) {
  uriArr.forEach((uri: string) => {
    FileUtils.copyToDistributedDir(context, uri);
  });
}

static copyToDistributedDir(context: Context, uri: string) {
  try {
    Logger.info(FileUtils.tag, 'copyToDistributedDir path = ' + uri);
    let buf = new ArrayBuffer(CommonConstants.FILE_BUFFER_SIZE);
    let readSize = 0;
    let file = fileIo.openSync(uri, fileIo.OpenMode.READ_ONLY);
    let readLen = fileIo.readSync(file.fd, buf, { offset: readSize });
    let fileName = file.name;
    let destinationDistribute = fileIo.openSync(`${context.distributedFilesDir}/${fileName}`,
      fileIo.OpenMode.READ_WRITE | fileIo.OpenMode.CREATE);
    while (readLen > 0) {
      readSize += readLen;
      fileIo.writeSync(destinationDistribute.fd, buf);
      readLen = fileIo.readSync(file.fd, buf, { offset: readSize });
    }
    Logger.info(FileUtils.tag, 'copyToDistributedDir destinationDistribute = ' + destinationDistribute.path);
    fileIo.closeSync(file);
    fileIo.closeSync(destinationDistribute);
  } catch (err) {
    Logger.error(FileUtils.tag, `copyToDistributedDir failed. Code: ${err.code}, message: ${err.message}`);
  }
}
接收侧:
private static copyToFilesDir(context: Context, nameArr: string[], state: number, callback: Function) {
  if (state === nameArr.length) {
    return;
  }
  let fileName = nameArr[state];
  let filesDir: string = context.filesDir;
  let distributedFilesDir: string = context.distributedFilesDir;
  let srcUri: string = fileUri.getUriFromPath(distributedFilesDir + `/${fileName}`);
  let destUri: string = fileUri.getUriFromPath(filesDir + `/${fileName}`);

  let options: fs.CopyOptions = {
    "progressListener": (progress: fs.Progress) => {
      if (progress.processedSize === progress.totalSize) {
        Logger.info(FileUtils.tag, 'copyToFilesDir success copied!');
        FileUtils.handleNextCopy(context, nameArr, state, callback);
      }
    }
  }
  try {
    fs.copy(srcUri, destUri, options).then(() => {
      Logger.info(FileUtils.tag, 'copyToFilesDir success copying!');
    }).catch((error: BusinessError) => {
      let err: BusinessError = error as BusinessError;
      Logger.error(FileUtils.tag, `copyToFilesDir failed to copy. Code: ${err.code}, message: ${err.message}`);
      FileUtils.handleNextCopy(context, nameArr, state, callback);
    });
  } catch (err) {
    Logger.error(FileUtils.tag, `copyToFilesDir failed to copy. Code: ${err.code}, message: ${err.message}`);
    FileUtils.handleNextCopy(context, nameArr, state, callback);
  }
}


 被折叠的 条评论
为什么被折叠?


