


首先要说的是CALayers 是屏幕上的一个具有可见内容的矩形区域,每个UIView都有一个根CALayer,其所有的绘制(视觉效果)都是在这个layer上进行的。(译者注:为验证这点,我写下了如下代码:
|
1
2 3 4 5 6 7 8 9 10 |
UILabel
* lable
=
[
[UILabel alloc
]initWithFrame
:CGRectMake
(0, 0, 100, 30
)
];
lable.text = @ "test"; [self.view addSubview : lable ]; lable.backgroundColor = [UIColor clearColor ]; [lable release ]; // 设定CALayer self.view.layer.backgroundColor = [UIColor orangeColor ].CGColor; self.view.layer.cornerRadius = 20.0; self.view.layer.frame = CGRectInset (self.view.layer.frame, 20, 20 ); |
请注意,我创建的UILable始终随着UIView的根CALayer的缩放而改变位置。)
其次,CALayer的可以影响其外观的特性有:
- 层的大小尺寸
- 背景色
- 内容(比如图像或是使用Core Graphics绘制的内容)
- 是否使用圆角
- 是否使用阴影
- 等等
需要说明的是CALayer的大部分属性都可以用来实现动画效果。
另外,你可以直接使用CALayer,也可以使用其子类,如CAGradientLayer,CATextLayer, CAShapeLayer等等。
示例
首先在Xcode中创建一个View-based App,CALayer是属于QuartzCore framework的,所以需要引入QuartzCore framework,另外在程序中包括QuartzCore.h。
第一个例子是创建一个带圆角的层,在你的ViewController中的ViewDidLoad中加入下面代码:
|
1
2 3 4 5 6 7 |
// Import QuartzCore.h at the top of the file
#import <QuartzCore/QuartzCore.h> // Uncomment viewDidLoad and add the following lines self.view.layer.backgroundColor = [UIColor orangeColor ].CGColor; self.view.layer.cornerRadius = 20.0; self.view.layer.frame = CGRectInset (self.view.layer.frame, 20, 20 ); |
结果如下:
然后添加一个带阴影效果的子层,加入下列代码:
|
1
2 3 4 5 6 7 8 |
CALayer
*sublayer
=
[CALayer layer
];
sublayer.backgroundColor = [UIColor blueColor ].CGColor; sublayer.shadowOffset = CGSizeMake (0, 3 ); sublayer.shadowRadius = 5.0; sublayer.shadowColor = [UIColor blackColor ].CGColor; sublayer.shadowOpacity = 0.8; sublayer.frame = CGRectMake (30, 30, 128, 192 ); [self.view.layer addSublayer :sublayer ]; |
效果图:
为子层增加内容(图片),你还可以设置层的边框,代码如下:
|
1
2 3 |
sublayer.contents
=
(
id
)
[UIImage imageNamed
:
@
"BattleMapSplashScreen.png"
].CGImage;
sublayer.borderColor = [UIColor blackColor ].CGColor; sublayer.borderWidth = 2.0; |
效果图:
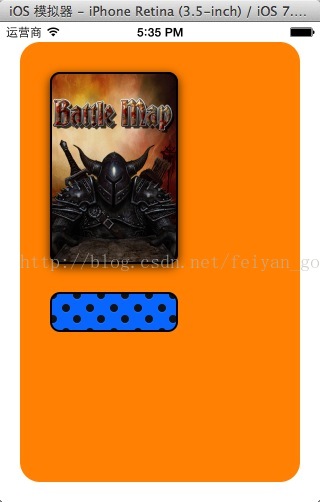
如 果你希望子层也是圆角怎么办?你可能说很容易设置cornerRadius属性就行。实际上你即算是设置了cornerRadius属性,图片仍然不会显 示圆角。你还需要设置masksToBounds为YES。但是这样做还是不够的,因为如果是这样,这个层的阴影显示就没有了。简单的实现方法如下(通过 两个层来实现):
|
1
2 3 4 5 6 7 8 9 10 11 12 13 14 15 16 17 18 |
CALayer
*sublayer
=
[CALayer layer
];
sublayer.backgroundColor = [UIColor blueColor ].CGColor; sublayer.shadowOffset = CGSizeMake (0, 3 ); sublayer.shadowRadius = 5.0; sublayer.shadowColor = [UIColor blackColor ].CGColor; sublayer.shadowOpacity = 0.8; sublayer.frame = CGRectMake (30, 30, 128, 192 ); sublayer.borderColor = [UIColor blackColor ].CGColor; sublayer.borderWidth = 2.0; sublayer.cornerRadius = 10.0; [self.view.layer addSublayer :sublayer ]; CALayer *imageLayer = [CALayer layer ]; imageLayer.frame = sublayer.bounds; imageLayer.cornerRadius = 10.0; imageLayer.contents = ( id ) [UIImage imageNamed : @ "BattleMapSplashScreen.png" ].CGImage; imageLayer.masksToBounds = YES; [sublayer addSublayer :imageLayer ]; |
效果图:
最 后,还介绍一下自绘图型的实现,其要点是要设置所绘制层的delegate。比如在我们的例子中使用ViewController作为delegate, 那么就需要在ViewController中实现drawLayer:inContext方法,对层进行绘制工作。另外,还需要调用 setNeedsDisplay,来通知层需要进行绘制了,于是层才会通过对delegate的drawLayer:inContext方法进行调用。
代码如下:
|
1
2 3 4 5 6 7 8 9 10 11 12 13 14 15 16 17 18 19 20 21 22 23 24 25 26 27 28 29 30 31 32 33 34 35 36 37 38 39 40 41 42 43 |
void MyDrawColoredPattern
(
void
*info, CGContextRef context
)
{
CGColorRef dotColor = [UIColor colorWithHue :0 saturation :0 brightness :0.07 alpha :1.0 ].CGColor; CGColorRef shadowColor = [UIColor colorWithRed :1 green :1 blue :1 alpha :0.1 ].CGColor; CGContextSetFillColorWithColor (context, dotColor ); CGContextSetShadowWithColor (context, CGSizeMake (0, 1 ), 1, shadowColor ); CGContextAddArc (context, 3, 3, 4, 0, radians (360 ), 0 ); CGContextFillPath (context ); CGContextAddArc (context, 16, 16, 4, 0, radians (360 ), 0 ); CGContextFillPath (context ); } - ( void )drawLayer : (CALayer * )layer inContext : (CGContextRef )context { CGColorRef bgColor = [UIColor colorWithHue :0.6 saturation :1.0 brightness :1.0 alpha :1.0 ].CGColor; CGContextSetFillColorWithColor (context, bgColor ); CGContextFillRect (context, layer.bounds ); staticconst CGPatternCallbacks callbacks = {0, &MyDrawColoredPattern, NULL }; CGContextSaveGState (context ); CGColorSpaceRef patternSpace = CGColorSpaceCreatePattern ( NULL ); CGContextSetFillColorSpace (context, patternSpace ); CGColorSpaceRelease (patternSpace ); CGPatternRef pattern = CGPatternCreate ( NULL, layer.bounds, CGAffineTransformIdentity, 24, 24, kCGPatternTilingConstantSpacing, true, &callbacks ); CGFloat alpha = 1.0; CGContextSetFillPattern (context, pattern, &alpha ); CGPatternRelease (pattern ); CGContextFillRect (context, layer.bounds ); CGContextRestoreGState (context ); } |
还需要注意,radians是一个自定义函数:
|
1
|
static inline
double radians
(
double degrees
)
{
return degrees
* M_PI
/
180;
}
|
效果如下:
本文的完整代码下载。
http://sue602.blog.163.com/blog/static/31495307201103034736509/


 被折叠的 条评论
为什么被折叠?
被折叠的 条评论
为什么被折叠?
 到【灌水乐园】发言


