


 超级会员免费看
一、NameService架构设计
首先来看一下总体的技术架构图
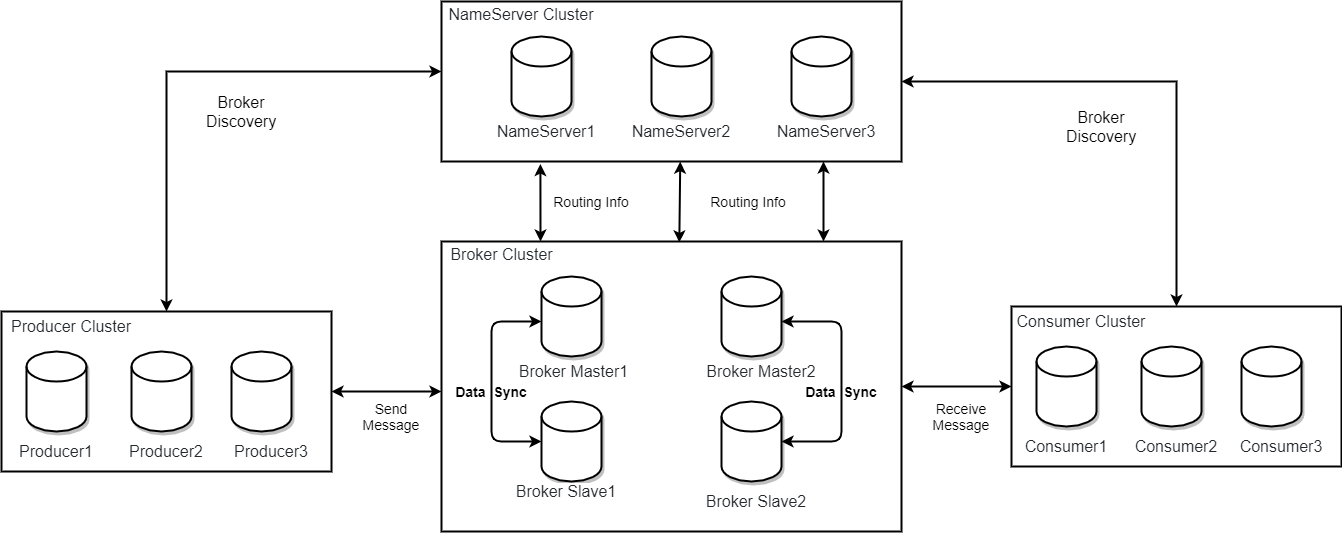
消息中间件的设计思路一般是基于主题订阅发布的机制,消息生产者(Producer)发送某一个主题到消息服务器,消息服务器负责将消息持久化存储,消息消费者(Consumer)订阅该兴趣的主题,消息服务器根据订阅信息(路由信息)将消息推送到消费者(Push模式)或者消费者主动向消息服务器拉去(Pull模式),从而实现消息生产者与消息消费者解耦。为了避免消息服务器的单点故障导致的整个系统瘫痪,通常会部署多台消息服务器共同承担消息的存储。那消息生产者如何知道消息要发送到哪台消息服务器呢?如果某一台消息服务器宕机了,那么消息生产者如何在不重启服务情况下感知呢? 名称服务器就是为了解决以上问题设计的。
Broker消息服务器在启动的时向所有NameServer注册,消息生产者(Producer)在发送消息时之前先从Nameserver获取Broker服务器地址列表,然后根据负载均衡算法从列表中选择一台服务器进行发送, Nameserver与每台Broker保持长连接,并间隔30S检测Broker是否存活,如果检测到Broker宕机,则从路由注册表中删除。但是路由变化不会马上通知消息生产者。这样设计的目的是为了降低NameServer实现的复杂度,在消息发送端提供容错机制保证消息发送的可用性
Nameserver本身的高可用是通过部署多台Nameserver来实现,但彼此之间不通讯,也就是Nameserver服务器之间在某一个时刻的数据并不完全相同,但这对消息发送并不会造成任何影响,这也是NameServer设计的一个亮点,总之,RocketMQ设计追求简单高效。
二、NameService启动
启动流程
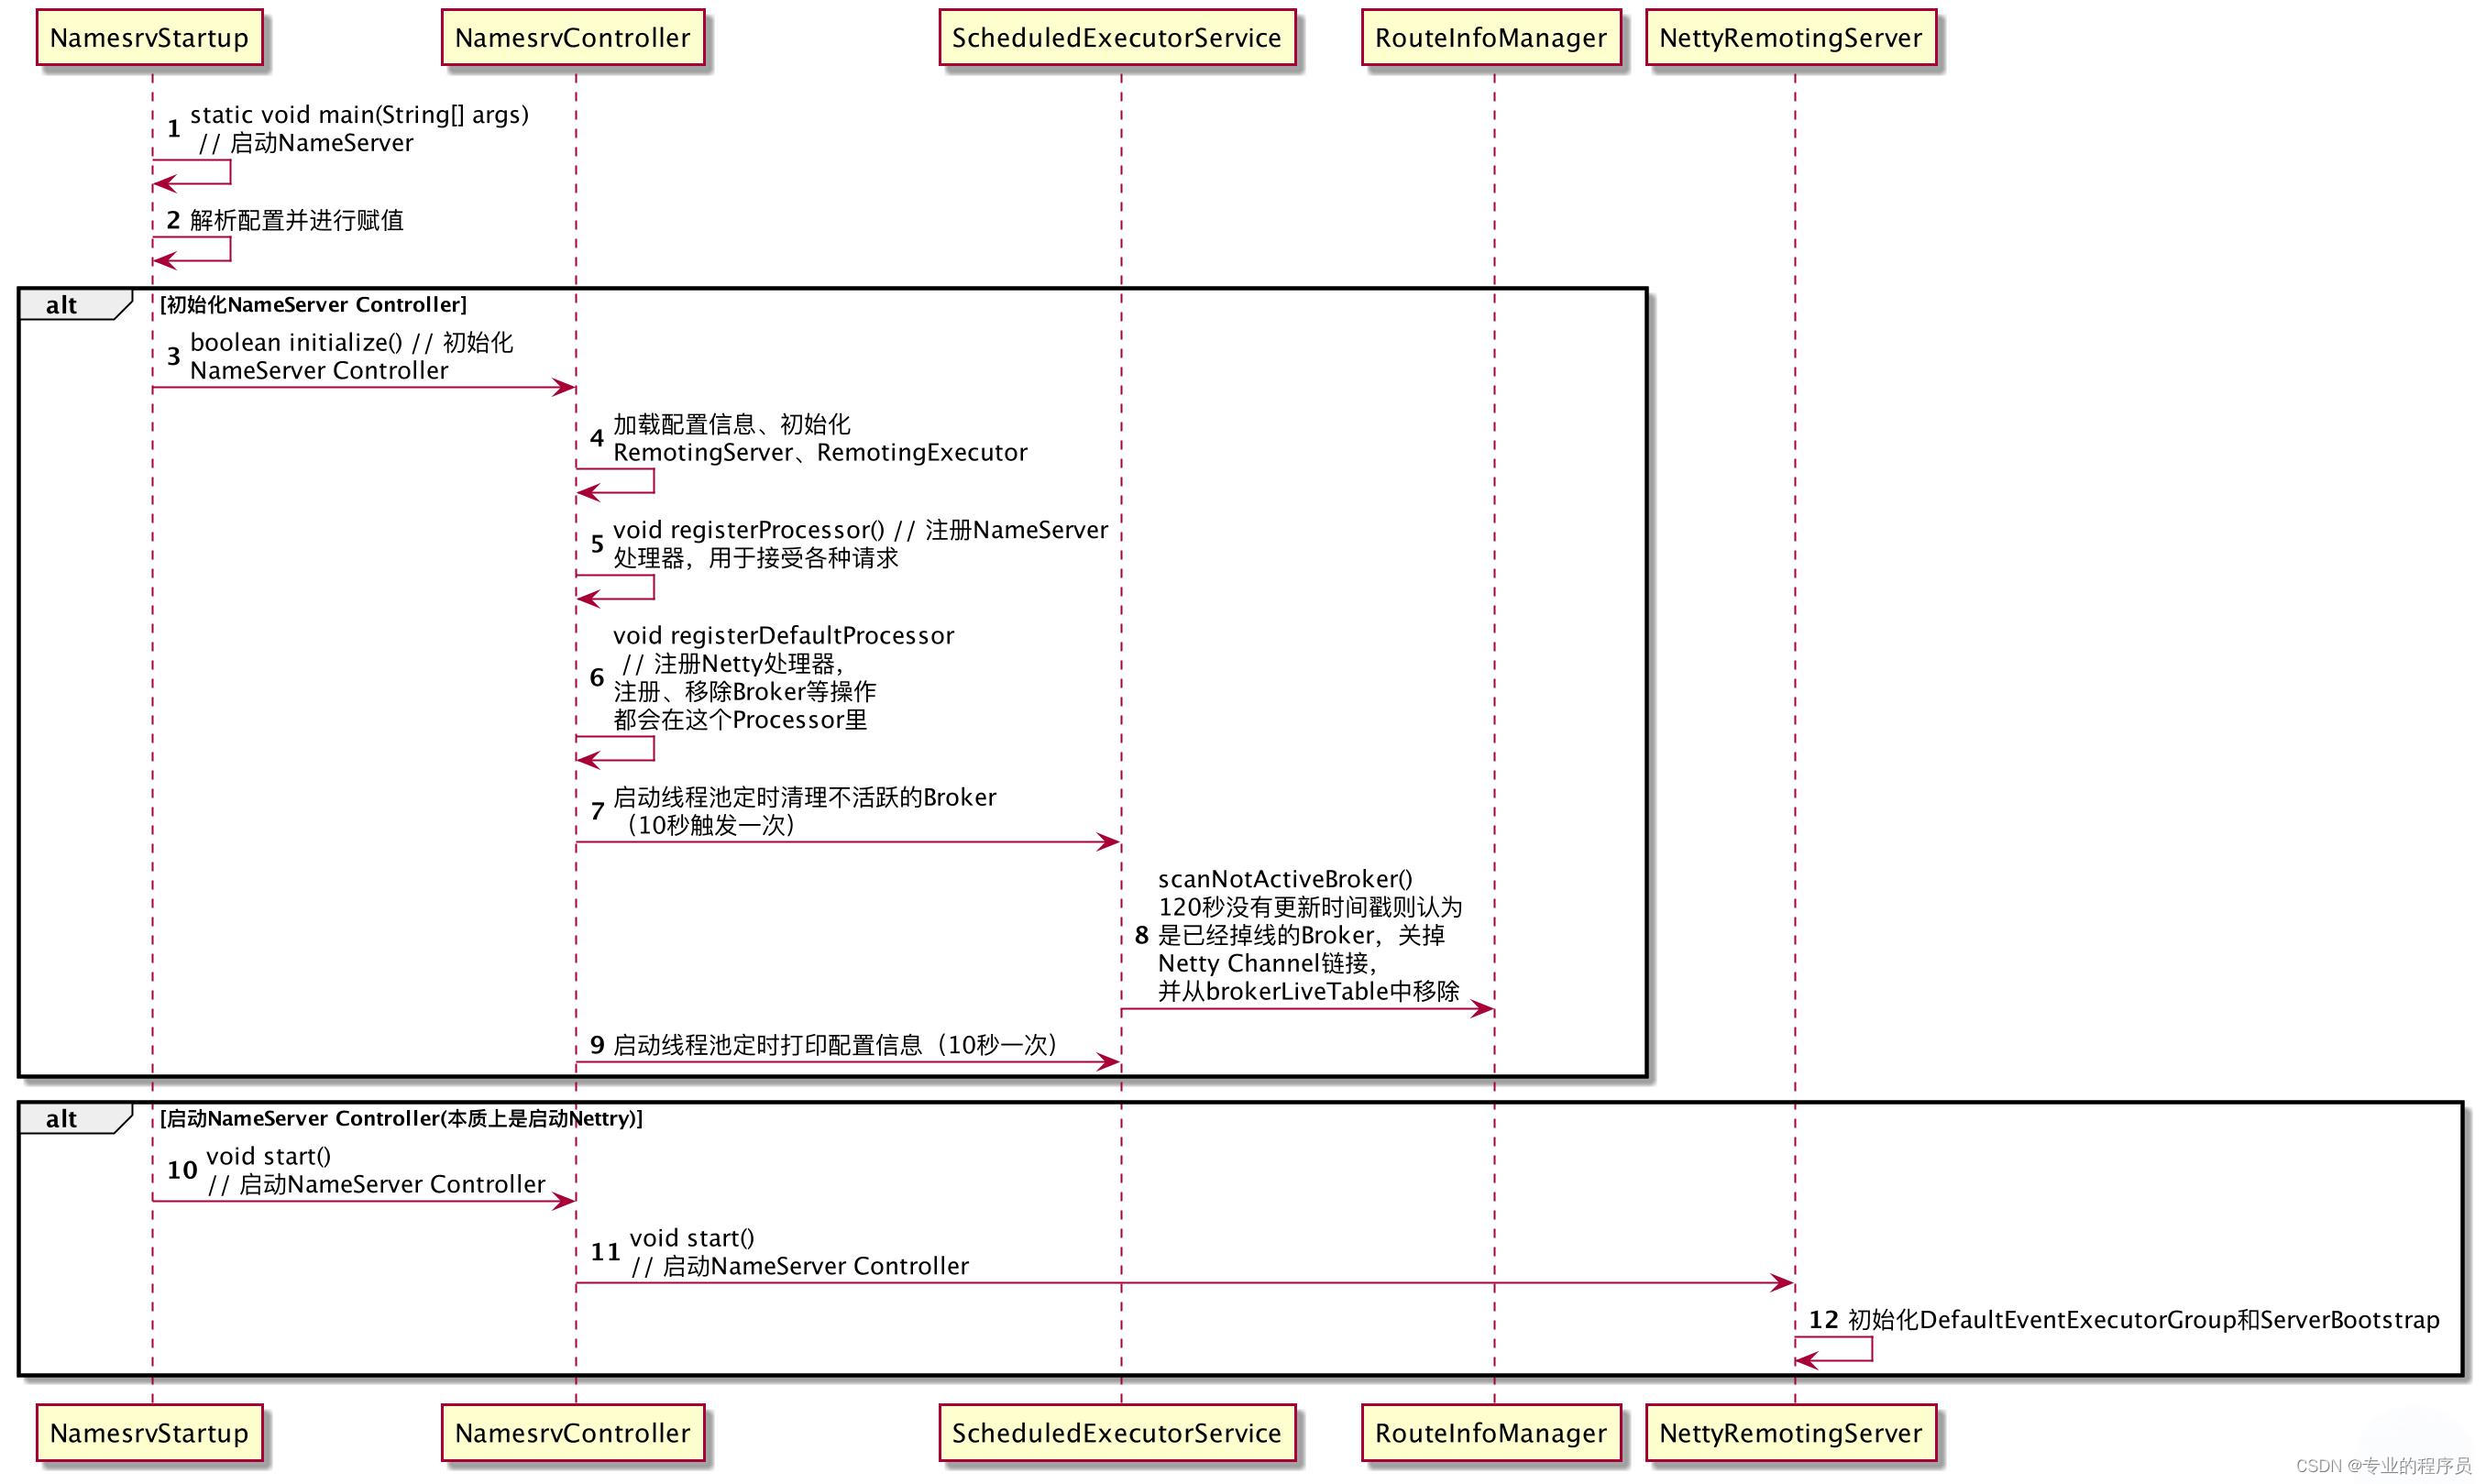
启动步骤1
解析配置文件,填充NameServerConfg、NettyServerConfig属性值,并创建NamesrvController。如下图所示。
代码:NamesrvController#createNamesrvController
NamesrvController是Nameserver的核心类,是接受请求并做出响应的核心类。所以第一步就要先创建出NamesrvController。我们把代码贴出来并一步步增加注释来解析controller创建的步骤。
第一步:创建两个config对象,一个是一个是NamesrvConfig、一个是NettyServerConfig
    final NamesrvConfig namesrvConfig = new NamesrvConfig();
    final NettyServerConfig nettyServerConfig = new NettyServerConfig();
打开 NamesrvConfig
public class NamesrvConfig {
    private static final InternalLogger log = InternalLoggerFactory.getLogger(LoggerName.NAMESRV_LOGGER_NAME);

    private String rocketmqHome = System.getProperty(MixAll.ROCKETMQ_HOME_PROPERTY, System.getenv(MixAll.ROCKETMQ_HOME_ENV));
    private String kvConfigPath = System.getProperty("user.home") + File.separator + "namesrv" + File.separator + "kvConfig.json";
    private String configStorePath = System.getProperty("user.home") + File.separator + "namesrv" + File.separator + "namesrv.properties";
    private String productEnvName = "center";
    private boolean clusterTest = false;
    private boolean orderMessageEnable = false;

    /**
     * Config in this black list will be not allowed to update by command.
     * Try to update this config black list by restart process.
     * Try to update configures in black list by restart process.
     */
    private String configBlackList = "configBlackList;configStorePath;kvConfigPath";

...
}
rocketmqHome:rocketmq主目录
kvConfig:NameServer存储KV配置属性的持久化路径
configStorePath:nameServer默认配置文件路径
orderMessageEnable:是否支持顺序消息
NettyServerConfig就是netty服务端相关的配置。我们看到这些默认的配置参数如下。
public class NettyServerConfig implements Cloneable {
    private int listenPort = 8888;
    private int serverWorkerThreads = 8;
    private int serverCallbackExecutorThreads = 0;
    private int serverSelectorThreads = 3;
    private int serverOnewaySemaphoreValue = 256;
    private int serverAsyncSemaphoreValue = 64;
    private int serverChannelMaxIdleTimeSeconds = 120;
    ...
}
listenPort:Nameserver监听端口,该值默认会被初始化为9876
serverWorkerThrepds:Netty业务线程池线程个数
servercallbackExecutorThreads:Netty public任务线程池线程个数,Netty网络设计,根据业务类型会创建不同的线程池,比如处理消息发送、消息消费、心跳检测等。如果该业务类型未注册线程池,则由public线程池执行。
serverselectorThreads:10 线程池个数,主要是Nameserver、Broker端解析请求、返回相应的线程个数,这类线程主要是处理网路请求的,解析请求包,然后转发到各个业务线程池完成具体的操作,然后将结果返回给调用方;
serverOnewaySemaphoreValue:send oneway消息请求并发读(Broker端参数):
serverAsyncsemaphoreValue:异步消息发送最大并发度:
serverChannelMaxldleTimeseconds:网络连接最大的空闲时间,默认120S。
serverSocketsndBufsize:网络socket发送缓冲冲区大小。
serverSocketRcvBufsize:网络接收端缓存区大小。
serverPooledByteBufAllocatorEnable:ByteBuffer是否开启缓存
useEpollNativeSelector:是否启用EpOll IO模型。
再往下,有两段代码,一段是从命令行中解析“-c”的参数,一段是解析“-p”的参数。
        // 解析-c的参数 值为属性配置文件
        if (commandLine.hasOption('c')) {
            String file = commandLine.getOptionValue('c');
            if (file != null) {
                InputStream in = new BufferedInputStream(new FileInputStream(file));
                properties = new Properties();
                properties.load(in);
                MixAll.properties2Object(properties, namesrvConfig);
                MixAll.properties2Object(properties, nettyServerConfig);

                namesrvConfig.setConfigStorePath(file);

                System.out.printf("load config properties file OK, %s%n", file);
                in.close();
            }
        }
从代码中可以看到就是从文件中读到数据读入流中,然后通过properties.load(in)方法载入流数据。在MixAll.properties2Object方法中,通过反射读取类中的set方法来逐一对属性进行赋值。
如果是“-p”,就是从后面跟着的键值对中读取数据,数据格式为key=value
        //  从键值对中读取属性 key=value
        if (commandLine.hasOption('p')) {
            InternalLogger console = InternalLoggerFactory.getLogger(LoggerName.NAMESRV_CONSOLE_NAME);
            MixAll.printObjectProperties(console, namesrvConfig);
            MixAll.printObjectProperties(console, nettyServerConfig);
            System.exit(0);
        }
        MixAll.properties2Object(ServerUtil.commandLine2Properties(commandLine), namesrvConfig);
接着对日志进行了初始化,这里就单独说了。最后就是一个构造方法,创建了NamesrvController的对象。
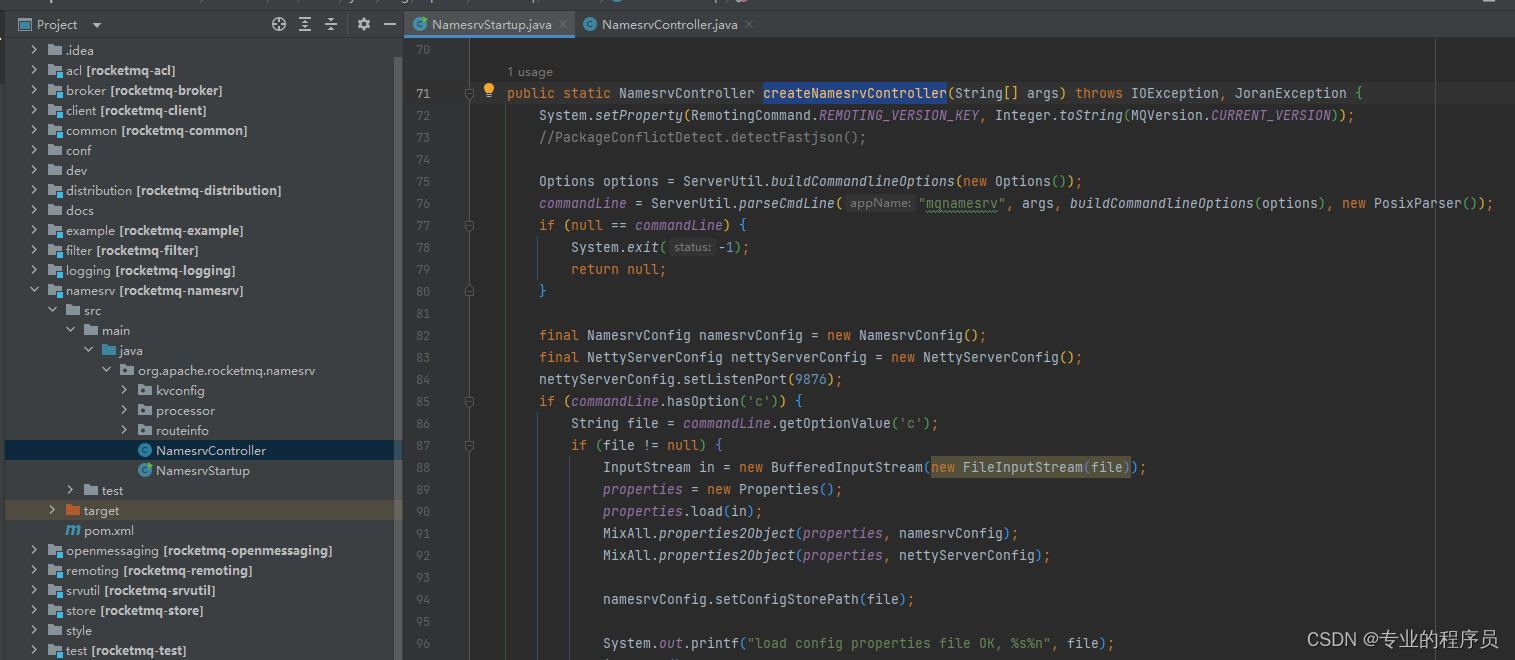
final NamesrvController controller = new NamesrvController(namesrvConfig, nettyServerConfig);完整代码如下:
public static NamesrvController createNamesrvController(String[] args) throws IOException, JoranException {

        //
        System.setProperty(RemotingCommand.REMOTING_VERSION_KEY, Integer.toString(MQVersion.CURRENT_VERSION));
        //PackageConflictDetect.detectFastjson();

        Options options = ServerUtil.buildCommandlineOptions(new Options());
        commandLine = ServerUtil.parseCmdLine("mqnamesrv", args, buildCommandlineOptions(options), new PosixParser());
        if (null == commandLine) {
            System.exit(-1);
            return null;
        }

        // 创建NamesrvController 必须要传入两个config
        // 一个是NamesrvConfig
        // 一个是NettyServerConfig
        final NamesrvConfig namesrvConfig = new NamesrvConfig();
        final NettyServerConfig nettyServerConfig = new NettyServerConfig();
        nettyServerConfig.setListenPort(9876);

        // 解析-c的参数 值为属性配置文件
        if (commandLine.hasOption('c')) {
            String file = commandLine.getOptionValue('c');
            if (file != null) {
                InputStream in = new BufferedInputStream(new FileInputStream(file));
                properties = new Properties();
                properties.load(in);
                MixAll.properties2Object(properties, namesrvConfig);
                MixAll.properties2Object(properties, nettyServerConfig);

                namesrvConfig.setConfigStorePath(file);

                System.out.printf("load config properties file OK, %s%n", file);
                in.close();
            }
        }

        //  从键值对中读取属性 key=value
        if (commandLine.hasOption('p')) {
            InternalLogger console = InternalLoggerFactory.getLogger(LoggerName.NAMESRV_CONSOLE_NAME);
            MixAll.printObjectProperties(console, namesrvConfig);
            MixAll.printObjectProperties(console, nettyServerConfig);
            System.exit(0);
        }

        MixAll.properties2Object(ServerUtil.commandLine2Properties(commandLine), namesrvConfig);

        if (null == namesrvConfig.getRocketmqHome()) {
            System.out.printf("Please set the %s variable in your environment to match the location of the RocketMQ installation%n", MixAll.ROCKETMQ_HOME_ENV);
            System.exit(-2);
        }

        LoggerContext lc = (LoggerContext) LoggerFactory.getILoggerFactory();
        JoranConfigurator configurator = new JoranConfigurator();
        configurator.setContext(lc);
        lc.reset();
        configurator.doConfigure(namesrvConfig.getRocketmqHome() + "/conf/logback_namesrv.xml");

        log = InternalLoggerFactory.getLogger(LoggerName.NAMESRV_LOGGER_NAME);

        MixAll.printObjectProperties(log, namesrvConfig);
        MixAll.printObjectProperties(log, nettyServerConfig);

        final NamesrvController controller = new NamesrvController(namesrvConfig, nettyServerConfig);

        // remember all configs to prevent discard
        controller.getConfiguration().registerConfig(properties);

        return controller;
    }
启动步骤2
根据启动属性创建NamesrvControler实例,并初始化该实例。NameserverController实例为Nameserver核心控制器
代码:NamesrvController#initialize

初始化的代码如下:
public boolean initialize() {
        // 1、加载KV配置管理器
        this.kvConfigManager.load();
        // 2、初始化netty远程通信服务
        this.remotingServer = new NettyRemotingServer(this.nettyServerConfig, this.brokerHousekeepingService);
        // 3、初始化线程池
        this.remotingExecutor =
            Executors.newFixedThreadPool(nettyServerConfig.getServerWorkerThreads(), new ThreadFactoryImpl("RemotingExecutorThread_"));
        // 4、注册请求处理器
        this.registerProcessor();

        // 5、定时扫描不活跃的broker
   this.scheduledExecutorService.scheduleAtFixedRate(NamesrvController.this.routeInfoManager::scanNotActiveBroker, 5, 10, TimeUnit.SECONDS);

        this.scheduledExecutorService.scheduleAtFixedRate(NamesrvController.this.kvConfigManager::printAllPeriodically, 1, 10, TimeUnit.MINUTES);

        if (TlsSystemConfig.tlsMode != TlsMode.DISABLED) {
            // Register a listener to reload SslContext
            try {
                fileWatchService = new FileWatchService(
                    new String[] {
                        TlsSystemConfig.tlsServerCertPath,
                        TlsSystemConfig.tlsServerKeyPath,
                        TlsSystemConfig.tlsServerTrustCertPath
                    },
                    new FileWatchService.Listener() {
                        boolean certChanged, keyChanged = false;
                        @Override
                        public void onChanged(String path) {
                            if (path.equals(TlsSystemConfig.tlsServerTrustCertPath)) {
                                log.info("The trust certificate changed, reload the ssl context");
                                reloadServerSslContext();
                            }
                            if (path.equals(TlsSystemConfig.tlsServerCertPath)) {
                                certChanged = true;
                            }
                            if (path.equals(TlsSystemConfig.tlsServerKeyPath)) {
                                keyChanged = true;
                            }
                            if (certChanged && keyChanged) {
                                log.info("The certificate and private key changed, reload the ssl context");
                                certChanged = keyChanged = false;
                                reloadServerSslContext();
                            }
                        }
                        private void reloadServerSslContext() {
                            ((NettyRemotingServer) remotingServer).loadSslContext();
                        }
                    });
            } catch (Exception e) {
                log.warn("FileWatchService created error, can't load the certificate dynamically");
            }
        }

        return true;
    }
过程可以分成几步
1、加载KV配置管理器
2、初始化netty远程通信服务
3、初始化线程池
4、注册请求处理器
5、定时扫描不活跃的broker
前三步就不说了,第四步我们跟踪源码看下:
    private void registerProcessor() {
        if (namesrvConfig.isClusterTest()) {

            this.remotingServer.registerDefaultProcessor(new ClusterTestRequestProcessor(this, namesrvConfig.getProductEnvName()),
                this.remotingExecutor);
        } else {

            this.remotingServer.registerDefaultProcessor(new DefaultRequestProcessor(this), this.remotingExecutor);
        }
    }
可以看到基本上就是把我们第三步创建的线程池,注册到当前的默认请求处理器中。
第五步,我们看到有一个定时任务,执行.routeInfoManager::scanNotActiveBroker方法,这个方法就是去扫描不活跃的broker。如下所示,从源码上看首次是5秒,然后每隔10秒执行一次。
    public int scanNotActiveBroker() {
        int removeCount = 0;
        Iterator<Entry<String, BrokerLiveInfo>> it = this.brokerLiveTable.entrySet().iterator();
        while (it.hasNext()) {
            Entry<String, BrokerLiveInfo> next = it.next();
            long last = next.getValue().getLastUpdateTimestamp();
            if ((last + BROKER_CHANNEL_EXPIRED_TIME) < System.currentTimeMillis()) {
                RemotingUtil.closeChannel(next.getValue().getChannel());
                it.remove();
                log.warn("The broker channel expired, {} {}ms", next.getKey(), BROKER_CHANNEL_EXPIRED_TIME);
                this.onChannelDestroy(next.getKey(), next.getValue().getChannel());

                removeCount++;
            }
        }

        return removeCount;
    }
启动步骤3
在JVM进程关闭之前,先将线程池关闭,及时释放资源。注意是在JVM进程结束的钩子函数中执行。
代码:NamesrvStartup#start
 在shutdown方法中,主要做了一下资源释放的处理。
    public void shutdown() {
        this.remotingServer.shutdown();
        this.remotingExecutor.shutdown();
        this.scheduledExecutorService.shutdown();

        if (this.fileWatchService != null) {
            this.fileWatchService.shutdown();
        }
    }


 724
724

 被折叠的 条评论
为什么被折叠?
被折叠的 条评论
为什么被折叠?
 到【灌水乐园】发言


