


一、mysql源码编译
编译安装
我们要使用cmake进行mysql的编译安装,所以我们先下载好cmake、gcc-c++
然后用cmake、make、make install来编译安装,在这个过程中我们可以看到进度百分比,这是比之前方便的地方
mysql初始化
先将mysql服务复制到默认目录之下,在查看是不是有可执行权限
[root@server1 support-files]# cp mysql.server /etc/init.d/mysqld
[root@server1 support-files]# ll /etc/init.d/mysqld
-rwxr-xr-x 1 root root 10566 Oct  7 11:31 /etc/init.d/mysqld
再修改一下环境变量
# .bash_profile

# Get the aliases and functions
if [ -f ~/.bashrc ]; then
        . ~/.bashrc
fi

# User specific environment and startup programs

PATH=$PATH:$HOME/bin:/usr/local/php/bin:/usr/local/mysql/bin

export PATH
把/etc/my.cnf中目录修改成我们设置的目录
[mysqld]
datadir=/data/mysql
socket=/data/mysql/mysql.sock
# Disabling symbolic-links is recommended to prevent assorted security risks
symbolic-links=0
# Settings user and group are ignored when systemd is used.
# If you need to run mysqld under a different user or group,
# customize your systemd unit file for mariadb according to the
# instructions in http://fedoraproject.org/wiki/Systemd

#[mysqld_safe]
#log-error=/var/log/mariadb/mariadb.log
#pid-file=/var/run/mariadb/mariadb.pid

#
# include all files from the config directory
#
#!includedir /etc/my.cnf.d
添加mysql用户用户组,赋予/data/mysql权限,并且建立目录
[root@server1 ~]# useradd -M -d /data/mysql -s /sbin/nologin mysql
[root@server1 ~]# mkdir /data/mysql -p
[root@server1 ~]# chown mysql.mysql /data/mysql/
[root@server1 ~]# mysqld --initialize --user=mysql
启动mysql
[root@server1 ~]# /etc/init.d/mysqld start
Starting MySQL.Logging to '/data/mysql/server1.2.err'.
 SUCCESS!
在进入mysql前进行最后的配置
[root@server1 mysql]# mysql_secure_installation

Securing the MySQL server deployment.

Enter password for user root:

The existing password for the user account root has expired. Please set a new password.

New password:

Re-enter new password:

VALIDATE PASSWORD PLUGIN can be used to test passwords
and improve security. It checks the strength of password
and allows the users to set only those passwords which are
secure enough. Would you like to setup VALIDATE PASSWORD plugin?

Press y|Y for Yes, any other key for No:
Using existing password for root.
Change the password for root ? ((Press y|Y for Yes, any other key for No) :

 ... skipping.
By default, a MySQL installation has an anonymous user,
allowing anyone to log into MySQL without having to have
a user account created for them. This is intended only for
testing, and to make the installation go a bit smoother.
You should remove them before moving into a production
environment.

Remove anonymous users? (Press y|Y for Yes, any other key for No) : y
Success.


Normally, root should only be allowed to connect from
'localhost'. This ensures that someone cannot guess at
the root password from the network.

Disallow root login remotely? (Press y|Y for Yes, any other key for No) : y
Success.

By default, MySQL comes with a database named 'test' that
anyone can access. This is also intended only for testing,
and should be removed before moving into a production
environment.


Remove test database and access to it? (Press y|Y for Yes, any other key for No) : y
 - Dropping test database...
Success.

 - Removing privileges on test database...
Success.

Reloading the privilege tables will ensure that all changes
made so far will take effect immediately.

Reload privilege tables now? (Press y|Y for Yes, any other key for No) : y
Success.

All done!
二、lnmp架构整合
首先安装phpmyadmin并且做个软链接方便查找
[root@server1 ~]# ln -s phpMyAdmin-5.0.2-all-languages.zip myadmin
在此之前,我们可以吧nginx的默认发布页修改为index.php,方便我们测试
   location / {
            root   html;
            index  index.php index.html index.htm;
        }
但是当我们访问页面并输入账号密码后发现会报错,这是因为没有找到相应的连接,找不到mysql.sock所以无法连接
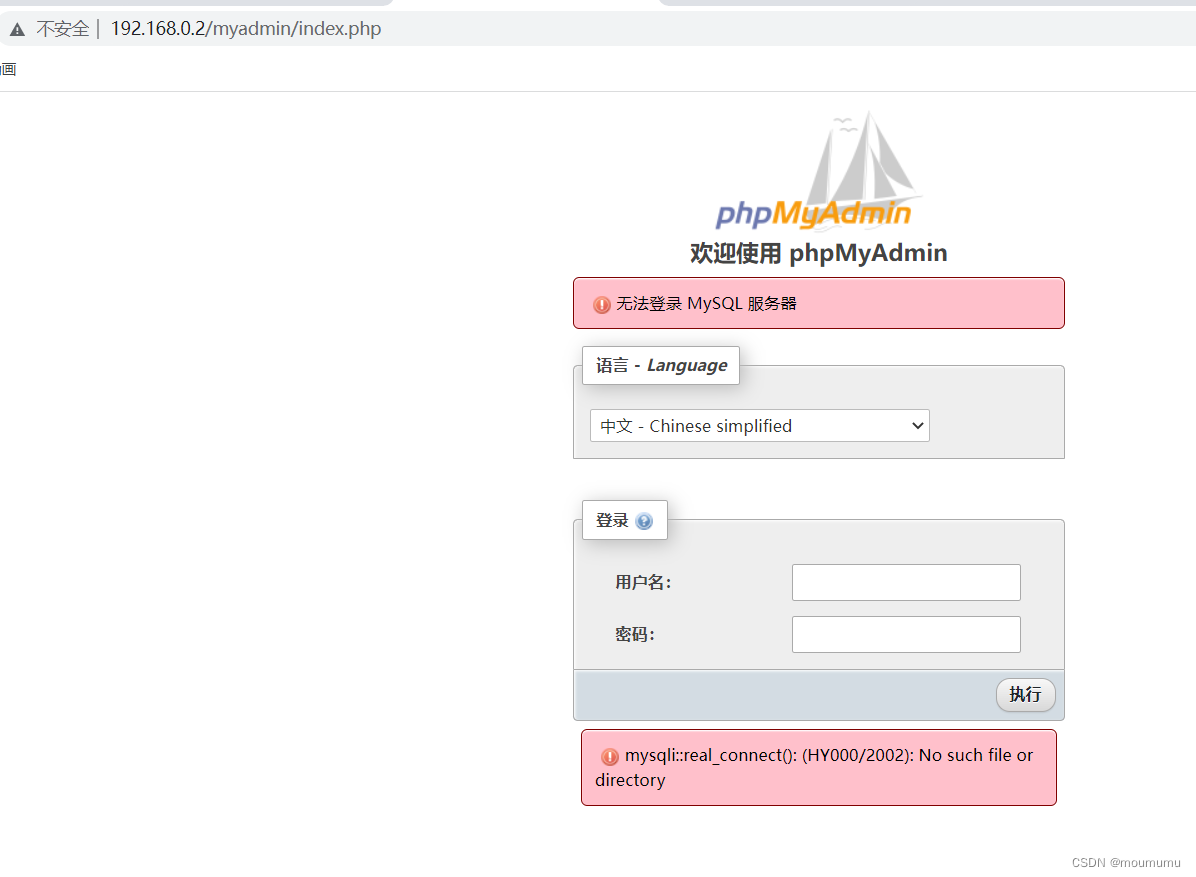
我们将/etc/local/php/etc/php.ini中的socket下目录改为我们自定义的目录,这样就可以便于连接
mysqli.default_socket =/data/mysql/mysql.sock
再次测试就会显示成功连接 ,而且成功进入数据库页面

在图形界面插入数据之后,我们就可以查询到我们添加的内容,数据库、表、以及表内的数据
mysql> show databases;
+--------------------+
| Database           |
+--------------------+
| information_schema |
| mysql              |
| performance_schema |
| sys                |
| westos             |
+--------------------+
5 rows in set (0.00 sec)
mysql> show tables;
+------------------+
| Tables_in_westos |
+------------------+
| t1               |
+------------------+
1 row in set (0.00 sec)

mysql> select * from t1;
+----------+----------+
| username | passward |
+----------+----------+
| mmy      | 020311   |
+----------+----------+
1 row in set (0.00 sec)
如果我们没有图形界面,同样我们也可以用sql语句的方式来插入数据
mysql> INSERT INTO t1 VALUES ('user3','333');
Query OK, 1 row affected (0.01 sec)

mysql> select * from t1;
+----------+----------+
| username | passward |
+----------+----------+
| mmy      | 020311   |
| user2    | 222      |
| user3    | 333      |
+----------+----------+
3 rows in set (0.00 sec)


 690
690


 被折叠的 条评论
为什么被折叠?
被折叠的 条评论
为什么被折叠?
 到【灌水乐园】发言


