


刚学Android的时候,我每每看到别人漂亮的view,然后就想实现
搜索一下,往往得到的结果,就是自定义view
当我满怀热情的去看人家的实现代码,发现一头雾水
硬着头皮,又相继读了一些大神关于自定义view的博客 和 书籍,加上自己的实践,才慢慢开始懂如何自定义view
在我看很多大神的讲解时,经常感到苦恼,看到好多不懂的东西
因为大牛们,都想把问题分析的更透彻,所以会引入源码去讲解
而源码中很多变量啊,方法啊,又是没见过的,这样,经常会让初学者感到很难掌握
所以,我尽量以简单的方式去告诉,怎么去做 自定义view
至于更深的分析,在我自己慢慢理解总结后再写吧~
自定义View的基本流程呢,就是View的测量,View的绘制
View的测量,就是告诉系统,要画一个多大的View
进入正文~本篇讲View的测量如何自定义
我们新建一个类继承View,然后按提示写一个构造方法,这个类就不会报错啦~
我们要自定义View的测量,就是重写onMeasure这个方法
public class MyView extends View{

	public MyView(Context context, AttributeSet attrs) {
		super(context, attrs);
	}

	@Override
	protected void onMeasure(int widthMeasureSpec, int heightMeasureSpec){
		super.onMeasure(widthMeasureSpec, heightMeasureSpec);
	}

}
可以看到,onMeasure接收了两个参数,显然是View的width 和 height属性
(就是我们在xml里面定义的android:layout_width 和 android:layout_height)
而widthMeasureSpec 和 heightMeasureSpec (以下我们统称为 MeasureSpec)
是一个32位的int值,其中高2位为测量的模式,低30位为测量的大小
什么是测量的模式呢?
测量的模式分以下三种:
1.EXACTLY
就是 精确值模式
当我们的View的layout_width 或者 layout_height属性设置为具体的数值(例: android:layout_width = "100dp")
或者指定为 "match_parent" 时(这时候系统会自动分配为父布局的大小)
就是使用的这个模式
2.AT_MOST
就是 最大值模式
当我们的View的layout_width 或者 layout_height属性设置为 "wrap_content" 时
也就是控件的大小随着子控件或者内容的变化而变化,这时候只要控件的尺寸不超过父布局允许的最大尺寸即可
3.UNSPECIFIED
这个模式下,View想多大就多大,通常在绘制自定义View时才会使用(我还没见过实际使用)
呢我们如何分别获得MeasureSpec的测量模式 和 测量大小呢?
很简单,上代码!
//获取测量模式
int specMode = MeasureSpec.getMode(measureSpec);
//获取测量大小
int specSize = MeasureSpec.getSize(measureSpec);View类默认的onMeasure()方法只支持EXACTLY模式,如果你不重写该方法,引入控件时属性设置为wrap_content,是不会生效的,而是自动采用match_parent
呢我们如何设置View的宽高呢?
我们进入源码看一下它怎么实现的
protected void onMeasure(int widthMeasureSpec, int heightMeasureSpec) {
        setMeasuredDimension(getDefaultSize(getSuggestedMinimumWidth(), widthMeasureSpec),
                getDefaultSize(getSuggestedMinimumHeight(), heightMeasureSpec));
    }
好啦,源码就此打住~我们不深入分析追究 getDefaultSize等源码方法的代码了
只要知道通过setMeasuredDimension(int width,int height) 传入我们想要的宽和高大小,就可以啦
可能你还有些糊涂,下面通过一个简单的实例来掌握一下
MyView类
import android.content.Context;
import android.util.AttributeSet;
import android.view.View;

public class MyView extends View{

	public MyView(Context context, AttributeSet attrs) {
		super(context, attrs);
	}

	@Override
	protected void onMeasure(int widthMeasureSpec, int heightMeasureSpec){
		//super.onMeasure(widthMeasureSpec, heightMeasureSpec);
		setMeasuredDimension(measure(widthMeasureSpec),measure(heightMeasureSpec));
	}

	/**
	 * 完全自己自定义的方法哦,你甚至可以让不管设置什么都返回固定大小!
	 * @param measureSpec 传入的measureSpec
	 * @return 处理后的大小
	 */
	private int measure(int measureSpec){
		int result = 0;
		//分别获取测量模式 和 测量大小
		int specMode = MeasureSpec.getMode(measureSpec);
		int specSize = MeasureSpec.getSize(measureSpec);

		//如果是精确度模式,呢就按xml中定义的来
		if(specMode == MeasureSpec.EXACTLY){
			result = specSize;
		}
		//如果是最大值模式,就按我们定义的来
		else if(specMode == MeasureSpec.AT_MOST){
			result = 200;
		}

		return result;
	}
}
引用MyView的布局文件
activity_main.xml
<RelativeLayout xmlns:android="http://schemas.android.com/apk/res/android"
    xmlns:tools="http://schemas.android.com/tools"
    android:layout_width="match_parent"
    android:layout_height="match_parent"
    tools:context="com.example.androidonmeasure.MainActivity" >

    <com.example.androidonmeasure.MyView
        android:layout_width="400px"
        android:layout_height="wrap_content"
        android:background="#ff0000"
        />

</RelativeLayout>
com.example.androidmeasure 是我MyView所在的包名
这里我们给它设一个红色的背景色,方便观察
宽度 400px (注意,我们在代码里面获得的 specSize测量大小 单位都是px,如果这里设置的是dp或其他,系统会自动按一定比例换算为px的)
高度 wrap_content
ok 我们运行一下
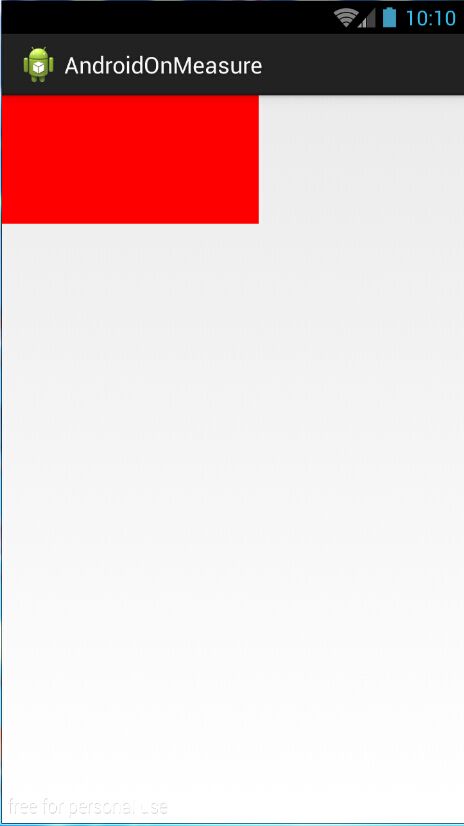
很好,宽度400px,高度就是我们自定义的值 200px
假设我们直接调用父类的onMeasure呢?
@Override
protected void onMeasure(int widthMeasureSpec, int heightMeasureSpec){
	super.onMeasure(widthMeasureSpec, heightMeasureSpec);
	//setMeasuredDimension(measure(widthMeasureSpec),measure(heightMeasureSpec));
}
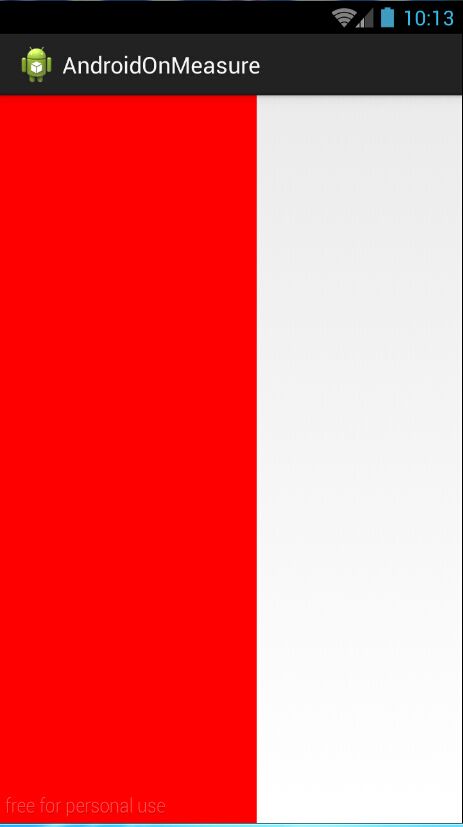
View 的高度 设为wrap_content 但是却是match_parent的效果
就这么多,很简单吧~
最好自己实验一下,写一写
该测试项目github地址点击打开链接


 81
81


 被折叠的 条评论
为什么被折叠?
被折叠的 条评论
为什么被折叠?
 到【灌水乐园】发言


