


通过上篇的文章,我们已经知道了SpringIoC和DI的基本操作,接下来我们来系统的学习SpringIoC和DI 的操作.
前⾯我们提到IoC控制反转,就是将对象的控制权交给Spring的IOC容器,由IOC容器创建及管理对 象。也就是bean的存储
Bean的存储
在之前的⼊⻔案例中,要把某个对象交给IOC容器管理,需要在类上添加⼀个注解:@Component,⽽Spring框架为了更好的服务web应⽤程序,提供了更丰富的注解
共有两类注解类型可以实现:
- 类注解:@Controller、@Service、@Repository、@Component、@Configuration.
- 方法注解:@Bean.
接下来我们分别来看Spring存储对象
@Controller(控制器存储)
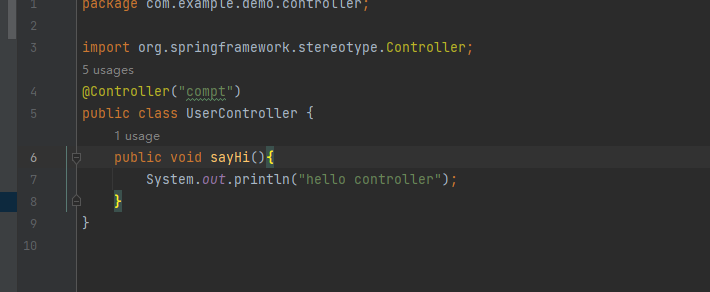
使⽤@Controller 存储bean的代码如下所⽰:
import org.springframework.stereotype.Controller;

@Controller
public class UserController {
    public void sayHi(){
        System.out.println("hello controller");
    }
}
如何观察这个对象已经存在Spring容器当中了呢?
接下来我们学习如何从Spring容器中获取对象
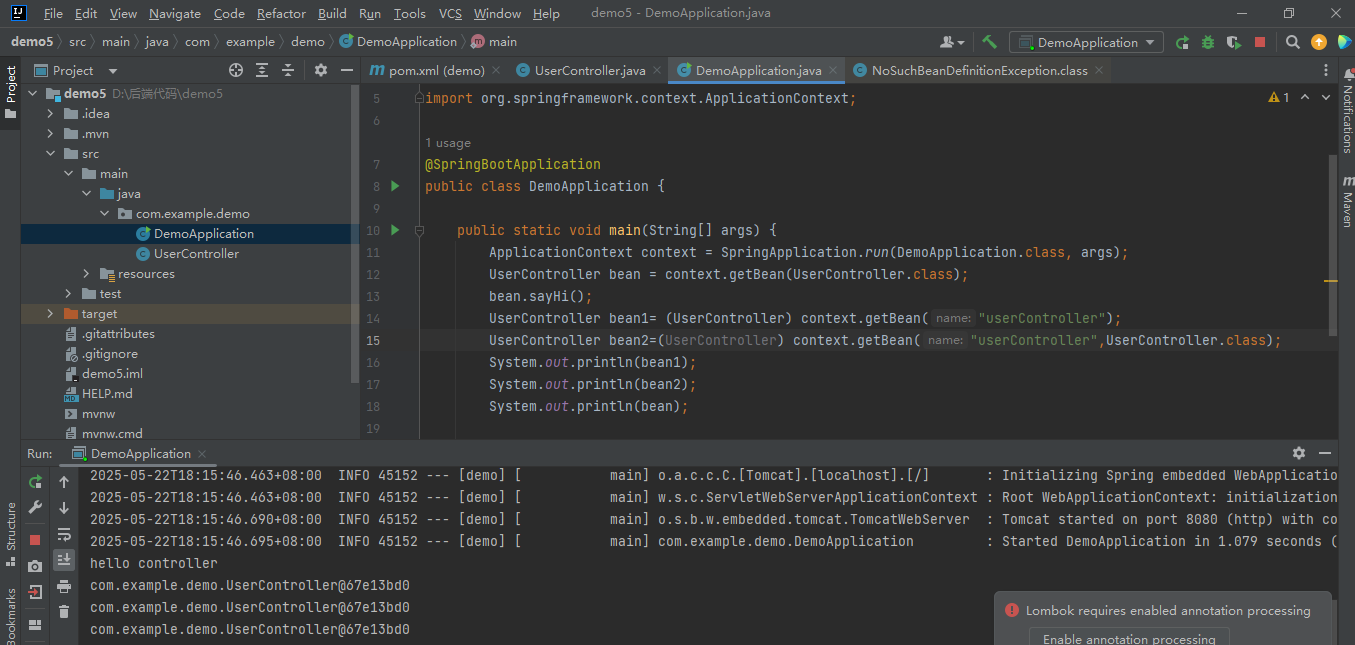
我们来查看这个启动类:
通过run将这个项目运行起来,我们查看这个run的源码,通过ApplicationContext来接收
![]()
代码:
import org.springframework.boot.SpringApplication;
import org.springframework.boot.autoconfigure.SpringBootApplication;
import org.springframework.context.ApplicationContext;
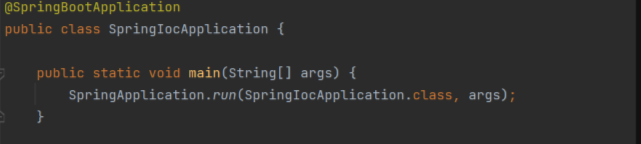
@SpringBootApplication
public class DemoApplication {
public static void main(String[] args) {
ApplicationContext context = SpringApplication.run(DemoApplication.class, args);
UserController bean = context.getBean(UserController.class);
bean.sayHi();
}
}
ApplicationContext 翻译过来就是:Spring上下文
因为对象都交给Spring管理了,所以获取对象要从Spring中获取,那么就得先得到Spring的上下文
关于上下⽂的概念
上学时,阅读理解经常会这样问:根据上下⽂,说⼀下你对XX的理解
在计算机领域,上下⽂这个概念,咱们最早是在学习线程时了解到过,⽐如我们应⽤进⾏线程切换的时 候,切换前都会把线程的状态信息暂时储存起来,这⾥的上下⽂就包括了当前线程的信息,等下次该 线程⼜得到CPU时间的时候,从上下⽂中拿到线程上次运⾏的信息
这个上下⽂,就是指当前的运⾏环境,也可以看作是⼀个容器,容器⾥存了很多内容,这些内容是当前 运⾏的环境
观察运⾏结果,发现成功从Spring中获取到Controller对象,并执⾏Controller的sayHi⽅法

如果把@Controller删掉

编译器会报错
报错信息显⽰:找不到类型是:com.example.demo.UserController的bean
获取bean对象的其他⽅式:
上述代码是根据类型来查找对象,如果Spring容器中,同⼀个类型存在多个bean的话,怎么来获取呢?
ApplicationContext 也提供了其他获取bean的⽅式,ApplicationContext获取bean对象的功能,是⽗ 类BeanFactory提供的功能.

常⽤的是上述1,2,4种,这三种⽅式,获取到的bean是⼀样的
其中1,4种都涉及到根据名称来获取对象.bean的名称是什么呢?
Bean的名称
Spring bean是Spring框架在运⾏时管理的对象,Spring会给管理的对象起⼀个名字.
⽐如学校管理学⽣,会给每个学⽣分配⼀个学号,根据学号,就可以找到对应的学⽣.
Spring也是如此,给每个对象起⼀个名字,根据Bean的名称(BeanId)就可以获取到对应的对象.
程序开发⼈员不需要为bean指定名称(BeanId),如果没有显式的提供名称(BeanId),Spring容器将为该 bean⽣成唯⼀的名称.
命名约定使⽤Java标准约定作为实例字段名.也就是说,bean名称以⼩写字⺟开头,然后使⽤小驼峰式 ⼤⼩写.
比如:
类名:UserController, Bean的名称为:userController
类名:AccountManager,Bean的名称为: accountManager
也有⼀些特殊情况,当有多个字符并且第⼀个和第⼆个字符都是⼤写时,将保留原始的⼤⼩写.
比如:
类名:UController, Bean的名称为:UController
类名:AManager,Bean的名称为: AManager
根据这个命名规则,我们来获取Bean.
如果这个过程中,我们所写的名称出错了,就会报错:

观察上面打印的地址,我们发现地址⼀样,说明对象是⼀个,这里就可以发现多次获取,得到的是同一对象,这就使用了单例模式
获取bean对象,是⽗类BeanFactory提供的功能
ApplicationContext VS BeanFactory(常⻅⾯试题)
继承关系和功能⽅⾯来说:Spring容器有两个顶级的接⼝:BeanFactory和 ApplicationContext。其中BeanFactory提供了基础的访问容器的能⼒,⽽ ApplicationContext 属于 BeanFactory 的⼦类,它除了继承了BeanFactory的所有功能之外, 它还拥有独特的特性,还添加了对国际化⽀持、资源访问⽀持、以及事件传播等⽅⾯的⽀持
从性能⽅⾯来说:ApplicationContext是⼀次性加载并初始化所有的Bean对象,⽽ BeanFactory 是需要那个才去加载那个,因此更加轻量.(空间换时间)(懒汉和恶汉了哈哈)
@Service(服务存储)
使⽤@Service 存储bean的代码如下所⽰:
import org.springframework.stereotype.Service;

@Service
public class UserService {
    public void sayHi(){
        System.out.println("hello service");
    }
}
import org.springframework.boot.SpringApplication;
import org.springframework.boot.autoconfigure.SpringBootApplication;
import org.springframework.context.ApplicationContext;

@SpringBootApplication
public class DemoApplication {

	public static void main(String[] args) {
		ApplicationContext context = SpringApplication.run(DemoApplication.class, args);
		UserController bean = context.getBean(UserController.class);
		bean.sayHi();
		UserService bean2=context.getBean(UserService.class);
		bean2.sayHi();

	}

}

观察运⾏结果,发现成功从Spring中获取到UserService对象,并执⾏UserService的sayHi⽅法
@Repository(仓库存储)
import org.springframework.stereotype.Repository;

@Repository
public class UserRepo {
    public void doRepo(){
        System.out.println("do repo");
    }
}

@Component(组件存储)
@Configuration(配置存储)
这俩个同上面一样书写代码即可!!
为什么要这么多类注解?
这个也是和咱们前⾯讲的应⽤分层是呼应的.让程序员看到类注解之后,就能直接了解当前类的⽤途.
@Controller:控制层,接收请求,对请求进⾏处理,并进⾏响应.
@Servie:业务逻辑层,处理具体的业务逻辑.
@Repository:数据访问层,也称为持久层.负责数据访问操作
@Configuration:配置层.处理项⽬中的⼀些配置信息.
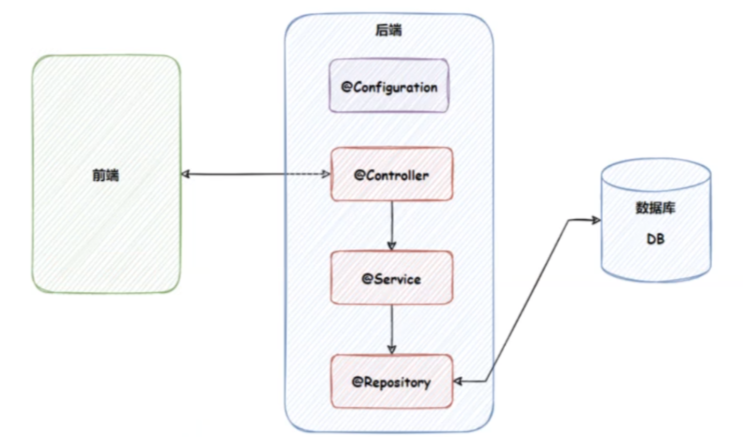
类注解之间的关系
查看 @Controller / @Service / @Repository / @Configuration等注解的源码发现:

其实这些注解⾥⾯都有⼀个注解 @Component ,说明它们本⾝就是属于@Component 的"⼦类".
@Component 是⼀个元注解,也就是说可以注解其他类注解,如@Controller , @Service ,@Repository 等.这些注解被称为 @Component 的衍⽣注解.
@Controller , @Service 和 @Controller , @Service , @Repository ⽤于更具体的⽤例(分别在控制层,业务逻辑层,持 久化层),在开发过程中,如果你要在业务逻辑层使⽤ @Component 或@Service,显然@Service是更 好的选择
在日常开发中我们可以混用,但是不建议混用
方法注解@Bean
类注解是添加到某个类上的,但是存在两个问题:
1.使用外部包里的类, 没办法添加类注解:

2.一个类,需要多个对象,比如多个数据源
这种场景, 我们就需要使⽤⽅法注解
我们先来看看⽅法注解如何使⽤:
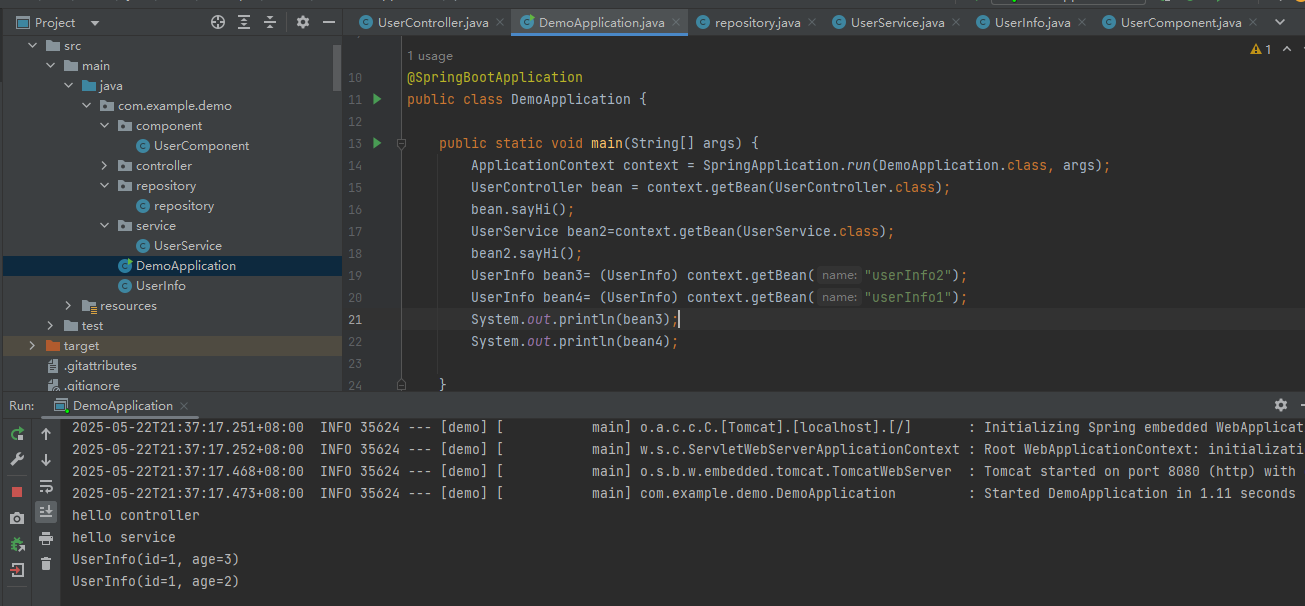
此时再去获取这两个对象就会报错:大概意思需要找唯一的,但是找到了两个,这里的userInfo和userInfo2就是bean的名称,那么bean的名称也就是方法名;

那么我们只需要根据bean的名称去拿即可:
代码附上:
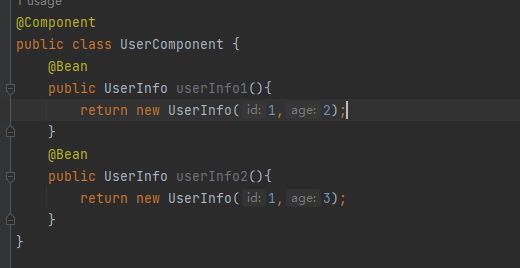
@Component
public class UserComponent {
    @Bean
    public UserInfo userInfo1(){
        return new UserInfo(1,2);
    }
    @Bean
    public UserInfo userInfo2(){
        return new UserInfo(1,3);
    }
}
import com.example.demo.component.UserComponent;
import com.example.demo.controller.UserController;
import com.example.demo.service.UserService;
import org.springframework.boot.SpringApplication;
import org.springframework.boot.autoconfigure.SpringBootApplication;
import org.springframework.context.ApplicationContext;
@SpringBootApplication
public class DemoApplication {
public static void main(String[] args) {
ApplicationContext context = SpringApplication.run(DemoApplication.class, args);
UserController bean = context.getBean(UserController.class);
bean.sayHi();
UserService bean2=context.getBean(UserService.class);
bean2.sayHi();
UserInfo bean3= (UserInfo) context.getBean("userInfo2");
UserInfo bean4= (UserInfo) context.getBean("userInfo1");
System.out.println(bean3);
System.out.println(bean4);
}
}
注意:@Bean需要搭配五大注解来使用,通常搭配@Component和@Configuration
@Component 让 Spring 管理 UserComponent 类本身的
@Bean 让 Spring 管理 userInfo1() 和 userInfo2() 方法返回的 UserInfo 实例的
你如果只使用 @Component userInfo1() 和 userInfo2() 方法只是普通方法,它们的返回值不会被 Spring 管理的
扫描路径
使⽤前⾯学习的五个注解声明的bean,⼀定会⽣效吗?
不⼀定(原因:bean想要⽣效,还需要被Spring扫描)
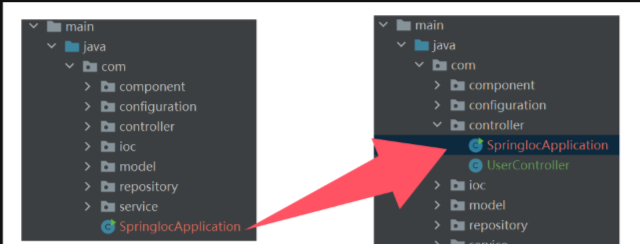
下⾯我们通过修改项⽬⼯程的⽬录结构,来测试bean对象是否⽣效:
再运⾏代码:

解释:没有bean的名称为userInfo
为什么没有找到bean对象呢?
使⽤五⼤注解声明的bean,要想⽣效,还需要配置扫描路径,让Spring扫描到这些注解,spring的扫描路径默认是启动类所在的路径,当前的路径是在com.controller路径下,所以只会扫描这两个文件,所以UserController对象是可以拿到的,并且在这个路径下扫描加了五大注解的;那么UserInfo就拿不到

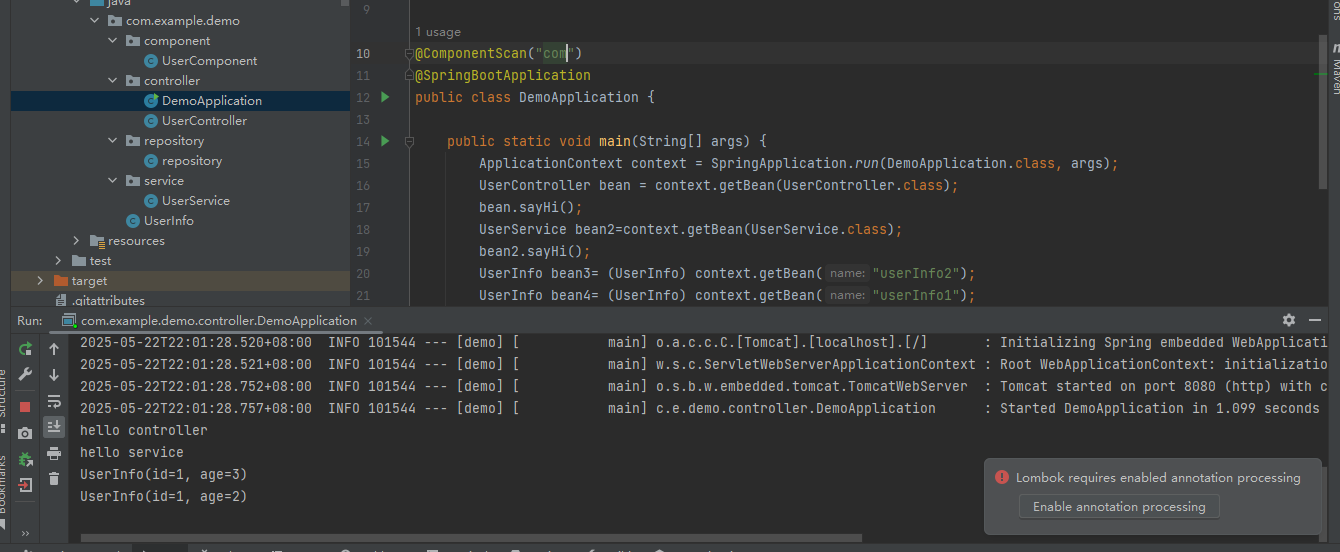
若就是想将启动类放在当前路径下,那么就可以通过 @ComponentScan 来配置扫描路径.
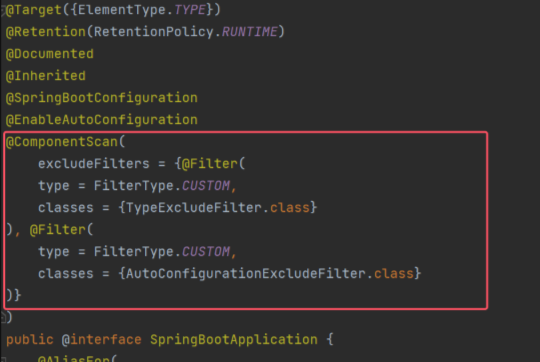
那为什么前⾯没有配置@ComponentScan注解也可以呢?
@ComponentScan 注解虽然没有显式配置,但是实际上已经包含在了启动类声明注解@SpringBootApplication 中了
默认扫描的范围是SpringBoot启动类所在包及其⼦包
在 配置类上添加@ComponentScan注解,该注解默认会扫描该类所在的包下所有的配置类
推荐做法: 把启动类放在我们希望扫描的包的路径下,这样我们定义的bean就都可以被扫描到
重命名Bean
可以通过设置name属性给Bean对象进⾏重命名操作,如下代码所⽰:

还可以重命名多个:


 1088
1088

 被折叠的 条评论
为什么被折叠?
被折叠的 条评论
为什么被折叠?
 到【灌水乐园】发言


