


swagger是什么:
Swagger 是一款RESTFUL接口的文档在线自动生成+功能测试功能软件。本文简单介绍了在项目中集成swagger的方法和一些常见问题。如果想深入分析项目源码,了解更多内容,见参考资料。
Swagger 是一个规范和完整的框架,用于生成、描述、调用和可视化 RESTful 风格的 Web 服务。总体目标是使客户端和文件系统作为服务器以同样的速度来更新。文件的方法,参数和模型紧密集成到服务器端的代码,允许API来始终保持同步。Swagger 让部署管理和使用功能强大的API从未如此简单。
将swagger集成到springmvc项目中去:
首先添加swagger依赖,作者用的maven管理:
<!-- swagger -->
<dependency>
<groupId>com.mangofactory</groupId>
<artifactId>swagger-springmvc</artifactId>
<version>1.0.2</version>
</dependency>
<dependency>
<groupId>com.fasterxml.jackson.core</groupId>
<artifactId>jackson-core</artifactId>
<version>2.5.1</version>
</dependency>
<dependency>
<groupId>com.fasterxml.jackson.core</groupId>
<artifactId>jackson-databind</artifactId>
<version>2.5.1</version>
</dependency>
<dependency>
<groupId>com.fasterxml.jackson.core</groupId>
<artifactId>jackson-annotations</artifactId>
<version>2.5.1</version>
</dependency>
创建自定义swagger初始化配置文件:
package com.yrok.swagger;
import org.springframework.beans.factory.annotation.Autowired;
import org.springframework.context.annotation.Bean;
import com.mangofactory.swagger.configuration.SpringSwaggerConfig;
import com.mangofactory.swagger.models.dto.ApiInfo;
import com.mangofactory.swagger.plugin.EnableSwagger;
import com.mangofactory.swagger.plugin.SwaggerSpringMvcPlugin;
@EnableSwagger
public class SwaggerConfig {
private SpringSwaggerConfig springSwaggerConfig;
/**
* Required to autowire SpringSwaggerConfig
*/
@Autowired
public void setSpringSwaggerConfig(SpringSwaggerConfig springSwaggerConfig)
{
this.springSwaggerConfig = springSwaggerConfig;
}
/**
* Every SwaggerSpringMvcPlugin bean is picked up by the swagger-mvc
* framework - allowing for multiple swagger groups i.e. same code base
* multiple swagger resource listings.
*/
@Bean
public SwaggerSpringMvcPlugin customImplementation()
{
return new SwaggerSpringMvcPlugin(this.springSwaggerConfig)
.apiInfo(apiInfo())
.includePatterns(".*?");
}
private ApiInfo apiInfo()
{
ApiInfo apiInfo = new ApiInfo(
"springmvc搭建swagger",
"spring-API swagger测试",
"My Apps API terms of service",
"534560449@qq.com",
"web app",
"My Apps API License URL");
return apiInfo;
}
}
将swagger配置类及依赖SpringSwaggerConfig加载到spring容器中:
<!-- 启用MVC注解 -->
<mvc:annotation-driven />
<!-- 将 springSwaggerConfig加载到spring容器 -->
<bean class="com.mangofactory.swagger.configuration.SpringSwaggerConfig" />
<!-- 将自定义的swagger配置类加载到spring容器 -->
<bean class="com.yrok.swagger.SwaggerConfig" />
配置相关controller的api:
package com.yrok.controller;
import javax.annotation.Resource;
import org.springframework.stereotype.Controller;
import org.springframework.web.bind.annotation.RequestMapping;
import org.springframework.web.bind.annotation.RequestParam;
import org.springframework.web.bind.annotation.ResponseBody;
import com.wordnik.swagger.annotations.Api;
import com.wordnik.swagger.annotations.ApiOperation;
import com.wordnik.swagger.annotations.ApiParam;
import com.yrok.entity.User;
import com.yrok.service.UserService;
@Api(value="user")
@Controller
@RequestMapping(value="/user")
public class UserController {
@Resource
UserService userService;
@RequestMapping(value = "/getUser")
@ResponseBody
@ApiOperation(value="根据ID获取用户信息",httpMethod="GET",notes="get user by id",response=User.class)
public User getUser(@ApiParam(required=true,value="用户ID",name="userId")@RequestParam(value="userId")Integer userId) {
return userService.getUserByID(userId);
}
}
和Swagger UI的集成:
在GitHub上将swaggerui下载,地址:https://github.com/swagger-api/swagger-ui
这里的swagger-ui,需要下载2.2版本的,否则会报
Can't read swagger JSON from http://localhost:8080/xxx/swagger/api-docs的错误。
解压后将dist文件夹中所有的文件拷贝到webapp/swagger这里的swagger是作者自定义的你可以写为自己创建的目录。
修改index.html中的 http://petstore.swagger.wordnik.com/v2/swagger.json修改为自己项目路径+api-docs,例如:
http://localhost:8080/SSMSwagger/api-docs:SSMSwagger为项目名称。
在spring-mvc.xml中过滤掉swagger-ui的文件:
<!-- 静态资源文件,不会被Spring MVC拦截 -->
<mvc:resources mapping="/swagger/**" location="/swagger/" />
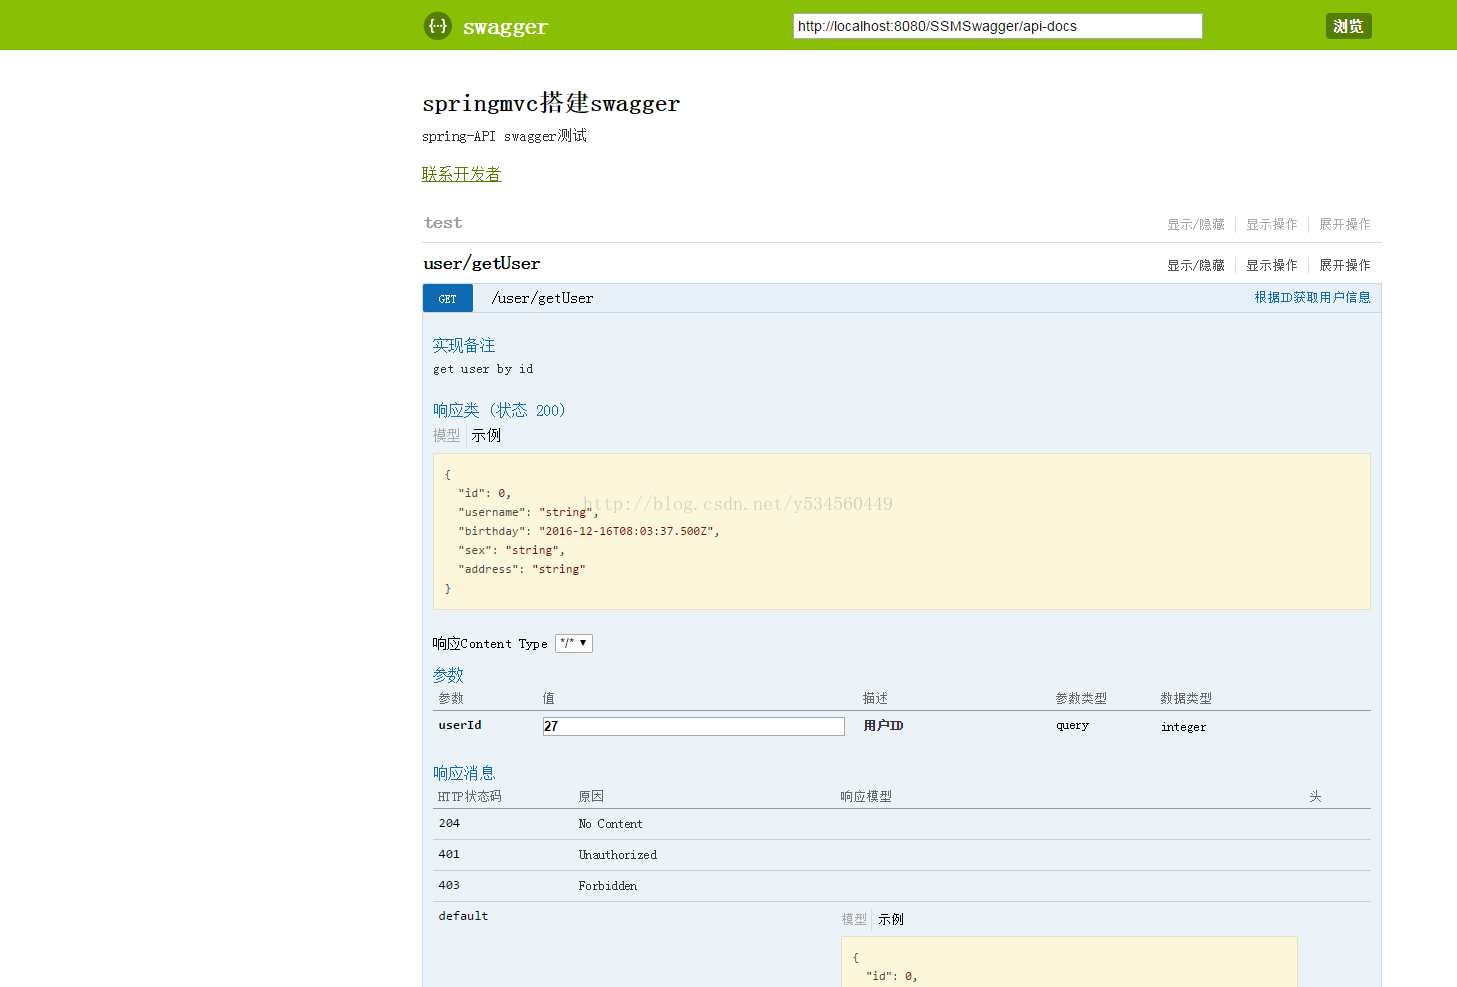
到这里基本完成了springmvc和swagger的整合,下面是测试结果:
在浏览器中访问:http://localhost:8080/SSMSwagger/swagger/index.html#/user/getUser
到此,本篇文章已经结束,下面分享其他资料和参考:
参考地址:
官网:http://swagger.io/
GitHub:
swagger-springmvc:https://github.com/martypitt/swagger-springmvc
swagger-ui:https://github.com/swagger-api/swagger-ui
swagger-core:https://github.com/swagger-api/swagger-core
swagger-spec:https://github.com/swagger-api/swagger-spec


 318
318


 被折叠的 条评论
为什么被折叠?
被折叠的 条评论
为什么被折叠?
 到【灌水乐园】发言


