


上一篇总结了redis sentinel(哨兵方案)的配置流程,本篇就redis整合ssm框架进行说明。目前,大多数公司用redis主要做缓存用,对于那些不常变动的数据来说,我们将其缓存在redis中,可以大大减少数据库的压力。
一、Spring集成redis
1.在resource目录下创建spring-redis.xml文件,内容如下:
<?xml version="1.0" encoding="UTF-8"?>
<beans xmlns="http://www.springframework.org/schema/beans"
    xmlns:xsi="http://www.w3.org/2001/XMLSchema-instance" xmlns:context="http://www.springframework.org/schema/context"
    xmlns:p="http://www.springframework.org/schema/p"
    xsi:schemaLocation="http://www.springframework.org/schema/aop http://www.springframework.org/schema/aop/spring-aop-4.1.xsd
        http://www.springframework.org/schema/beans http://www.springframework.org/schema/beans/spring-beans-4.1.xsd
        http://www.springframework.org/schema/context http://www.springframework.org/schema/context/spring-context-4.1.xsd">

    <bean id="jedisPoolConfig" class="redis.clients.jedis.JedisPoolConfig">
        <property name="maxIdle" value="2000" />
        <property name="maxTotal" value="20000" />
        <property name="minEvictableIdleTimeMillis" value="300000"></property>
        <property name="numTestsPerEvictionRun" value="3"></property>
        <property name="timeBetweenEvictionRunsMillis" value="60000"></property>
        <property name="maxWaitMillis" value="20000" />
        <property name="testOnBorrow" value="false" />
    </bean>

    <bean id="sentinelConfig"
        class="org.springframework.data.redis.connection.RedisSentinelConfiguration">
        <property name="master">
            <bean class="org.springframework.data.redis.connection.RedisNode">
                <property name="name" value="mymaster"></property>
            </bean>
        </property>
        <property name="sentinels">
            <set>
                <bean class="org.springframework.data.redis.connection.RedisNode">
                    <constructor-arg name="host" value="192.168.12.90" />
                    <constructor-arg name="port" value="7505" />
                </bean>
                <bean class="org.springframework.data.redis.connection.RedisNode">
                    <constructor-arg name="host" value="192.168.12.90" />
                    <constructor-arg name="port" value="7506" />
                </bean>
            </set>
        </property>
    </bean>
    <!-- 在此将sentinel配置集成到redis连接池中 -->
    <bean id="jedisConnectionFactory"
        class="org.springframework.data.redis.connection.jedis.JedisConnectionFactory">
        <property name="timeout" value="20000"></property>
        <property name="poolConfig" ref="jedisPoolConfig"></property>
        <constructor-arg name="sentinelConfig" ref="sentinelConfig"></constructor-arg>
    </bean>

    <bean id="stringRedisTemplate" class="org.springframework.data.redis.core.StringRedisTemplate">
        <property name="connectionFactory" ref="jedisConnectionFactory" />
    </bean>

</beans>
- 1
- 2
- 3
- 4
- 5
- 6
- 7
- 8
- 9
- 10
- 11
- 12
- 13
- 14
- 15
- 16
- 17
- 18
- 19
- 20
- 21
- 22
- 23
- 24
- 25
- 26
- 27
- 28
- 29
- 30
- 31
- 32
- 33
- 34
- 35
- 36
- 37
- 38
- 39
- 40
- 41
- 42
- 43
- 44
- 45
- 46
- 47
- 48
- 49
- 50
- 51
在上述配置中,我们用jedis 池化管理方案,将sentinel纳入配置中去,这样就不用代码中用JedisSentinelPool了,直接用JedisPool就ok了。别忘了,将此文件加入web.xml中:
<context-param>
        <param-name>contextConfigLocation</param-name>
        <param-value>classpath:spring-mybatis.xml,classpath:spring-redis.xml</param-value>
</context-param>
- 1
- 2
- 3
- 4
2.测试
新建测试类,内容如下:
package com.dg;

import java.util.Collection;
import java.util.List;
import java.util.Map;
import java.util.Set;

import javax.annotation.Resource;

import org.junit.Test;
import org.junit.runner.RunWith;
import org.springframework.data.redis.connection.RedisSentinelConnection;
import org.springframework.data.redis.connection.RedisServer;
import org.springframework.data.redis.core.StringRedisTemplate;
import org.springframework.test.context.ContextConfiguration;
import org.springframework.test.context.junit4.SpringJUnit4ClassRunner;

import com.alibaba.fastjson.JSONObject;
import com.dg.bean.User;

@RunWith(SpringJUnit4ClassRunner.class)
@ContextConfiguration(locations = { "classpath:spring-redis.xml" })
public class SpringRedis {

    @Resource(name = "stringRedisTemplate")
    private StringRedisTemplate stringRedisTemplate;

    /**
     * redis 读写测试
     */
    @Test
    public void testSpringRedis() {

        try {
            // ApplicationContext context = new
            // ClassPathXmlApplicationContext("spring-redis.xml");
            // StringRedisTemplate stringRedisTemplate =
            // context.getBean("stringRedisTemplate",
            // StringRedisTemplate.class);
            // String读写
            stringRedisTemplate.delete("myStr");
            stringRedisTemplate.opsForValue().set("myStr", "http://yjmyzz.cnblogs.com/");
            System.out.println(stringRedisTemplate.opsForValue().get("myStr"));
            System.out.println("---------------");

            // List读写
            stringRedisTemplate.delete("myList");
            stringRedisTemplate.opsForList().rightPush("myList", "A");
            stringRedisTemplate.opsForList().rightPush("myList", "B");
            stringRedisTemplate.opsForList().leftPush("myList", "0");
            List<String> listCache = stringRedisTemplate.opsForList().range("myList", 0, -1);
            for (String s : listCache) {
                System.out.println(s);
            }
            System.out.println("---------------");

            // Set读写
            stringRedisTemplate.delete("mySet");
            stringRedisTemplate.opsForSet().add("mySet", "A");
            stringRedisTemplate.opsForSet().add("mySet", "B");
            stringRedisTemplate.opsForSet().add("mySet", "C");
            Set<String> setCache = stringRedisTemplate.opsForSet().members("mySet");
            for (String s : setCache) {
                System.out.println(s);
            }
            System.out.println("---------------");

            // Hash读写
            stringRedisTemplate.delete("myHash");
            stringRedisTemplate.opsForHash().put("myHash", "PEK", "北京");
            stringRedisTemplate.opsForHash().put("myHash", "SHA", "上海虹桥");
            stringRedisTemplate.opsForHash().put("myHash", "PVG", "浦东");
            Map<Object, Object> hashCache = stringRedisTemplate.opsForHash().entries("myHash");
            for (Map.Entry<Object, Object> entry : hashCache.entrySet()) {
                System.out.println(entry.getKey() + " - " + entry.getValue());
            }
            System.out.println("---------------");
        } catch (Exception e) {
            e.printStackTrace();
        }
    }

    /**
     * redis 得到所有的master and slave 信息
     */
    @Test
    public void testGetAllMasterAndSlave() {

        RedisSentinelConnection conn = stringRedisTemplate.getConnectionFactory().getSentinelConnection();

        for (RedisServer master : conn.masters()) {
            System.out.println("master => " + master);// 打印master信息
            Collection<RedisServer> slaves = conn.slaves(master);
            // 打印该master下的所有slave信息
            for (RedisServer slave : slaves) {
                System.out.println("slaves of " + master + " => " + slave);
            }
            System.out.println("--------------");
        }
    }

    /*
     * 测试redis 缓存object 和 list 类型数据(方案:用json将object和list序列化)
     */
    @Test
    public void testRedisCacheObjectAndList() {

        User user1 = new User("zhangsan", "123456", "222888@qq.com", "15824812342", 'M', 22);
//      // fastJson 序列化
//      String jsonStr = JSONObject.toJSONString(user1);
//      System.out.println(">>>>>>>>>>>>>>>>" + jsonStr);
//      // fastJson 反序列化
//      user1 = JSONObject.parseObject(jsonStr, User.class);
//      System.out.println(">>>>>>>>>>>>>>>>>>" + user1);

        stringRedisTemplate.delete("user1");
        // 将object 用 json 序列化后保存redis
        stringRedisTemplate.opsForValue().set("user1", JSONObject.toJSONString(user1));

        user1 = JSONObject.parseObject(stringRedisTemplate.opsForValue().get("user1"), User.class);
        System.out.println("-----------------------" + user1);
    }
}
    /**测试redis客户端*/
    @Test
    public void testRedis(){

        Jedis jedis = new Jedis("192.168.12.90", 6379);

        jedis.set("name", "mrdg");
        jedis.set("age", "24");

        System.out.println("name:"+jedis.get("name"));
        System.out.println("age:"+jedis.get("age"));
        System.out.println("tel:"+jedis.get("Tel"));
        System.out.println("no:"+jedis.get("No"));
    }
    /**测试redis集群方案*/
    @Test
    public void testCluster(){

        Set<HostAndPort> jedisClusterNodes = new HashSet<HostAndPort>();
        //Jedis Cluster will attempt to discover cluster nodes automatically
        jedisClusterNodes.add(new HostAndPort("192.168.12.90", 7001));
        JedisCluster jc = new JedisCluster(jedisClusterNodes);
        jc.set("foo", "bar");
        String value = jc.get("foo");

        System.out.println(value);
        try {
            jc.close();
        } catch (Exception e) {
            e.printStackTrace();
        }
    }
- 1
- 2
- 3
- 4
- 5
- 6
- 7
- 8
- 9
- 10
- 11
- 12
- 13
- 14
- 15
- 16
- 17
- 18
- 19
- 20
- 21
- 22
- 23
- 24
- 25
- 26
- 27
- 28
- 29
- 30
- 31
- 32
- 33
- 34
- 35
- 36
- 37
- 38
- 39
- 40
- 41
- 42
- 43
- 44
- 45
- 46
- 47
- 48
- 49
- 50
- 51
- 52
- 53
- 54
- 55
- 56
- 57
- 58
- 59
- 60
- 61
- 62
- 63
- 64
- 65
- 66
- 67
- 68
- 69
- 70
- 71
- 72
- 73
- 74
- 75
- 76
- 77
- 78
- 79
- 80
- 81
- 82
- 83
- 84
- 85
- 86
- 87
- 88
- 89
- 90
- 91
- 92
- 93
- 94
- 95
- 96
- 97
- 98
- 99
- 100
- 101
- 102
- 103
- 104
- 105
- 106
- 107
- 108
- 109
- 110
- 111
- 112
- 113
- 114
- 115
- 116
- 117
- 118
- 119
- 120
- 121
- 122
- 123
- 124
- 125
- 126
- 127
- 128
- 129
- 130
- 131
- 132
- 133
- 134
- 135
- 136
- 137
- 138
- 139
- 140
- 141
- 142
- 143
- 144
- 145
- 146
- 147
- 148
- 149
- 150
- 151
- 152
- 153
- 154
- 155
上面的测试类,cluster方案集群环境为(详见http://blog.csdn.net/donggang1992/article/details/50981954):

sentinel方案环境为(详见http://blog.csdn.net/donggang1992/article/details/50981341):

二、mybatis集成redis进行缓存配置
1.mybatis开启缓存支持
在spring-mabatis.xml中添加下列内容:
<!-- spring和MyBatis完美整合,不需要mybatis的配置映射文件 -->
    <bean id="sqlSessionFactory" class="org.mybatis.spring.SqlSessionFactoryBean">
        <property name="dataSource" ref="dataSource" />
        <!-- 自动扫描mapping.xml文件 -->
        <property name="mapperLocations" value="classpath:com/dg/mapping/*.xml"></property>
        <!-- 开启缓存支持 -->
        <property name="configurationProperties">
            <props>
                <prop key="cacheEnabled">true</prop>
                <!-- 查询时,关闭关联对象即时加载以提高性能 -->
                <prop key="lazyLoadingEnabled">false</prop>
                <!-- 设置关联对象加载的形态,此处为按需加载字段(加载字段由SQL指定),不会加载关联表的所有字段,以提高性能 -->
                <prop key="aggressiveLazyLoading">true</prop>
                <!-- 对于未知的SQL查询,允许返回不同的结果集以达到通用的效果 -->
                <prop key="multipleResultSetsEnabled">true</prop>
                <!-- 允许使用列标签代替列名 -->
                <prop key="useColumnLabel">true</prop>
                <!-- 允许使用自定义的主键值(比如由程序生成的UUID 32位编码作为键值),数据表的PK生成策略将被覆盖 -->
                <prop key="useGeneratedKeys">true</prop>
                <!-- 给予被嵌套的resultMap以字段-属性的映射支持 -->
                <prop key="autoMappingBehavior">FULL</prop>
                <!-- 对于批量更新操作缓存SQL以提高性能 -->
                <prop key="defaultExecutorType">BATCH</prop>
                <!-- 数据库超过25000秒仍未响应则超时 -->
                <prop key="defaultStatementTimeout">25000</prop>
            </props>
        </property>
    </bean>
- 1
- 2
- 3
- 4
- 5
- 6
- 7
- 8
- 9
- 10
- 11
- 12
- 13
- 14
- 15
- 16
- 17
- 18
- 19
- 20
- 21
- 22
- 23
- 24
- 25
- 26
- 27
- 28
2.新建cache包,并创建RedisCache类
RedisCache类的内容为:
package com.dg.cache;

import java.util.Set;
import java.util.concurrent.locks.ReadWriteLock;
import java.util.concurrent.locks.ReentrantReadWriteLock;

import org.apache.commons.codec.digest.DigestUtils;
import org.apache.ibatis.cache.Cache;
import org.slf4j.Logger;
import org.slf4j.LoggerFactory;
import org.springframework.context.ApplicationContext;
import org.springframework.context.support.ClassPathXmlApplicationContext;

import com.dg.util.SerializeUtil;

import redis.clients.jedis.Jedis;
import redis.clients.jedis.JedisPool;
import redis.clients.jedis.JedisPoolConfig;

/*
 * 使用第三方缓存服务器,处理二级缓存
 */
public class RedisCache implements Cache {

    private static Logger logger = LoggerFactory.getLogger(RedisCache.class);

    /** The ReadWriteLock. */
    private final ReadWriteLock readWriteLock = new ReentrantReadWriteLock();
    private String id;
    private JedisPool jedisPool;
    private static final int DB_INDEX = 1;
    private final String COMMON_CACHE_KEY = "COM:";
    private static final String UTF8 = "utf-8";

    private ApplicationContext context;

    /**
     * 按照一定规则标识key
     */
    private String getKey(Object key) {
        StringBuilder accum = new StringBuilder();
        accum.append(COMMON_CACHE_KEY);
        accum.append(this.id).append(":");
        accum.append(DigestUtils.md5Hex(String.valueOf(key)));
        return accum.toString();
    }

    /**
     * redis key规则前缀
     */
    private String getKeys() {
        return COMMON_CACHE_KEY + this.id + ":*";
    }

    public RedisCache() {

    }

    public RedisCache(final String id) {
        if (id == null) {
            throw new IllegalArgumentException("必须传入ID");
        }
        context = new ClassPathXmlApplicationContext("spring-redis.xml");
        JedisPoolConfig jedisPoolConfig = (JedisPoolConfig) context.getBean("jedisPoolConfig");
        jedisPool = new JedisPool(jedisPoolConfig, "192.168.12.90", 7504);
        logger.debug(">>>>>>>>>>>>>>>>>>>>>MybatisRedisCache:id=" + id);
        this.id = id;
    }

    @Override
    public String getId() {
        return this.id;
    }

    @Override
    public int getSize() {
        Jedis jedis = null;
        int result = 0;
        boolean borrowOrOprSuccess = true;
        try {
            jedis = jedisPool.getResource();
            jedis.select(DB_INDEX);
            Set<byte[]> keys = jedis.keys(getKeys().getBytes(UTF8));
            if (null != keys && !keys.isEmpty()) {
                result = keys.size();
            }
            logger.debug(this.id + "---->>>>总缓存数:" + result);
        } catch (Exception e) {
            borrowOrOprSuccess = false;
            if (jedis != null)
                jedisPool.returnBrokenResource(jedis);
        } finally {
            if (borrowOrOprSuccess)
                jedisPool.returnResource(jedis);
        }
        return result;
    }

    @Override
    public void putObject(Object key, Object value) {
        Jedis jedis = null;
        boolean borrowOrOprSuccess = true;
        try {
            jedis = jedisPool.getResource();
            jedis.select(DB_INDEX);

            byte[] keys = getKey(key).getBytes(UTF8);
            jedis.set(keys, SerializeUtil.serialize(value));
            logger.debug("添加缓存--------" + this.id);
            // getSize();
        } catch (Exception e) {
            borrowOrOprSuccess = false;
            if (jedis != null)
                jedisPool.returnBrokenResource(jedis);
        } finally {
            if (borrowOrOprSuccess)
                jedisPool.returnResource(jedis);
        }
    }

    @Override
    public Object getObject(Object key) {
        Jedis jedis = null;
        Object value = null;
        boolean borrowOrOprSuccess = true;
        try {
            jedis = jedisPool.getResource();
            jedis.select(DB_INDEX);
            value = SerializeUtil.unserialize(jedis.get(getKey(key).getBytes(UTF8)));
            logger.debug("从缓存中获取-----" + this.id);
            // getSize();
        } catch (Exception e) {
            borrowOrOprSuccess = false;
            if (jedis != null)
                jedisPool.returnBrokenResource(jedis);
        } finally {
            if (borrowOrOprSuccess)
                jedisPool.returnResource(jedis);
        }
        return value;
    }

    @Override
    public Object removeObject(Object key) {
        Jedis jedis = null;
        Object value = null;
        boolean borrowOrOprSuccess = true;
        try {
            jedis = jedisPool.getResource();
            jedis.select(DB_INDEX);
            value = jedis.del(getKey(key).getBytes(UTF8));
            logger.debug("LRU算法从缓存中移除-----" + this.id);
            // getSize();
        } catch (Exception e) {
            borrowOrOprSuccess = false;
            if (jedis != null)
                jedisPool.returnBrokenResource(jedis);
        } finally {
            if (borrowOrOprSuccess)
                jedisPool.returnResource(jedis);
        }
        return value;
    }

    @Override
    public void clear() {
        Jedis jedis = null;
        boolean borrowOrOprSuccess = true;
        try {
            jedis = jedisPool.getResource();
            jedis.select(DB_INDEX);
            // 如果有删除操作,会影响到整个表中的数据,因此要清空一个mapper的缓存(一个mapper的不同数据操作对应不同的key)
            Set<byte[]> keys = jedis.keys(getKeys().getBytes(UTF8));
            logger.debug("出现CUD操作,清空对应Mapper缓存======>" + keys.size());
            for (byte[] key : keys) {
                jedis.del(key);
            }
            // 下面是网上流传的方法,极大的降低系统性能,没起到加入缓存应有的作用,这是不可取的。
            // jedis.flushDB();
            // jedis.flushAll();
        } catch (Exception e) {
            borrowOrOprSuccess = false;
            if (jedis != null)
                jedisPool.returnBrokenResource(jedis);
        } finally {
            if (borrowOrOprSuccess)
                jedisPool.returnResource(jedis);
        }
    }

    @Override
    public ReadWriteLock getReadWriteLock() {
        return readWriteLock;
    }
}
- 1
- 2
- 3
- 4
- 5
- 6
- 7
- 8
- 9
- 10
- 11
- 12
- 13
- 14
- 15
- 16
- 17
- 18
- 19
- 20
- 21
- 22
- 23
- 24
- 25
- 26
- 27
- 28
- 29
- 30
- 31
- 32
- 33
- 34
- 35
- 36
- 37
- 38
- 39
- 40
- 41
- 42
- 43
- 44
- 45
- 46
- 47
- 48
- 49
- 50
- 51
- 52
- 53
- 54
- 55
- 56
- 57
- 58
- 59
- 60
- 61
- 62
- 63
- 64
- 65
- 66
- 67
- 68
- 69
- 70
- 71
- 72
- 73
- 74
- 75
- 76
- 77
- 78
- 79
- 80
- 81
- 82
- 83
- 84
- 85
- 86
- 87
- 88
- 89
- 90
- 91
- 92
- 93
- 94
- 95
- 96
- 97
- 98
- 99
- 100
- 101
- 102
- 103
- 104
- 105
- 106
- 107
- 108
- 109
- 110
- 111
- 112
- 113
- 114
- 115
- 116
- 117
- 118
- 119
- 120
- 121
- 122
- 123
- 124
- 125
- 126
- 127
- 128
- 129
- 130
- 131
- 132
- 133
- 134
- 135
- 136
- 137
- 138
- 139
- 140
- 141
- 142
- 143
- 144
- 145
- 146
- 147
- 148
- 149
- 150
- 151
- 152
- 153
- 154
- 155
- 156
- 157
- 158
- 159
- 160
- 161
- 162
- 163
- 164
- 165
- 166
- 167
- 168
- 169
- 170
- 171
- 172
- 173
- 174
- 175
- 176
- 177
- 178
- 179
- 180
- 181
- 182
- 183
- 184
- 185
- 186
- 187
- 188
- 189
- 190
- 191
- 192
- 193
- 194
- 195
然后,在mapper文件中添加下列一行使对应的表添加缓存支持:
<cache eviction="LRU" type="com.dg.cache.RedisCache" />
- 1
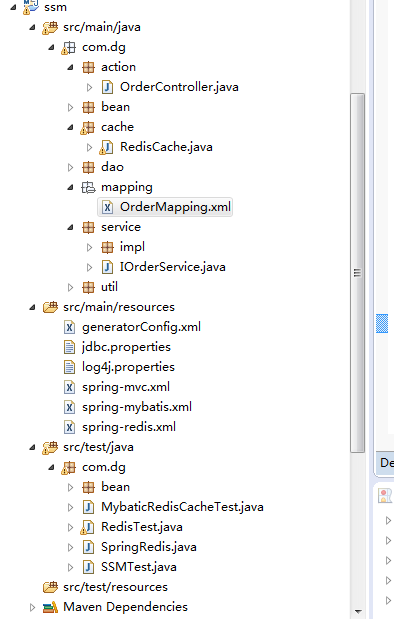
我是以订单表数据作为缓存目标的(通常我们只是对不常变动的数据进行缓存,如登陆用户信息、系统业务配置信息等,这里我用订单表只是作为范例),应用结构如下:
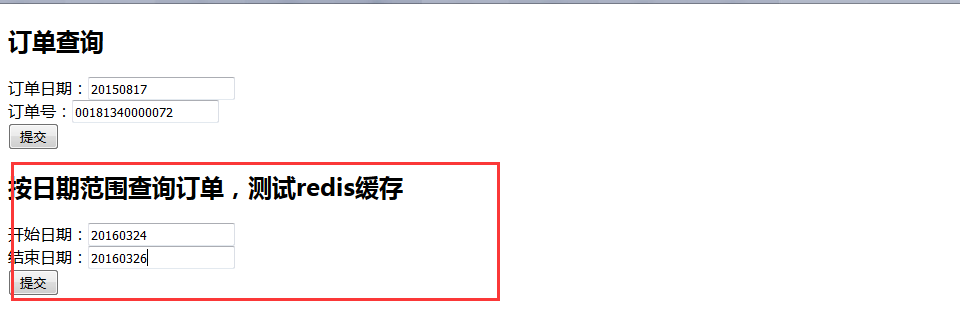
3.测试
测试缓存的话,我们建一个页面,然后查询日期范围的订单列表,如下效果:
看输出的日志:
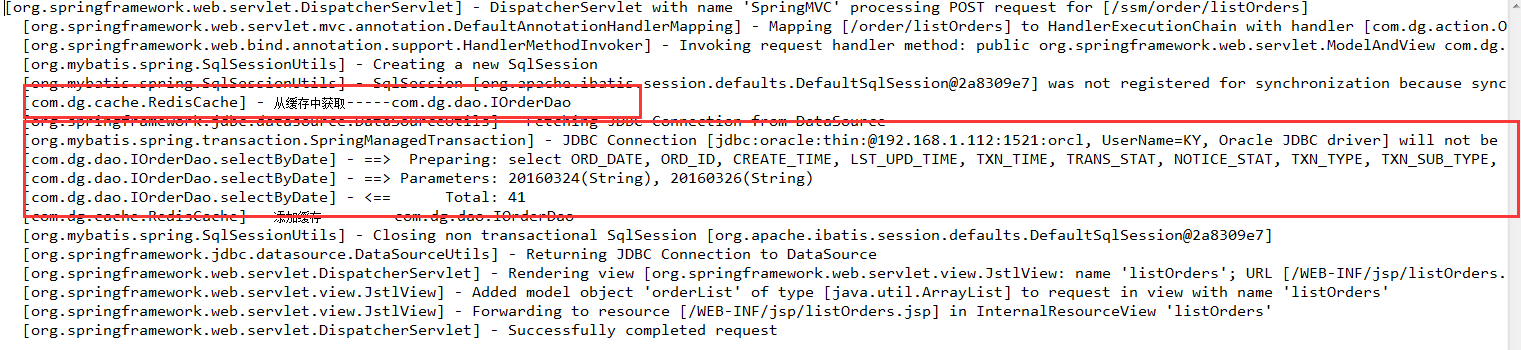
可以看出,初次查询的时候,有sql语句,将订单列表查询出之后放入了缓存中去;返回来在执行刚才的查询动作时,只有下面的输出,说明第二次没再查库,而是直接从redis缓存中去取。

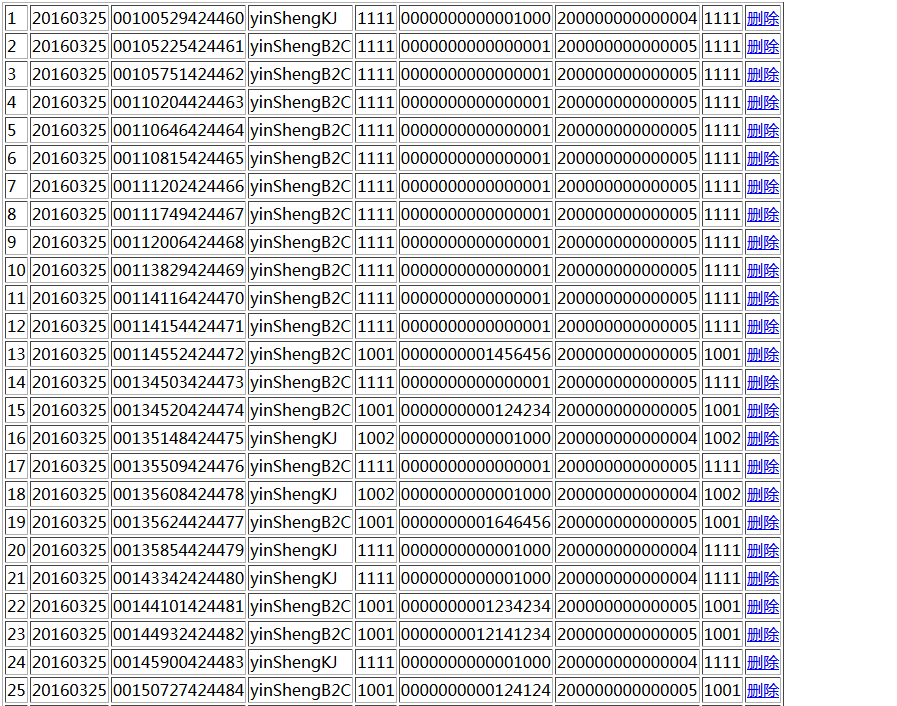
结果列表为:
以上只是简单介绍了redis和ssm的整合过程,如果需要完整的代码,到http://download.csdn.net/detail/donggang1992/9481612 下载。
转载地址:http://blog.csdn.net/donggang1992/article/details/51064962


 2万+
2万+

 被折叠的 条评论
为什么被折叠?
被折叠的 条评论
为什么被折叠?
 到【灌水乐园】发言


