


 该文详细介绍了如何配置防火墙以设置公网IP、VLAN、DHCP服务器、安全区域和策略,以及NAT转换。同时,也涵盖了交换机的VLAN配置,确保了PC设备能够获取IP并正常上网。最后,通过网络测试验证了配置的有效性。
拓扑图

一、防火墙设置
1、G1/0/0接口设置IP,G1/0/1接口切换二层口设置VLAN,G1/0/0 桥接了本地无线网卡来模拟公网地址
<USG6000V1>sys
[USG6000V1]sys FW1
[FW1]un in en
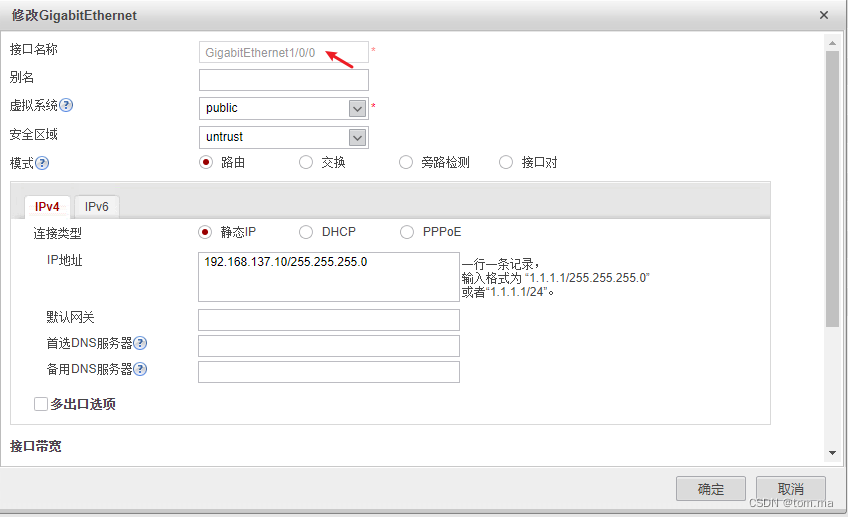
# 设置公网IP
[FW1]int g1/0/0
[FW1-GigabitEthernet1/0/0]ip addr 192.168.137.10 24
# 开启所有服务
[FW1-GigabitEthernet1/0/0]service-manage all permit
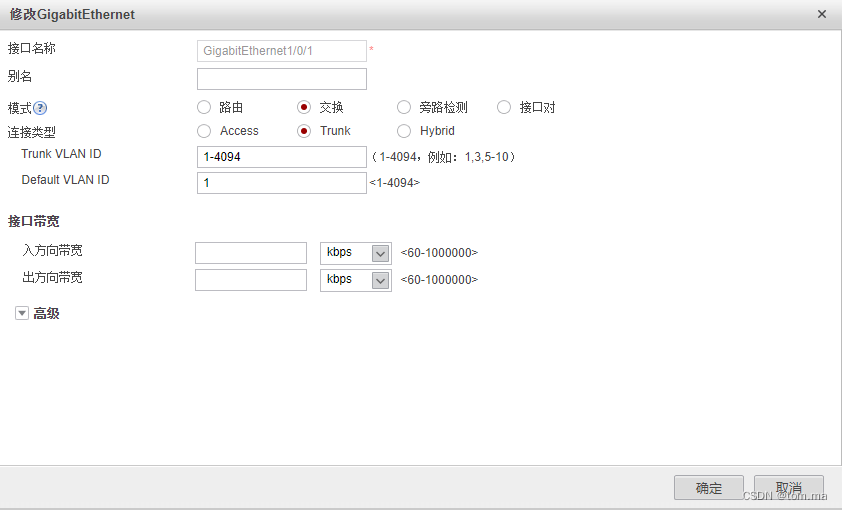
# 切换二层口并加入VLAN
[FW1-GigabitEthernet1/0/0]int g1/0/1
[FW1-GigabitEthernet1/0/1]portswitch
[FW1-GigabitEthernet1/0/1]p l t
[FW1-GigabitEthernet1/0/1]p t a v a
[FW1-GigabitEthernet1/0/1]quit2、VLANIF 配置 DHCP,开启PING服务
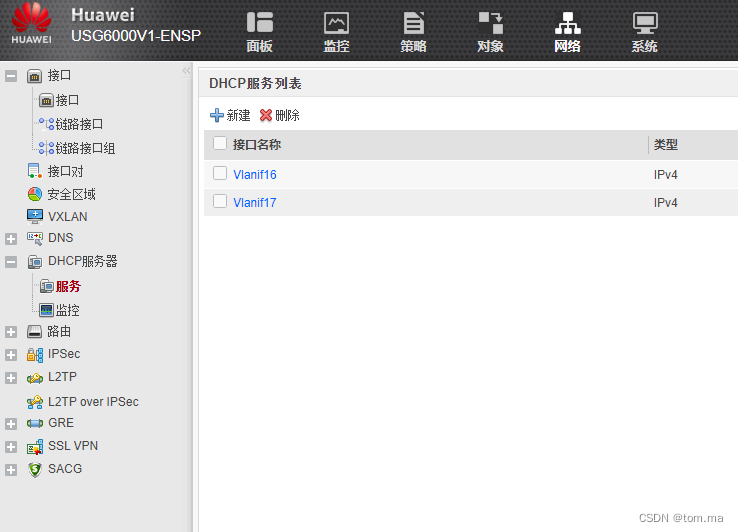
# 开启DHCP
[FW1]dhcp enable
# 创建VLAN
[FW1]vlan batch 16 17
# VLAN设置IP,基于接口开启DHCP
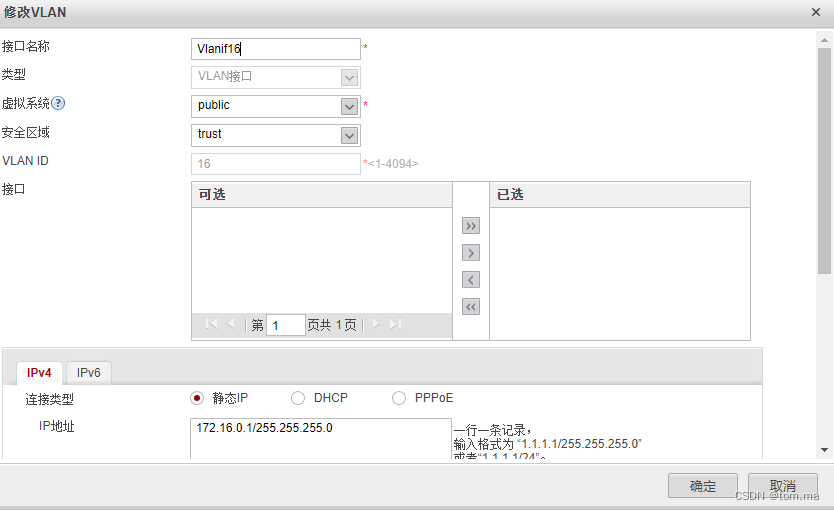
[FW1]int vlanif 16
[FW1-Vlanif16]ip addr 172.16.0.1 24
[FW1-Vlanif16]dhcp select int
[FW1-Vlanif16]dhcp server dns-list 114.114.114.114
# 单独开启PING服务
[FW1-Vlanif16]service-manage ping permit
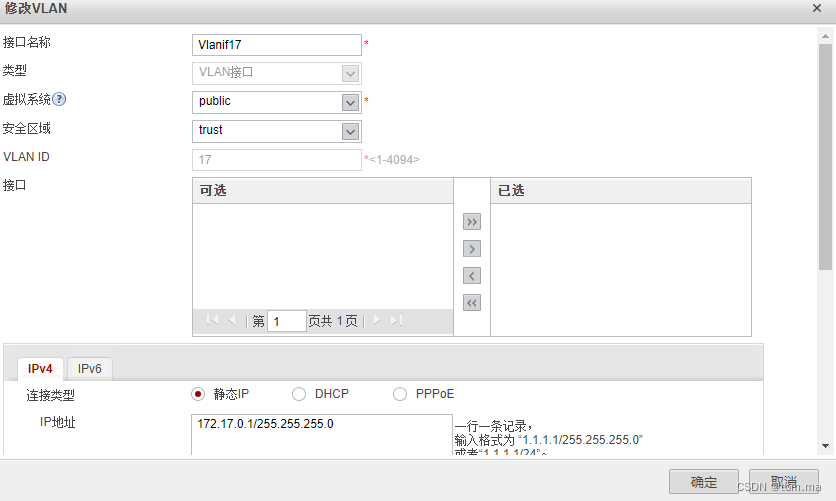
[FW1-Vlanif16]int vlanif 17
[FW1-Vlanif17]ip addr 172.17.0.1 24
[FW1-Vlanif17]service-manage ping permit
[FW1-Vlanif17]dhcp select int
[FW1-Vlanif17]dhcp server dns-list 114.114.114.114
[FW1-Vlanif17]service-manage ping permit
[FW1-Vlanif17]quit
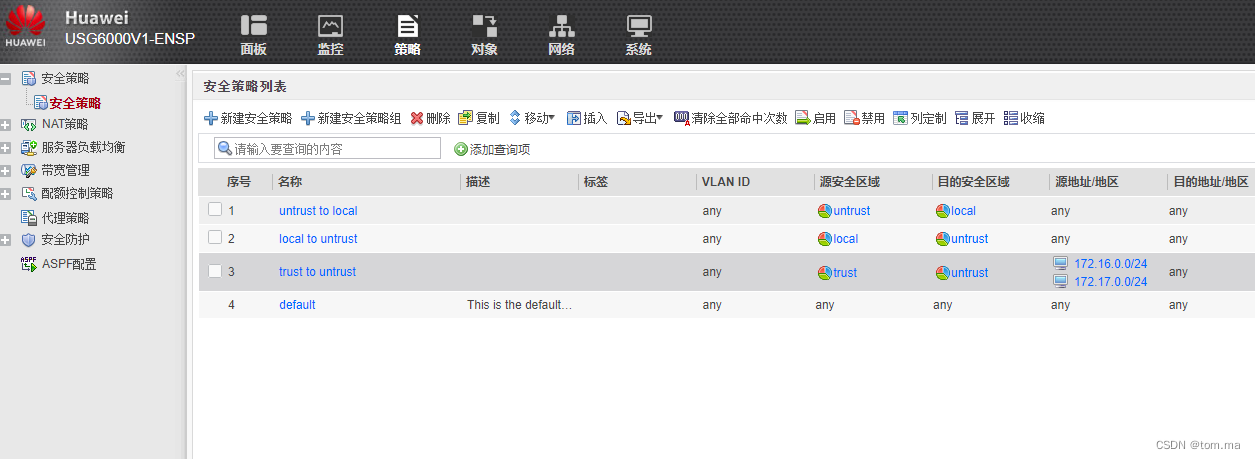
3、配置安全区域
# 配置安全区域
[FW1]firewall zone untrust
[FW1-zone-untrust]add int g1/0/0
[FW1-zone-untrust]firewall zone trust
[FW1-zone-trust]add int g1/0/1
[FW1-zone-trust]add int vlanif 16
[FW1-zone-trust]add int vlanif 17
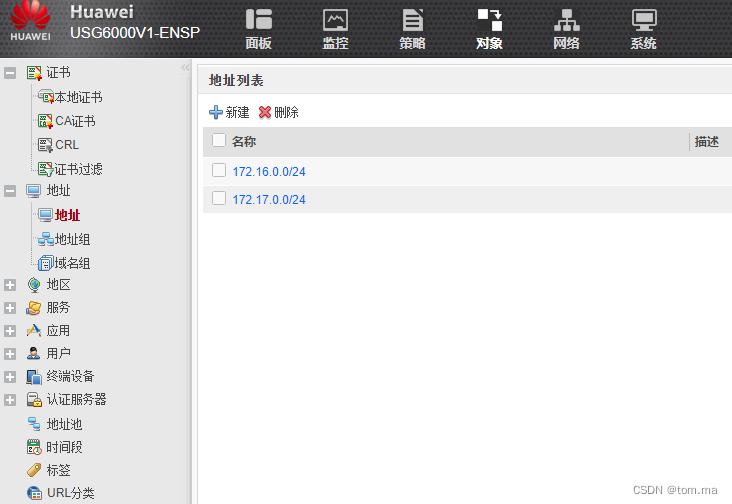
[FW1-zone-trust]quit4、创建地址列表
[FW1]ip address-set 172.16.0.0/24 type object
[FW1-object-address-set-172.16.0.0/24]address 0 172.16.0.0 mask 24
[FW1-object-address-set-172.16.0.0/24]ip address-set 172.17.0.0/24 type object
[FW1-object-address-set-172.17.0.0/24]address 0 172.17.0.0 mask 24
[FW1-object-address-set-172.17.0.0/24]quit
5、配置安全策略
[FW1]security-policy
[FW1-policy-security]rule name "untrust to local"
[FW1-policy-security-rule-untrust to local]source-zone untrust
[FW1-policy-security-rule-untrust to local]destination-zone local
[FW1-policy-security-rule-untrust to local]action permit
[FW1-policy-security-rule-untrust to local]rule name "local to untrust"
[FW1-policy-security-rule-local to untrust]source-zone local
[FW1-policy-security-rule-local to untrust]destination-zone untrust
[FW1-policy-security-rule-local to untrust]action permit
[FW1-policy-security-rule-local to untrust]rule name "trust to untrust"
[FW1-policy-security-rule-trust to untrust]source-zone trust
[FW1-policy-security-rule-trust to untrust]destination-zone untrust
[FW1-policy-security-rule-trust to untrust]source-address address-set 172.16.0.0/24
[FW1-policy-security-rule-trust to untrust]source-address address-set 172.17.0.0/24
[FW1-policy-security-rule-trust to untrust]action permit
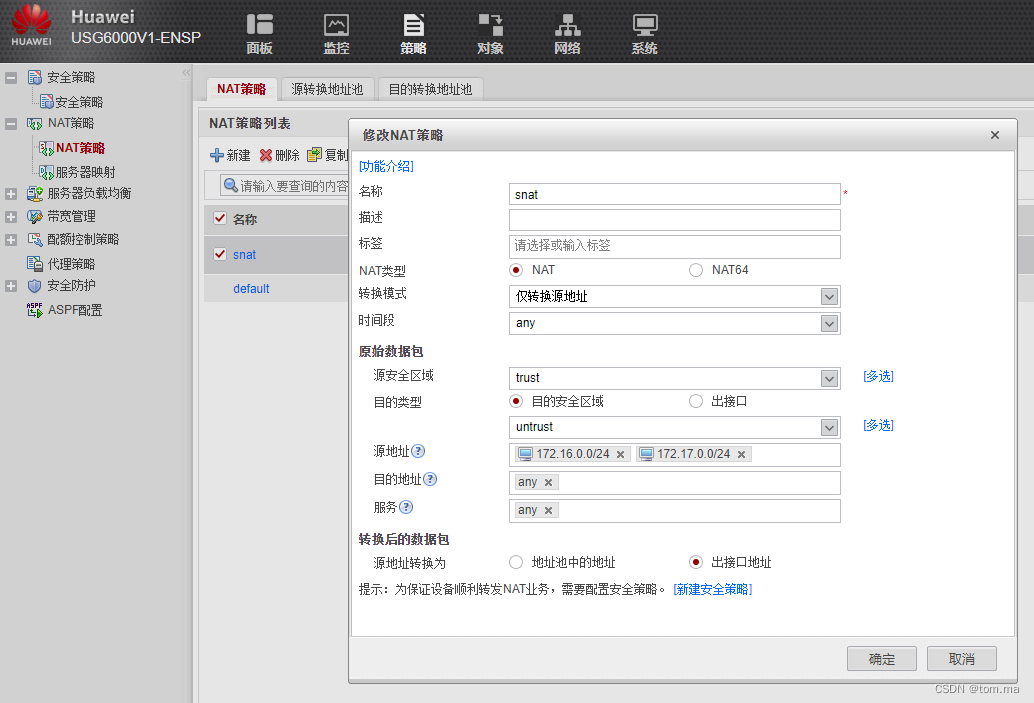
[FW1-policy-security-rule-trust to untrust]quit6、配置NAT策略
[FW1-policy-security]nat-policy
[FW1-policy-nat]rule name snat
[FW1-policy-nat-rule-snat]source-zone trust
[FW1-policy-nat-rule-snat]destination-zone untrust
[FW1-policy-nat-rule-snat]source-address address-set 172.16.0.0/24
[FW1-policy-nat-rule-snat]source-address address-set 172.17.0.0/24
[FW1-policy-nat-rule-snat]action source-nat easy-ip
7、设置默认路由
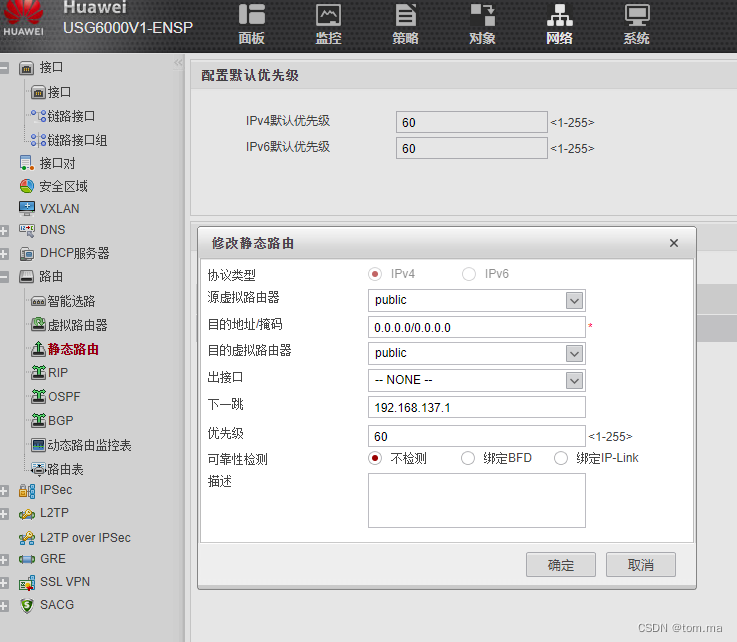
[FW1]ip route-static 0.0.0.0 0.0.0.0 192.168.137.18、配置DNS
[FW1]dns resolve
[FW1]dns server 114.114.114.114
二、交换机设置
1、配置
[Huawei]sys
[Huawei]sys sw1
[sw1]un in en

# 创建VLAN
[sw1]vlan batch 16 17

# 接口设置VLAN
[sw1]int e0/0/16
[sw1-Ethernet0/0/16]p l a
[sw1-Ethernet0/0/16]p d v 16

[sw1-Ethernet0/0/16]int e0/0/17
[sw1-Ethernet0/0/17]p l a
[sw1-Ethernet0/0/17]p d v 17

[sw1-Ethernet0/0/17]int e0/0/1
[sw1-Ethernet0/0/1]p l t
[sw1-Ethernet0/0/1]p t a v a
三、CLOUD 云设置
1、设置如下
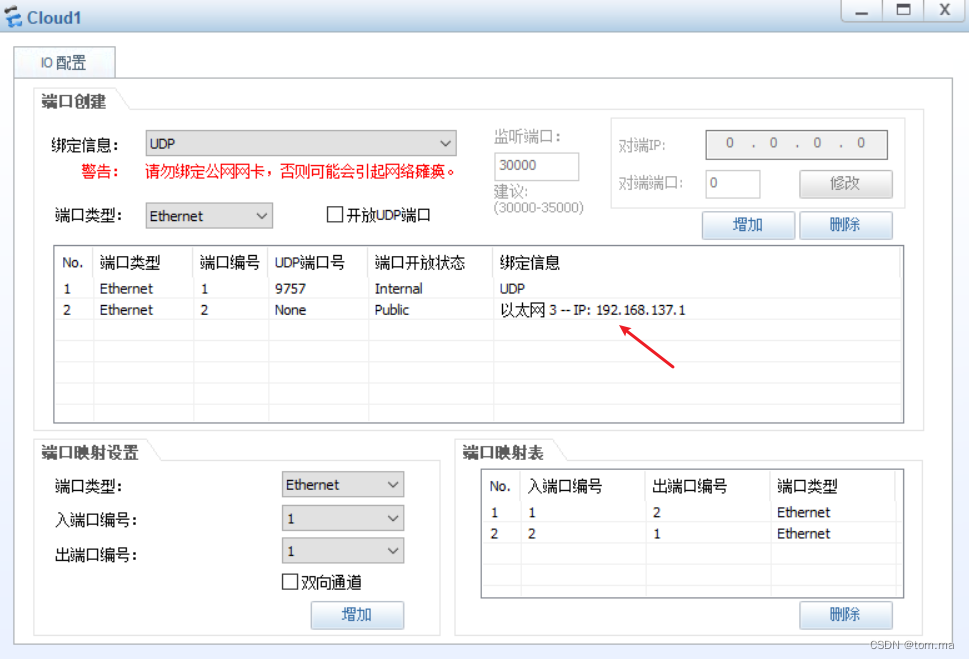
2、以太网3--IP:192.168.137.1是本地添加的一张环回网卡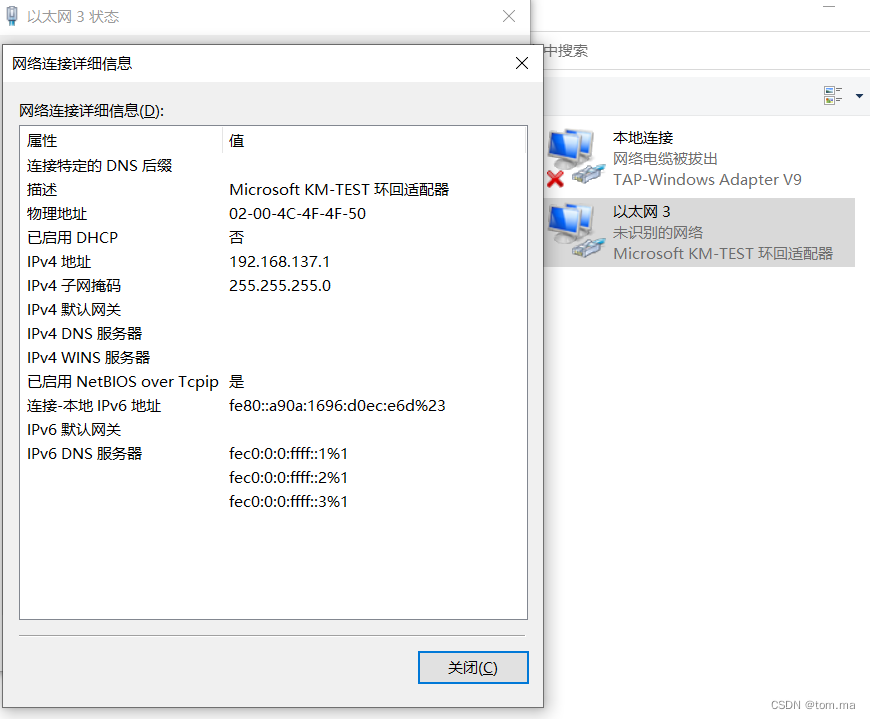
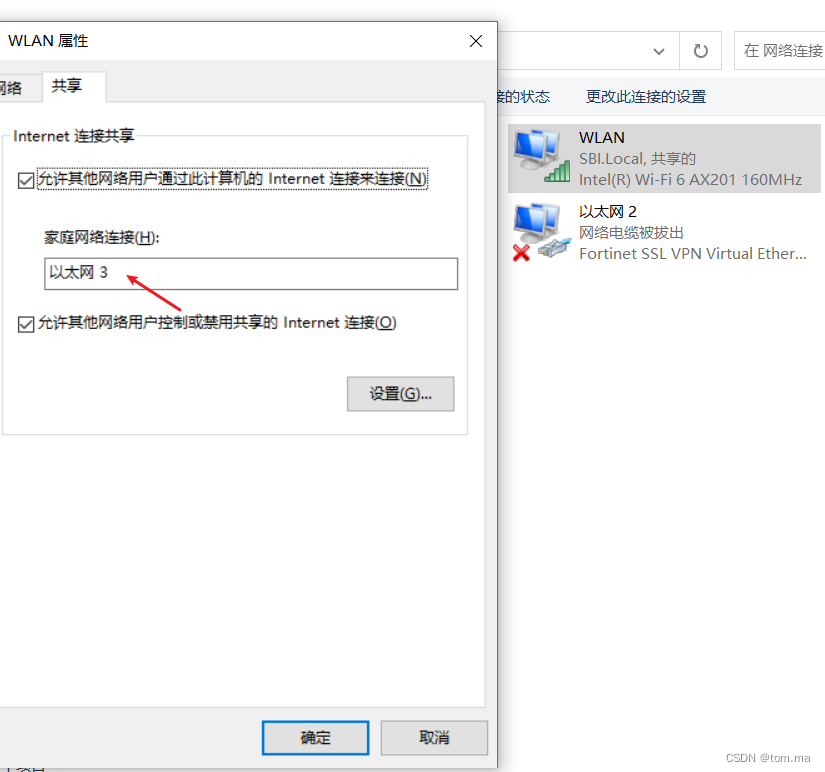
3、无线网卡共享给这张环回网卡,以实现上网,共享后环回网卡IP会自动变成 192.168.137.1,这里系统默认设置的IP
四、测试验证
1、首先查看防火墙能不能上网
# 外网网关
[FW1]ping 192.168.137.1
  PING 192.168.137.1: 56  data bytes, press CTRL_C to break
    Reply from 192.168.137.1: bytes=56 Sequence=1 ttl=128 time=3 ms
    Reply from 192.168.137.1: bytes=56 Sequence=2 ttl=128 time=3 ms
    Reply from 192.168.137.1: bytes=56 Sequence=3 ttl=128 time=2 ms
    Reply from 192.168.137.1: bytes=56 Sequence=4 ttl=128 time=2 ms
    Reply from 192.168.137.1: bytes=56 Sequence=5 ttl=128 time=1 ms

  --- 192.168.137.1 ping statistics ---
    5 packet(s) transmitted
    5 packet(s) received
    0.00% packet loss
    round-trip min/avg/max = 1/2/3 ms

# 正常访问外网
[FW1]ping 114.114.114.114
  PING 114.114.114.114: 56  data bytes, press CTRL_C to break
    Reply from 114.114.114.114: bytes=56 Sequence=1 ttl=78 time=35 ms
    Reply from 114.114.114.114: bytes=56 Sequence=2 ttl=63 time=32 ms
    Reply from 114.114.114.114: bytes=56 Sequence=3 ttl=64 time=46 ms
    Reply from 114.114.114.114: bytes=56 Sequence=4 ttl=62 time=42 ms
    Reply from 114.114.114.114: bytes=56 Sequence=5 ttl=82 time=39 ms

  --- 114.114.114.114 ping statistics ---
    5 packet(s) transmitted
    5 packet(s) received
    0.00% packet loss
    round-trip min/avg/max = 32/38/46 ms
2、PC1
# 成功获取IP
PC1>ipconfig

Link local IPv6 address...........: fe80::5689:98ff:fe42:4c93
IPv6 address......................: :: / 128
IPv6 gateway......................: ::
IPv4 address......................: 172.16.0.218
Subnet mask.......................: 255.255.255.0
Gateway...........................: 172.16.0.1
Physical address..................: 54-89-98-42-4C-93
DNS server........................: 114.114.114.114
3、PC2
PC2>ipconfig

Link local IPv6 address...........: fe80::5689:98ff:fe9c:4e3c
IPv6 address......................: :: / 128
IPv6 gateway......................: ::
IPv4 address......................: 172.17.0.102
Subnet mask.......................: 255.255.255.0
Gateway...........................: 172.17.0.1
Physical address..................: 54-89-98-9C-4E-3C
DNS server........................: 114.114.114.114
4、验证PC1 PC2能否上网
PC1>ping www.baidu.com

www.baidu.com -> www.a.shifen.com

Ping www.a.shifen.com [110.242.68.3]: 32 data bytes, Press Ctrl_C to break
From 110.242.68.3: bytes=32 seq=1 ttl=47 time=63 ms
From 110.242.68.3: bytes=32 seq=2 ttl=47 time=46 ms
From 110.242.68.3: bytes=32 seq=3 ttl=47 time=94 ms
From 110.242.68.3: bytes=32 seq=4 ttl=47 time=78 ms
From 110.242.68.3: bytes=32 seq=5 ttl=47 time=47 ms

--- 110.242.68.3 ping statistics ---
  5 packet(s) transmitted
  5 packet(s) received
  0.00% packet loss
  round-trip min/avg/max = 46/65/94 ms
5、验证PC1 PC2互通
PC1>ping 172.17.0.102

Ping 172.17.0.102: 32 data bytes, Press Ctrl_C to break
From 172.17.0.102: bytes=32 seq=1 ttl=127 time=62 ms
From 172.17.0.102: bytes=32 seq=2 ttl=127 time=63 ms
From 172.17.0.102: bytes=32 seq=3 ttl=127 time=47 ms
From 172.17.0.102: bytes=32 seq=4 ttl=127 time=47 ms
From 172.17.0.102: bytes=32 seq=5 ttl=127 time=62 ms

--- 172.17.0.102 ping statistics ---
  5 packet(s) transmitted
  5 packet(s) received
  0.00% packet loss
  round-trip min/avg/max = 47/56/63 ms
五、进入WEB管理界面
1、接口管理
int g1/0/0 接口
int g1/0/1 接口,已经转成二层接口
VLAN 16 接口
VLAN 17 接口
2、DHCP管理
3、安全策略
4、NAT策略
5、地址
6、静态路由
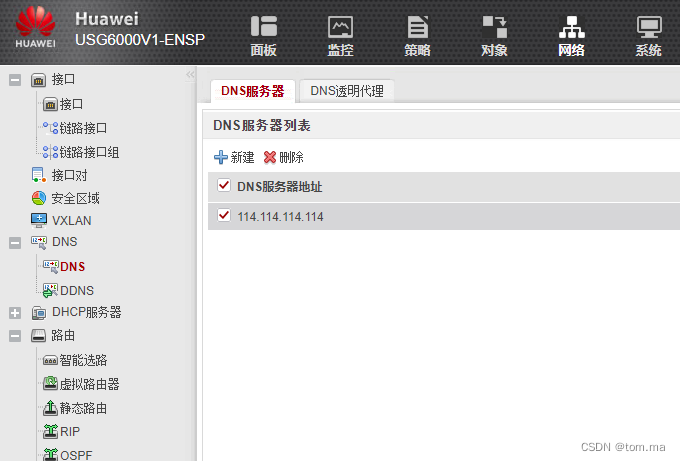
7、DNS管理


 1169
1169

 被折叠的 条评论
为什么被折叠?
被折叠的 条评论
为什么被折叠?
 到【灌水乐园】发言


