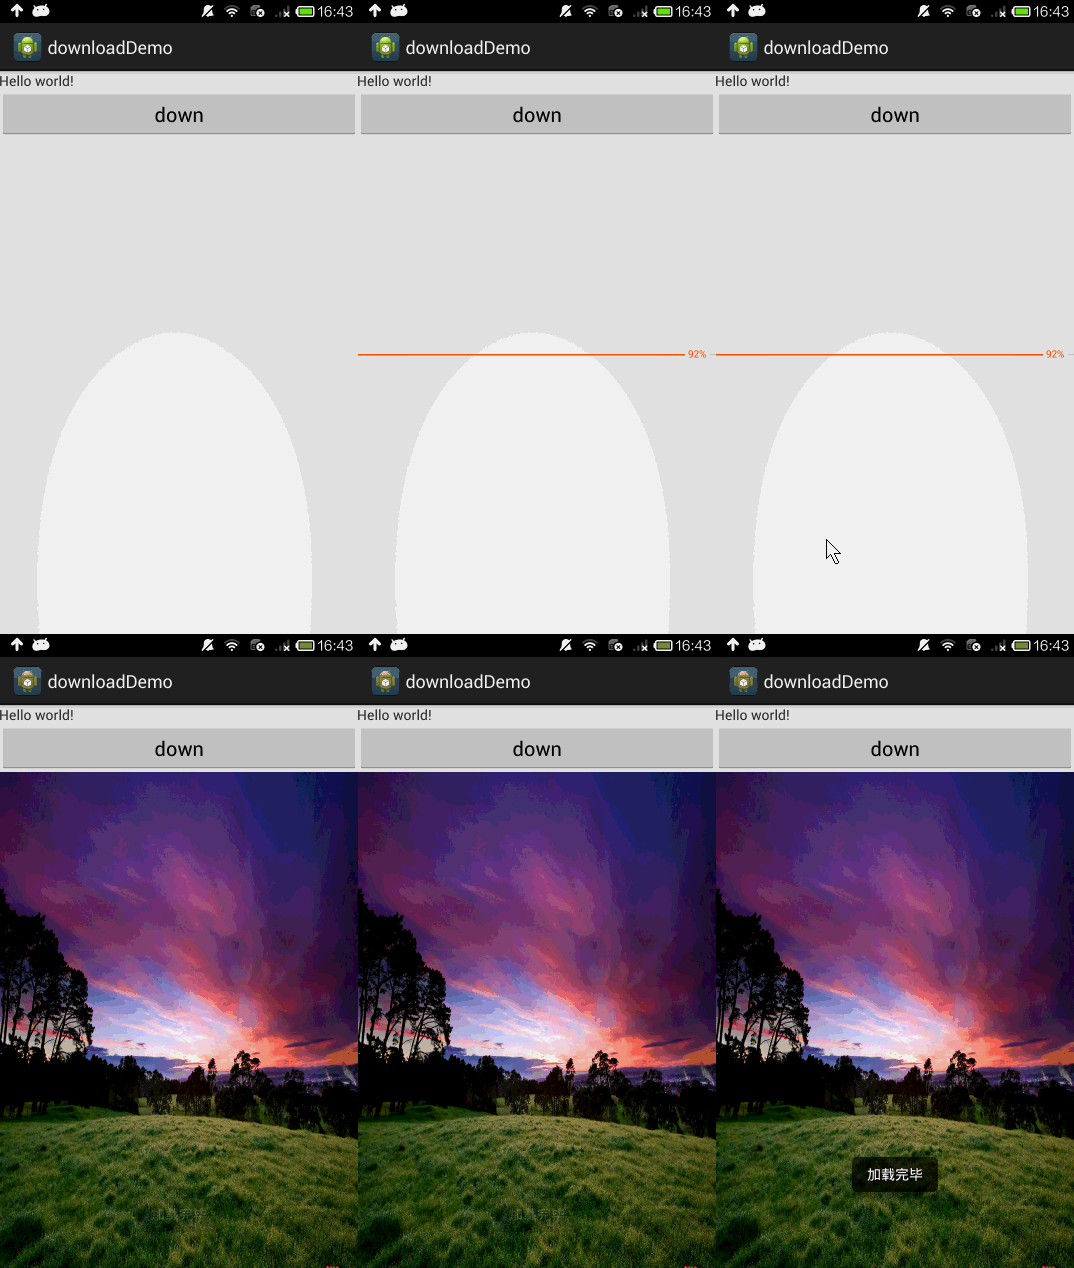
大家好 我是akira上一节 我们讲到使用AsyncTask 这个类进行异步的下载
主要是涉及到一些图片的更新 这次我们继续上一个demo的改进 。
不知道你是否发现一个问题 上一节我们遗留了两个bug 1 在无网络情况下 点击会崩
咱们说 软件开发最忌讳的就是crash 而这个是在bug解决方案中的一级要解决的 所以这个问题
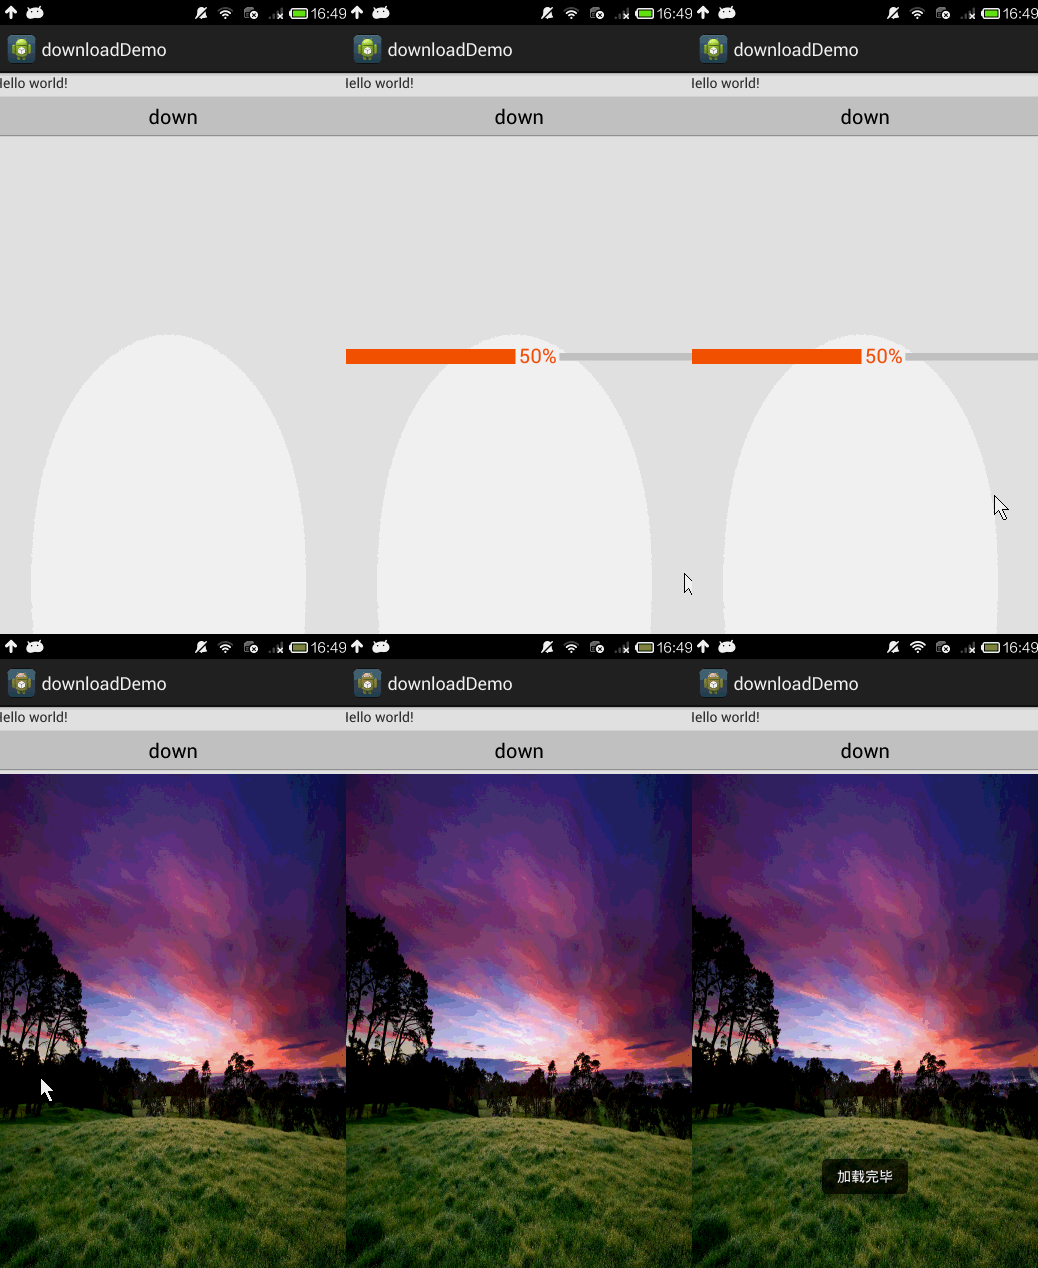
必须搞定 2 就是我们会发现进度并未更新 而图片是显示完毕了的 3 就是一个扩展 这次我将会带来
daimajia的新库 也是做库小达人的最新作品 NumberProgressBar的使用。
1 首先 咱们问题一个一个的解决 首先是第一个 点击会崩溃 那我们就要清楚 why
也就是为什么点击会崩溃 解决这个问题的源头要从原来的代码看起
下面这段代码
 try {
            HttpURLConnection connection = (HttpURLConnection) imageUrl.openConnection();
            connection.setDoInput(true);
            connection.connect();
            inputStream =  connection.getInputStream();
            downloadImg =  BitmapFactory.decodeStream(inputStream);

}没有流 就会造成 inputstream为null 而 再去加载一个null 自然而然 就XXX了 所以 我们找到根源 就是要判断得到的流是否为null
但 仅仅如此么 显然不是 我们最好从源头找到为什么没网 或者说是一个有网的监听 这样最好
说到网 有人自然会想到wifi 说道wifi有人自然会想当然是去想到一个类叫做wifiManager 好 我就满足你的需求
来解析下wifiManager会不会提供一个有没有网的方法 来去判断
先看下wifiManager的实例化
WifiManager manager = (WifiManager) getSystemService(WIFI_SERVICE);
wifiState = manager.getWifiState();//wifi状态而第二句就是很多人想要的那个状态 究竟是不是想要的呢 我们继续往下看
这里面的状态 我也写下来了
private  final int  WIFI_STATE_DISABLING = 0 ;//表示停用中。
    private  final int  WIFI_STATE_DISABLED  = 1; //表示不可用。
    private  final int  WIFI_STATE_ENABLING  = 2; //表示启动中。
    private  final int  WIFI_STATE_ENABLED   = 3; //表示准备就绪。
private final int WIFI_STATE_UNKNOWN = 4; //表示未知状态。我们发现最靠谱的启动中似乎也不能满足我们的需求 这个时候有些人也许开始怀疑人生 忘了说
如果你想监听wifi的状态 你还需要加上权限
如下
 <uses-permission android:name="android.permission.ACCESS_WIFI_STATE" />
    <uses-permission android:name="android.permission.ACCESS_NETWORK_STATE" />
但是 根本的问题还是没解决呀
所以 别怀疑了 咱从头来过吧
这个时候 有人提到了 ConnectivityManager 咦? 这个行不行呢
咱来看看
ConnectivityManager cManager =  (ConnectivityManager)getSystemService(CONNECTIVITY_SERVICE);
NetworkInfo mInfo =  cManager.getNetworkInfo(ConnectivityManager.TYPE_WIFI);
yahoo!!! 不错 看起来挺靠谱 继续往下深究
mInfo.isAvailable()这个api就是告诉你网络是否可用 前面那个type有很多 这里面就说了wifi的 都比较简单 咱就不去官网看了
然后 你想怎么做 是判断当前网络可用就点击么 nono 万一url为空怎么办 考虑到严谨性和代码的健壮性 咱们
要进行并且的判断
并且去设置按钮是否为可点
Button downBtn = (Button) findViewById(R.id.downBtn);
        if (mInfo.isAvailable() && !TextUtils.isEmpty(url)){
                downBtn.setClickable(true);
                downBtn.setOnClickListener(new View.OnClickListener() {
                @Override
                public void onClick(View view) {
                    new ImageDownloadTask(MainActivity.this,img,bar).execute(url);

                }
             });
        }else{
            downBtn.setClickable(false);
            downBtn.setOnClickListener(null);
            Toast.makeText(MainActivity.this,"当前无wifi",Toast.LENGTH_SHORT).show();
        }
OK 外面的逻辑 咱们处理完了 解决了1 crash
PS: 其实这里解决网络很不专业 一般在正式项目里 我们都会写一个广播接受 去观察网络是否可用 这个放到以后
广播的时候再讲
2 关于更新进度 首先 我很清楚一点 如果我要更新一个进度 我肯定要知道一个
总进度 一个当前进度 还有一个通知其刷的这么一个方法
OK 来看关键代码
int totalLength;//总共长度
        URL imageUrl = null;//图片的url
        int length = -1;
        InputStream inputStream = null;
        try {
            imageUrl = new URL(params[0]);
            HttpURLConnection connection = (HttpURLConnection) imageUrl.openConnection();
            connection.setDoInput(true);
            connection.connect();
            inputStream =  connection.getInputStream();
            totalLength = connection.getContentLength();
            if(inputStream!=null){
                ByteArrayOutputStream baos = new ByteArrayOutputStream();
                byte[] buffer = new byte[1024];
                int count = 0;
                while ((length = inputStream.read(buffer)) != -1) {
                    baos.write(buffer, 0, length);
                    count += length;
                    //这句通知upXXX更新进度
                    publishProgress((int) ((count / (float) totalLength) * 100));
                }
                byte[] data=baos.toByteArray();//声明字节数组
                downloadImg=BitmapFactory.decodeByteArray(data, 0, data. length);
                return "ok";
            }
        }
这里面 咱用一个流去写 然后加载的时候从流利去拿 而总长度有一个getContentLength的方法
最后 刷新 看到那个publishProgress了么 那个就是刷新方法
@Override
    protected void onProgressUpdate(Integer... progress) {
          super.onProgressUpdate(progress[0]);
          mBar.setProgress(progress[0]);
          Log.e("akira",progress[0]+"...");
    }
同样 这里进行刷新 注意 progress是一个可变数组
下面我用log打印了下 不打印无所谓
最后post方法没修改
3
daimajia的库 首先 我们需要找到daimajia的库
以下url
https://github.com/daimajia/NumberProgressBar
写的已经非常非常非常清楚了
Eclipse和andriodstudio都有各自的导入方式 就不赘述了
有些如果你发现你导入之后 找不到style 你可以手动去拷它里面的样式
下面是我的layout代码
<RelativeLayout xmlns:android="http://schemas.android.com/apk/res/android"
    xmlns:tools="http://schemas.android.com/tools"
    xmlns:custom="http://schemas.android.com/apk/res-auto"
    android:layout_width="match_parent"
    android:layout_height="match_parent"
    tools:context=".MainActivity"
    >

    <TextView
        android:id="@+id/hello"
        android:text="@string/hello_world" android:layout_width="wrap_content"
        android:layout_height="wrap_content" />

    <Button
        android:layout_below="@id/hello"
        android:id="@+id/downBtn"
        android:text="down"
        android:textSize="20sp"
        android:textColor="@android:color/black"
        android:layout_width="match_parent"
        android:layout_height="wrap_content" />

    <ImageView
        android:layout_centerInParent="true"
        android:layout_below="@id/downBtn"
        android:id="@+id/img"
        android:layout_width="wrap_content"
        android:layout_height="wrap_content"
        android:scaleType="fitXY"
        android:visibility="gone"
        />

    <com.daimajia.numberprogressbar.NumberProgressBar
        style="@style/NumberProgressBar_Funny_Orange"
        android:id="@+id/bar"
        android:layout_centerInParent="true"
        android:layout_width="wrap_content"
        android:layout_height="wrap_content"
        android:visibility="gone"
        />
    <!--<ProgressBar
        android:id="@+id/bar"
        android:layout_centerInParent="true"
        android:layout_width="wrap_content"
        android:layout_height="wrap_content"
        android:visibility="gone"
        />-->

</RelativeLayout>
这里面 你会发现 我的custom命名空间没有用到 为毛 因为我把有些东西全部用一个style代表了
不行你看
<style name="NumberProgressBar_Funny_Orange">
        <item name="android:layout_height">wrap_content</item>
        <item name="android:layout_width">match_parent</item>
        <item name="max">100</item>
        <item name="progress">0</item>
        <item name="progress_unreached_color">#CCCCCC</item>
        <item name="progress_reached_color">#FF530D</item>
        <item name="progress_text_size">10sp</item>
        <item name="progress_text_color">#FF530D</item>
        <item name="progress_reached_bar_height">1.5dp</item>
        <item name="progress_unreached_bar_height">0.75dp</item>
    </style>
这里面 你会发现 他定义了 宽高 max 进度 颜色 和字体颜色 大小等等
所以直接用就可以了
main代码修改
public class MainActivity extends Activity {
    String url ;
    private  final int  WIFI_STATE_DISABLING = 0 ;//表示停用中。
    private  final int  WIFI_STATE_DISABLED  = 1; //表示不可用。
    private  final int  WIFI_STATE_ENABLING  = 2; //表示启动中。
    private  final int  WIFI_STATE_ENABLED   = 3; //表示准备就绪。
    private  final int  WIFI_STATE_UNKNOWN   = 4; //表示未知状态。
    private  NetworkInfo mInfo;
    private ConnectivityManager cManager;
    private Button downBtn;
    @Override
    protected void onCreate(Bundle savedInstanceState) {
        super.onCreate(savedInstanceState);
        setContentView(R.layout.activity_main);
        if(TextUtils.isEmpty(url))
            url = "http://bbra.cn/Uploadfiles/imgs/20110303/fengjin/015.jpg";
        final NumberProgressBar bar = (NumberProgressBar) findViewById(R.id.bar);
        final ImageView img = (ImageView) findViewById(R.id.img);
        final WifiManager manager = (WifiManager) getSystemService(WIFI_SERVICE);
        int wifiState =  manager.getWifiState();//wifi状态
        cManager = (ConnectivityManager)getSystemService(CONNECTIVITY_SERVICE);
        mInfo =  cManager.getNetworkInfo(ConnectivityManager.TYPE_WIFI);
        downBtn = (Button) findViewById(R.id.downBtn);
        if (mInfo.isAvailable() && !TextUtils.isEmpty(url)){
                downBtn.setClickable(true);
                downBtn.setOnClickListener(new View.OnClickListener() {
                @Override
                public void onClick(View view) {
                    new ImageDownloadTask(MainActivity.this,img,bar).execute(url);

                }
             });
        }else{
            downBtn.setClickable(false);
            downBtn.setOnClickListener(null);
            Toast.makeText(MainActivity.this,"当前无wifi",Toast.LENGTH_SHORT).show();
        }

    }


}
ImageDownXXX代码修改
/**
 * Created by akira on 2015/1/27.
 */
public class ImageDownloadTask extends AsyncTask<String,Integer,String> {
    private Bitmap downloadImg;
    private NumberProgressBar mBar;
    private Context mContext;
    private ImageView netImageView;
    private int perPro;//递增的进度
    public ImageDownloadTask(Context context, ImageView imageView, NumberProgressBar bar){
        this.mContext = context;
        this.netImageView = imageView;
        this.mBar = bar;
        mBar.incrementProgressBy(perPro);
    }

    @Override
    protected void onPreExecute() {
//        super.onPreExecute();
        mBar.setVisibility(View.VISIBLE);
    }

    @Override
    protected String doInBackground(String... params) {
        int totalLength;//总共长度
        URL imageUrl = null;//图片的url
        int length = -1;
        InputStream inputStream = null;
        try {
            imageUrl = new URL(params[0]);
            HttpURLConnection connection = (HttpURLConnection) imageUrl.openConnection();
            connection.setDoInput(true);
            connection.connect();
            inputStream =  connection.getInputStream();
            totalLength = connection.getContentLength();
            if(inputStream!=null){
                ByteArrayOutputStream baos = new ByteArrayOutputStream();
                byte[] buffer = new byte[1024];
                int count = 0;
                while ((length = inputStream.read(buffer)) != -1) {
                    baos.write(buffer, 0, length);
                    count += length;
                    //这句通知upXXX更新进度
                    publishProgress((int) ((count / (float) totalLength) * 100));
                }
                byte[] data=baos.toByteArray();//声明字节数组
                downloadImg=BitmapFactory.decodeByteArray(data, 0, data. length);
                return "ok";
            }
        } catch (MalformedURLException e) {
            e.printStackTrace();
        } catch (IOException e) {
            e.printStackTrace();
        }finally {
            try {
                inputStream.close();
            } catch (IOException e) {
                e.printStackTrace();
            }
        }

        return null;
    }

    @Override
    protected void onProgressUpdate(Integer... progress) {
          super.onProgressUpdate(progress[0]);
          mBar.setProgress(progress[0]);
          Log.e("akira",progress[0]+"...");
    }


    @Override
    protected void onPostExecute(String result) {
//        super.onPostExecute(s);
         mBar.setVisibility(View.GONE);
         netImageView.setVisibility(View.VISIBLE);
         netImageView.setImageBitmap(downloadImg);
         Toast.makeText(mContext,"加载完毕",Toast.LENGTH_LONG).show();
    }
}
什么 你没看起清楚? 没事 onemoretime!
OK 三个问题搞定 下一次 咱们来动态设置progress的style 以及写一个自己的progressbar
各位下期再会!


 4611
4611

 被折叠的 条评论
为什么被折叠?


