


环境说明:
os 版本:CentOS 7.8
服务版本:mysql-5.7.22,keepalived-2.0.10
Mysql-1 ip:192.168.139.128
Mysql-2 ip:192.168.139.129
vip:192.168.139.141
关闭防火墙
setenforce 0 && sed -i 's/^SELINUX=.*/SELINUX=disabled/' /etc/selinux/config
source /etc/selinux/config
systemctl stop firewalld && systemctl disabled firewalld


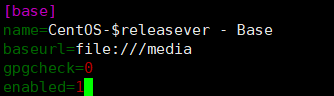
配置本地yum源
mount /dev/cdrom /media
#挂载本地光盘镜像到/media

cd /etc/yum.repos.d/
mkdir bak  && mv CentOS* bak
cp bak/CentOS-Base.repo . && vi CentOS-Base.repo
部署Mysql
#解压mysql软件包
tar -xvf mysql-5.7.22-linux-glibc2.12-x86_64.tar.gz -C /usr/local/
cd /usr/local
mv mysql-5.7.22-linux-glibc2.12-x86_64 mysql
#卸载旧版本
rpm -qa | grep -E 'mysql|mariadb'
rpm -e mariadb-libs --nodeps
#创建mysql数据库管理用户和组
groupadd mysql
useradd -g mysql -s /bin/false -M mysql
#创建数据目录
mkdir /usr/local/mysql/data/
chown -R mysql:mysql /usr/local/mysql
chmod 755 /usr/local/mysql/data/
#配置环境变量
echo "
export PATH=$PATH:/usr/local/mysql/bin
" >> /etc/profile

source /etc/profile
#创建my.cnf配置文件
vim /etc/my.cnf
[client]
socket=/var/lib/mysql/mysql.sock

[mysqld]
user=mysql
basedir=/usr/local/mysql
datadir=//usr/local/mysql/data
pid-file=/usr/local/mysql/data/mysql.pid
socket=/var/lib/mysql/mysql.sock
log-error=/usr/local/mysql/data/mysql.err

#validate_password = off

character-set-server=utf8
default-storage-engine=INNODB
sql_mode="STRICT_TRANS_TABLES,NO_ZERO_IN_DATE,NO_ZERO_DATE,ERROR_FOR_DIVISION_BY_ZERO,NO_AUTO_CREATE_USER,NO_ENGINE_SUBSTITUTION"

[msyql]
default-character-set=utf8
#新建本地连接文件目录
mkdir /var/lib/mysql
chmod 777 /var/lib/mysql
#初始化数据目录
cd /usr/local/mysql/
bin/mysqld --initialize --user=mysql --basedir=/usr/local/mysql --datadir=/usr/local/mysql/data
#配置MySQL启动
cp support-files/mysql.server /etc/init.d/mysqld
启动mysql服务
/etc/init.d/mysqld start
#初始化数据库
获取临时密码
grep "password" /usr/local/mysql/data/mysql.err
mysql -uroot -p
Enter password:
mysql>ALTER USER 'root'@'localhost' IDENTIFIED BY 'mysql';
mysql>quit

配置远程连接
mysql -uroot -p
Enter password:
#授权 所有权限(all),所有数据库(*.*) 给 用户名(root),任何主机(%),密码(mysql)
mysql>grant all privileges on *.* to 'root'@'%' identified by 'mysql' with grant option;
#刷新权限使其立即生效
mysql>flush privileges;
#退出MySQL
mysql>quit
#修改 MySQL 配置文件
两台 MySQL 均要开启 binlog 日志功能,开启方法:在 MySQL 配置文件[MySQLd]段中加上log-bin=MySQL-bin 选项,两台 MySQL 的 server-ID 不能一样,默认情况下两台 MySQL 的serverID 都是 1,需将其中一台修改为 2 即可。
Mysql-1 和 Mysql-2 只有 server-id 不同和 auto-increment-offset 不同。
mysql 中有自增长字段,在做数据库的主主同步时需要设置自增长的两个相关配置:auto_increment_offset 和 auto_increment_increment。auto-increment-increment 表示自增长字段每次递增的量,其默认值是 1。 它的值应设为整个结构中服务器的总数,本案例用到两台服务器,所以值设为 2。auto-increment-offset 是用来设定数据库中自动增长的起点(即初始值),因为这两能服务器都设定了一次自动增长值 2,所以它们的起点必须得不同,这样才能避免两台服务器数据同步时出现主键冲突。
(Mysql-1)
vim /etc/my.cnf

server-id = 1
log-bin= mysql-bin
binlog_format = mixed
relay-log = relay-bin
relay-log-index = slave-relay-bin.index
auto-increment-increment = 2
auto-increment-offset = 1

(Mysql-2)
vim /etc/my.cnf

server-id = 2
log-bin= mysql-bin
binlog_format = mixed
relay-log = relay-bin
relay-log-index = slave-relay-bin.index
auto-increment-increment = 2
auto-increment-offset = 2
#将 SQL-1 设为 SQL-2 的主服务器在 SQL-1 主机上创建授权账户,允许在SQL-2(192.168.139.129)主机上连接
mysql -uroot -p
Enter password:
mysql>grant replication slave on *.* to 'root'@'192.168.139.%' identified by 'mysql';
#查看binlog状态信息
mysql>show master status;
+------------------+----------+--------------+------------------+-------------------+
| File             | Position | Binlog_Do_DB | Binlog_Ignore_DB | Executed_Gtid_Set |
+------------------+----------+--------------+------------------+-------------------+
| mysql-bin.000001 |      154 |              |                  |                   |
+------------------+----------+--------------+------------------+-------------------+
1 row in set (0.12 sec)
在 SQL-2 上将 SQL-1 设为自已的主服务器并开启 slave 功能。
mysql -uroot -p
Enter password:
mysql>change master to master_host='192.168.139.128',master_user='root',master_password='mysql',master_log_file='mysql-bin.000001',master_log_pos=154;
#开启 slave
mysql> start slave;
mysql> show slave status\G;
*************************** 1. row ***************************
               Slave_IO_State: Waiting for master to send event
                  Master_Host: 192.168.139.128
                  Master_User: root
                  Master_Port: 3306
                Connect_Retry: 60
              Master_Log_File: mysql-bin.000001
          Read_Master_Log_Pos: 154
               Relay_Log_File: relay-bin.000002
                Relay_Log_Pos: 320
        Relay_Master_Log_File: mysql-bin.000001
             Slave_IO_Running: Yes
            Slave_SQL_Running: Yes
              Replicate_Do_DB:
          Replicate_Ignore_DB:
           Replicate_Do_Table:
       Replicate_Ignore_Table:
      Replicate_Wild_Do_Table:
  Replicate_Wild_Ignore_Table:
                   Last_Errno: 0
                   Last_Error:
                 Skip_Counter: 0
          Exec_Master_Log_Pos: 154
              Relay_Log_Space: 521
              Until_Condition: None
               Until_Log_File:
                Until_Log_Pos: 0
           Master_SSL_Allowed: No
           Master_SSL_CA_File:
           Master_SSL_CA_Path:
              Master_SSL_Cert:
            Master_SSL_Cipher:
               Master_SSL_Key:
        Seconds_Behind_Master: 0
Master_SSL_Verify_Server_Cert: No
                Last_IO_Errno: 0
                Last_IO_Error:
               Last_SQL_Errno: 0
               Last_SQL_Error:
  Replicate_Ignore_Server_Ids:
             Master_Server_Id: 1
                  Master_UUID: 88634c89-a1a2-11eb-8e4f-000c29a40623
             Master_Info_File: /usr/local/mysql/data/master.info
                    SQL_Delay: 0
          SQL_Remaining_Delay: NULL
      Slave_SQL_Running_State: Slave has read all relay log; waiting for more updates
           Master_Retry_Count: 86400
                  Master_Bind:
      Last_IO_Error_Timestamp:
     Last_SQL_Error_Timestamp:
               Master_SSL_Crl:
           Master_SSL_Crlpath:
           Retrieved_Gtid_Set:
            Executed_Gtid_Set:
                Auto_Position: 0
         Replicate_Rewrite_DB:
                 Channel_Name:
           Master_TLS_Version:
1 row in set (0.03 sec)

ERROR:
No query specified

mysql>
#将 SQL-2 设为 SQL-1 的主服务器在 SQL-2 主机上创建授权账户,允许在SQL-1(192.168.139.128)主机上连接
mysql -uroot -p
Enter password:
mysql>grant replication slave on *.* to 'root'@'192.168.139.%' identified by 'mysql';
#查看binlog状态信息
mysql>show master status;
+------------------+----------+--------------+------------------+-------------------+
| File             | Position | Binlog_Do_DB | Binlog_Ignore_DB | Executed_Gtid_Set |
+------------------+----------+--------------+------------------+-------------------+
| mysql-bin.000001 |      454 |              |                  |                   |
+------------------+----------+--------------+------------------+-------------------+
1 row in set (0.01 sec)
在 SQL-1 上将 SQL-2 设为自已的主服务器并开启 slave 功能。
mysql -uroot -p
Enter password:
mysql>change master to master_host='192.168.139.129',master_user='root',master_password='mysql',master_log_file='mysql-bin.000001',master_log_pos=454;
#开启 slave
mysql> start slave;
mysql> show slave status\G;
*************************** 1. row ***************************
               Slave_IO_State: Waiting for master to send event
                  Master_Host: 192.168.139.129
                  Master_User: root
                  Master_Port: 3306
                Connect_Retry: 60
              Master_Log_File: mysql-bin.000001
          Read_Master_Log_Pos: 454
               Relay_Log_File: relay-bin.000002
                Relay_Log_Pos: 320
        Relay_Master_Log_File: mysql-bin.000001
             Slave_IO_Running: Yes
            Slave_SQL_Running: Yes
              Replicate_Do_DB:
          Replicate_Ignore_DB:
           Replicate_Do_Table:
       Replicate_Ignore_Table:
      Replicate_Wild_Do_Table:
  Replicate_Wild_Ignore_Table:
                   Last_Errno: 0
                   Last_Error:
                 Skip_Counter: 0
          Exec_Master_Log_Pos: 454
              Relay_Log_Space: 521
              Until_Condition: None
               Until_Log_File:
                Until_Log_Pos: 0
           Master_SSL_Allowed: No
           Master_SSL_CA_File:
           Master_SSL_CA_Path:
              Master_SSL_Cert:
            Master_SSL_Cipher:
               Master_SSL_Key:
        Seconds_Behind_Master: 0
Master_SSL_Verify_Server_Cert: No
                Last_IO_Errno: 0
                Last_IO_Error:
               Last_SQL_Errno: 0
               Last_SQL_Error:
  Replicate_Ignore_Server_Ids:
             Master_Server_Id: 2
                  Master_UUID: 813958df-a1a2-11eb-8e77-000c296f1873
             Master_Info_File: /usr/local/mysql/data/master.info
                    SQL_Delay: 0
          SQL_Remaining_Delay: NULL
      Slave_SQL_Running_State: Slave has read all relay log; waiting for more updates
           Master_Retry_Count: 86400
                  Master_Bind:
      Last_IO_Error_Timestamp:
     Last_SQL_Error_Timestamp:
               Master_SSL_Crl:
           Master_SSL_Crlpath:
           Retrieved_Gtid_Set:
            Executed_Gtid_Set:
                Auto_Position: 0
         Replicate_Rewrite_DB:
                 Channel_Name:
           Master_TLS_Version:
1 row in set (0.00 sec)

ERROR:
No query specified

以下两个值必须为 yes,代表从服务器能正常连接主服务器

Slave_IO_Running:Yes
Slave_SQL_Running:Yes
#SQL-1和SQL-2设置防火墙放行端口
开启端口:
firewall-cmd --add-port=3306/tcp --permanent
firewall-cmd --add-port=3306/udp --permanent
firewall-cmd --reload #重启firewall

查看已经开放的端口:
firewall-cmd --list-ports

rm -rf auto.cnf
/etc/init.d/mysqld restart
#测试主主同步
在 SQL-1 上创建要同步的数据库 test_db,并在 test_db 中创建一张测试表如 tab
mysql> create database test1;
Query OK, 1 row affected (0.11 sec)

mysql> use test1;
Database changed

mysql> create table tb1(id int,name varchar(20)) ;
Query OK, 0 rows affected (0.22 sec)
mysql>
查看 SQL-2 主机是否同步了 SQL-1 上的数据变化
mysql> show databases;
+--------------------+
| Database           |
+--------------------+
| information_schema |
| mysql              |
| performance_schema |
| sys                |
| test1              |
+--------------------+
5 rows in set (0.05 sec)

mysql> use test1;
Reading table information for completion of table and column names
You can turn off this feature to get a quicker startup with -A

Database changed

mysql> show tables;
+-----------------+
| Tables_in_test1 |
+-----------------+
| tb1             |
+-----------------+
1 row in set (0.00 sec)
在 SQL-2 主机上向 tab1 表中向同步的数据库插入数据信息
mysql> insert into test1.tb1(id,name) values (1,'tom1');
Query OK, 1 row affected (0.11 sec)

mysql> commit ;
Query OK, 0 rows affected (0.00 sec)

mysql>
查看 SQL-1 主机是否同步了 SQL-2 上的数据变化
mysql> show databases;
+--------------------+
| Database           |
+--------------------+
| information_schema |
| mysql              |
| performance_schema |
| sys                |
| test1              |
+--------------------+
5 rows in set (0.00 sec)

mysql> use test1;
Database changed
mysql> show tables;
+-----------------+
| Tables_in_test1 |
+-----------------+
| tb1             |
+-----------------+
1 row in set (0.00 sec)

mysql> select * from tb1;
+------+------+
| id   | name |
+------+------+
|    1 | tom1 |
+------+------+
1 row in set (0.01 sec)

mysql>
部署Keepalived
#安装依赖
#内核开发包 kernel-devel #支持库openssl-devel、popt-devel #gcc,C编译器 #
yum -y install libnl libnl-devel gcc openssl-devel kernel-devel popt-devel
#编译安装
解压keepalived到/usr/local目录
tar -zxvf keepalived-2.0.10.tar.gz  -C /usr/local

进入到解压目录
cd /usr/local/keepalived-2.0.10

编译
./configure --prefix=/usr/local/keepalived

Keepalived configuration
------------------------

Keepalived version       : 2.0.10
Compiler                 : gcc
Preprocessor flags       :
Compiler flags           : -Wall -Wunused -Wstrict-prototypes -Wextra -Winit-self -g -D_GNU_SOURCE -fPIE -Wformat -Werror=format-security -Wp,-D_FORTIFY_SOURCE=2 -fexceptions -fstack-protector-strong --param=ssp-buffer-size=4 -grecord-gcc-switches -O2
Linker flags             :  -pie
Extra Lib                :  -lcrypto  -lssl  -lnl
Use IPVS Framework       : Yes
IPVS use libnl           : Yes
IPVS syncd attributes    : No
IPVS 64 bit stats        : No
HTTP_GET regex support   : No
fwmark socket support    : Yes
Use VRRP Framework       : Yes
Use VRRP VMAC            : Yes
Use VRRP authentication  : Yes
With ip rules/routes     : Yes
Use BFD Framework        : No
SNMP vrrp support        : No
SNMP checker support     : No
SNMP RFCv2 support       : No
SNMP RFCv3 support       : No
DBUS support             : No
SHA1 support             : No
Use Json output          : No
libnl version            : 1
Use IPv4 devconf         : No
Use libiptc              : No
Use libipset             : No
init type                : systemd
Strict config checks     : No
Build genhash            : Yes
Build documentation      : No

安装
make install
#将keepalived添加到系统服务中
拷贝执行文件
cp /usr/local/keepalived/sbin/keepalived /usr/sbin/

将初始化脚本拷贝到系统初始化目录下
cp /usr/local/keepalived-2.0.10/keepalived/etc/init.d/keepalived /etc/init.d/

将keepalived配置文件拷贝到etc下
cp /usr/local/keepalived-2.0.10/keepalived/etc/sysconfig/keepalived /etc/sysconfig/

创建keepalived文件夹
mkdir /etc/keepalived/
将keepalived配置文件拷贝到etc下
cp /usr/local/keepalived-2.0.10/keepalived/etc/keepalived/keepalived.conf /etc/keepalived/

添加可执行权限
chmod +x /etc/init.d/keepalived

添加keepalived到开机启动
chkconfig --add keepalived
chkconfig keepalived on
#修改 Keepalived 的配置文件
vim /etc/keepalived/keepalived.conf
(SQL-1)
! Configuration File for keepalived

global_defs {
   router_id MYSQL-1
}

vrrp_instance VI_1 {
    state BACKUP
    interface ens33
    virtual_router_id 51
    priority 100
    advert_int 1
    nopreempt
    authentication {
        auth_type PASS
        auth_pass 1111
    }
    virtual_ipaddress {
        192.168.139.141
    }
}

virtual_server 192.168.139.141 3306 {
    delay_loop 2
    lb_algo rr
    lb_kind DR
    persistence_timeout 50
    protocol TCP

    real_server 192.168.139.128 3306 {
        weight 1
        notify_down /etc/keepalived/bin/mysql.sh
        TCP_CHECK {
        connect_timeout 3
        delay_before_retry 3
        connect_port 3306
        }
    }
}
(SQL-2)
! Configuration File for keepalived

global_defs {
   router_id MYSQL-2
}

vrrp_instance VI_1 {
    state BACKUP
    interface ens33
    virtual_router_id 51
    priority 50
    advert_int 1
    authentication {
        auth_type PASS
        auth_pass 1111
    }
    virtual_ipaddress {
        192.168.139.141
    }
}

virtual_server 192.168.139.141 3306 {
    delay_loop 2
    lb_algo rr
    lb_kind DR
    persistence_timeout 50
    protocol TCP

    real_server 192.168.139.129 3306 {
        weight 1
        notify_down /etc/keepalived/bin/mysql.sh
        TCP_CHECK {
        connect_timeout 3
        delay_before_retry 3
        connect_port 3306
        }
    }
}
#配置切换为主、备时启动脚本
mkdir /etc/keepalived/bin
sudo vim /etc/keepalived/bin/mysql.sh

#!/bin/bash

pkill keepalived

~

chmod +x /etc/keepalived/bin/mysql.sh
#启动keepalived服务
systemctl start keepalived
#测试mysql服务故障时keepalived是否正常切换
停止(SQL-1)mysql服务,查看vip状态
停止mysql服务
(SQL-1)
[root@centos7-1 keepalived]# ip a
1: lo: <LOOPBACK,UP,LOWER_UP> mtu 65536 qdisc noqueue state UNKNOWN group default qlen 1000
    link/loopback 00:00:00:00:00:00 brd 00:00:00:00:00:00
    inet 127.0.0.1/8 scope host lo
       valid_lft forever preferred_lft forever
    inet6 ::1/128 scope host
       valid_lft forever preferred_lft forever
2: ens33: <BROADCAST,MULTICAST,UP,LOWER_UP> mtu 1500 qdisc pfifo_fast state UP group default qlen 1000
    link/ether 00:0c:29:a4:06:23 brd ff:ff:ff:ff:ff:ff
    inet 192.168.139.128/24 brd 192.168.139.255 scope global noprefixroute dynamic ens33
       valid_lft 1080sec preferred_lft 1080sec
    inet 192.168.139.141/32 scope global ens33
       valid_lft forever preferred_lft forever
    inet6 fe80::4061:d287:c2aa:84e9/64 scope link noprefixroute
       valid_lft forever preferred_lft forever
[root@centos7-1 keepalived]# /etc/init.d/mysqld stop
Shutting down MySQL........................ SUCCESS!
[root@centos7-1 keepalived]# ip a
1: lo: <LOOPBACK,UP,LOWER_UP> mtu 65536 qdisc noqueue state UNKNOWN group default qlen 1000
    link/loopback 00:00:00:00:00:00 brd 00:00:00:00:00:00
    inet 127.0.0.1/8 scope host lo
       valid_lft forever preferred_lft forever
    inet6 ::1/128 scope host
       valid_lft forever preferred_lft forever
2: ens33: <BROADCAST,MULTICAST,UP,LOWER_UP> mtu 1500 qdisc pfifo_fast state UP group default qlen 1000
    link/ether 00:0c:29:a4:06:23 brd ff:ff:ff:ff:ff:ff
    inet 192.168.139.128/24 brd 192.168.139.255 scope global noprefixroute dynamic ens33
       valid_lft 1727sec preferred_lft 1727sec
    inet6 fe80::4061:d287:c2aa:84e9/64 scope link noprefixroute
       valid_lft forever preferred_lft forever
vip正常跳转
(SQL-2)
[root@centos7-2 ~]# ip a
1: lo: <LOOPBACK,UP,LOWER_UP> mtu 65536 qdisc noqueue state UNKNOWN group default qlen 1000
    link/loopback 00:00:00:00:00:00 brd 00:00:00:00:00:00
    inet 127.0.0.1/8 scope host lo
       valid_lft forever preferred_lft forever
    inet6 ::1/128 scope host
       valid_lft forever preferred_lft forever
2: ens33: <BROADCAST,MULTICAST,UP,LOWER_UP> mtu 1500 qdisc pfifo_fast state UP group default qlen 1000
    link/ether 00:0c:29:6f:18:73 brd ff:ff:ff:ff:ff:ff
    inet 192.168.139.129/24 brd 192.168.139.255 scope global noprefixroute dynamic ens33
       valid_lft 1320sec preferred_lft 1320sec
    inet 192.168.139.141/32 scope global ens33
       valid_lft forever preferred_lft forever
    inet6 fe80::2c0f:ee1a:b68:84b8/64 scope link noprefixroute
       valid_lft forever preferred_lft forever
SQL-1,重启mysql、keepalived服务,停止SQL-2mysql服务,查看vip跳转到SQL-1是否正常
启动mysql服务
(SQL-1)
[root@centos7-1 keepalived]# /etc/init.d/mysqld start
Starting MySQL................................................. SUCCESS!
[root@centos7-1 keepalived]# ip a
1: lo: <LOOPBACK,UP,LOWER_UP> mtu 65536 qdisc noqueue state UNKNOWN group default qlen 1000
    link/loopback 00:00:00:00:00:00 brd 00:00:00:00:00:00
    inet 127.0.0.1/8 scope host lo
       valid_lft forever preferred_lft forever
    inet6 ::1/128 scope host
       valid_lft forever preferred_lft forever
2: ens33: <BROADCAST,MULTICAST,UP,LOWER_UP> mtu 1500 qdisc pfifo_fast state UP group default qlen 1000
    link/ether 00:0c:29:a4:06:23 brd ff:ff:ff:ff:ff:ff
    inet 192.168.139.128/24 brd 192.168.139.255 scope global noprefixroute dynamic ens33
       valid_lft 1242sec preferred_lft 1242sec
    inet6 fe80::4061:d287:c2aa:84e9/64 scope link noprefixroute
       valid_lft forever preferred_lft forever
开启 slave
[root@centos7-1 keepalived]# mysql -uroot -p
Enter password:
Welcome to the MySQL monitor.  Commands end with ; or \g.
Your MySQL connection id is 6
Server version: 5.7.22-log MySQL Community Server (GPL)

Copyright (c) 2000, 2018, Oracle and/or its affiliates. All rights reserved.

Oracle is a registered trademark of Oracle Corporation and/or its
affiliates. Other names may be trademarks of their respective
owners.

Type 'help;' or '\h' for help. Type '\c' to clear the current input statement.

mysql> start slave;
Query OK, 0 rows affected, 1 warning (0.02 sec)

mysql> show slave status\G;
*************************** 1. row ***************************
               Slave_IO_State: Waiting for master to send event
                  Master_Host: 192.168.139.129
                  Master_User: root
                  Master_Port: 3306
                Connect_Retry: 60
              Master_Log_File: mysql-bin.000002
          Read_Master_Log_Pos: 154
               Relay_Log_File: relay-bin.000006
                Relay_Log_Pos: 367
        Relay_Master_Log_File: mysql-bin.000002
             Slave_IO_Running: Yes
            Slave_SQL_Running: Yes
              Replicate_Do_DB:
          Replicate_Ignore_DB:
           Replicate_Do_Table:
       Replicate_Ignore_Table:
      Replicate_Wild_Do_Table:
  Replicate_Wild_Ignore_Table:
                   Last_Errno: 0
                   Last_Error:
                 Skip_Counter: 0
          Exec_Master_Log_Pos: 154
              Relay_Log_Space: 734
              Until_Condition: None
               Until_Log_File:
                Until_Log_Pos: 0
           Master_SSL_Allowed: No
           Master_SSL_CA_File:
           Master_SSL_CA_Path:
              Master_SSL_Cert:
            Master_SSL_Cipher:
               Master_SSL_Key:
        Seconds_Behind_Master: 0
Master_SSL_Verify_Server_Cert: No
                Last_IO_Errno: 0
                Last_IO_Error:
               Last_SQL_Errno: 0
               Last_SQL_Error:
  Replicate_Ignore_Server_Ids:
             Master_Server_Id: 2
                  Master_UUID: 813958df-a1a2-11eb-8e77-000c296f1873
             Master_Info_File: /usr/local/mysql/data/master.info
                    SQL_Delay: 0
          SQL_Remaining_Delay: NULL
      Slave_SQL_Running_State: Slave has read all relay log; waiting for more updates
           Master_Retry_Count: 86400
                  Master_Bind:
      Last_IO_Error_Timestamp:
     Last_SQL_Error_Timestamp:
               Master_SSL_Crl:
           Master_SSL_Crlpath:
           Retrieved_Gtid_Set:
            Executed_Gtid_Set:
                Auto_Position: 0
         Replicate_Rewrite_DB:
                 Channel_Name:
           Master_TLS_Version:
1 row in set (0.38 sec)

ERROR:
No query specified

mysql>
重启keepalived服务
[root@centos7-1 data]# ps -ef | grep keepalived
root      35765  78159  0 11:51 pts/3    00:00:00 grep --color=auto keepalived
[root@centos7-1 data]# systemctl start keepalived
[root@centos7-1 data]# ps -ef | grep keepalived
root      35780      1  0 11:53 ?        00:00:00 /usr/local/keepalived/sbin/keepalived -D
root      35781  35780  0 11:53 ?        00:00:00 /usr/local/keepalived/sbin/keepalived -D
root      35782  35780  0 11:53 ?        00:00:00 /usr/local/keepalived/sbin/keepalived -D
root      35785  78159  0 11:53 pts/3    00:00:00 grep --color=auto keepalived
(SQL-2)
[root@centos7-2 ~]# /etc/init.d/mysqld stop
Shutting down MySQL............ SUCCESS!
[root@centos7-2 ~]# ip a
1: lo: <LOOPBACK,UP,LOWER_UP> mtu 65536 qdisc noqueue state UNKNOWN group default qlen 1000
    link/loopback 00:00:00:00:00:00 brd 00:00:00:00:00:00
    inet 127.0.0.1/8 scope host lo
       valid_lft forever preferred_lft forever
    inet6 ::1/128 scope host
       valid_lft forever preferred_lft forever
2: ens33: <BROADCAST,MULTICAST,UP,LOWER_UP> mtu 1500 qdisc pfifo_fast state UP group default qlen 1000
    link/ether 00:0c:29:6f:18:73 brd ff:ff:ff:ff:ff:ff
    inet 192.168.139.129/24 brd 192.168.139.255 scope global noprefixroute dynamic ens33
       valid_lft 1748sec preferred_lft 1748sec
    inet6 fe80::2c0f:ee1a:b68:84b8/64 scope link noprefixroute
       valid_lft forever preferred_lft forever
vip正常跳转到SQL-1
(SQL-1)
[root@centos7-1 data]# ip a
1: lo: <LOOPBACK,UP,LOWER_UP> mtu 65536 qdisc noqueue state UNKNOWN group default qlen 1000
    link/loopback 00:00:00:00:00:00 brd 00:00:00:00:00:00
    inet 127.0.0.1/8 scope host lo
       valid_lft forever preferred_lft forever
    inet6 ::1/128 scope host
       valid_lft forever preferred_lft forever
2: ens33: <BROADCAST,MULTICAST,UP,LOWER_UP> mtu 1500 qdisc pfifo_fast state UP group default qlen 1000
    link/ether 00:0c:29:a4:06:23 brd ff:ff:ff:ff:ff:ff
    inet 192.168.139.128/24 brd 192.168.139.255 scope global noprefixroute dynamic ens33
       valid_lft 1079sec preferred_lft 1079sec
    inet 192.168.139.141/32 scope global ens33
       valid_lft forever preferred_lft forever
    inet6 fe80::4061:d287:c2aa:84e9/64 scope link noprefixroute
       valid_lft forever preferred_lft forever


 1万+
1万+


 被折叠的 条评论
为什么被折叠?
被折叠的 条评论
为什么被折叠?
 到【灌水乐园】发言


