


基于Ubuntu22.04下进行实验
一 实验内容:
1. 在Linux 0.11 下时间进程运行轨迹的跟踪,将操作系统启动到系统关机的所有进程运行轨迹都记录在一个
日志文件下
2. 修改进程调度的时间片,观察修改后系统进程运行情况的变化。
二 .编写主程序
我们需要编写一个程序process.c,这个程序可以创建多个进程,并为每个进程分配占用cpu的时间和占用io设备的时间。实验给出了样本程序,我们只需要添加即可。
#include <stdio.h>
#include <unistd.h>
#include <time.h>
#include <sys/times.h>
#include <sys/wait.h>
#include <stdlib.h>
#define HZ 100
void cpuio_bound(int last, int cpu_time, int io_time);
int main(int argc, char * argv[])
{
//我们添加的部分
pid_t num[10];
int i;
for(i=0;i<10;i++)
{
num[i]=fork();
if(num[i]<0)
{
printf("Failed to fork child process %d\n",i+1);
}
else if(num[i]==0)
{
cpuio_bound(10,i,10-i);
exit(0);
}
}
for(i=0;i<10;i++)
{
printf("Child process PID: %d\n",num[i]);
}
wait(&i);
return 0;
}
/*
* 此函数按照参数占用CPU和I/O时间
* last: 函数实际占用CPU和I/O的总时间,不含在就绪队列中的时间,>=0是必须的
* cpu_time: 一次连续占用CPU的时间,>=0是必须的
* io_time: 一次I/O消耗的时间,>=0是必须的
* 如果last > cpu_time + io_time,则往复多次占用CPU和I/O
* 所有时间的单位为秒
*/
void cpuio_bound(int last, int cpu_time, int io_time)
{
struct tms start_time, current_time;
clock_t utime, stime;
int sleep_time;
while (last > 0)
{
/* CPU Burst */
times(&start_time);
/* 其实只有t.tms_utime才是真正的CPU时间。但我们是在模拟一个
* 只在用户状态运行的CPU大户,就像“for(;;);”。所以把t.tms_stime
* 加上很合理。*/
do
{
times(¤t_time);
utime = current_time.tms_utime - start_time.tms_utime;
stime = current_time.tms_stime - start_time.tms_stime;
} while ( ( (utime + stime) / HZ ) < cpu_time );
last -= cpu_time;
if (last <= 0 )
break;
/* IO Burst */
/* 用sleep(1)模拟1秒钟的I/O操作 */
sleep_time=0;
while (sleep_time < io_time)
{
sleep(1);
sleep_time++;
}
last -= sleep_time;
}
}
—— 其中fork()在创建时会返回两种状态,且会复制父进程的变量;对父进程返回的是子进程的pid,对子进程返回的是0;
—— 所以在process.c中,判断num[ i ]==0,说明此时是子进程,调用cpuio_bound(),在子进程执行完毕后,调用exit(0)来结束该进程。所以一直是进程1在fork()创建子进程,
——(只有进程0、1的文件描述符一定关联着log文件,保证子进程运行状态可以写入log文件中)
三 创建log文件
我们要尽可能早的开始记录进程轨迹,应当在内核启动时就打开log文件。
3.1 内核的入口
内核的入口在 /linux 0.11/init/main.c中的main()
int main()
{
	……
	move_to_user_mode()
	if(!fork())
	{
		init();
	}
}
在这里,0号进程调用fork()创建了1号进程,并调用init进行初始化。
在init中,建立了文件描述符0、1、2,分别是标准输入stdin,标准输出stdout和标准错误stderr。
……
setup((void *) &drive_info);        //加载文件系统
(void) open("/dev/tty0",O_RDWR,0);    //打开/dev/tty0,建立文件描述符0和/dev/tty0的关联
(void) dup(0);                //让文件描述符1也和/dev/tty0关联
(void) dup(0);
……                //让文件描述符2也和/dev/tty0关联
我将这些代码放到main()中,放在move_to_user_mode()后,然后添加打开log文件并关联文件描述符的代码。修改后的main函数如下
……
move_to_user_mode();

/***************添加开始***************/
setup((void *) &drive_info);
(void) open("/dev/tty0",O_RDWR,0);    //建立文件描述符0和/dev/tty0的关联
(void) dup(0);        //文件描述符1也和/dev/tty0关联
(void) dup(0);        //文件描述符2也和/dev/tty0关联
(void) open("/var/process.log",O_CREAT|O_TRUNC|O_WRONLY,0666);
/***************添加结束***************/

if (!fork()) {
    init();
}
……
文件描述符3与log文件关联,参数含义是:建立只写文件,若文件已经存在则清空已有的内容;0666中的0表示这是个八进制数,6代表二进制110,则当前用户对该文件可读可写不可执行,组内用户和其他用户也是相同的权限。
四 创建写log文件的函数
所有的状态转移都在内核中进行,而内核状态下,我们需要自己编写一个函数来写
log文件,参考printk()和sys_write().
#include <linux/sched.h>
#include <sys/stat.h>

static char logbuf[1024];
int fprintk(int fd, const char *fmt, ...)
{
    va_list args;
    int count;
    struct file * file;
    struct m_inode * inode;

    va_start(args, fmt);
    count=vsprintf(logbuf, fmt, args);
    va_end(args);

    if (fd < 3)    /* 如果输出到stdout或stderr,直接调用sys_write即可 */
    {
        __asm__("push %%fs\n\t"
            "push %%ds\n\t"
            "pop %%fs\n\t"
            "pushl %0\n\t"
            "pushl $logbuf\n\t"
            "pushl %1\n\t"
            "call sys_write\n\t"
            "addl $8,%%esp\n\t"
            "popl %0\n\t"
            "pop %%fs"
            ::"r" (count),"r" (fd):"ax","cx","dx");
    }
    else    /* 假定>=3的描述符都与文件关联。事实上,还存在很多其它情况,这里并没有考虑。*/
    {
        if (!(file=task[0]->filp[fd]))    /* 从进程0的文件描述符表中得到文件句柄 */
            return 0;
        inode=file->f_inode;

        __asm__("push %%fs\n\t"
            "push %%ds\n\t"
            "pop %%fs\n\t"
            "pushl %0\n\t"
            "pushl $logbuf\n\t"
            "pushl %1\n\t"
            "pushl %2\n\t"
            "call file_write\n\t"
            "addl $12,%%esp\n\t"
            "popl %0\n\t"
            "pop %%fs"
            ::"r" (count),"r" (file),"r" (inode):"ax","cx","dx");
    }
    return count;
}
同时我们需要在kernel.h中定义fprintk().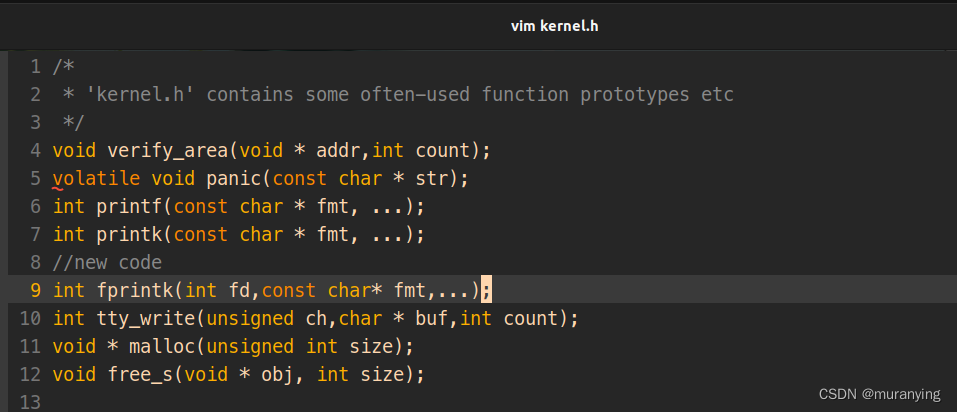
fprintk使用了不确定参数的函数定义,在使用时,第一个参数写文件描述符,第二个参数写后面输入参数的类型,然后第三第四……参数写要传入的值就可以了。
——例如:
fprintk(1, "The ID of running process is %ld", current->pid);
//向stdout打印正在运行的进程的ID
fprintk(3, "%ld\t%c\t%ld\n", current->pid, 'R', jiffies);
//向log文件输出
此时我们已经完成了一半了。现在我们需要在系统进行进程状态切换的地方,调用fprintk()来将状态转移的信息记录下来。
五 寻找切换点
进程有新建态(N),就绪态(J),运行态(R),阻塞态(W),退出态(E)
——新建态在fork()新建一个进程时出现,新建到就绪也在fork.c中

——就绪态到运行态依靠schedule()

——运行态到阻塞态,依靠sleep_on()、interrupt_sleep_on()以及sys_pause()

——阻塞到就绪依靠wake_up()

——退出态在exit.c中的do_exit()
下面的c文件都在linunx-0.11/kernel下
5.1 fork.c
在fork中,创建进程主要的函数是copy_process()
 ……
p->start_time = jiffies;
fprintk(3,"%d\t%c\t%d\n",p->pid,'N',jiffies);
//在更新了启动时间后,进程新建完成
//……
p->state = TASK_RUNNING;
fprintk(3,"%d\t%c\t%d\n",p->pid,'J',jiffies)
//切换状态为就绪态
 ……
5.2 sched.c
sleep_on()
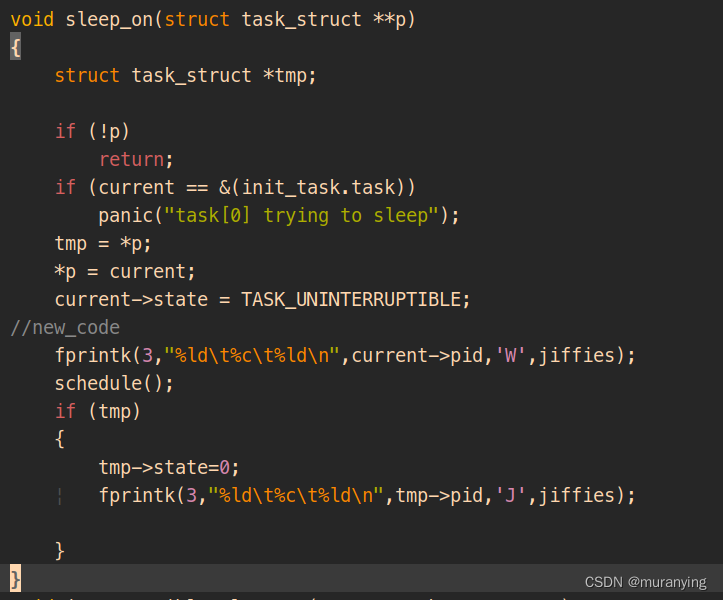
sleep_on将当前进程设置为睡眠态,将等待队列中的第一个进程唤醒
interrupt_sleep_on()
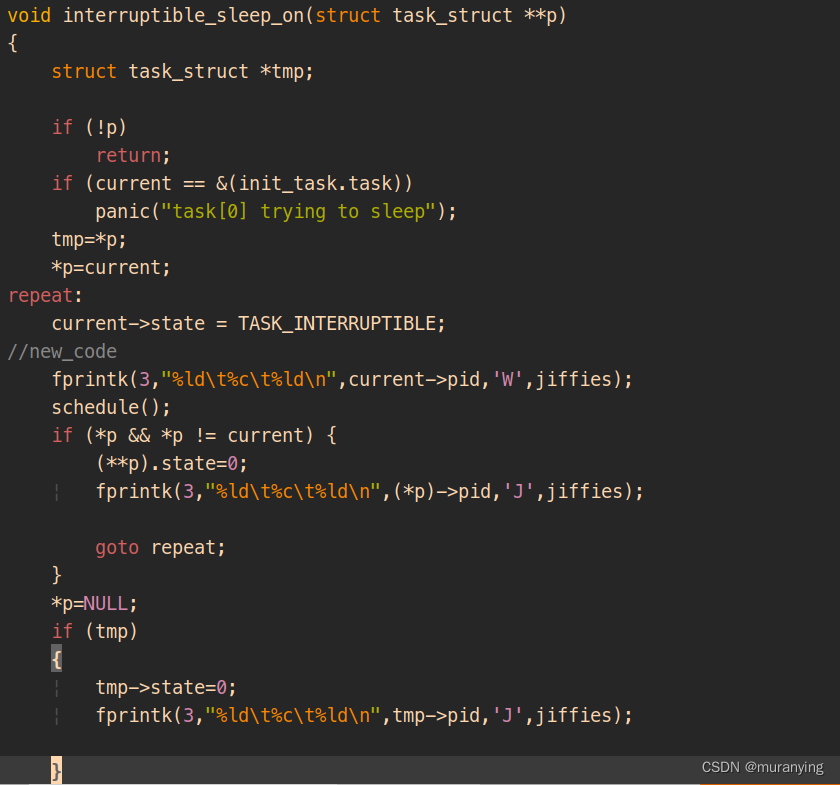
功能和sleep_on()相似
schedule()
void schedule(void)
{
	int i, next, c;
	struct task_struct **p;

	/* check alarm, wake up any interruptible tasks that have got a signal */

	for (p = &LAST_TASK; p > &FIRST_TASK; --p)
		if (*p)
		{
			if ((*p)->alarm && (*p)->alarm < jiffies)
			{
				(*p)->signal |= (1 << (SIGALRM - 1));
				(*p)->alarm = 0;
			}
			if (((*p)->signal & ~(_BLOCKABLE & (*p)->blocked)) &&
				(*p)->state == TASK_INTERRUPTIBLE)
			{
				(*p)->state = TASK_RUNNING;
				/*从可中断睡眠态转换为就绪态*/
				fprintk(3, "%ld\t%c\t%ld\n", (*p)->pid, 'J', jiffies);
			}
		}

	/* this is the scheduler proper: */

	while (1)
	{
		c = -1;
		next = 0;
		i = NR_TASKS;
		p = &task[NR_TASKS];
		while (--i)
		{
			if (!*--p)
				continue;
			if ((*p)->state == TASK_RUNNING && (*p)->counter > c)
				c = (*p)->counter, next = i;
		}
		if (c)
			break;
		for (p = &LAST_TASK; p > &FIRST_TASK; --p)
			if (*p)
				(*p)->counter = ((*p)->counter >> 1) +
								(*p)->priority;
	}
	switch_to(next);
}
在linux 0.11 中,就绪态和运行态在源码中都是TASK_RUNNING,所以我们需要在就绪态到运行态转变的schedule中,添加一段代码来清楚记录这个状态的转变
if(current->pid != task[next] ->pid)
	{
		if(current->state == TASK_RUNNING)
			fprintk(3,"%d\t%c\t%d\n",current->pid,'J',jiffies);
		fprintk(3,"%d\t%c\t%d\n",task[next]->pid,'R',jiffies);
	}
	//在swich_to(next)前添加
这段代码判断下一个要执行的程序是否是当前程序,若不是,则将当前程序设置为就绪态,而将下一个要
执行的程序设置为运行态。
wake_up()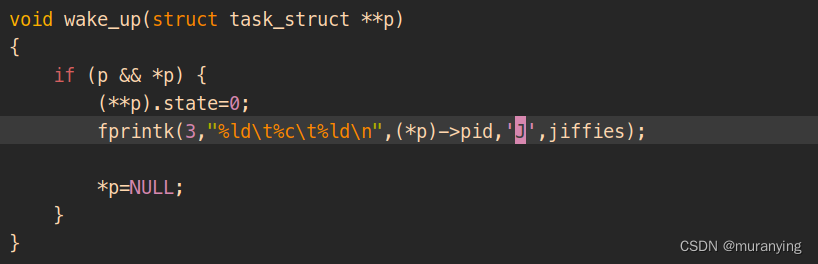
调用wake_up()主动从阻塞态转变为就绪态。
sys_pause()

进程0会不断调用sys_pause()来进行调用,所以我们将进程0排除在外。其他进程调用sys_pause()时,记录其状态变化为阻塞态W
5.3 exit.c
do_exit()
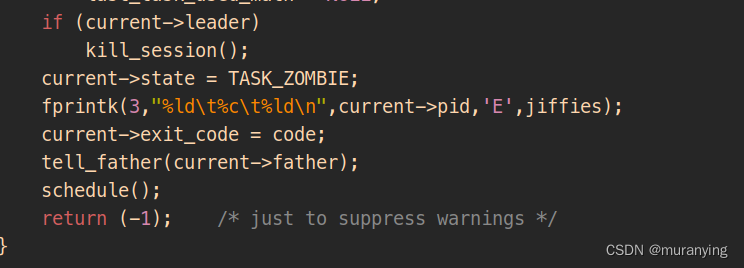
在将进程的状态设置为僵死后,可以视为退出态
sys_waitpif()
int sys_waitpid(pid_t pid,unsigned long * stat_addr, int options)
{
	int flag, code;
	struct task_struct ** p;

	verify_area(stat_addr,4);
repeat:
	flag=0;
	for(p = &LAST_TASK ; p > &FIRST_TASK ; --p) {
		if (!*p || *p == current)
			continue;
		if ((*p)->father != current->pid)
			continue;
		if (pid>0) {
			if ((*p)->pid != pid)
				continue;
		} else if (!pid) {
			if ((*p)->pgrp != current->pgrp)
				continue;
		} else if (pid != -1) {
			if ((*p)->pgrp != -pid)
				continue;
		}
		switch ((*p)->state) {
			case TASK_STOPPED:
				if (!(options & WUNTRACED))
					continue;
				put_fs_long(0x7f,stat_addr);
				return (*p)->pid;
			case TASK_ZOMBIE:
				current->cutime += (*p)->utime;
				current->cstime += (*p)->stime;
				flag = (*p)->pid;
				code = (*p)->exit_code;
				/*这一部分代码检索了队列中进程的状态,若为僵死,则设置其释放,我们在do_exit已经
				标注进程为退出态了,所以这里不重复写进log文件了*/
				release(*p);
				put_fs_long(code,stat_addr);
				return flag;
			default:
				flag=1;
				continue;
		}
	}
	if (flag) {
		if (options & WNOHANG)
			return 0;
		current->state=TASK_INTERRUPTIBLE;
		fprintk(3,"%ld\t%c\t%ld\n",current->pid,'W',jiffies);
		//设置当前进程为阻塞态
		schedule();
		if (!(current->signal &= ~(1<<(SIGCHLD-1))))
			goto repeat;
		else
			return -EINTR;
	}
	return -ECHILD;
}
六 测试
6.1 运行系统
在oslab目录下卸载虚拟机挂载后,重新编译内核
cd ~/oslab/linux-0.11
make clean
make all
进入bochs
cd ~/oslab
./run
编译process.c
gcc -o process process.c
//运行
./process
//保存到文件中
sync
process.log 结果如图

6.2 分析数据
实验提供了一个数据统计程序 stat_log_py,可以对该实验产生的log文件进行数据分析
stat_log_py
该程序使用python2写成,ubuntu 22.04为python3,所以需要下载并使用python2来运行该程序
//将stat_log_py设置为可执行程序
chmod +x stat_log.py
//这里我的python2的版本为python2.7
python2.7 stat_log.py process.log 13 14 15 16
运行结果如图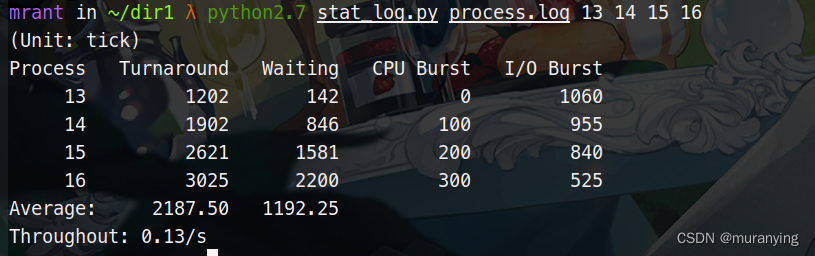
若发生报错,一般是log文件记录的数据有问题,可以排查在各个地方加入的fprink()是否完整和正确
七 修改时间片
时间片小->(导致)切换次数多->系统内耗大(切换需要时间)->吞吐量就小
7.1 INIT_TASK
时间片的初始值是进程0的priority,在linux-0.11/include/linux/sched.h中的宏INIT_TASK中定义
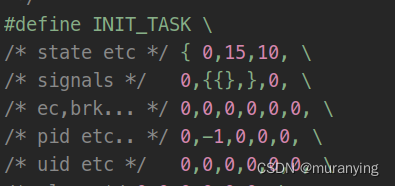
修改state etc即可,修改时间片需要修改第三个值,默认为15,这里修改为10。
7.2 再次运行程序
结果如下图
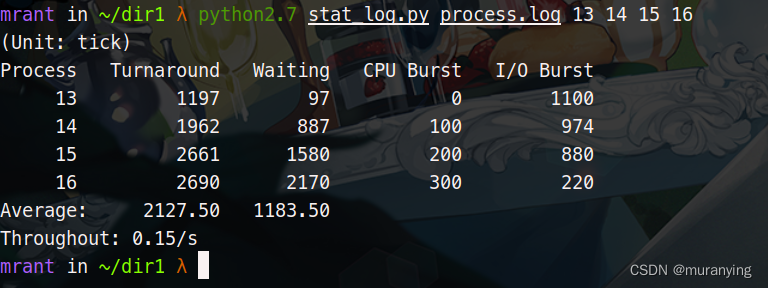
可以看到进程的等待时间明显变短


 656
656


 被折叠的 条评论
为什么被折叠?
被折叠的 条评论
为什么被折叠?
 到【灌水乐园】发言


