


Pod详解
一. Pod介绍
1. Pod结构

2. 每个Pod中都可以包含一个或者多个容器,这些容器可以分为两类:
- 用户程序所在的容器,数量可多可少
- Pause容器,这是每个Pod都会有的一个根容器,它的作用有两个:
- 可以以它为依据,评估整个Pod的健康状态
- 可以在根容器上设置Ip地址,其它容器都用这个Ip(Pod IP),以实现Pod内部的网路通信
这里是Pod内部的通讯,Pod的之间的通讯采用虚拟二层网络技术来实现,我们当前环境用的是Flannel

集群网络:
节点网络
pod网络
service网络
3. Pod定义
- 下面是Pod的资源清单:
kubectl explain pods
apiVersion: v1     #必选,版本号,例如v1
kind: Pod         #必选,资源类型,例如 Pod
metadata:         #必选,元数据
  name: string     #必选,Pod名称
  namespace: string  #Pod所属的命名空间,默认为"default"
  labels:           #自定义标签列表
    - name: string
spec:  #必选,Pod中容器的详细定义
  containers:  #必选,Pod中容器列表
  - name: string   #必选,容器名称
    image: string  #必选,容器的镜像名称
    imagePullPolicy: [ Always|Never|IfNotPresent ]  #获取镜像的策略 ,IfNotPresent没有容器的时候去拉
    command: [string]   #容器的启动命令列表,如不指定,使用打包时使用的启动命令
    args: [string]      #容器的启动命令参数列表
    workingDir: string  #容器的工作目录
    volumeMounts:       #挂载到容器内部的存储卷配置
    - name: string      #引用pod定义的共享存储卷的名称,需用volumes[]部分定义的的卷名
      mountPath: string #存储卷在容器内mount的绝对路径,应少于512字符
      readOnly: boolean #是否为只读模式
    ports: #需要暴露的端口库号列表
    - name: string        #端口的名称
      containerPort: int  #容器需要监听的端口号
      hostPort: int       #容器所在主机需要监听的端口号,默认与Container相同
      protocol: string    #端口协议,支持TCP和UDP,默认TCP
    env:   #容器运行前需设置的环境变量列表
    - name: string  #环境变量名称
      value: string #环境变量的值
    resources: #资源限制和请求的设置
      limits:  #资源限制的设置
cpu: string     #Cpu的限制,单位为core数,将用于docker run --cpu-shares参数,能够使用几核cpu
        memory: string  #内存限制,单位可以为Mib/Gib,将用于docker run --memory参数
      requests: #资源请求的设置
        cpu: string    #Cpu请求,容器启动的初始可用数量
        memory: string #内存请求,容器启动的初始可用数量
    lifecycle: #生命周期钩子,能活多久
        postStart: #容器启动后立即执行此钩子,如果执行失败,会根据重启策略进行重启
        preStop: #容器终止前执行此钩子,无论结果如何,容器都会终止
    livenessProbe:  #对Pod内各容器健康检查的设置,当探测无响应几次后将自动重启该容器
      exec:         #对Pod容器内检查方式设置为exec方式
        command: [string]  #exec方式需要制定的命令或脚本
      httpGet:       #对Pod内个容器健康检查方法设置为HttpGet,需要制定Path、port
        path: string
        port: number
        host: string
        scheme: string
        HttpHeaders:
        - name: string
          value: string
      tcpSocket:     #对Pod内个容器健康检查方式设置为tcpSocket方式
         port: number
       initialDelaySeconds: 0       #容器启动完成后首次探测的时间,单位为秒
       timeoutSeconds: 0          #对容器健康检查探测等待响应的超时时间,单位秒,默认1秒
       periodSeconds: 0           #对容器监控检查的定期探测时间设置,单位秒,默认10秒一次
       successThreshold: 0#成功多少次,任务他成功了
       failureThreshold: 0#失败多少次,任务他失败了
       securityContext:#安全上下文
         privileged: false
  restartPolicy: [Always | Never | OnFailure]  #Pod的重启策略
  nodeName: <string> #设置NodeName表示将该Pod调度到指定到名称的node节点上,指定位置
  nodeSelector: obeject #设置NodeSelector表示将该Pod调度到包含这个label的node上
  imagePullSecrets: #Pull镜像时使用的secret名称,以key:secretkey格式指定
  - name: string
  hostNetwork: false   #是否使用主机网络模式,默认为false,如果设置为true,表示使用宿主机网络(真机网络)
  volumes:   #在该pod上定义共享存储卷列表
  - name: string    #共享存储卷名称 (volumes类型有很多种)
    emptyDir: {}       #类型为emtyDir的存储卷,与Pod同生命周期的一个临时目录。为空值
    hostPath: string   #类型为hostPath的存储卷,表示挂载Pod所在宿主机的目录
      path: string                #Pod所在宿主机的目录,将被用于同期中mount的目录
    secret:          #类型为secret的存储卷,挂载集群与定义的secret对象到容器内部
      scretname: string
      items:
      - key: string
        path: string
    configMap:         #类型为configMap的存储卷,挂载预定义的configMap对象到容器内部
      name: string
      items:
      - key: string
        path: string
- 提示
#小提示:
#   在这里,可通过一个命令来查看每种资源的可配置项
#   kubectl explain 资源类型         查看某种资源可以配置的一级属性
#   kubectl explain 资源类型.属性     查看属性的子属性
[root@k8s-master01 ~]# kubectl explain pod
KIND:     Pod
VERSION:  v1
FIELDS:
   apiVersion   <string>
   kind <string>
   metadata     <Object>
   spec <Object>
   status       <Object>

[root@k8s-master01 ~]# kubectl explain pod.metadata
KIND:     Pod
VERSION:  v1
RESOURCE: metadata <Object>
FIELDS:
   annotations  <map[string]string>
   clusterName  <string>
   creationTimestamp    <string>
   deletionGracePeriodSeconds   <integer>
   deletionTimestamp    <string>
   finalizers   <[]string>
   generateName <string>
   generation   <integer>
   labels       <map[string]string>
   managedFields        <[]Object>
   name <string>
   namespace    <string>
   ownerReferences      <[]Object>
   resourceVersion      <string>
   selfLink     <string>
   uid  <string>
4. 在kubernetes中基本所有资源的一级属性都是一样的,主要包含5部分:
- apiVersion 版本,由kubernetes内部定义,版本号必须可以用 kubectl api-versions 查询到
- kind 类型,由kubernetes内部定义,版本号必须可以用 kubectl api-resources 查询到
- metadata
- 元数据,主要是资源标识和说明,常用的有name、namespace、labels等
- spec 描述,这是配置中最重要的一部分,里面是对各种资源配置的详细描述
- status 状态信息,里面的内容不需要定义,由kubernetes自动生成
4.1 在上面的属性中,spec是接下来研究的重点,继续看下它的常见子属性:
- containers <[]Object> 容器列表,用于定义容器的详细信息
- nodeName 根据nodeName的值将pod调度到指定的Node节点上
- nodeSelector 根据节点选择器中定义的信息选择将该Pod调度到包含这些label的Node 上
- hostNetwork 是否使用主机网络模式,默认为false,如果设置为true,表示使用宿主机网络
- volumes <[]Object> 存储卷,用于定义Pod上面挂在的存储信息
- restartPolicy 重启策略,表示Pod在遇到故障的时候的处理策略(出现故障,是重启,不重启,还是在干掉在重启)
二. Pod配置
pod.spec.containers属性
 <[]Object> 是个列表

容器拉取策略:
Always, Never, IfNotPresent
一直拉取,绝不拉,没有的时候拉,有的时候不拉取镜像

[root@k8s-master01 ~]# kubectl explain pod.spec.containers
KIND:     Pod
VERSION:  v1
RESOURCE: containers <[]Object>   # 数组,代表可以有多个容器
FIELDS:
   name  <string>     # 容器名称
   image <string>     # 容器需要的镜像地址
   imagePullPolicy  <string> # 镜像拉取策略
   command  <[]string> # 容器的启动命令列表,如不指定,使用打包时使用的启动命令
   args     <[]string> # 容器的启动命令需要的参数列表
   env      <[]Object> # 容器环境变量的配置
   ports    <[]Object>     # 容器需要暴露的端口号列表
   resources <Object>      # 资源限制和资源请求的设置(能用多少资源)
1. 基本配置
[root@k8s-master ~]# kubectl create ns dev
namespace/dev created

[root@k8s-master manifest]# vim pod-base.yaml
[root@k8s-master manifest]# cat pod-base.yaml
apiVersion: v1
kind: Pod
metadata:
  name: pod-base
  namespace: dev
  labels:
    user: mushuang
spec:
  containers:
  - name: nginx
    image: nginx:1.17.1
  - name: busybox
    image: busybox:1.30
[root@k8s-master manifest]#

定义了一个比较简单Pod的配置,里面有两个容器:

nginx:用1.17.1版本的nginx镜像创建,(nginx是一个轻量级web容器)
busybox:用1.30版本的busybox镜像创建,(busybox是一个小巧的linux命令集合)

# 创建Pod
[root@k8s-master manifest]# kubectl apply -f pod-base.yaml
pod/pod-base created


# 查看Pod状况
# READY 1/2 : 表示当前Pod中有2个容器,其中1个准备就绪,1个未就绪
# RESTARTS  : 重启次数,因为有1个容器故障了,Pod一直在重启试图恢复它
[root@k8s-master manifest]# kubectl get -f pod-base.yaml
NAME       READY   STATUS             RESTARTS     AGE
pod-base   1/2     CrashLoopBackOff   1 (4s ago)   33s
[root@k8s-master manifest]#

# 可以通过describe查看内部的详情
# 此时已经运行起来了一个基本的Pod,虽然它暂时有问题
- 修改之后,busybox没有内置命令,一执行就退出了
[root@k8s-master manifest]# cat pod-base.yaml
apiVersion: v1
kind: Pod
metadata:
  name: pod-base
  namespace: dev
  labels:
    user: mushuang
spec:
  containers:
  - name: nginx
    image: nginx:1.17.1
  - name: busybox
    image: busybox:1.30
    command: ["/bin/sleep","6000"]
[root@k8s-master manifest]#

[root@k8s-master manifest]# kubectl get pods -n dev
NAME       READY   STATUS    RESTARTS   AGE
pod-base   2/2     Running   0          72s
[root@k8s-master manifest]# kubectl get -f pod-base.yaml
NAME       READY   STATUS    RESTARTS   AGE
pod-base   2/2     Running   0          83s
[root@k8s-master manifest]#
2. 镜像拉取
[root@k8s-master manifest]# vim pod-httpd.yml
[root@k8s-master manifest]# cat pod-httpd.yml
apiVersion: v1
kind: Pod
metadata:
  name: pod-pullimage
  namespace: dev
spec:
  containers:
  - name: httpd
    image: httpd:latest
    imagePullPolicy: IfNotPresent  # 用于设置镜像拉取策略
  - name: busybox
    image: busybox:latest
    command: ["/bin/sleep","6000"]

# 创建Pod
[root@k8s-master manifest]# kubectl apply -f pod-httpd.yml
pod/pod-pullimage created
[root@k8s-master manifest]# kubectl get -f pod-httpd.yml
NAME            READY   STATUS    RESTARTS   AGE
pod-pullimage   2/2     Running   0          9s
[root@k8s-master manifest]#

# 查看Pod详情
# 此时明显可以看到httpd镜像有一步Pulling image "httpd:latest"的过程
[root@k8s-master manifest]# kubectl describe -f pod-httpd.yml
.............
Events:
  Type    Reason     Age    From               Message
  ----    ------     ----   ----               -------
  Normal  Scheduled  2m34s  default-scheduler  Successfully assigned dev/pod-pullimage to k8s-node2
  Normal  Pulled     2m33s  kubelet            Container image "httpd:latest" already present on machine
  Normal  Created    2m32s  kubelet            Created container httpd
  Normal  Started    2m32s  kubelet            Started container httpd
  Normal  Pulling    2m32s  kubelet            Pulling image "busybox:latest"
  Normal  Pulled     2m27s  kubelet            Successfully pulled image "busybox:latest" in 4.246264392s
  Normal  Created    2m27s  kubelet            Created container busybox
  Normal  Started    2m26s  kubelet            Started container busybox
3. 添加标签
[root@k8s-master manifest]# vim pod-httpd.yml
[root@k8s-master manifest]# kubectl apply -f pod-httpd.yml
pod/pod-pullimage configured
[root@k8s-master manifest]# cat pod-httpd.yml
apiVersion: v1
kind: Pod
metadata:
  name: pod-pullimage
  namespace: dev
  labels:
    app: httpdlab
spec:
  containers:
  - name: httpd
    image: httpd:latest
    imagePullPolicy: IfNotPresent
  - name: busybox
    image: busybox:latest
    command: ["/bin/sleep","6000"]
##sleep会停止的
[root@k8s-master manifest]#

查看标签:
[root@k8s-master manifest]# kubectl get -f pod-httpd.yml --show-labels
NAME            READY   STATUS    RESTARTS   AGE     LABELS
pod-pullimage   2/2     Running   0          8m44s   app=httpdlab
[root@k8s-master manifest]#
4. 镜像拉取策略 imagePullPolicy
-
用于设置镜像拉取策略,kubernetes支持配置三种拉取策略:
- Always:总是从远程仓库拉取镜像(一直远程下载)
- IfNotPresent:本地有则使用本地镜像,本地没有则从远程仓库拉取镜像(本地有就本地 本地没就远程下载)
- Never:只使用本地镜像,从不去远程仓库拉取,本地没有就报错 (一直使用本地)
-
默认值说明:
- 如果镜像tag为具体版本号, 默认策略是:IfNotPresent
- 如果镜像tag为:latest(最终版本) ,默认策略是always
5. 启动命令
- busybox并不是一个程序,而是类似于一个工具类的集合,kubernetes集群启动管理后,它会自动关闭。解决方法就是让其一直在运行,这就用到了command配置
[root@k8s-master manifest]# vim pod-command.yml
[root@k8s-master manifest]# cat pod-command.yml
apiVersion: v1
kind: Pod
metadata:
  name: pod-pullimage
  namespace: dev
  labels:
    app: httpdlab
spec:
  containers:
  - name: httpd
    image: httpd:latest
    imagePullPolicy: IfNotPresent
  - name: busybox
    image: busybox:latest
    command: ["/bin/sh","-c","while true;do /bin/echo $(date +%T) > /tmp/hello.txt; sleep 3; done;"]

# 创建Pod
[root@k8s-master manifest]# kubectl apply -f pod-command.yml
pod/pod-pullimage created

# 查看Pod状态
# 此时发现两个pod都正常运行了
[root@k8s-master manifest]# kubectl get -f pod-command.yml
NAME            READY   STATUS    RESTARTS   AGE
pod-pullimage   2/2     Running   0          31s
[root@k8s-master manifest]# kubectl get -f pod-command.yml --show-labels
NAME            READY   STATUS    RESTARTS   AGE   LABELS
pod-pullimage   2/2     Running   0          39s   app=httpdlab


# 进入pod中的busybox容器,查看文件内容
# 补充一个命令: kubectl exec  pod名称 -n 命名空间 -it -c 容器名称 /bin/sh  在容器内部执行命令
# 使用这个命令就可以进入某个容器的内部,然后进行相关操作了
# 比如,可以查看txt文件的内容
[root@k8s-master manifest]# kubectl exec pod-pullimage -itn dev -c busybox -- /bin/sh
/ # tail -f /tmp/hello.txt
09:41:50
09:41:53
09:41:56
^C
/ # cat /tmp/hello.txt
09:31:46
09:31:49
09:31:52
09:31:55

[root@k8s-master manifest]# kubectl exec pod-pullimage -itn dev -c httpd -- /bin/bash
root@pod-pullimage:/usr/local/apache2# cat /etc/os-release
PRETTY_NAME="Debian GNU/Linux 11 (bullseye)"
NAME="Debian GNU/Linux"
VERSION_ID="11"
VERSION="11 (bullseye)"
VERSION_CODENAME=bullseye
ID=debian
HOME_URL="https://www.debian.org/"
SUPPORT_URL="https://www.debian.org/support"
BUG_REPORT_URL="https://bugs.debian.org/"
root@pod-pullimage:/usr/local/apache2#
6. 执行命令 - command
- 用于在pod中的容器初始化完毕之后运行一个命令
稍微解释下上面命令的意思:

"/bin/sh","-c", 使用sh执行命令

while true;do /bin/echo $(date +%T) > /tmp/hello.txt; sleep 3; done; 每隔3秒向文件/tmp/hello.txt 文件中写入当前时间
- 特别说明:
    通过上面发现command已经可以完成启动命令和传递参数的功能,为什么这里还要提供一个args选项,用于传递参数呢?这其实跟docker有点关系,kubernetes中的command、args两项其实是实现覆盖Dockerfile中ENTRYPOINT的功能。
 1 如果command和args均没有写,那么用Dockerfile的配置。
 2 如果command写了,但args没有写,那么Dockerfile默认的配置会被忽略,执行输入的command
 3 如果command没写,但args写了,那么Dockerfile中配置的ENTRYPOINT的命令会被执行,使用当前args的参数
 4 如果command和args都写了,那么Dockerfile的配置被忽略,执行command并追加上args参数

command取代ENTRYPOINT功能
args取代cmd功能

docker下entrypoint和cmd的区别是:
1、CMD指令运行一个可执行的文件并提供参数,可以为ENTRYPOINT指定参数;
2、ENTRYPOINT指令本身也可以包含参数,变动的参数不会被覆盖。
7. 环境变量
- 创建pod-env.yaml文件
[root@k8s-master manifest]# vim pod-env.yml
[root@k8s-master manifest]# cat pod-env.yml
apiVersion: v1
kind: Pod
metadata:
  name: pod-env
  namespace: dev
  labels:
    app: httpdlab
spec:
  containers:
  - name: busybox
    image: busybox:latest
    imagePullPolicy: IfNotPresent
    command: ["/bin/sh","-c","while true;do /bin/echo $(date +%T) >> /tmp/hello.txt; sleep 3; done;"]
    env:
    - name: "username"
      value: "mushuang"
    - name: "password"
      value: "run123123"
    - name: "age"
      value: "20"
[root@k8s-master manifest]#

env # 设置环境变量列表
- env,环境变量,用于在pod中的容器设置环境变量。
# 创建Pod
[root@k8s-master manifest]# kubectl apply -f pod-env.yml
pod/pod-env created
[root@k8s-master manifest]# kubectl get -f pod-env.yml
NAME      READY   STATUS    RESTARTS   AGE
pod-env   1/1     Running   0          10s
[root@k8s-master manifest]#


# 进入容器,输出环境变量
[root@k8s-master manifest]# kubectl exec pod-env -itn dev -c busybox -- /bin/sh
/ # echo $username
mushuang
/ # echo $age
20
/ # echo $password
run123123
/ #
8. 端口设置
- containers的ports选项,ports支持的子选项
[root@k8s-k8s-master ~]# kubectl explain pod.spec.containers.ports
KIND:     Pod
VERSION:  v1
RESOURCE: ports <[]Object>
FIELDS:
   name         <string>  # 端口名称,如果指定,必须保证name在pod中是唯一的
   containerPort<integer> # 容器要监听的端口(0<x<65536)
   hostPort     <integer> # 容器要在主机上公开的端口,如果设置,主机上只能运行容器的一个副本(一般省略)
   hostIP       <string>  # 要将外部端口绑定到的主机IP(一般省略)
   protocol     <string>  # 端口协议。必须是UDP、TCP或SCTP。默认为“TCP”。
- 编写pod-ports.yml
[root@k8s-master manifest]# vim pod-ports.yml
[root@k8s-master manifest]# cat pod-ports.yml
apiVersion: v1
kind: Pod
metadata:
  name: pod-pullimage
  namespace: dev
  labels:
    app: httpdlab
spec:
  containers:
  - name: httpd
    image: httpd:latest
    imagePullPolicy: IfNotPresent
    ports:
    - name: httpd-port
      containerPort: 80
      protocol: TCP
[root@k8s-master manifest]#

ports: # 设置容器暴露的端口列表
- 创建
# 创建Pod
[root@k8s-master manifest]# kubectl apply -f pod-ports.yml
pod/pod-pullimage created
[root@k8s-master manifest]# kubectl get -f pod-ports.yml
NAME            READY   STATUS    RESTARTS   AGE
pod-pullimage   1/1     Running   0          17s
[root@k8s-master manifest]#


# 查看pod
# 在下面可以明显看到配置信息
[root@k8s-master manifest]# kubectl get -f pod-ports.yml -o yaml
..................
spec:
  containers:
  - image: httpd:latest
    imagePullPolicy: IfNotPresent
    name: httpd
    ports:
    - containerPort: 80
      name: httpd-port
      protocol: TCP
    resources: {}
...................
- 访问容器中的程序需要使用的是
Podip:containerPort
9. 资源配额
-
容器中的程序要运行,肯定是要占用一定资源的,比如cpu和内存等,如果不对某个容器的资源做限制,那么它就可能吃掉大量资源,导致其它容器无法运行。针对这种情况,kubernetes提供了对内存和cpu的资源进行配额的机制,这种机制主要通过resources选项实现,他有两个子选项:
- limits:用于限制运行时容器的最大占用资源,当容器占用资源超过limits时会被终止,并进行重启(限制最大使用多少,超过了,容器会进行重启)
- requests :用于设置容器需要的最小资源,如果环境资源不够,容器将无法启动(限制最小使用多少)
-
可以通过上面两个选项设置资源的上下限
9.1 编写一个测试案例,创建pod-resources.yml
[root@k8s-master manifest]# vim pod-resources.yml
[root@k8s-master manifest]# cat pod-resources.yml
apiVersion: v1
kind: Pod
metadata:
  name: httpd-resources
  namespace: dev
spec:
  containers:
  - name: appche
    image: httpd:latest
    resources:
      limits:
        cpu: "2"
        memory: "10Gi"
      requests:
        cpu: "1"
        memory: "10Mi"
[root@k8s-master manifest]#


spec:
  containers:
  - name: appche
    image: httpd:latest
    resources: # 资源配额
      limits:  # 限制资源(上限,最大)
        cpu: "2" # CPU限制,单位是core数
        memory: "10Gi" # 内存限制
      requests: # 请求资源(下限,最少)
        cpu: "1"  # CPU限制,单位是core数
        memory: "10Mi"  # 内存限制
- 对cpu和memory的单位
- cpu:core数,可以为整数或小数
- memory: 内存大小,可以使用Gi、Mi、G、M等形式
# 运行Pod
[root@k8s-master manifest]# kubectl apply -f pod-resources.yml
pod/httpd-resources created

# 查看发现pod运行正常
[root@k8s-master manifest]# kubectl get -f pod-resources.yml
NAME              READY   STATUS    RESTARTS   AGE
httpd-resources   1/1     Running   0          8s
[root@k8s-master manifest]#

# 接下来,停止Pod
[root@k8s-master manifest]# kubectl delete -f pod-resources.yml
pod "httpd-resources" deleted
[root@k8s-master manifest]#


# 编辑pod,修改resources.requests.memory的值为10Gi
[root@k8s-master manifest]# cat pod-resources.yml
apiVersion: v1
kind: Pod
metadata:
  name: httpd-resources
  namespace: dev
spec:
  containers:
  - name: appche
    image: httpd:latest
    resources:
      limits:
        cpu: "2"
        memory: "10Gi"
      requests:
        cpu: "1"
        memory: "10Gi"
[root@k8s-master manifest]#
修改resources.requests.memory的值为10Gi

# 再次启动pod
[root@k8s-master manifest]# kubectl apply -f pod-resources.yml
pod/httpd-resources created


# 查看Pod状态,发现Pod启动失败
[root@k8s-master manifest]# kubectl get -f pod-resources.yml
NAME              READY   STATUS    RESTARTS   AGE
httpd-resources   0/1     Pending   0          2s
[root@k8s-master manifest]#

###挂起(Pending)

# 查看pod详情会发现,如下提示
[root@k8s-master manifest]# kubectl describe -f pod-resources.yml
.......省略
 Warning  FailedScheduling  68s   default-scheduler  0/3 nodes are available: 1 node(s) had untolerated taint {node-role.kubernetes.io/control-plane: }, 3 Insufficient memory. preemption: 0/3 nodes are available: 1 Preemption is not helpful for scheduling, 2 No preemption victims found for incoming pod.
####(Insufficient memory:内存不足)
[root@k8s-master manifest]#

68s default-scheduler 0/3节点可用:1个(s)节点有不可容忍的污染{node- roles .kubernetes。io/control-plane:}, 3内存不足。抢占:0/3节点可用:1抢占对调度没有帮助,2传入pod没有发现抢占受害者。
三. Pod生命周期
- 一般将pod对象从创建至终的这段时间范围称为pod的生命周期,它主要包含下面的过程:
- pod创建过程
- 运行初始化容器(init container)过程
- 运行主容器(main container)
- 容器启动后钩子(post start)、容器终止前钩子(pre stop)
- 容器的存活性探测(liveness probe)、就绪性探测(readiness probe)
- pod终止过程
[外链图片转存失败,源站可能有防盗链机制,建议将图片保存下来直接上传(img-W1WTt1ux-1662908249867)(16622977091193.jpg)]
- 在整个生命周期中,Pod会出现5种状态**(相位),分别如下:**
- 挂起(Pending):apiserver已经创建了pod资源对象,但它尚未被调度完成或者仍处于下载镜像的过程中
- 运行中(Running):pod已经被调度至某节点,并且所有容器都已经被kubelet创建完成
- 成功(Succeeded):pod中的所有容器都已经成功终止并且不会被重启
- 失败(Failed):所有容器都已经终止,但至少有一个容器终止失败,即容器返回了非0值的退出状态
- 未知(Unknown):apiserver无法正常获取到pod对象的状态信息,通常由网络通信失败所导致
1. 创建和终止
1.1 pod的创建过程
- 用户通过kubectl或其他api客户端提交需要创建的pod信息给apiServer
- apiServer开始生成pod对象的信息,并将信息存入etcd存储,然后返回确认信息至客户端
- apiServer开始反映etcd中的pod对象的变化,其它组件使用watch机制(监控)来跟踪检查apiServer上的变动
- scheduler发现有新的pod对象要创建,开始为Pod分配主机并将结果信息更新至apiServer
- node节点上的kubelet发现有pod调度过来,尝试调用docker启动容器,并将结果回送至apiServer
- apiServer将接收到的pod状态信息存入etcd中
[外链图片转存失败,源站可能有防盗链机制,建议将图片保存下来直接上传(img-IQ2mcvkb-1662908249868)(16622977400664.jpg)]
- kubectl 去认证访问apiserver,发现有个pod要运行,就把它交给scheduler,scheduler去指定在哪里运行,apiserver将信息更新到etcd中,然后调度访问
1.2 pod的终止过程
- 用户向apiServer发送删除pod对象的命令
- apiServcer中的pod对象信息会随着时间的推移而更新,在宽限期内(默认30s),pod被视为dead
- 将pod标记为terminating状态
- kubelet在监控到pod对象转为terminating状态的同时启动pod关闭过程
- 节点控制器监控到pod对象的关闭行为时将其从所有匹配到此端点的service资源列表中移除
- 如果当前pod对象定义了preStop钩子处理器(相当于触发器),则在其标记为terminating后即会以同步的方式启动执行
- pod对象中的容器进程收到停止信号
- 宽限期结束后,若pod中还存在仍在运行的进程,那么pod对象会收到立即终止的信号
- kubelet请求apiServer将此pod资源的宽限期设置为0从而完成删除操作,此时pod对于用户已不可见
2. 初始化容器
-
初始化容器是在pod的主容器启动之前要运行的容器,主要是做一些主容器的前置工作,具有两大特征:
- 初始化容器必须运行完成直至结束,若某初始化容器运行失败,那么kubernetes需要重启它直到成功完成
- 初始化容器必须按照定义的顺序执行,当且仅当前一个成功之后,后面的一个才能运行
-
初始化容器有很多的应用场景,下面列出的是最常见的几个:
- 提供主容器镜像中不具备的工具程序或自定义代码(主容器中有个镜像,镜像中没有某个工具(ping)可以通过辅助容器来运行)
- 初始化容器要先于应用容器串行启动并运行完成,因此可用于延后应用容器的启动直至其依赖的条件得到满足
2.1 测试
- 假设要以主容器来运行nginx,但是要求在运行nginx之前先要能够连接上mysql和redis所在服务器
- 为了简化测试,事先规定好mysql
(192.168.232.160)和redis(192.168.232.170)服务器的地址
[root@k8s-master manifest]# cat pod-initcon.yml
apiVersion: v1
kind: Pod
metadata:
  name: pod-initcon
  namespace: dev
spec:
  containers:
  - name: main-con
    image: nginx:latest
    ports:
    - name: nginx-port
      containerPort: 80
  initContainers:
  - name: test-mysql
    image: busybox:latest
    command: ['sh', '-c', 'until ping 192.168.232.160 -c 1 ; do echo waiting for mysql...; sleep 2; done;']
  - name: test-redis
    image: busybox:latest
    command: ['sh', '-c', 'until ping 192.168.232.170 -c 1 ; do echo waiting for reids...; sleep 2; done;']
[root@k8s-master manifest]#

command: ['sh', '-c', 'until ping 192.168.232.160 -c 1 ; do echo waiting for mysql...; sleep 2; done;']
      条件不满足,ping不通,做后面的事情。
      通了,条件满足,然后退出
- 进行运行
# 创建pod
[root@k8s-master manifest]# kubectl apply -f pod-initcon.yml
pod/pod-initcon created

# 查看pod状态
[root@k8s-master manifest]# kubectl get -f pod-initcon.yml
NAME          READY   STATUS     RESTARTS   AGE
pod-initcon   0/1     Init:0/2   0          10s
[root@k8s-master manifest]#

# 发现pod卡在启动第一个初始化容器过程中,后面的容器不会运行
[root@k8s-master manifest]# kubectl describe pods pod-initcon -n dev
Events:
  Type    Reason     Age    From               Message
  ----    ------     ----   ----               -------
  Normal  Scheduled  2m12s  default-scheduler  Successfully assigned dev/pod-initcon to k8s-node1
  Normal  Pulling    2m9s   kubelet            Pulling image "busybox:latest"
  Normal  Pulled     2m5s   kubelet            Successfully pulled image "busybox:latest" in 4.0940422s
  Normal  Created    2m5s   kubelet            Created container test-mysql
  Normal  Started    2m5s   kubelet            Started container test-mysql

# 接下来新开一个shell,为当前服务器新增两个ip,观察pod的变化
[root@k8s-master ~]# ip addr add 192.168.232.160/24 dev ens160
[root@k8s-master ~]# ip addr add 192.168.232.170/24 dev ens160


# 动态查看pod
[root@k8s-master manifest]# kubectl get pods pod-initcon -n dev -w
NAME          READY   STATUS     RESTARTS   AGE
pod-initcon   0/1     Init:0/2   0          5m6s
pod-initcon   0/1     Init:1/2   0          6m20s
pod-initcon   0/1     PodInitializing   0          6m24s
pod-initcon   1/1     Running           0          6m29s
^C[root@k8s-master manifest]#

# 查看pod状态
[root@k8s-master manifest]# kubectl get -f pod-initcon.yml
NAME          READY   STATUS    RESTARTS   AGE
pod-initcon   1/1     Running   0          7m22s
[root@k8s-master manifest]#
3. 钩子函数
-
钩子函数能够感知自身生命周期中的事件,并在相应的时刻到来时运行用户指定的程序代码。
-
kubernetes在主容器的启动之后和停止之前提供了两个钩子函数:
- post start:容器创建之后执行,如果失败了会重启容器
- pre stop :容器终止之前执行,执行完成之后容器将成功终止,在其完成之前会阻塞删除容器的操作
3.1 钩子处理器支持使用下面三种方式定义动作:
- Exec命令:在容器内执行一次命令
……
lifecycle://生命周期

  postStart:

    exec:

      command:

      - cat

      - /tmp/healthy

……
- TCPSocket:在当前容器尝试访问指定的socket
……
lifecycle:

  postStart:

    tcpSocket:

      port: 8080

……

如果是tomcat
- HTTPGet:在当前容器中向某url发起http请求
……
lifecycle:

  postStart:

    httpGet:

      path: / #URI地址

      port: 80 #端口号

      host: 192.168.5.3 #主机地址

      scheme: HTTP #支持的协议,http或者https

……

//如果是网站服务就用主机地址+port+uri地址
3.2 示例,演示下钩子函数的使用
3.2.1 exec
[root@k8s-master manifest]# cat pod-exec.yml
apiVersion: v1
kind: Pod
metadata:
  name: pod-exec
  namespace: dev
spec:
  containers:
  - name: main-con
    image: nginx:latest
    ports:
    - name: nginx-port
      containerPort: 80
    lifecycle:
      postStart:
        exec:
          command: ["/bin/sh", "-c", "echo 'hello world' > /usr/share/nginx/html/index.html"]
      preStop:
        exec:
          command: ["/usr/sbin/nginx","-s","quit"]
[root@k8s-master manifest]#


spec:
  containers:
  - name: main-container
    image: nginx:1.17.1
    ports:
    - name: nginx-port
      containerPort: 80
    lifecycle:
      postStart:
        exec: # 在容器启动的时候执行一个命令,修改掉nginx的默认首页内容
          command: ["/bin/sh", "-c", "echo postStart... > /usr/share/nginx/html/index.html"]
      preStop:
        exec: # 在容器停止之前停止nginx服务
          command: ["/usr/sbin/nginx","-s","quit"]
# 创建pod
[root@k8s-master manifest]# kubectl apply -f pod-exec.yml
pod/pod-exec created

# 查看pod
[root@k8s-master manifest]# kubectl get -f pod-exec.yml
NAME       READY   STATUS    RESTARTS   AGE
pod-exec   1/1     Running   0          21s
[root@k8s-master manifest]# kubectl get -f pod-exec.yml -o wide
NAME       READY   STATUS    RESTARTS   AGE   IP            NODE        NOMINATED NODE   READINESS GATES
pod-exec   1/1     Running   0          82s   10.244.1.34   k8s-node1   <none>           <none>
[root@k8s-master manifest]#


# 访问pod
[root@k8s-master manifest]# curl 10.244.1.34
hello world
[root@k8s-master manifest]#

进入容器
[root@k8s-master manifest]# kubectl exec pod-exec -itn dev -c main-con -- /bin/bash
root@pod-exec:/# cd /usr/share/nginx/html/
root@pod-exec:/usr/share/nginx/html# ls
50x.html  index.html
root@pod-exec:/usr/share/nginx/html# cat index.html
hello world
root@pod-exec:/usr/share/nginx/html#
4. 容器探测
-
容器探测用于检测容器中的应用实例是否正常工作,是保障业务可用性的一种传统机制。如果经过探测,实例的状态不符合预期,那么kubernetes就会把该问题实例" 摘除 ",不承担业务流量。(假死状态)
-
kubernetes提供了两种探针来实现容器探测,分别是:
- liveness probes:存活性探针,用于检测应用实例当前是否处于正常运行状态,如果不是,k8s会重启容器(检测是否运行)
- readiness probes:就绪性探针,用于检测应用实例当前是否可以接收请求,如果不能,k8s不会转发流量(检测是否接收请求)
-
livenessProbe 决定是否重启容器,readinessProbe 决定是否将请求转发给容器。
4.1 上面两种探针目前均支持三种探测方式:
- Exec命令:在容器内执行一次命令,如果命令执行的退出码为0,则认为程序正常,否则不正常
……
livenessProbe:

  exec:

    command:

    - cat

    - /tmp/healthy

……
- TCPSocket:将会尝试访问一个用户容器的端口,如果能够建立这条连接,则认为程序正常,否则不正常
……
livenessProbe:

  tcpSocket:

    port: 8080

……
- HTTPGet:调用容器内Web应用的URL,如果返回的状态码在200和399之间,则认为程序正常,否则不正常
……
livenessProbe:

  httpGet:

    path: / #URI地址

    port: 80 #端口号

    host: 127.0.0.1 #主机地址

    scheme: HTTP #支持的协议,http或者https

……
4.2 Exec
- 创建pod
[root@k8s-master manifest]# vim pod-liveness-exec.yml
[root@k8s-master manifest]# cat pod-liveness-exec.yml
apiVersion: v1
kind: Pod
metadata:
  name: pod-liveness-exec
  namespace: dev
spec:
  containers:
  - name: nginx
    image: nginx:latest
    ports:
    - name: nginx-port
      containerPort: 80
    livenessProbe:
      exec:
        command: ["/bin/cat","/tmp/hello.txt"]
[root@k8s-master manifest]#


livenessProbe:
      exec:
        command: ["/bin/cat","/tmp/hello.txt"] # 执行一个查看文件的命令
- 创建pod,观察效果
# 创建Pod
[root@k8s-master manifest]# kubectl apply -f pod-liveness-exec.yml
pod/pod-liveness-exec created

# 查看Pod详情
[root@k8s-master manifest]# kubectl get -f pod-liveness-exec.yml
NAME                READY   STATUS    RESTARTS      AGE
pod-liveness-exec   1/1     Running   2 (12s ago)   72s
[root@k8s-master manifest]# kubectl describe pods pod-liveness-exec -n dev
Events:
  Type     Reason     Age                  From               Message
  ----     ------     ----                 ----               -------
  Normal   Scheduled  3m4s                 default-scheduler  Successfully assigned dev/pod-liveness-exec to k8s-node1
  Normal   Pulled     2m58s                kubelet            Successfully pulled image "nginx:latest" in 5.176318986s
  Normal   Pulled     2m30s                kubelet            Successfully pulled image "nginx:latest" in 3.947683628s
  Normal   Created    2m (x3 over 2m58s)   kubelet            Created container nginx
  Normal   Started    2m (x3 over 2m58s)   kubelet            Started container nginx
  Normal   Pulled     2m                   kubelet            Successfully pulled image "nginx:latest" in 3.004210518s
  Warning  Unhealthy  94s (x9 over 2m53s)  kubelet            Liveness probe failed: /bin/cat: /tmp/hello.txt: No such file or directory
  Normal   Killing    94s (x3 over 2m34s)  kubelet            Container nginx failed liveness probe, will be restarted
  Normal   Pulling    93s (x4 over 3m3s)   kubelet            Pulling image "nginx:latest"


# 观察上面的信息就会发现nginx容器启动之后就进行了健康检查
# 检查失败之后,容器被kill掉,然后尝试进行重启
# 稍等一会之后,再观察pod信息,就可以看到RESTARTS不再是0,而是一直增长
[root@k8s-master manifest]# kubectl get -f pod-liveness-exec.yml
NAME                READY   STATUS             RESTARTS      AGE
pod-liveness-exec   0/1     CrashLoopBackOff   5 (85s ago)   5m6s
[root@k8s-master manifest]#


# 当然接下来,可以修改成一个存在的文件,比如/tmp/hello.txt,再试,结果就正常了......
[root@k8s-master manifest]# kubectl exec pod-liveness-exec -itn dev -c nginx -- /bin/bash
root@pod-liveness-exec:/# echo '123456' > tmp/hello.txt
root@pod-liveness-exec:/# cat tmp/hello.txt
123456
root@pod-liveness-exec:/# exit
exit
[root@k8s-master manifest]# kubectl get -f pod-liveness-exec.yml NAME                READY   STATUS    RESTARTS        AGE
pod-liveness-exec   1/1     Running   4 (2m13s ago)   4m14s
[root@k8s-master manifest]#
4.3 TCPSocket
[root@k8s-master manifest]# vim pod-liveness-tcpsocket.yml
[root@k8s-master manifest]# cat pod-liveness-tcpsocket.yml
apiVersion: v1
kind: Pod
metadata:
  name: pod-liveness-tcpsocket
  namespace: dev
spec:
  containers:
  - name: nginx
    image: nginx:latest
    ports:
    - name: nginx-port
      containerPort: 80
    livenessProbe:
      tcpSocket:
        port: 8080
[root@k8s-master manifest]#

port: 8080 # 尝试访问8080端口
- 创建pod,观察效果
[root@k8s-master manifest]# kubectl apply -f pod-liveness-tcpsocket.yml
pod/pod-liveness-tcpsocket created
[root@k8s-master manifest]#

# 查看Pod详情
[root@k8s-master manifest]# kubectl describe -f pod-liveness-tcpsocket.yml
Events:
  Type     Reason     Age               From               Message
  ----     ------     ----              ----               -------
  Normal   Scheduled  36s               default-scheduler  Successfully assigned dev/pod-liveness-tcpsocket to k8s-node1
  Normal   Pulled     31s               kubelet            Successfully pulled image "nginx:latest" in 4.115050213s
  Normal   Created    31s               kubelet            Created container nginx
  Normal   Started    31s               kubelet            Started container nginx
  Normal   Pulling    6s (x2 over 35s)  kubelet            Pulling image "nginx:latest"
  Warning  Unhealthy  6s (x3 over 26s)  kubelet            Liveness probe failed: dial tcp 10.244.1.36:8080: connect: connection refused
  Normal   Killing    6s                kubelet            Container nginx failed liveness probe, will be restarted


failed: dial tcp 10.244.1.36:8080

# 观察上面的信息,发现尝试访问8080端口,但是失败了
# 稍等一会之后,再观察pod信息,就可以看到RESTARTS不再是0,而是一直增长
[root@k8s-master manifest]# kubectl get -f pod-liveness-tcpsocket.yml
NAME                     READY   STATUS             RESTARTS      AGE
pod-liveness-tcpsocket   0/1     CrashLoopBackOff   4 (11s ago)   2m41s
[root@k8s-master manifest]#

# 当然接下来,可以修改成一个可以访问的端口,比如80,再试,结果就正常了......
[root@k8s-master manifest]# cat pod-liveness-tcpsocket.yml
apiVersion: v1
kind: Pod
metadata:
  name: pod-liveness-tcpsocket
  namespace: dev
spec:
  containers:
  - name: nginx
    image: nginx:latest
    ports:
    - name: nginx-port
      containerPort: 80
    livenessProbe:
      tcpSocket:
        port: 80
[root@k8s-master manifest]#
[root@k8s-master manifest]# kubectl delete -f pod-liveness-tcpsocket.yml
pod "pod-liveness-tcpsocket" deleted
[root@k8s-master manifest]# kubectl apply -f pod-liveness-tcpsocket.yml
pod/pod-liveness-tcpsocket created
[root@k8s-master manifest]# kubectl get -f pod-liveness-tcpsocket.yml
NAME                     READY   STATUS    RESTARTS   AGE
pod-liveness-tcpsocket   1/1     Running   0          6s
4.4 HTTPGet
[root@k8s-master manifest]# vim pod-httpget.yaml
[root@k8s-master manifest]# cat pod-httpget.yaml
apiVersion: v1
kind: Pod
metadata:
  name: pod-liveness-httpget
  namespace: dev
spec:
  containers:
  - name: nginx
    image: nginx:latest
    ports:
    - name: nginx-port
      containerPort: 80
    livenessProbe:
      httpGet:
        scheme: HTTP
        port: 80
        path: /hello
[root@k8s-master manifest]#

livenessProbe:
      httpGet:  # 其实就是访问http://127.0.0.1:80/hello
        scheme: HTTP #支持的协议,http或者https
        port: 80 #端口号
        path: /hello #URI地址
- 创建pod,观察效果
[root@k8s-master manifest]# kubectl apply -f pod-httpget.yaml
pod/pod-liveness-httpget created

# 查看Pod详情
[root@k8s-master manifest]# kubectl describe -f pod-httpget.yaml

Events:
  Type     Reason     Age                From               Message
  ----     ------     ----               ----               -------
  Normal   Scheduled  52s                default-scheduler  Successfully assigned dev/pod-liveness-httpget to k8s-node2
  Normal   Pulled     47s                kubelet            Successfully pulled image "nginx:latest" in 4.101020488s
  Normal   Killing    22s                kubelet            Container nginx failed liveness probe, will be restarted
  Normal   Pulling    21s (x2 over 51s)  kubelet            Pulling image "nginx:latest"
  Normal   Created    17s (x2 over 47s)  kubelet            Created container nginx
  Normal   Started    17s (x2 over 47s)  kubelet            Started container nginx
  Normal   Pulled     17s                kubelet            Successfully pulled image "nginx:latest" in 4.545526848s
  Warning  Unhealthy  2s (x5 over 42s)   kubelet            Liveness probe failed: HTTP probe failed with statuscode: 404
[root@k8s-master manifest]#


# 观察上面信息,尝试访问路径,但是未找到,出现404错误
# 稍等一会之后,再观察pod信息,就可以看到RESTARTS不再是0,而是一直增长
[root@k8s-master manifest]# kubectl get -f pod-httpget.yaml
NAME                   READY   STATUS    RESTARTS      AGE
pod-liveness-httpget   1/1     Running   3 (20s ago)   110s


# 当然接下来,可以修改成一个可以访问的路径path,比如/,再试,结果就正常了......
[root@k8s-master manifest]# cat pod-httpget.yaml
apiVersion: v1
kind: Pod
metadata:
  name: pod-liveness-httpget
  namespace: dev
spec:
  containers:
  - name: nginx
    image: nginx:latest
    ports:
    - name: nginx-port
      containerPort: 80
    livenessProbe:
      httpGet:
        scheme: HTTP
        port: 80
        path: /
[root@k8s-master manifest]#
[root@k8s-master manifest]# kubectl apply -f pod-httpget.yaml
[root@k8s-master manifest]# kubectl get -f pod-httpget.yaml
NAME                   READY   STATUS    RESTARTS   AGE
pod-liveness-httpget   1/1     Running   0          43s
[root@k8s-master manifest]# kubectl describe -f pod-httpget.yaml
Events:
  Type    Reason     Age   From               Message
  ----    ------     ----  ----               -------
  Normal  Scheduled  46s   default-scheduler  Successfully assigned dev/pod-liveness-httpget to k8s-node1
  Normal  Pulling    45s   kubelet            Pulling image "nginx:latest"
  Normal  Pulled     42s   kubelet            Successfully pulled image "nginx:latest" in 3.40873179s
  Normal  Created    42s   kubelet            Created container nginx
  Normal  Started    42s   kubelet            Started container nginx
4.5 查看livenessProbe的子属性
[root@k8s-master01 ~]# kubectl explain pod.spec.containers.livenessProbe
FIELDS:
   exec <Object>
   tcpSocket    <Object>
   httpGet      <Object>
   initialDelaySeconds  <integer>  # 容器启动后等待多少秒执行第一次探测
   timeoutSeconds       <integer>  # 探测超时时间。默认1秒,最小1秒
   periodSeconds        <integer>  # 执行探测的频率。默认是10秒,最小1秒
   failureThreshold     <integer>  # 连续探测失败多少次才被认定为失败。默认是3。最小值是1
   successThreshold     <integer>  # 连续探测成功多少次才被认定为成功。默认是1
[root@k8s-master manifest]# cat pod-liveness-httpget.yaml
apiVersion: v1
kind: Pod
metadata:
  name: pod-liveness-httpget
  namespace: dev
spec:
  containers:
  - name: nginx
    image: nginx:latest
    ports:
    - name: nginx-port
      containerPort: 80
    livenessProbe:
      httpGet:
        scheme: HTTP
        port: 80
        path: /
      initialDelaySeconds: 30
      timeoutSeconds: 5
[root@k8s-master manifest]#


    livenessProbe:
      httpGet:
        scheme: HTTP
        port: 80
        path: /
      initialDelaySeconds: 30 # 容器启动后30s开始探测
      timeoutSeconds: 5 # 探测超时时间为5s
[root@k8s-master manifest]# kubectl apply -f pod-liveness-httpget.yaml
pod/pod-liveness-httpget created
[root@k8s-master manifest]# kubectl get -f pod-liveness-httpget.yaml
NAME                   READY   STATUS    RESTARTS   AGE
pod-liveness-httpget   1/1     Running   0          15s
[root@k8s-master manifest]#

[root@k8s-master manifest]# kubectl describe -f pod-liveness-httpget.yaml
Events:
  Type    Reason     Age   From               Message
  ----    ------     ----  ----               -------
  Normal  Scheduled  71s   default-scheduler  Successfully assigned dev/pod-liveness-httpget to k8s-node1
  Normal  Pulling    71s   kubelet            Pulling image "nginx:latest"
  Normal  Pulled     67s   kubelet            Successfully pulled image "nginx:latest" in 4.007974086s
  Normal  Created    67s   kubelet            Created container nginx
  Normal  Started    66s   kubelet            Started container nginx

成功分配dev/pod- alive -httpget到k8s-node1
将图像“nginx:最新的“
在4.007974086s中成功拉出“nginx:latest”图像
创建容器nginx
启动容器nginx
5. 重启策略
-
跟检测一起使用
-
一旦容器探测出现了问题,kubernetes就会对容器所在的Pod进行重启,其实这是由pod的重启策略决定的
-
pod的重启策略有 3 种,分别如下:
- Always :容器失效时,自动重启该容器,这也是默认值。
- OnFailure : 容器终止运行且退出码不为0时重启
- Never : 不论状态为何,都不重启该容器
-
重启策略适用于pod对象中的所有容器,首次需要重启的容器,将在其需要时立即进行重启,随后再次需要重启的操作将由kubelet延迟一段时间后进行
-
反复的重启操作的延迟时长以此为10s、20s、40s、80s、160s和300s,300s是最大延迟时长。
[root@k8s-master manifest]# cat pod-restartPolicy.yml
apiVersion: v1
kind: Pod
metadata:
  name: pod-restartpolicy
  namespace: dev
spec:
  containers:
  - name: nginx
    image: nginx:latest
    ports:
    - name: nginx-port
      containerPort: 80
    livenessProbe:
      httpGet:
        scheme: HTTP
        port: 80
        path: /hello
  restartPolicy: Never
[root@k8s-master manifest]#

path: /hello  访问不存在的
restartPolicy: Never # 设置重启策略为Never,不重启
- 运行Pod测试
# 创建Pod
[root@k8s-master manifest]# kubectl apply -f pod-restartPolicy.yml
pod/pod-restartpolicy created

# 查看Pod详情,发现nginx容器失败
Events:
  Type     Reason     Age   From               Message
  ----     ------     ----  ----               -------
  Normal   Scheduled  10s   default-scheduler  Successfully assigned dev/pod-restartpolicy to k8s-node2
  Normal   Pulling    9s    kubelet            Pulling image "nginx:latest"
  Normal   Pulled     5s    kubelet            Successfully pulled image "nginx:latest" in 4.135430013s
  Normal   Created    5s    kubelet            Created container nginx
  Normal   Started    5s    kubelet            Started container nginx
  Warning  Unhealthy  0s    kubelet            Liveness probe failed: HTTP probe failed with statuscode: 404
活动探测失败:HTTP探测失败,状态码为404

# 多等一会,再观察pod的重启次数,发现一直是0,并未重启
[root@k8s-master manifest]# kubectl get -f pod-restartPolicy.yml
NAME                READY   STATUS      RESTARTS   AGE
pod-restartpolicy   0/1     Completed   0          79s
[root@k8s-master manifest]# kubectl get -f pod-restartPolicy.yml
NAME                READY   STATUS      RESTARTS   AGE
pod-restartpolicy   0/1     Completed   0          81s
[root@k8s-master manifest]# kubectl get -f pod-restartPolicy.yml
NAME                READY   STATUS      RESTARTS   AGE
pod-restartpolicy   0/1     Completed   0          82s
[root@k8s-master manifest]#
6. Pod调度
-
在默认情况下,一个Pod在哪个Node节点上运行,是由Scheduler组件采用相应的算法计算出来的,这个过程是不受人工控制的。
-
在实际使用中,想控制某些Pod到达某些节点上
-
kubernetes提供了四大类调度方式:
-
自动调度:运行在哪个节点上完全由Scheduler(调度器)经过一系列的算法计算得出
-
定向调度:NodeName、NodeSelector(用节点选择器通过标签来选择需要到那些有标签的节点上运行)
-
亲和性调度:NodeAffinity(我期望在哪个节点上运行,那个节点不能跑选次一级)、PodAffinity(期望和另外一个pod在同一节点上运行)、PodAntiAffinity(不期望在哪个节点上运行)
-
污点(容忍)调度:Taints(打污点)、Toleration(容忍)
-
  [root@k8s-master ~]# kubectl describe node k8s-master
  Taints:             node-role.kubernetes.io/control-plane:NoSchedule
-
6.1 定向调度
- 定向调度,指的是利用在pod上声明nodeName或者nodeSelector,以此将Pod调度到期望的node节点上。
- 注意,这里的调度是强制的,这就意味着即使要调度的目标Node不存在,也会向上面进行调度,只不过pod运行失败而已。
6.1.1 NodeName
- NodeName用于强制约束将Pod调度到指定的Name的Node节点上。这种方式,其实是直接跳过Scheduler的调度逻辑,直接将Pod调度到指定名称的节点。
[root@k8s-master manifest]# cat pod-httpd.yml
apiVersion: v1
kind: Pod
metadata:
  name: pod-pullimage
  namespace: dev
  labels:
    app: httpdlab
spec:
  nodeName: k8s-node1
  containers:
  - name: httpd
    image: httpd:latest
    imagePullPolicy: IfNotPresent
  - name: busybox
    image: busybox:latest
    command: ["/bin/sleep","6000"]
#查看Pod调度到NODE属性,确实是调度到了node1节点上
[root@k8s-master manifest]# kubectl apply -f pod-httpd.yml
pod/pod-pullimage created
[root@k8s-master manifest]# kubectl get -f pod-httpd.yml -o wide
NAME            READY   STATUS    RESTARTS   AGE   IP            NODE        NOMINATED NODE   READINESS GATES
pod-pullimage   2/2     Running   0          12s   10.244.1.40   k8s-node1   <none>           <none>
[root@k8s-master manifest]# kubectl delete -f pod-httpd.yml
pod "pod-pullimage" deleted
# 接下来,删除pod,修改nodeName的值为node2
[root@k8s-master manifest]# cat pod-httpd.yml
apiVersion: v1
kind: Pod
metadata:
  name: pod-pullimage
  namespace: dev
  labels:
    app: httpdlab
spec:
  nodeName: k8s-node2
  containers:
  - name: httpd
    image: httpd:latest
    imagePullPolicy: IfNotPresent
  - name: busybox
    image: busybox:latest
    command: ["/bin/sleep","6000"]

nodeName: node2 # 指定调度到node2节点上
#再次查看,发现已经向Node2节点调度
[root@k8s-master manifest]# kubectl apply -f pod-httpd.yml
pod/pod-pullimage created
[root@k8s-master manifest]# kubectl get -f pod-httpd.yml -o wide
NAME            READY   STATUS              RESTARTS   AGE   IP       NODE        NOMINATED NODE   READINESS GATES
pod-pullimage   0/2     ContainerCreating   0          4s    <none>   k8s-node2   <none>           <none>
[root@k8s-master manifest]#
# 接下来,删除pod,修改nodeName的值为node3(并没有node3节点)
[root@k8s-master01 ~]# kubectl delete -f pod-nodename.yaml
pod "pod-nodename" deleted
[root@k8s-master01 ~]# vim pod-nodename.yaml
[root@k8s-master01 ~]# kubectl create -f pod-nodename.yaml
pod/pod-nodename created

#再次查看,发现已经向Node3节点调度,但是由于不存在node3节点,所以pod无法正常运行
[root@k8s-master01 ~]# kubectl get pods pod-nodename -n dev -o wide
NAME           READY   STATUS    RESTARTS   AGE   IP       NODE    ......
pod-nodename   0/1     Pending   0          6s    <none>   node3   ......
6.1.2 NodeSelector
-
NodeSelector用于将pod调度到添加了指定标签的node节点上。
-
它是通过kubernetes的label-selector机制实现的,也就是说,在pod创建之前,会由scheduler使用MatchNodeSelector调度策略进行label匹配,找出目标node,然后将pod调度到目标节点,该匹配规则是强制约束。
-
首先分别为node节点添加标签
[root@k8s-master ~]# kubectl get nodes --show-labels

[root@k8s-master ~]# kubectl label nodes k8s-node1 env=test
node/k8s-node1 labeled
[root@k8s-master ~]# kubectl label nodes k8s-node2 env=prod
node/k8s-node2 labeled
[root@k8s-master ~]#
- 创建一个pod-nodeselector.yaml文件,并使用它创建Pod
[root@k8s-master manifest]# cat pod-httpd.yml
apiVersion: v1
kind: Pod
metadata:
  name: pod-pullimage
  namespace: dev
  labels:
    app: httpdlab
spec:
  nodeSelector:
    env: prod
  containers:
  - name: httpd
    image: httpd:latest
    imagePullPolicy: IfNotPresent

nodeSelector:
env: prod # 指定调度到具有env=prod标签的节点上
#创建Pod
[root@k8s-master manifest]# kubectl apply -f pod-httpd.yml
pod/pod-pullimage created
[root@k8s-master manifest]#

#查看Pod调度到NODE属性,确实是调度到了node2节点上
[root@k8s-master manifest]# kubectl get -f pod-httpd.yml -o wide
NAME            READY   STATUS    RESTARTS   AGE    IP            NODE        NOMINATED NODE   READINESS GATES
pod-pullimage   1/1     Running   0          2m4s   10.244.2.59   k8s-node2   <none>           <none>
[root@k8s-master manifest]#

# 接下来,删除pod,修改nodeSelector的值为env: mushuang(不存在打有此标签的节点)
[root@k8s-master manifest]# cat pod-httpd.yml
apiVersion: v1
kind: Pod
metadata:
  name: pod-pullimage
  namespace: dev
  labels:
    app: httpdlab
spec:
  nodeSelector:
    env: mushuang
  containers:
  - name: httpd
    image: httpd:latest
    imagePullPolicy: IfNotPresent

#再次查看,发现pod无法正常运行,Node的值为none
[root@k8s-master manifest]# kubectl apply -f pod-httpd.yml
pod/pod-pullimage created

# 查看详情,发现node selector匹配失败的提示
[root@k8s-master manifest]# kubectl get -f pod-httpd.yml -o wide
NAME            READY   STATUS    RESTARTS   AGE   IP       NODE     NOMINATED NODE   READINESS GATES
pod-pullimage   0/1     Pending   0          6s    <none>   <none>   <none>           <none>
[root@k8s-master manifest]#
6.2 亲和性调度
-
有一定的问题,那就是如果没有满足条件的Node,那么Pod将不会被运行,即使在集群中还有可用Node列表也不行,这就限制了它的使用场景
-
基于上面的问题,kubernetes还提供了一种亲和性调度(Affinity)。
-
它在NodeSelector的基础之上的进行了扩展,可以通过配置的形式,实现优先选择满足条件的Node进行调度,如果没有,也可以调度到不满足条件的节点上,使调度更加灵活。
-
Affinity主要分为三类:
- nodeAffinity(node亲和性): 以node为目标,解决pod可以调度到哪些node的问题
- podAffinity(pod亲和性) : 以pod为目标,解决pod可以和哪些已存在的pod部署在同一个拓扑域中的问题(之前存在一个pod,现在要运行一个pod,希望和之前那个pod在一个节点上运行)
- podAntiAffinity(pod反亲和性) : 以pod为目标,解决pod不能和哪些已存在pod部署在同一个拓扑域中的问题(之前运行一个pod,现在运行一个pod不想在那个pod上运行)
-
亲和性(反亲和性)使用场景的说明
- 亲和性:如果两个应用频繁交互,那就有必要利用亲和性让两个应用的尽可能的靠近,这样可以减少因网络通信而带来的性能损耗。(在内部通信)
- 反亲和性:当应用的采用多副本部署时,有必要采用反亲和性让各个应用实例打散分布在各个node上,这样可以提高服务的高可用性。(不能在一个节点上跑相同的内容,让他们分散,达到高可用)
6.2.1 NodeAffinity
NodeAffinity的可配置项:
pod.spec.affinity.nodeAffinity
  requiredDuringSchedulingIgnoredDuringExecution  Node节点必须满足指定的所有规则才可以,相当于硬限制
    nodeSelectorTerms  节点选择列表
      matchFields   按节点字段列出的节点选择器要求列表
      matchExpressions   按节点标签列出的节点选择器要求列表(推荐)
        key    键
        values 值
        operator 关系符 支持Exists, DoesNotExist, In, NotIn, Gt, Lt
  preferredDuringSchedulingIgnoredDuringExecution 优先调度到满足指定的规则的Node,相当于软限制 (倾向)
    preference   一个节点选择器项,与相应的权重相关联
      matchFields   按节点字段列出的节点选择器要求列表
      matchExpressions   按节点标签列出的节点选择器要求列表(推荐)
        key    键
        values 值
        operator 关系符 支持In, NotIn, Exists, DoesNotExist, Gt, Lt
    weight 倾向权重,在范围1-100。


硬限制:必须调度到那个节点上去
软限制:倾向于调度到那个节点,也可在别的节点上去


支持Exists, DoesNotExist, In, NotIn, Gt, Lt
存在 不存在 在 不在 大于 小于
关系符的使用说明:

- matchExpressions:
  - key: nodeenv              # 匹配存在标签的key为nodeenv的节点
    operator: Exists
  - key: nodeenv              # 匹配标签的key为nodeenv,且value是"xxx"或"yyy"的节点
    operator: In
    values: ["xxx","yyy"]
  - key: nodeenv              # 匹配标签的key为nodeenv,且value大于"xxx"的节点
    operator: Gt
    values: "xxx"
6.2.2 演示一下requiredDuringSchedulingIgnoredDuringExecution
- 示例
[root@k8s-master manifest]# cat pod-httpd.yml
apiVersion: v1
kind: Pod
metadata:
  name: pod-nodeaffinity-required
  namespace: dev
spec:
  containers:
  - name: httpd
    image: httpd:latest
  affinity:   #亲和性设置
    nodeAffinity:  #设置node亲和性
      requiredDuringSchedulingIgnoredDuringExecution: # 硬限制
        nodeSelectorTerms:
        - matchExpressions: # 匹配env的值在["abc","123"]中的标签
          - key: env
            operator: In
            values: ["abc","123"]
[root@k8s-master manifest]#
# 创建pod
[root@k8s-master manifest]# kubectl apply -f pod-httpd.yml
pod/pod-nodeaffinity-required created


# 查看pod状态 (运行失败)
[root@k8s-master manifest]# kubectl get -f pod-httpd.yml -o wide
NAME                        READY   STATUS    RESTARTS   AGE   IP       NODE     NOMINATED NODE   READINESS GATES
pod-nodeaffinity-required   0/1     Pending   0          6s    <none>   <none>   <none>           <none>


# 查看Pod的详情
# 发现调度失败,提示node选择失败
[root@k8s-master manifest]# kubectl describe -f pod-httpd.yml
Events:
  Type     Reason            Age   From               Message
  ----     ------            ----  ----               -------
  Warning  FailedScheduling  31s   default-scheduler  0/3 nodes are available: 1 node(s) had untolerated taint {node-role.kubernetes.io/control-plane: }, 3 node(s) didn't match Pod's node affinity/selector. preemption: 0/3 nodes are available: 3 Preemption is not helpful for scheduling.
[root@k8s-master manifest]#

31s default-scheduler 0/3节点可用:1个(s)节点有不可容忍的污染{node- roles .kubernetes。io/control-plane:}, 3个节点不匹配Pod的节点亲和性/选择器。preemption: 0/3节点可用:3节点抢占对调度没有帮助。


#接下来,停止pod
[root@k8s-master manifest]# kubectl delete -f pod-httpd.yml
pod "pod-nodeaffinity-required" deleted
[root@k8s-master manifest]#

# 修改文件,将values: ["abc","123"]------> ["prod","123"]
[root@k8s-master manifest]# cat pod-httpd.yml
apiVersion: v1
kind: Pod
metadata:
  name: pod-nodeaffinity-required
  namespace: dev
spec:
  containers:
  - name: httpd
    image: httpd:latest
  affinity:
    nodeAffinity:
      requiredDuringSchedulingIgnoredDuringExecution:
        nodeSelectorTerms:
        - matchExpressions:
          - key: env
            operator: In
            values: ["prod","123"]
[root@k8s-master manifest]#

# 再次启动
[root@k8s-master manifest]# kubectl apply -f pod-httpd.yml
pod/pod-nodeaffinity-required created

# 此时查看,发现调度成功,已经将pod调度到了node2上
[root@k8s-master manifest]# kubectl get -f pod-httpd.yml -o wide
NAME                        READY   STATUS              RESTARTS   AGE   IP       NODE        NOMINATED NODE   READINESS GATES
pod-nodeaffinity-required   0/1     ContainerCreating   0          4s    <none>   k8s-node2   <none>           <none>
[root@k8s-master manifest]#
6.2.3 演示一下requiredDuringSchedulingIgnoredDuringExecution
- 创建pod
[root@k8s-master manifest]# vim pod-nodeaffinity-preferred.yaml
[root@k8s-master manifest]# cat pod-nodeaffinity-preferred.yaml
apiVersion: v1
kind: Pod
metadata:
  name: pod-nodeaffinity-preferred
  namespace: dev
spec:
  containers:
  - name: nginx
    image: nginx:1.17.1
  affinity:  #亲和性设置
    nodeAffinity: #设置node亲和性
      preferredDuringSchedulingIgnoredDuringExecution: # 软限制
      - weight: 1
        preference:
          matchExpressions:# 匹配env的值在["xxx","yyy"]中的标签(当前环境没有)
          - key: env
            operator: In
            values: ["xxx","yyy"]
[root@k8s-master manifest]#
# 创建pod
[root@k8s-master manifest]# kubectl apply -f pod-nodeaffinity-preferred.yaml
pod/pod-nodeaffinity-preferred created

# 查看pod状态 (运行成功)
[root@k8s-master manifest]# kubectl get -f pod-nodeaffinity-preferred.yaml
NAME                         READY   STATUS    RESTARTS   AGE
pod-nodeaffinity-preferred   1/1     Running   0          9s
[root@k8s-master manifest]#
- 注意事项
NodeAffinity规则设置的注意事项:
1 如果同时定义了nodeSelector和nodeAffinity,那么必须两个条件都得到满足,Pod才能运行在指定的Node上,多个标签都要满足要用两个matchexpressions
    2 如果nodeAffinity指定了多个nodeSelectorTerms,那么只需要其中一个能够匹配成功即可
    3 如果一个nodeSelectorTerms中有多个matchExpressions ,则一个节点必须满足所有的才能匹配成功
4 如果一个pod所在的Node在Pod运行期间其标签发生了改变,不再符合该Pod的节点亲和性需求,则系统将忽略此变化(已经通过一个标签选择某一个正在运行,将标签改了之后,当前运行的不受影响,,在重新有运行一个pod受影响)
6.2.4 PodAffinity、
-
PodAffinity主要实现以运行的Pod为参照,实现让新创建的Pod跟参照pod在一个区域的功能。
-
PodAffinity的可配置项
pod.spec.affinity.podAffinity
  requiredDuringSchedulingIgnoredDuringExecution  硬限制
    namespaces       指定参照pod的namespace
    topologyKey      指定调度作用域
    labelSelector    标签选择器
      matchExpressions  按节点标签列出的节点选择器要求列表(推荐)
        key    键
        values 值
        operator 关系符 支持In, NotIn, Exists, DoesNotExist.
      matchLabels    指多个matchExpressions映射的内容
  preferredDuringSchedulingIgnoredDuringExecution 软限制
    podAffinityTerm  选项
      namespaces
      topologyKey
      labelSelector
        matchExpressions
          key    键
          values 值
          operator
        matchLabels
    weight 倾向权重,在范围1-100
topologyKey用于指定调度时作用域,例如:
    如果指定为kubernetes.io/hostname,那就是以Node节点为区分范围
    如果指定为beta.kubernetes.io/os,则以Node节点的操作系统类型来区分
6.2.5 演示下requiredDuringSchedulingIgnoredDuringExecution
- 首先创建一个参照Pod
[root@k8s-master manifest]# vim pod-podaffinity-target.yaml
[root@k8s-master manifest]# cat pod-podaffinity-target.yaml
apiVersion: v1
kind: Pod
metadata:
  name: pod-podaffinity-target
  namespace: dev
  labels:
    env: prod #设置标签
spec:
  containers:
  - name: nginx
    image: nginx:1.17.1
  nodeName: k8s-node1 # 将目标pod名确指定到node1上
[root@k8s-master manifest]#
- 运行pod
# 启动目标pod
[root@k8s-master manifest]# kubectl apply -f pod-podaffinity-target.yaml
pod/pod-podaffinity-target created
# 查看pod状况
[root@k8s-master manifest]# kubectl get -f pod-podaffinity-target.yaml -o wide
NAME                     READY   STATUS    RESTARTS   AGE   IP            NODE        NOMINATED NODE   READINESS GATES
pod-podaffinity-target   1/1     Running   0          20s   10.244.1.43   k8s-node1   <none>           <none>
[root@k8s-master manifest]#
- 创建pod-podaffinity-required.yaml
[root@k8s-master manifest]# cat pod-podaffinity-required.yaml
apiVersion: v1
kind: Pod
metadata:
  name: pod-podaffinity-required
  namespace: dev
spec:
  containers:
  - name: nginx
    image: nginx:1.17.1
  affinity:  #亲和性设置
    podAffinity: #设置pod亲和性
      requiredDuringSchedulingIgnoredDuringExecution: # 硬限制
      - labelSelector:
          matchExpressions: # 匹配env的值在["xxx","yyy"]中的标签
          - key: env
            operator: In
            values: ["xxx","yyy"]
        topologyKey: kubernetes.io/hostname
[root@k8s-master manifest]#
- 上面配置表达的意思是:新Pod必须要与拥有标签env=xxx或env=yyy的pod在同一Node上,显然现在没有这样pod,接下来,运行测试一下。
# 启动pod
[root@k8s-master manifest]# kubectl apply -f pod-podaffinity-required.yaml
pod/pod-podaffinity-required created


# 查看pod状态,发现未运行
[root@k8s-master manifest]# kubectl get -f pod-podaffinity-required.yaml
NAME                       READY   STATUS    RESTARTS   AGE
pod-podaffinity-required   0/1     Pending   0          10s
[root@k8s-master manifest]#


# 查看详细信息
[root@k8s-master manifest]# kubectl describe -f pod-podaffinity-required.yaml
Warning  FailedScheduling  53s   default-scheduler  0/3 nodes are available: 1 node(s) had untolerated taint {node-role.kubernetes.io/control-plane: }, 3 node(s) didn't match pod affinity rules. preemption: 0/3 nodes are available: 3 Preemption is not helpful for scheduling.
[root@k8s-master manifest]#


# 接下来修改  values: ["xxx","yyy"]----->values:["prod","yyy"]
# 意思是:新Pod必须要与拥有标签env=xxx或者env=yyy的pod在同一Node上
[root@k8s-master manifest]# cat pod-podaffinity-required.yaml
apiVersion: v1
kind: Pod
metadata:
  name: pod-podaffinity-required
  namespace: dev
spec:
  containers:
  - name: nginx
    image: nginx:1.17.1
  affinity:  #亲和性设置
    podAffinity: #设置pod亲和性
      requiredDuringSchedulingIgnoredDuringExecution: # 硬限制
      - labelSelector:
  matchExpressions: # 匹配env的值在["prod","yyy"]中的标签
          - key: env
            operator: In
  values: ["prod","yyy"]
        topologyKey: kubernetes.io/hostname
[root@k8s-master manifest]#


# 然后重新创建pod,查看效果
[root@k8s-master manifest]# kubectl apply -f pod-podaffinity-required.yaml
pod/pod-podaffinity-required created


# 发现此时Pod运行正常
[root@k8s-master manifest]# kubectl get -f pod-podaffinity-required.yaml
NAME                       READY   STATUS    RESTARTS   AGE
pod-podaffinity-required   1/1     Running   0          10s
[root@k8s-master manifest]# kubectl get -f pod-podaffinity-required.yaml  -o wide
NAME                       READY   STATUS    RESTARTS   AGE   IP            NODE        NOMINATED NODE   READINESS GATES
pod-podaffinity-required   1/1     Running   0          39s   10.244.1.44   k8s-node1   <none>           <none>
[root@k8s-master manifest]#
6.2.6 PodAntiAffinity
-
PodAntiAffinity主要实现以运行的Pod为参照,让新创建的Pod跟参照pod不在一个区域中的功能。
-
它的配置方式和选项跟PodAffinty是一样的,这里不再做详细解释,直接做一个测试案例。
-
继续使用上个案例中目标pod
[root@k8s-master manifest]# kubectl get pods -n dev -o wide
NAME                       READY   STATUS    RESTARTS   AGE   IP            NODE        NOMINATED NODE   READINESS GATES
pod-podaffinity-required   1/1     Running   0          10s   10.244.1.45   k8s-node1   <none>           <none>
pod-podaffinity-target     1/1     Running   0          32m   10.244.1.43   k8s-node1   <none>           <none>
- 创建pod-podantiaffinity-required.yaml
[root@k8s-master manifest]# cat pod-podantiaffinity-required.yaml
apiVersion: v1
kind: Pod
metadata:
  name: pod-podantiaffinity-required
  namespace: dev
spec:
  containers:
  - name: nginx
    image: nginx:1.17.1
  affinity:  #亲和性设置
    podAntiAffinity: #设置pod亲和性
      requiredDuringSchedulingIgnoredDuringExecution: # 硬限制
      - labelSelector:
          matchExpressions: # 匹配podenv的值在["prod"]中的标签
          - key: env
            operator: In
            values: ["prod"]
        topologyKey: kubernetes.io/hostname
[root@k8s-master manifest]#
- 上面配置表达的意思是:新Pod必须要与拥有标签env=prod的pod不在同一Node上,运行测试一下
# 创建pod
[root@k8s-master manifest]# kubectl apply -f pod-podantiaffinity-required.yaml
pod/pod-podantiaffinity-required created

# 查看pod
# 发现调度到了node2上
[root@k8s-master manifest]# kubectl get -f pod-podantiaffinity-required.yaml -o wide
NAME                           READY   STATUS    RESTARTS   AGE   IP            NODE        NOMINATED NODE   READINESS GATES
pod-podantiaffinity-required   1/1     Running   0          43s   10.244.2.66   k8s-node2   <none>           <none>
[root@k8s-master manifest]#
7. 污点和容忍
7.1 污点(Taints)
-
前面的调度方式都是站在Pod的角度上,通过在Pod上添加属性,来确定Pod是否要调度到指定的Node上,其实我们也可以站在Node的角度上,通过在Node上添加污点属性,来决定是否允许Pod调度过来。
-
Node被设置上污点之后就和Pod之间存在了一种相斥的关系,进而拒绝Pod调度进来,甚至可以将已经存在的Pod驱逐出去。
-
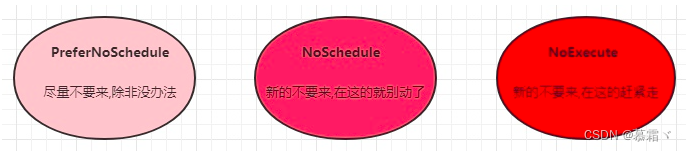
污点的格式为:
key=value:effect, key和value是污点的标签,effect描述污点的作用,支持如下三个选项:- PreferNoSchedule:kubernetes将尽量避免把Pod调度到具有该污点的Node上,除非没有其他节点可调度**(尽量不要来,除非没办法)**
- NoSchedule:kubernetes将不会把Pod调度到具有该污点的Node上,但不会影响当前Node上已存在的Pod (新的不要来,在这的就别动了)
- NoExecute:kubernetes将不会把Pod调度到具有该污点的Node上,同时也会将Node上已存在的Pod驱离**(新的不要来,在这的赶紧走)**
- 先运行几个pod
[root@k8s-master ~]# kubectl run pod1 --image httpd
pod/pod1 created
[root@k8s-master ~]# kubectl run pod2 --image httpd
pod/pod2 created
[root@k8s-master ~]# kubectl run pod3 --image httpd
pod/pod3 created
[root@k8s-master ~]# kubectl run pod4 --image httpd
pod/pod4 created
[root@k8s-master ~]# kubectl get pods -o wide
NAME   READY   STATUS    RESTARTS   AGE   IP            NODE        NOMINATED NODE   READINESS GATES
pod1   1/1     Running   0          37s   10.244.1.47   k8s-node1   <none>           <none>
pod2   1/1     Running   0          33s   10.244.2.67   k8s-node2   <none>           <none>
pod3   1/1     Running   0          29s   10.244.1.48   k8s-node1   <none>           <none>
pod4   1/1     Running   0          26s   10.244.2.68   k8s-node2   <none>           <none>
- 使用kubectl设置和去除污点的命令示例如下
# 设置污点
kubectl taint nodes node1 key=value:effect

# 去除污点
kubectl taint nodes node1 key:effect-

# 去除所有污点
kubectl taint nodes node1 key-
- 演示下污点的效果:
- 准备节点node1(为了演示效果更加明显,暂时停止node2节点)
- 为node1节点设置一个污点:
tag=wangqing:PreferNoSchedule;然后创建pod1( pod1 可以 ) - 修改为node1节点设置一个污点:
tag=wangqing:NoSchedule;然后创建pod2( pod1 正常 pod2 失败 ) - 修改为node1节点设置一个污点:
tag=wangqing:NoExecute;然后创建pod3 ( 3个pod都失败 )
# 为k8s-node1设置污点(PreferNoSchedule,尽可能不调度)
[root@k8s-master ~]# kubectl taint nodes k8s-node1 tag=mushuang:PreferNoSchedule
node/k8s-node1 tainted
[root@k8s-master ~]#
[root@k8s-master ~]# kubectl describe node k8s-node1|grep -i taint
Taints:             tag=mushuang:PreferNoSchedule

# 创建pod5和6
[root@k8s-master ~]# kubectl run pod5 --image httpd
[root@k8s-master ~]# kubectl run pod6 --image httpd
#然后创建的pod在node2上
[root@k8s-master ~]# kubectl get pods -o wide
NAME   READY   STATUS    RESTARTS   AGE   IP            NODE        NOMINATED NODE   READINESS GATES
pod1   1/1     Running   0          90m   10.244.1.47   k8s-node1   <none>           <none>
pod2   1/1     Running   0          90m   10.244.2.67   k8s-node2   <none>           <none>
pod3   1/1     Running   0          90m   10.244.1.48   k8s-node1   <none>           <none>
pod4   1/1     Running   0          90m   10.244.2.68   k8s-node2   <none>           <none>
pod5   1/1     Running   0          49s   10.244.2.69   k8s-node2   <none>           <none>
pod6   1/1     Running   0          28s   10.244.2.70   k8s-node2   <none>           <none>


# 为node1设置污点(取消PreferNoSchedule,设置NoSchedule)
[root@k8s-master ~]# kubectl taint nodes k8s-node1 tag=mushuang:PreferNoSchedule-
node/k8s-node1 untainted
[root@k8s-master ~]# kubectl taint nodes k8s-node1 tag=mushuang:NoSchedule
node/k8s-node1 tainted
[root@k8s-master ~]# kubectl describe node k8s-node1|grep -i taint
Taints:             tag=mushuang:NoSchedule
[root@k8s-master ~]#

# 创建pod8
[root@k8s-master ~]# kubectl run pod8 --image httpd
pod/pod8 created
[root@k8s-master ~]# kubectl get pods -o wide
NAME   READY   STATUS              RESTARTS   AGE     IP            NODE        NOMINATED NODE   READINESS GATES
pod1   1/1     Running             0          98m     10.244.1.47   k8s-node1   <none>           <none>
pod2   1/1     Running             0          98m     10.244.2.67   k8s-node2   <none>           <none>
pod3   1/1     Running             0          98m     10.244.1.48   k8s-node1   <none>           <none>
pod4   1/1     Running             0          98m     10.244.2.68   k8s-node2   <none>           <none>
pod5   1/1     Running             0          8m50s   10.244.2.69   k8s-node2   <none>           <none>
pod6   1/1     Running             0          8m29s   10.244.2.70   k8s-node2   <none>           <none>
pod7   1/1     Running             0          31s     10.244.1.49   k8s-node1   <none>           <none>
pod8   0/1     ContainerCreating   0          2s      <none>        k8s-node2   <none>           <none>
[root@k8s-master ~]#

取消取消node1 NoSchedule
[root@k8s-master ~]# kubectl taint nodes k8s-node1 tag=mushuang:NoSchedule-
node/k8s-node1 untainted
[root@k8s-master ~]# kubectl describe node k8s-node1|grep -i taintTaints:             <none>

# 为node2设置污点(设置NoExecute)
[root@k8s-master ~]# kubectl taint nodes k8s-node2 tag=mushuang:NoExecute
node/k8s-node2 tainted
[root@k8s-master ~]# kubectl describe node k8s-node2|grep -i taint
Taints:             tag=mushuang:NoExecute
[root@k8s-master ~]#

# 会自动将node2上的pod去除
[root@k8s-master ~]# kubectl get pods -o wide
NAME   READY   STATUS    RESTARTS   AGE     IP            NODE        NOMINATED NODE   READINESS GATES
pod1   1/1     Running   0          103m    10.244.1.47   k8s-node1   <none>           <none>
pod3   1/1     Running   0          103m    10.244.1.48   k8s-node1   <none>           <none>
pod7   1/1     Running   0          5m47s   10.244.1.49   k8s-node1   <none>           <none>
[root@k8s-master ~]#
- 提示
使用kubeadm搭建的集群,默认就会给master节点添加一个污点标记,所以pod就不会调度到master节点上.
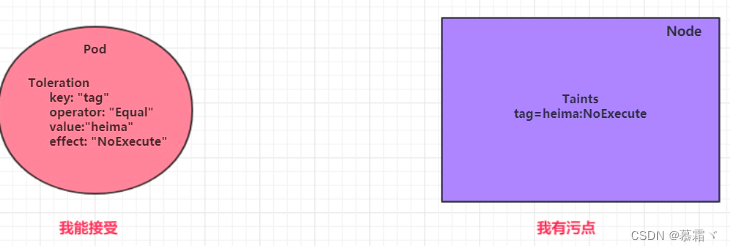
7.2 容忍(Toleration)
- 污点就是拒绝,容忍就是忽略,Node通过污点拒绝pod调度上去,Pod通过容忍忽略拒绝
- 通过一个案例看下效果
- 上一小节,已经在node1节点上打上了
NoExecute的污点,此时pod是调度不上去的 - 本小节,可以通过给pod添加容忍,然后将其调度上去
- 上一小节,已经在node1节点上打上了
[root@k8s-master ~]# kubectl describe node k8s-node1|grep -i taint
Taints:             <none>
[root@k8s-master ~]# kubectl describe node k8s-node2|grep -i taint
Taints:             tag=mushuang:NoExecute
[root@k8s-master ~]#

[root@k8s-master manifest]# cat pod-toleration.yaml
apiVersion: v1
kind: Pod
metadata:
  name: pod-toleration
  namespace: dev
spec:
  containers:
  - name: nginx
    image: nginx:1.17.1
  tolerations:      # 添加容忍
  - key: "tag"        # 要容忍的污点的key
    operator: "Equal" # 操作符
    value: "mushuang"    # 容忍的污点的value
    effect: "NoExecute"   # 添加容忍的规则,这里必须和标记的污点规则相同
- 添加容忍之后可以在node2上运行
[root@k8s-master manifest]# kubectl apply -f pod-toleration.yaml
pod/pod-toleration created
[root@k8s-master manifest]# kubectl get -f pod-toleration.yaml
NAME             READY   STATUS    RESTARTS   AGE
pod-toleration   1/1     Running   0          6s
[root@k8s-master manifest]# kubectl get -f pod-toleration.yaml -o wide
NAME             READY   STATUS    RESTARTS   AGE   IP            NODE        NOMINATED NODE   READINESS GATES
pod-toleration   1/1     Running   0          12s   10.244.2.73   k8s-node2   <none>           <none>
[root@k8s-master manifest]#
- 容忍的详细配置:
[root@k8s-master01 ~]# kubectl explain pod.spec.tolerations
......
FIELDS:
   key       # 对应着要容忍的污点的键,空意味着匹配所有的键
   value     # 对应着要容忍的污点的值
   operator  # key-value的运算符,支持Equal和Exists(默认)
   effect    # 对应污点的effect,空意味着匹配所有影响
   tolerationSeconds   # 容忍时间, 当effect为NoExecute时生效,表示pod在Node上的停留时间


 3241
3241


 被折叠的 条评论
为什么被折叠?
被折叠的 条评论
为什么被折叠?
 到【灌水乐园】发言


