


本期简介
RSA是非常安全的非对称加解密算法,单纯的RSA的原理和使用网络资料较多,本期不细讲RSA的原理,主要讲解实战,如何与Springboot+SpringSecurity集成起来,做到在安全框架基础上,对用户的密码进行加密存储,解密认证。同时,平时我们登录ECS服务器大多数情况都是账号密码登录形式,麻烦且容易忘记密码,本期最后会讲如何通过RSA的密钥来实现ECS免密自动登录。
- 本期要点:
- 如何生成RSA公钥文件和私钥文件
- 获取公钥文件和私钥文件转换成JDK的密钥文件对象
- 简单的验证加密和解密
- 与Springboot、SpringSecurity如何集成
- 集成后验证用户注册的加密存储
- 集成后验证用户登录的解密验证
- 实现ECS的免密登录
一、如何生成RSA公钥文件和私钥文件
方式一:通过命令行生成
- 命令:ssh-keygen -t -rsa -C xxxxx@mail.com
- 说明:-t rsa表示生成的密钥使用的算法为RSA,-C表示用户邮箱号,会追加在公钥文件文本后
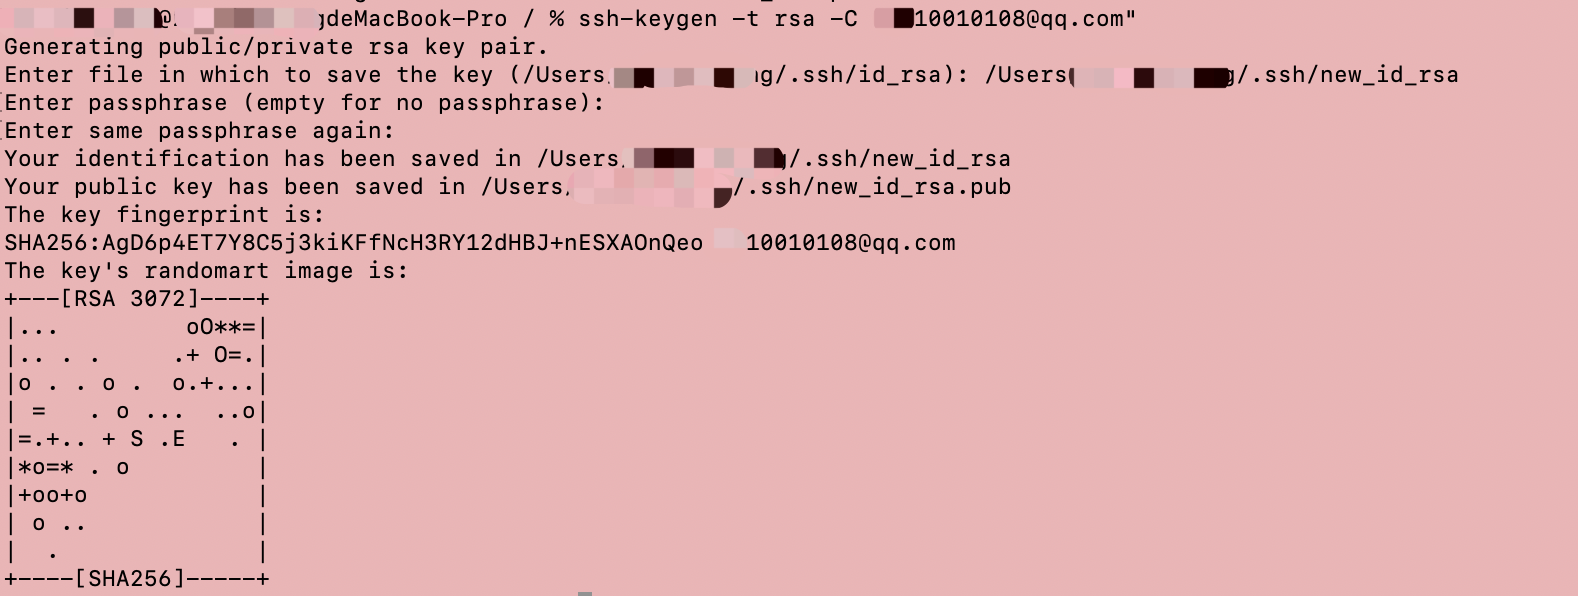
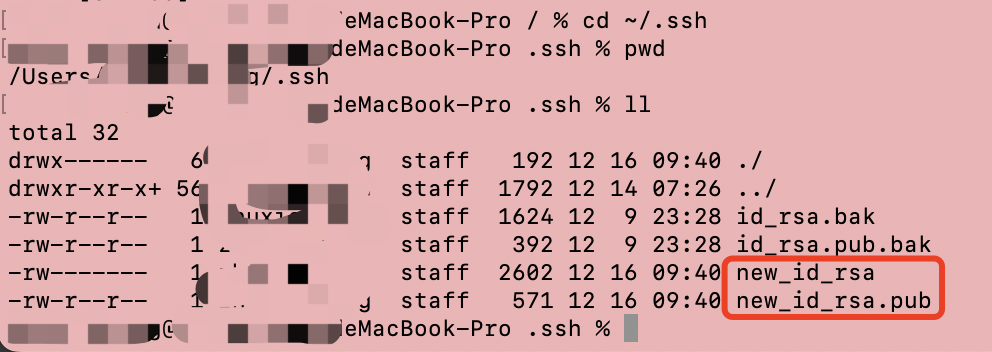
查看生成结果,可以看到生成了new_id_rsa私钥文件和new_id_rsa.pub公钥文件
如果前面一步执行命令一路回车生成的默认密钥路径分别是/Users/本机用户名/.ssh/id_rsa
/Users/本机用户名/.ssh/id_rsa.pub
方式二:通过代码自动生成
- 首先创建RsaUtils工具类方法
    /**
     * 根据密文,生存RSA公钥和私钥,并写入指定文件
     *
     * @param publicKeyFilename  公钥文件路径
     * @param privateKeyFilename 私钥文件路径
     * @param password           生成密钥的密码
     */
    public static void generateKey(String publicKeyFilename, String privateKeyFilename, String password, int keySize) throws Exception {
        // 创建KeyPairGenerator对象,指定算法为RSA
        KeyPairGenerator keyPairGenerator = KeyPairGenerator.getInstance(ALGORITHM);
        if (password == null) {
            // 初始化KeyPairGenerator对象,设置密钥长度为2048位
            keyPairGenerator.initialize(Math.max(keySize, DEFAULT_KEY_SIZE), JCAUtil.getSecureRandom());
        } else {
            SecureRandom secureRandom = new SecureRandom(password.getBytes(StandardCharsets.UTF_8));
            // 初始化KeyPairGenerator对象,设置密钥长度为2048位
            keyPairGenerator.initialize(Math.max(keySize, DEFAULT_KEY_SIZE), secureRandom);
        }

        // 生成KeyPair对象,即公钥和私钥
        KeyPair keyPair = keyPairGenerator.genKeyPair();
        // 获取公钥并写到文件
        byte[] publicKeyBytes = keyPair.getPublic().getEncoded();
        publicKeyBytes = Base64.getEncoder().encode(publicKeyBytes);
        writeFile(publicKeyFilename, publicKeyBytes);

        // 获取私钥并写到文件
        byte[] privateKeyBytes = keyPair.getPrivate().getEncoded();
        privateKeyBytes = Base64.getEncoder().encode(privateKeyBytes);
        writeFile(privateKeyFilename, privateKeyBytes);
    }

    public static void generateKey(String pubKeyFileName, String priKeyFileName) throws Exception {
        generateKey(pubKeyFileName, priKeyFileName, null, DEFAULT_KEY_SIZE);
    }

    private static byte[] readBytesFromFile(String fileName) throws Exception {
        return Files.readAllBytes(new File(fileName).toPath());
    }

    private static void writeFile(String destPath, byte[] bytes) throws IOException {
        File dest = new File(destPath);
        if (dest.exists()) {
            Files.write(dest.toPath(), bytes);
            return;
        }
        boolean created = dest.createNewFile();
        if (!created) {
            log.warn("写入密钥内容到文件{}失败,请检查!", destPath);
        }
        Files.write(dest.toPath(), bytes);
    }

    public static void main(String[] args) throws Exception {
        RsaUtils.generateKey("/Users/本机用户名/.ssh/id_rsa.pub", "/Users/本机用户名/.ssh/id_rsa");
    }
从上方代码实现的功能就是ssh-keygen -t rsa功能,执行该main方法:
从输出日志看,成功生成了公钥和私钥文件

从本机对应目录检查下生成结果:

二、获取公钥文件和私钥文件转换成JDK的密钥文件对象
到目前为止已经生成了公钥文件和私钥文件,要实现加解密,还需要将公钥文件和私钥文件读取到jvm内存并转换成对应的公钥文件对象和私钥文件对象
获取公钥文件
公钥文件类java.security.PublicKey是属于jdk里面的类,把公钥文件转换成该对象实例
    /**
     * 从文件中读取公钥为PublicKey对象
     *
     * @param filename 公钥保存路径,相对于classpath
     * @return 公钥对象
     * @throws Exception 读取公钥抛出的异常类型
     */
    public static PublicKey getPublicKey(String filename) throws Exception {
        byte[] bytes = readBytesFromFile(filename);
        byte[] decodeBytes = Base64.getDecoder().decode(bytes);
        X509EncodedKeySpec spec = new X509EncodedKeySpec(decodeBytes);
        KeyFactory factory = KeyFactory.getInstance(ALGORITHM);
        return factory.generatePublic(spec);
    }
获取私钥文件
私钥文件类java.security.PrivateKey是属于jdk里面的类,把私钥文件转换成该对象实例
    /**
     * 从文件中读取私钥为PrivateKey对象
     *
     * @param filename 私钥保存路径,相对于classpath
     * @return 私钥对象
     * @throws Exception 读取私钥抛出的异常类型
     */
    public static PrivateKey getPrivateKey(String filename) throws Exception {
        byte[] bytes = readBytesFromFile(filename);
        byte[] decodeBytes = Base64.getDecoder().decode(bytes);
        PKCS8EncodedKeySpec spec = new PKCS8EncodedKeySpec(decodeBytes);
        KeyFactory factory = KeyFactory.getInstance(ALGORITHM);
        return factory.generatePrivate(spec);
    }
完成这两个方法后便具备了通过代码进行加密和解密的功能,下面进行加解密的验证。
三、简单的验证加密和解密
- RSA算法是公钥加密、私钥解密,所以公钥可以分发,私钥不能分发,一旦私钥泄漏,将是一场灾难
加密
加密方法,指定加密明文和公钥文件的路径
    /**
     * RSA公钥加密
     *
     * @param plainText     明文
     * @param publicKeyPath 公钥文件路径
     * @return 密文
     * @throws Exception 加密过程中的异常信息
     */
    public static String encrypt(String plainText, String publicKeyPath) throws Exception {
        // base64编码的公钥
        PublicKey publicKey = getPublicKey(publicKeyPath);
        // RSA加密
        Cipher cipher = Cipher.getInstance(ALGORITHM);
        cipher.init(Cipher.ENCRYPT_MODE, publicKey);
        byte[] cipherBytes = cipher.doFinal(plainText.getBytes(StandardCharsets.UTF_8));
        return Base64.getEncoder().encodeToString(cipherBytes);
    }
解密
解密方法,指定解密密文和私钥文件的路径
    /**
     * RSA私钥解密
     *
     * @param cipherText     密文
     * @param privateKeyPath 私钥文件路径
     * @return 明文
     */
    public static String decrypt(String cipherText, String privateKeyPath) throws Exception {
        // 64位解码加密后的字符串
        byte[] inputBytes;
        inputBytes = Base64.getDecoder().decode(cipherText.getBytes(StandardCharsets.UTF_8));
        PrivateKey privateKey = getPrivateKey(privateKeyPath);
        // RSA解密
        Cipher cipher = Cipher.getInstance(ALGORITHM);
        cipher.init(Cipher.DECRYPT_MODE, privateKey);
        return new String(cipher.doFinal(inputBytes));
    }
验证加解密
编写main方法,对明文先加密,再从密文解密,对比加解密前后的一致性
public static void main(String[] args) throws Exception {
String publicKeyPath = "/Users/本机用户名/.ssh/id_rsa.pub";
String privateKeyPath = "/Users/本机用户名/.ssh/id_rsa";
System.out.printf("公钥文件路径:%s\n", publicKeyPath);
System.out.printf("私钥文件路径:%s\n\n", privateKeyPath);
String plainText = "pass123456@2023!";
String cipherText = encrypt(plainText, publicKeyPath);
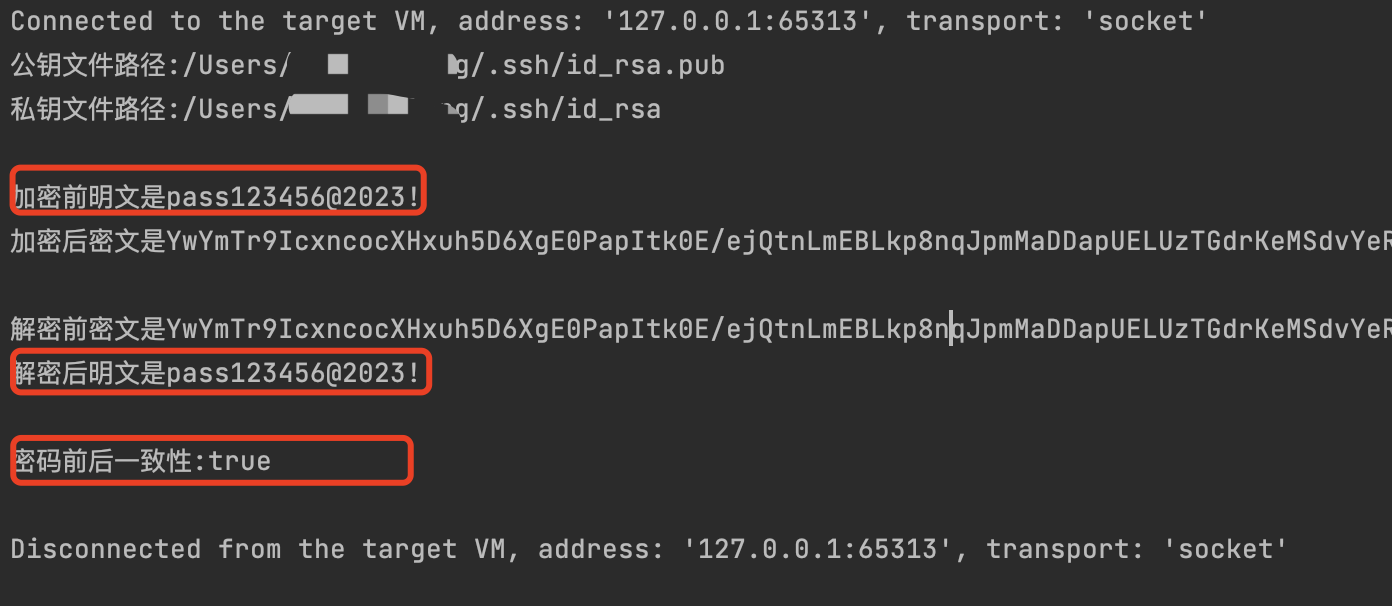
System.out.printf("加密前明文是%s\n", plainText);
System.out.printf("加密后密文是%s\n\n", cipherText);
String plainTextRecovery = decrypt(cipherText, privateKeyPath);
System.out.printf("解密前密文是%s\n", cipherText);
System.out.printf("解密后明文是%s\n", plainTextRecovery);
System.out.printf("密码前后一致性:%s\n\n", plainText.equals(plainTextRecovery));
}
验证结果:
从结果来看,是符合预期的,接下来将RSA集成到Springboot和SpringSecurity实现加解密注册登录验证
四、与Springboot、SpringSecurity如何集成
编写配置类
用于系统启动自动读取公私钥文件的路径
@Data
@Configuration
@ConfigurationProperties(prefix = "rsa.key")
public class RsaKeyProperties {

    private String pubKeyFile;
    private String priKeyFile;
}
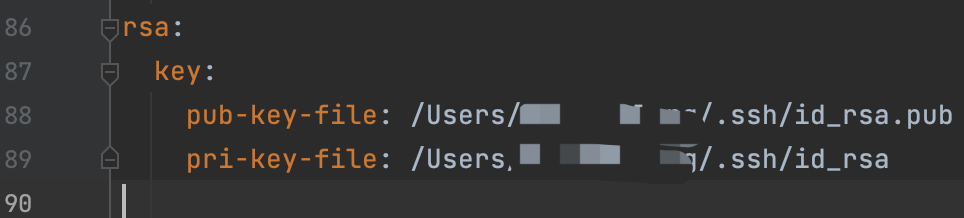
对应application-env.yml的配置:
启动自动加载公私钥
我们需要在系统启动的时候自动加载公私钥路径,并且将公私钥文件转换为PublicKey和privateKey的实例
@Data
@Configuration
@ConfigurationProperties(prefix = "rsa.key")
public class RsaKeyProperties {

    private String pubKeyFile;
    private String priKeyFile;

    private PublicKey publicKey;
    private PrivateKey privateKey;

    /**
     * 系统启动的时候触发,将公钥文件从本机文件加载为公私钥对象
     * @throws Exception 公私钥加载异常
     */
    @PostConstruct
    public void createRsaKey() throws Exception {
        publicKey = RsaUtils.getPublicKey(pubKeyFile);
        privateKey = RsaUtils.getPrivateKey(priKeyFile);
    }
}
SpringSecurity集成RSA
SpringSecurity提供了一个PasswordEncoder接口,我们通过实现这个接口来创建自定义的 RSA加解密:
import com.snycedu.platform.auth.config.RsaKeyProperties;
import com.snycedu.platform.auth.util.RsaUtils;
import lombok.extern.slf4j.Slf4j;
import org.apache.commons.lang3.StringUtils;
import org.springframework.security.crypto.password.PasswordEncoder;

@Slf4j
public class RSACryptPasswordEncoder implements PasswordEncoder {
    private RsaKeyProperties prop;

    public RSACryptPasswordEncoder(RsaKeyProperties prop) {
        this.prop = prop;
    }

    @Override
    public String encode(CharSequence plainText) {
        try {
            return RsaUtils.encrypt(plainText.toString(), prop.getPublicKey());
        } catch (Exception exception) {
            log.error("加密异常:{}", exception.getMessage(), exception);
        }
        return "";
    }

    public String decode(CharSequence cipherText) {
        try {
            return RsaUtils.decrypt(cipherText.toString(), prop.getPrivateKey());
        } catch (Exception exception) {
            log.error("解密异常:{}", exception.getMessage(), exception);
        }
        return "";
    }

    @Override
    public boolean matches(CharSequence plainText, String cipherText) {
        String decryptedPlainText = decode(cipherText);
        return StringUtils.equals(plainText, decryptedPlainText);
    }
}
在前面几期提到要创建SpringSecurity的安全配置类,现在在WebSecurityConfig中注册一个beanpasswordEncoder,其为RSACryptPasswordEncoder的对象实例
public class WebSecurityConfig extends WebSecurityConfigurerAdapter {

    @Bean
    public RSACryptPasswordEncoder passwordEncoder() {
        return new RSACryptPasswordEncoder(prop);
    }
}
在WebSecurityConfig重写configure(AuthenticationManagerBuilder auth) 方法,指定密码认证管理器为我们注册的自定义RSA加解密的bean,这样SpringSecurity就和RSA集成起来了。
    // 指定认证对象的来源
    public void configure(AuthenticationManagerBuilder auth) throws Exception {
        auth.userDetailsService(userService).passwordEncoder(passwordEncoder());
    }
SpringSecurity如何进行账号密码认证:
通过用户的账号和密码创建了UsernamePasswordAuthenticationToken认证实例,authenticationManager.authenticate(authRequest)进行账号密码认证,这一步就需要用到前面的加解密的bean
    public Authentication attemptAuthentication(HttpServletRequest request, HttpServletResponse response) throws AuthenticationException {
        UserPo sysUser = null;
        try {
            sysUser = new ObjectMapper().readValue(request.getInputStream(), UserPo.class);

            UsernamePasswordAuthenticationToken authRequest = new UsernamePasswordAuthenticationToken(sysUser.getUsername(), sysUser.getPassword());
            return authenticationManager.authenticate(authRequest);
        } catch (Exception exception) {
            // 这里省略了登录认证失败的逻辑,前几期有提到,可以翻看下
        }
        return null;
    }
五、集成后验证用户注册的加密存储
注册接口
注意:注册登录接口无需进行权限相关的验证,需从SpringSecurity中配置为白名单,前期有讲
    @Operation(tags = "用户注册")
    @PostMapping("/api/v1/register")
    public Response<LoginUser> register(@RequestBody @Validated RegisterRequest user) {
        LoginUser loginUser = registerService.register(user);
        return ResponseResult.success(loginUser);
    }
注册业务层的实现
注入BeanpasswordEncoder,用于注册时对用户的明文密码进行加密存储
    @Autowired
    RSACryptPasswordEncoder passwordEncoder;

    @Autowired
    UserService userService;

    @Override
    @Transactional(rollbackFor = Exception.class)
    public LoginUser register(RegisterRequest user) {
        // 先判定账号是否被占用
        int exits = userService.existsTheLoginName(user.getLoginName());
        if (exits > 0) {
            throw new BusinessException("此账号已被占用,请更换");
        }
        UserPo userPo = JsonUtils.copy(user, UserPo.class);

        userPo.setId(SnowflakeIdWorker.nextId());

        userPo.setPassword(passwordEncoder.encode(user.getPassword()));
        userPo.setCreator(user.getLoginName());
        userPo.setCreateTime(LocalDateTime.now());
        userPo.setStatus(LoginStatusEnum.INIT);

        UserPo registerUser = userService.add(userPo);
        return JsonUtils.copy(registerUser, LoginUser.class);
    }
调用注册接口注册并验证数据存储结果
- 通过postman调用注册接口
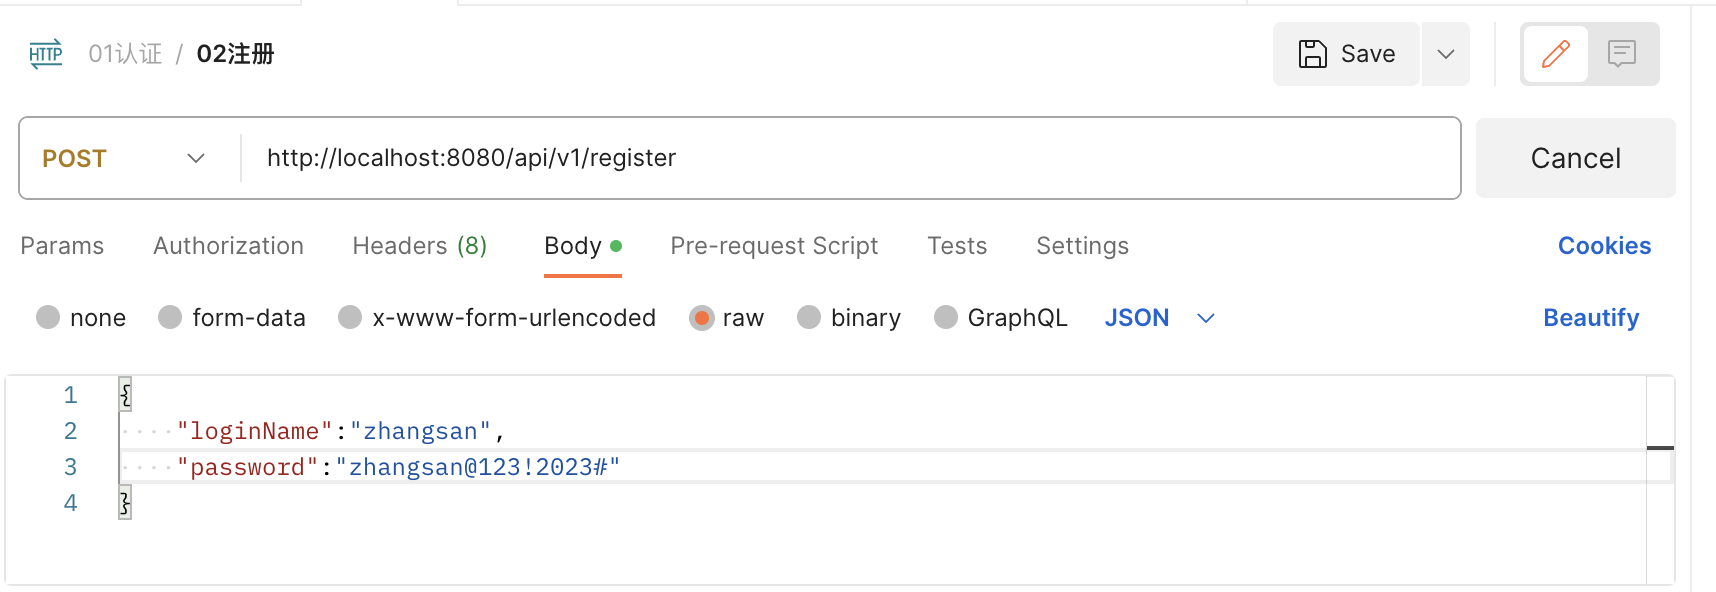
- 断点调试加密前获取到的注册信息,可以看到是明文的密码
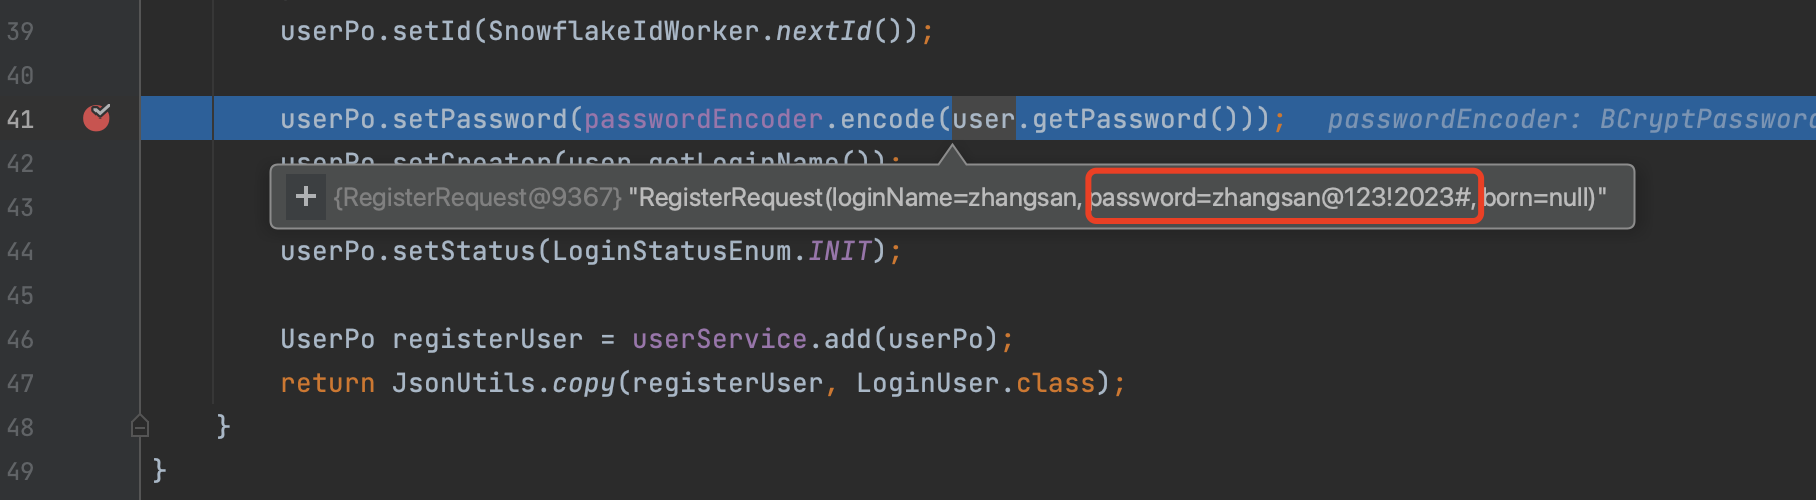
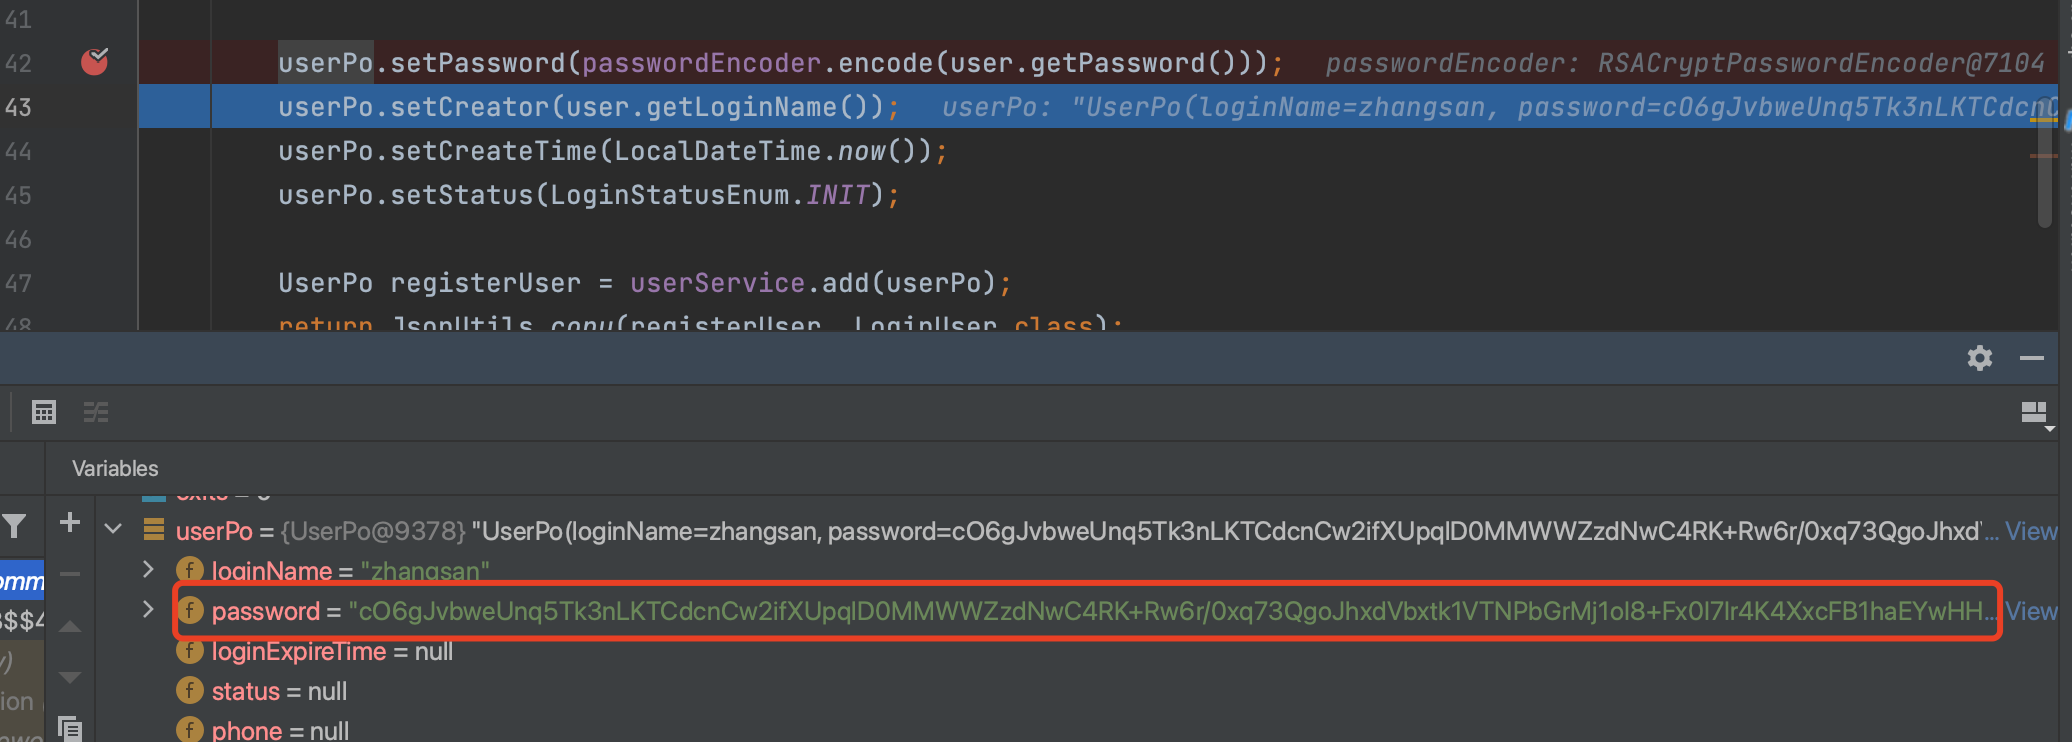
- 断点调试加密后的用户密码,可以看到已经是加密的密文了
从插入sql的日志查看写入情况
2023-12-16 11:26:06.737 [http-nio-8080-exec-9] [INFO] [com.snycedu.platform.common.interceptor.MybatisSqlInterceptor:75] -
========================user:user   pwd:123456  db:jdbc:mysql://127.0.0.1:33061/snycedu?serverTimezone=CTT&useSSL=false&useUnicode=true&characterEncoding=utf-8&allowMultiQueries=true&autoReconnect=true
[    SQL   ID]:com.snycedu.platform.auth.mapper.UserMapper.insert
[         SQL]:insert into common_user ( id, login_name, password, status, phone, born, fail_count, creator, create_time, modifier, modify_time ) values (16137259137024000, 'zhangsan', 'cO6gJvbweUnq5Tk3nLKTCdcnCw2ifXUpqlD0MMWWZzdNwC4RK+Rw6r/0xq73QgoJhxdVbxtk1VTNPbGrMj1oI8+Fx0I7Ir4K4XxcFB1haEYwHHvgLE0nicNYg9AFEygiZwDwW+O3da9kRtLX8445XqHrcIo51zPgWCWadEIfmfWLTzxgky5Omzhb5/rFpBtqVc3944MdOV8Si0JH1laOOo8GmICdxg2SHXvYWtcTWMhWhNu3eKydyLna+m31vv6FLhUUvUt1LLEgk7Sgthe2OyV2aKyG2qQudR5IU+v1y5EjcgLQCXuqjUhVWFk7Jaw3uzk1W9a243ag0LNtFhDY9Q==', INIT,,,, 'zhangsan', 2023-12-16T12:45:12.435, , 2023-12-16T12:45:12.439 )
[RETURN TOTAL]:
[RETURN  DATA]:1
[WASTE   TIME]:31(ms)
========================================================================================================================

2023-12-16 11:26:06.739 [http-nio-8080-exec-9] [INFO] [com.snycedu.platform.component.mybatis.base.service.impl.BaseServiceImpl:43] - 成功插入1条数据
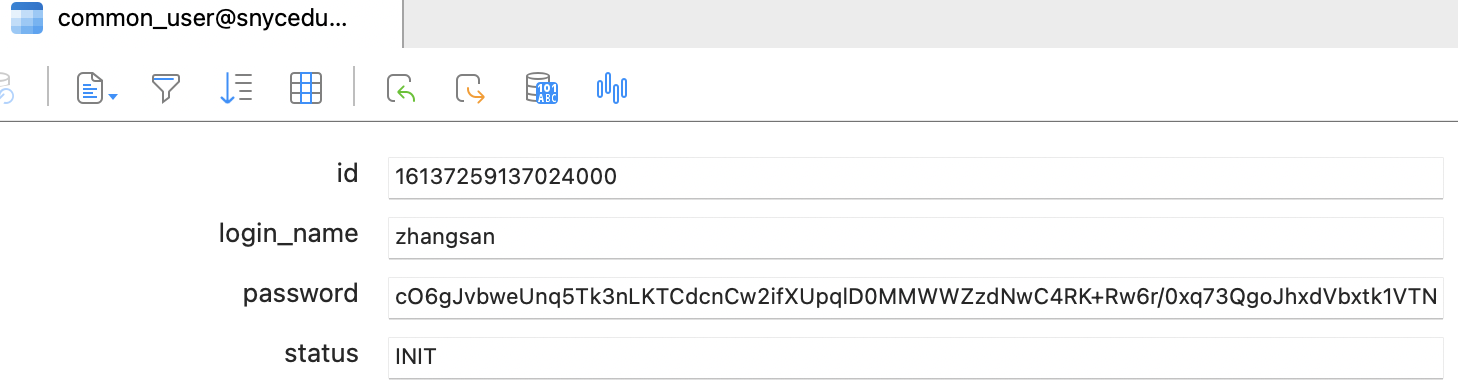
从数据库看,也是成功插入注册的信息
六、集成后验证用户登录的解密验证
登录接口
前期提到,SpringSecurity默认实现了登录接口,我们只需要把登录验证逻辑写在Filter中即可
-
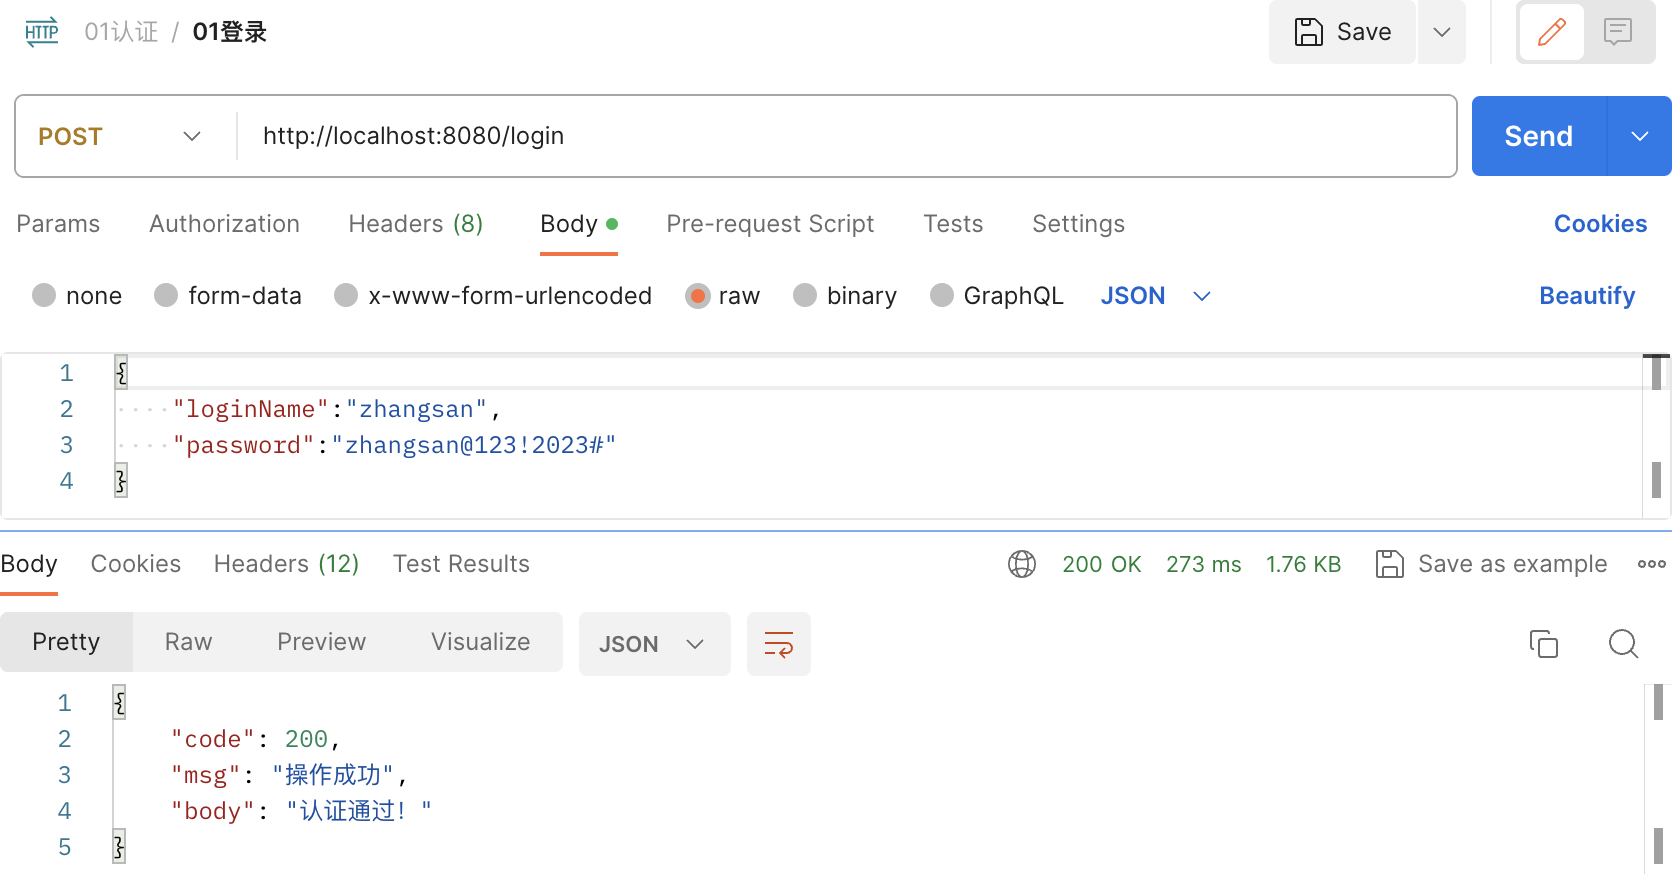
调用登录接口
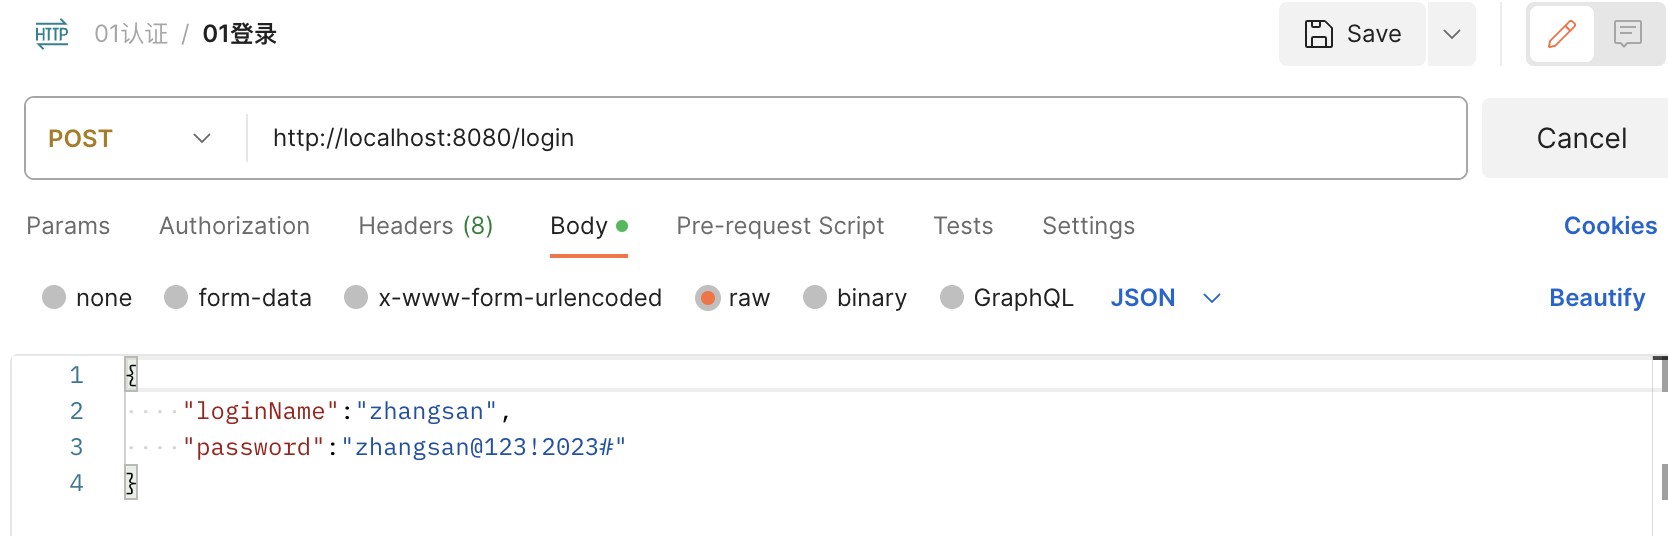
-
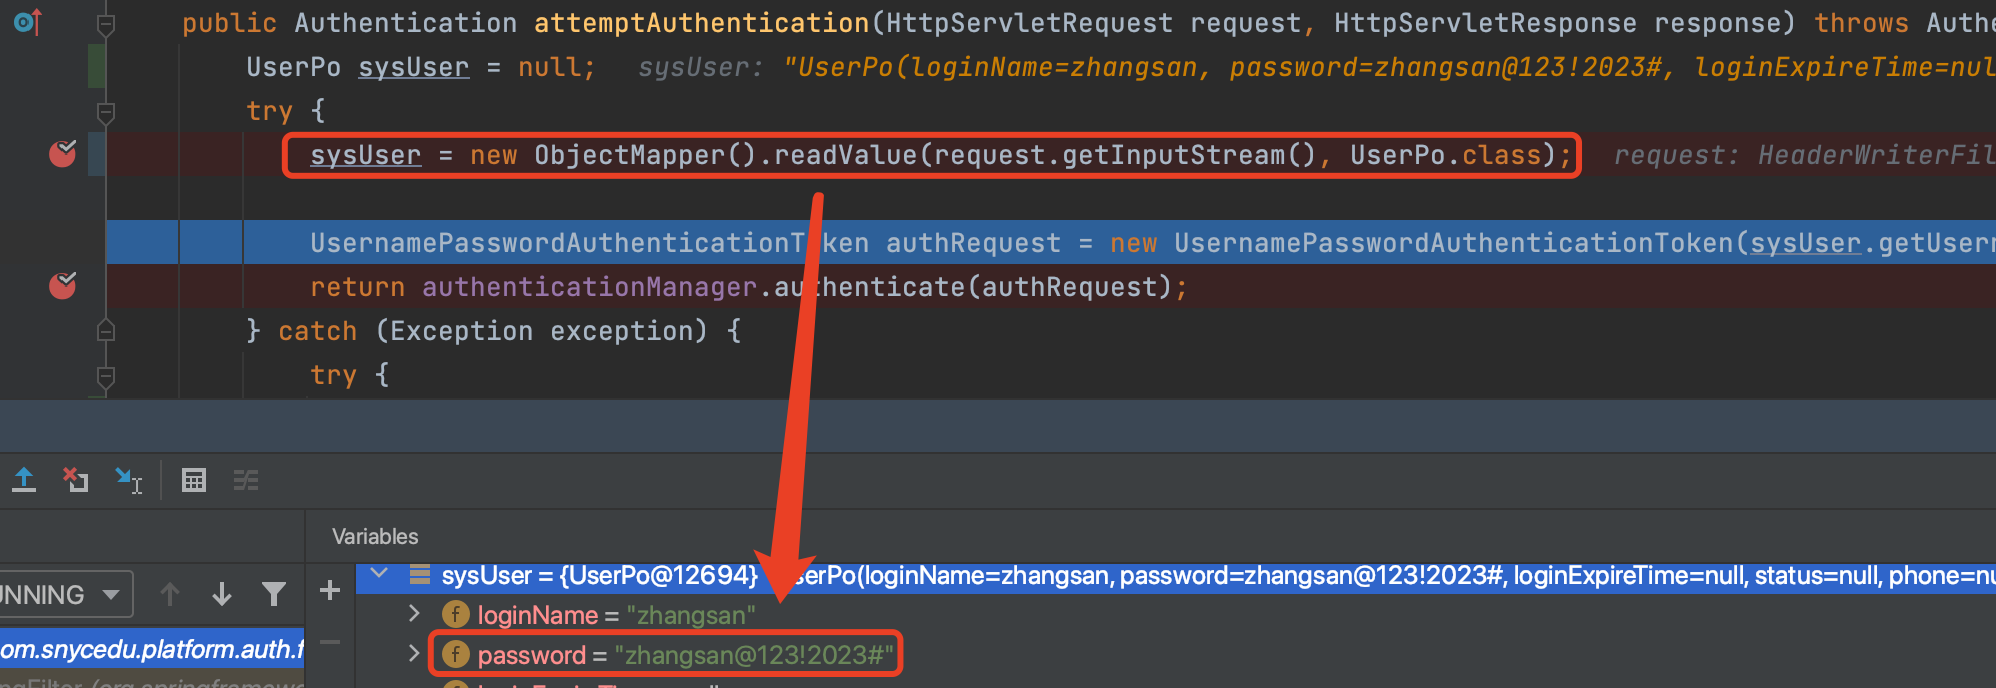
登录UserLoginFilter断点查看账号密码如何认证的
从下面断点可以看到,认证前登录传入的还是明文密码,数据库的密码是密文,如何进行密码匹配的:前面提到通过用户名和密码构造了UsernamePasswordAuthenticationToken的是实例,然后通过认证管理器beanauthenticationManager进行认证
-
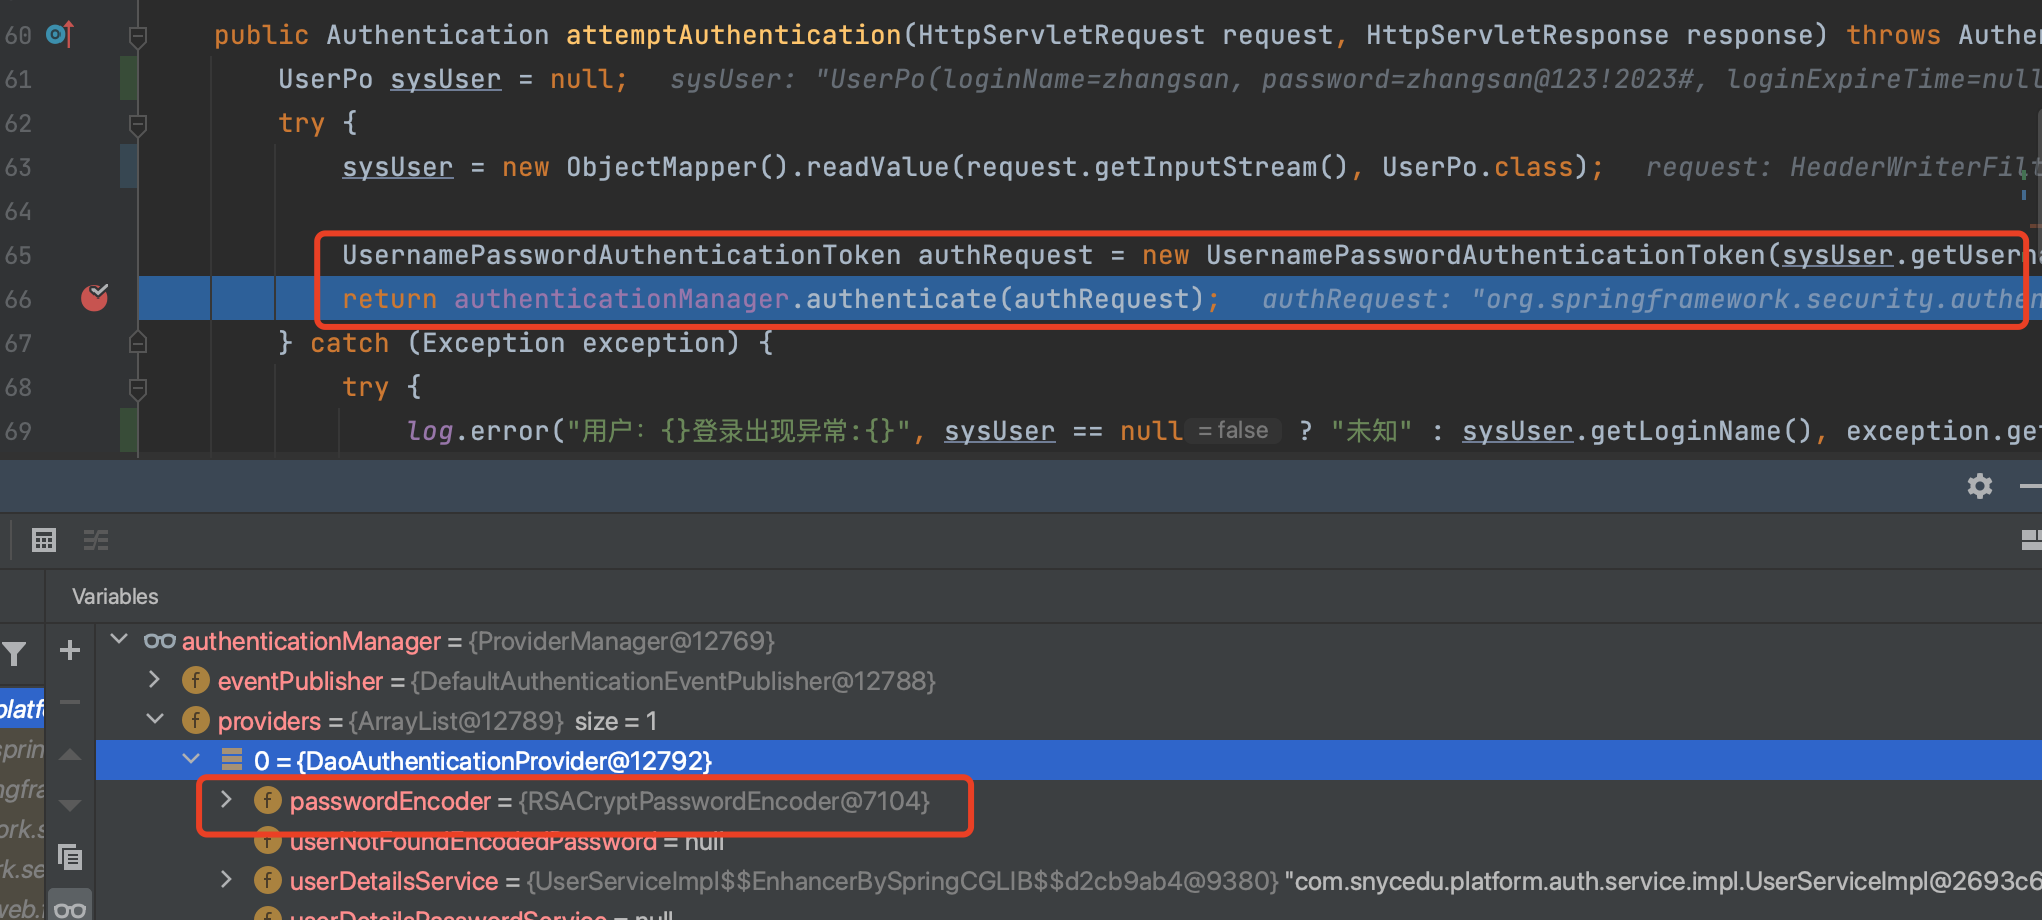
认证管理器和密码解密器
从下图可以看出,账号密码认证管理器中的加解密器就是我们自定义的RSACryptPasswordEncoder,继续断点,查看明文密码和密文是如何进行验证的,细心的读者其实已经发现了
-
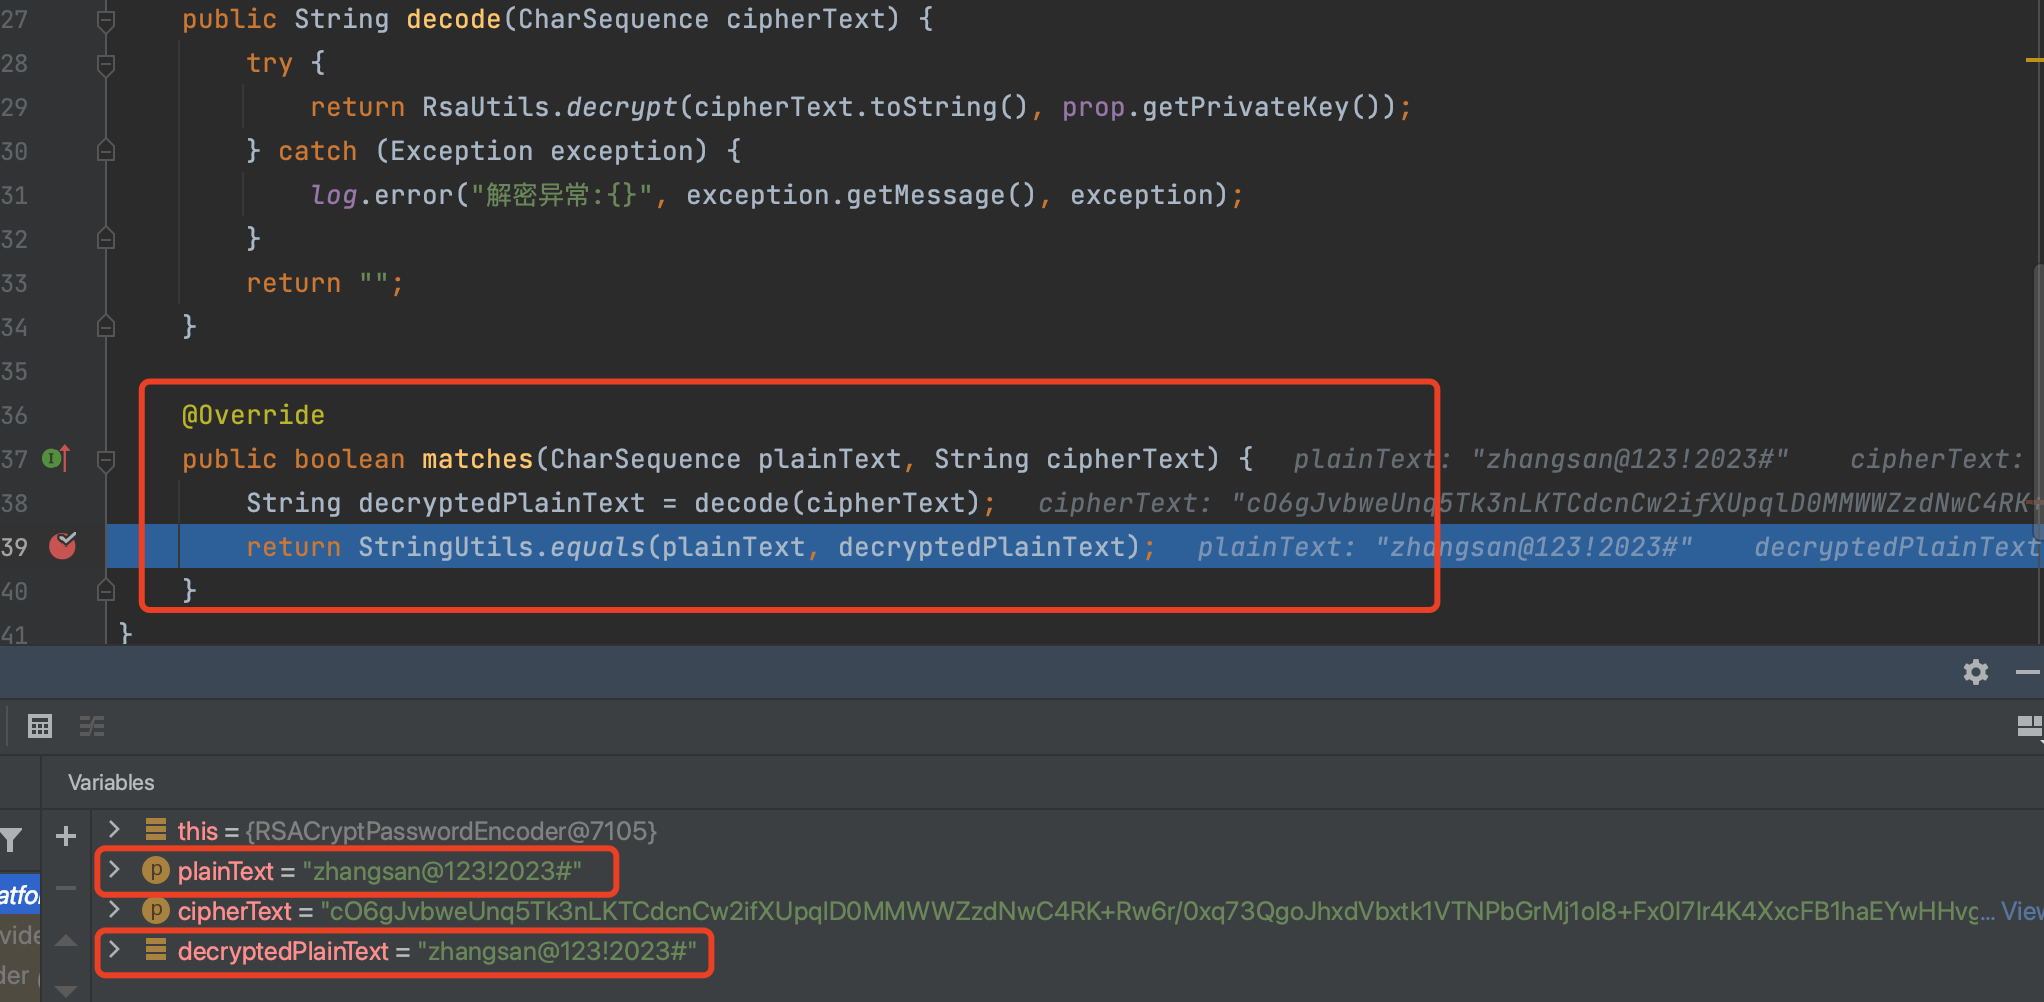
明文密码与密文密码匹配机制
从下图很明显可以看出,密码的验证就是在我们的RSACryptPasswordEncoder类中的matches方法,方法的参数1就是登录传入的明文密码,参数2就是数据库读取到的加密密文,将密文进行解密与明文密码进行匹配即可验证密码
-
登录验证
不出意外,登录就可以成功了
七、实现ECS的免密登录
既然主要围绕RSA讲,我们平时登录ECS大多是通过账号密码进行登录,每次都要输入密码,现在用RSA的公私钥进行自动验证登录
- 正常密码登录
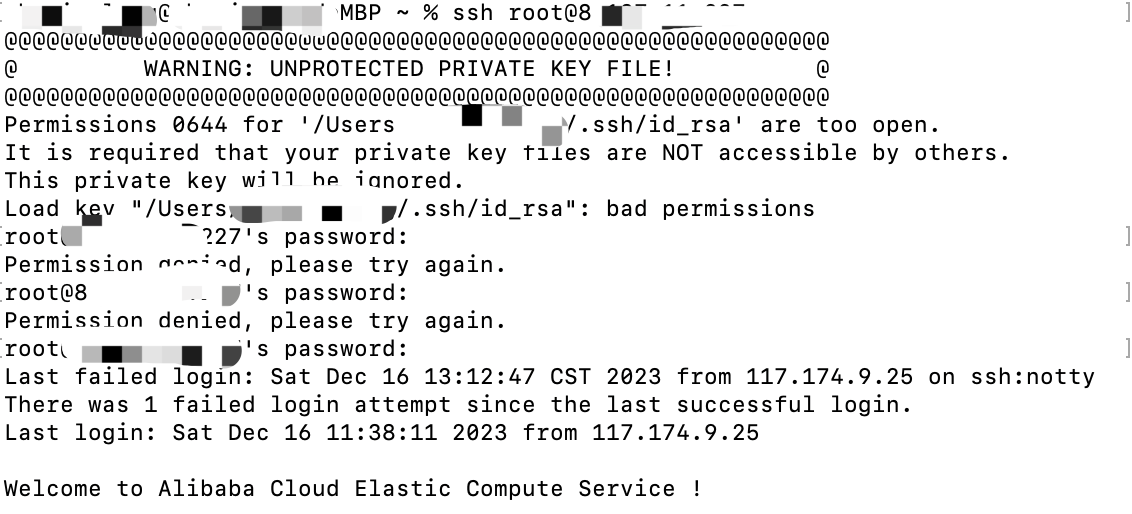
-
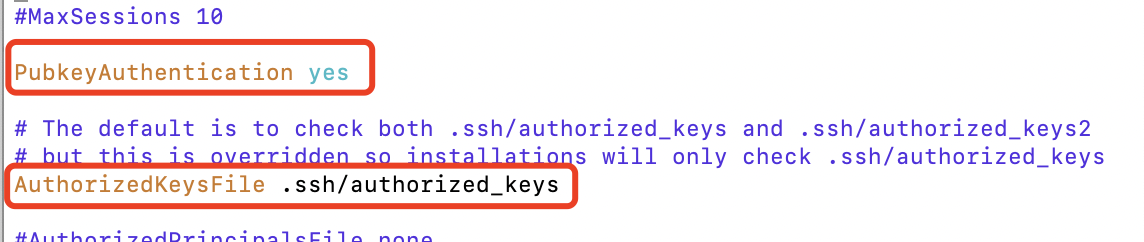
ECS开启公钥免密登录
sudo vim /etc/ssh/sshd_config
修改下面2个配置远程ECS开启公钥免密登录及公钥文件位置
- 本地生成免密公钥authorized_keys文件
cp id_rsa.pub authorized_keys
- 免密登录

可以看到,直接ssh root@xx.xxx.xx.xx即可免密登录到远程ECS


 1061
1061


 被折叠的 条评论
为什么被折叠?
被折叠的 条评论
为什么被折叠?
 到【灌水乐园】发言


