


简述:
对基于 System.Web 的 ASP.NET WebForms 和 MVC 应用程序的 Markdown 支持
从 NuGet 获取
要使用可以从Nuget安装的控件:
PS> install-package Westwind.Web.Markdown
特征
该库提供:
- Markdown Parser Functions
使用Markdown.parse()和Markdown.parsehtml()方法进行简单的Markdown解析,你可以在代码或MVC或WebForms标记中使用。 - Markdown WebForms Control for ‘Markdown Islands’
一个有用的<ww:markdown>服务器 WebControl,用于轻松嵌入静态markdown文本,从文件markdown或数据绑定markdown到文档。对于大型Web页面内的静态内容使用Markdown非常好,包括从文件加载内容的能力。 - 使用 MarkdownHttpHandler从磁盘提供 Markdown 页面
这个Http处理程序允许您将Markdown文件放到站点中,并将这些Markdown文件作为HTML呈现到可配置模板中。模板的工作是在HTML周围提供站点chrome,所以这可以简单地是一个小的内容页,指向WebForms中的母版页或MVC中的布局页。模型对象通过Items集合传递。 - 使用很棒的 Markdig 解析器
这个库依赖于Markdig Markdown 解析器,并通过配置挂钩提供对该解析器的所有 Markdown 管道配置选项的访问。 - 可选的 Html 脚本
解析器和Web Control都有清除HTML的选项,以避免常见的XSS攻击。
- 主要的内容
- A Markdown TagHelper
- Markdown Parsing function
- Markdown Page Processing Middleware that allows you to serve Markdown Pages as HTML
静态Markdown解析函数
对于直接的Markdown解析,你可以使用这个库**将Markdown渲染为HTML的字符串或MVC的HtmlString值**。
string html = Markdown.Parse("This is **bold Markdown**.");
or
<%= Markdown.Parse("This is **bold Markdown**.") %>
or甚至在网页或MVC中:
@Markdown.ParseHtml("This is **bold Markdown**.")
还有一些基于文件的方法可以从文件中解析Markdown:
<%= Markdown.ParseHtmlFromFile("~/HomePageMainContent.md") %>
or in MVC:
@Markdown.ParseHtmlStringFromFile("~/HomePageMainContent.md")
Markdown Control
Web控件为您提供了**将静态Markdown文本轻松嵌入任何Web表单页面**的能力。
<ww:Markdown runat="server" id="md1">
    ### 1.6.2
    *September 10th, 2017*

    * **Keyboard support for Context Menu**
    You can now pop up the context menu via keyboard using the Windows context menu key (or equivalent). The menu is now cursor navigable. This brings spell checking and various edit operations to keyboard only use.

    * **Fix: `UseSingleWindow=false` no longer opens Remembered Documents**
    When not running in `UseSingleWindow` mode, the `RememberLastDocumentsLength` setting has no effect and no previous windows are re-opened. This is so multiple open windows won't open the same documents all the time. In `UseSingleWindow` mode last documents are remembered and opened when starting MM for the first time.
</ww:Markdown>
并且内容将在运行时呈现为HTML。
Control Usage and Syntax
若要使用该控件,将其像任何其他服务器控件一样添加到页面中。
首先在页面或Web.config中****添加对控件程序集的引用:
在页面顶部:
<%@ Register TagPrefix="ww" Namespace="Westwind.Web.Markdown" Assembly="Westwind.Web.Markdown" %>
or in web.config globally:
<configuration>
    <system.web>
        <pages>
            <controls>
                <add assembly="Westwind.Web.Markdown"
                     namespace="Westwind.Web.Markdown"
                     tagPrefix="ww" />
            </controls>
        </pages>
    </system.web>
</configuration>
在ASP.NET中
<markdown normalize-whitespace="true" sanitize-html="true">
 ##### Parse Html in Code:
 The following is a short snippet of C# code:

 ```cs
 var html = Markdown.Parse("This is **Markdown** Text.")
 ```

 Using fenced code blocks and <a href="https://highlightjs.com">highlightJs</a>
</markdown>
然后将控件嵌入到你想要标记出现的页面中:
<ww:Markdown runat="server" id="md2"
NormalizeWhiteSpace="True"
Filename=""
SanitizeHtml="True">
# Markdown Monster Change Log
[download latest version](https://markdownmonster.west-wind.com/download.aspx) •
[install from Chocolatey](https://chocolatey.org/packages/MarkdownMonster) •
[Web Site](https://markdownmonster.west-wind.com)
</ww:Markdown>
NormalizeWhiteSpace(规范化的空白)
默认情况下,此属性为true,如果控件以一个缩进的行开始,它将从后面的所有行都会采用相同的缩进**(类似于属性继承)**。这允许像这样的文本正确渲染为Markdown:
<div class="container">
    <ww:Markdown runat="server" id="md1">
        ### 1.6.2
        *September 10th, 2017*

        * **Keyboard support for Context Menu**
        You can now pop up the context menu via keyboard using the Windows context menu key (or equivalent). The menu is now cursor navigable. This brings spell checking and various edit operations to keyboard only use.

        * **Fix: `UseSingleWindow=false` no longer opens Remembered Documents**
        When not running in `UseSingleWindow` mode, the `RememberLastDocumentsLength` setting has no effect and no previous windows are re-opened. This is so multiple open windows won't open the same documents all the time. In `UseSingleWindow` mode last documents are remembered and opened when starting MM for the first time.
    </ww:Markdown>
</div>
注意标记的缩进。当’NormalizeWhiteSpace 关闭时,你需要显式地左对齐嵌入的Markdown Content:
<ww:Markdown runat="server" id="md2" NormalizeWhiteSpace="False">
# Markdown Monster Change Log
[download latest version](https://markdownmonster.west-wind.com/download.aspx) •
[install from Chocolatey](https://chocolatey.org/packages/MarkdownMonster) •
[Web Site](https://markdownmonster.west-wind.com)
</ww:Markdown>
如果不进行规范化,整个标记块将呈现为代码(超过4个空白字符,这是一个代码块)。当 NormalizeWhiteSpace 为true时,将从整个块中剥离前导空间。
第一行确定要剥离的空白
Markdown块的第一行确定要从所有其他行中剥离哪些空白。
Note the default is True - if you have funky behavior due to indentation I’d recommend you left justify your markdown and set this value to False.注意默认是’ True ’ —如果你有古怪的行为由于缩进,我建议你左证明你的markdown和设置这个值为’ False '。
SanitizeHtml
Markdown本质上是HTML的超集,因为您可以将任何HTML嵌入到Markdown中。Markdown本身没有任何关于可以嵌入什么HTML的规则,完全可以在Markdown中嵌入脚本代码。
如果你从用户那里获取Markdown文本,你必须像对待原始HTML用户输入一样对待输入Markdown。
To help with this, the Markdown control has a SanitizeHtml property which is set to True by default, which performs rudimentary script sanitation. It removes <script>, <iframe>, <form> and a few other elements, removes javascript: and data: attribute content, and removes onXXX event handlers from HTML input.
为了帮助实现这一点,Markdown控件有一个SanitizeHtml 属性,默认设置为True ,执行基本的脚本卫生。它删除’
如果你宁愿渲染你的Markdown as is设置“SantizeHtml”为“False”。要看看它看起来像什么,你可以在你的Markdown块尝试以下:
<markdown runat="server" id="mm1" SanitizeHtml="False">

	### Links:
	[Please don't hurt me](javascript:alert('clicked!');)

	### Script Blocks
	<script>alert('this will show!');</script>

	<div onmouseover="alert('That really hurts!')"
	     style="opacity: 0; padding: 20px;">
		A hidden menace in Venice
	</div>
</markdown>
Markdown.Parse() and Markdown.ParseHtml() 都有一个sanitizeHtml参数,默认为’ true '。
如果你渲染你控制的静态文本,那么’ SanitizeHtml=False ‘通常是可以的,但如果你==获取用户输入并放入浏览器中显示,**总是使用’ SanitizeHtml=True ’ **==。
Filename
您可以选择在Markdown控件主体中提供文件名来代替文本内容。文件可以指定为虚拟路径:
<ww:Markdown Filename="~/EmbeddedMarkdown.md"></ww:Markdown>
文件名解析并从磁盘加载,转换为Markdown并呈现到页面中。
文件名被提供给Server.MapPath() ,因此任何对MapPath() 有效的路径都可以工作,但为了可移植性,我建议您使用**页面相对路径或如上所示的虚拟路径**。
相关资源是相对于主机页的
请不要在Markdown文档中链接的资源—大部分是图像—是主机页面相对的,而不是相对于Markdown文件。在大多数情况下,最好将引用的Markdown文档放在与主机页面相同的文件夹中,以确保相关链接一致工作。
Static Markdown Rendering 静态Markdown渲染
该控件还包括静态Markdown呈现,您可以在Web应用程序的页面或Web代码中使用它。
string html = Markdown.Parse("This is **bold Markdown**");
你也可以像这样将Markdown嵌入页面:
<div class="container" id="ChangeLogText">
    <%= Markdown.Parse(Model.ChangelogMarkdownText) %>
</div>
or in WebPages or MVC:
<div class="well well-sm">
    @Markdown.ParseHtml("This is **bold Markdown**.")
</div>
sanitizeHtml Parameter
By default the Parse method applies HTML sanitation via a sanitzeHtml parameter, which defaults to true. If you would like to get the raw unsanitized HTML returned or you want to do your own HTML Sanitation post parsing, set sanitizeHtml: false in the method call.
For code you know is safe:
默认情况下,Parse方法通过’ sanitzeHtml ‘参数应用HTML sanitation (公共设施),该参数默认为’ true '。如果你想要返回unsanitized的原始HTML,或者你想做自己的HTMLsanitation (公共设施)后解析,在方法调用中设置’ sanitizeHtml: false '。
对于你知道是安全的代码:
string html = Markdown.Parse(staticMarkdown,sanitizeHtml: false);
对于你回显到屏幕上的用户输入:
// true is the default but it's good to be explicit!
string html = Markdown.Parse(staticMarkdown, sanitizeHtml: true);
Important
始终把用户输入的Markdown当作原始HTML对待!
Markdown Page Handler(处理)
The Markdown HTTP Handler allows you to simply drop Markdown files into an ASP.NET Web site and get those pages served as HTML. You can provide a template to provide the site’s chrome around the rendered and access a ‘model’ that contains the title, the rendered Markdown, original Markdown and a few other things to render into your template. The ‘template’ is simply an endpoint in your System.Web based application, so it can point at either a WebForms Page or an MVC Controller/View Endpoint.Markdown HTTP处理程序允许您简单地将Markdown文件放入ASP.NET网站,并将这些页面作为HTML服务。你可以提供一个template模板,在渲染周围提供网站的chrome,并访问一个“模型model”,其中包含标题,渲染的Markdown,原始Markdown和其他一些东西渲染到你的模板。“模板”只是系统中的一个endpoint 端点。基于Web的应用程序,因此它**可以指向WebForms页面或MVC控制器/视图端点**。
Setting up the Markdown Page Handler
To set up the handler you need to:
-
添加Westwind.Web.Markdown Nuget包的引用
-
添加一个处理器Handler的映射 of
.mdtoMarkdownHttpHandler -
Set up a ‘template’ HTML page or Controller/View
-
Use `Context.Items[MarkdownHttpHandler.ItemKey] to 检索模型
-
Embed
Model.RenderedMarkdownHtmlinto the template -
Drop some
.mdfiles anywhere in your site对应的ASP.NET

Add an HttpHandler Mapping(映射)
ASP.NET中没有用到
In order for IIS and ASP.NET to process .md (or whatever other extensions you choose) files, the extension has to be registered in web.config.为了实现IIS和ASP.NET来处理.md (或任何其他扩展名你选择)文件,扩展名必须注册在web.config.
<configuration>
  <system.webServer>
    <handlers>
      <add name=".md extension"
           path="*.md" verb="GET"
           type="Westwind.Web.Markdown.MarkdownHttpHandler,Westwind.Web.Markdown"
           preCondition="integratedMode" />
    </handlers>
  </system.webServer>
</configuration>
Configuration
You can optionally configure the handler’s operation using the static configuration object provided as MarkdownHttpHandler.Configuration. Preferrably you’ll want to set this configuration once during application startup in Application_Start(): 您可以选择使用作为MarkdownHttpHandler.Configuration提供的静态配置对象来配置处理程序的操作。你最好在应用程序启动时在Application_Start()中设置这个配置:
void Application_Start(object sender, EventArgs e)
{
	MarkdownHttpHandler.Configuration.SanitizeHtml = true;
	MarkdownHttpHandler.Configuration.MarkdownTemplatePagePath = "~/_MarkdownPage.aspx";
}
Both of these values are shown as default above so unless you need to change those values you don’t have to set them. The important one is the virtual path to the template that will actually render the Markdown content as a full HTML document. This can be any valid page in your System.Web based Web site that can access the Context.Items collection which is needed to retrieve the model data. 上述两个值都显示为默认值,所以除非需要更改这些值,否则不必设置它们。重要的一个是模板的虚拟路径,它将实际Markdown内容呈现为完整的HTML文档。这可以是您的System.Web 中的任何有效页面。基于 Web site可以访问Context.Items 集合。集合,它是检索模型数据所需要的。
Create a Template
Next you’ll need a template into which the markdown content can be rendered. Remember Markdown is just an HTML Fragment not a full document, so Markdown always needs a host document. Most likely you’ll also want to make sure the document renders consistently using your Web site’s consistent site chrome.
You can use either WebForms or MVC to do this - just pick an WebForms page or MVC view as an endpoint and then access the following model data in your HTML markdown or codebehind/controller:
接下来,您需要一个可以将markdown内容呈现到其中的模板。记住Markdown只是一个HTML片段不是一个完整的文档,所以Markdown总是需要一个host 宿主文档。最可能的情况是,您还需要确保这个宿主文档是能够使用你的 Web site’s consistent 来进行一致性渲染chrome。
你可以使用WebForms或MVC来实现这一点——只需要选择一个WebForms页面或MVC视图作为端点,然后在你的HTML markdown或codebehind/controller中访问以下模型数据:
var model = Context.Items[MarkdownHttpHandler.ModelKey] as MarkdownModel;
模型的可用属性如下所示:
| Property | Value |
|---|---|
| Title | The title of the page from first # header or YAML(另一种标记语言(Yet Another Markup Language)) |
| RenderedMarkdown | An HtmlString value that contains the rendered Markdown |
| RawMarkdown | Holds the raw, original Markdown text(保存原始的Markdown文本) |
| YamlHeader | Hold the YAML header if one is provided |
| RelativePath | The relative virtual path of the original Markdown File |
| PhysicalPath | The physical path of the original Markdown File requested |
Most likely the only values you’ll be interested in are RenderedMarkdown and the Title. You’ll want to use the title for the title in the <head> of the page at least, and perhaps also in some sort of non-content page header.
Here’s what the simplest possible templates look like for Web Forms and MVC:
最有可能的是你感兴趣的唯一值是 RenderedMarkdown and the Title。您至少需要在页面的’ '中为标题使用标题,也许还需要在某种非内容页眉中使用标题。
下面是Web Forms和MVC最简单的模板:
WebForms
<%@ Page Language="C#" AutoEventWireup="true" MasterPageFile="~/MasterPage.master"  %>
<%@ Import Namespace="Westwind.Web.Markdown" %>

<asp:Content runat="server" ContentPlaceHolderID="MainContent">
    <%
        var model = Context.Items[MarkdownHttpHandler.ModelKey] as MarkdownModel;
    %>
    <div class="container">
        <%= model.RenderedMarkdown %>
    </div>
</asp:Content>
MVC
For MVC you’ll want to change the path to point a view/controller of your choice in the configuration in Application_Start():
对于MVC,你需要在Application_Start()的配置中改变路径来指向你选择的view/controller :
// this will be an internally redirected URL only(这将是一个内部重定向URL)
MarkdownHttpHandler.Configuration.MarkdownTemplatePagePath = "~/system/markdownhandling";
Then you can have a controller method (or just code in a view):
然后你可以有一个控制器方法(或者只是视图中的代码):
public ActionResult MarkdownHandling()
{
	var model = Context.Items[MarkdownHttpHandler.ModelKey] as MarkdownModel; //创建一个模板
	return View(model);
}
然后在Razor视图内部,你可以根据需要使用模型:
@model MarkdownModel

<div class="container">
	<div class="page-header">
		@model.Title
	</div>

	<div class="page-content">
		@model.RenderedMarkdown
	</div>
</div>
If you need to pass other items into the view like authentication or login data required in your site chrome, you can just create a custom view that includes theMarkdownModel data. I left this in raw form from the
Context.Itemscollection to allow this to work in just about anySystem.Webbased solution. 如果你需要传递其他项目到视图,如认证或登录数据需要在你的网站chrome,你可以只创建一个自定义视图,其中包括MarkdownModel 数据。我从Context.Itemscollection 中留下了原始的形式,以允许这工作在几乎基于解决方案的System.Web上。
Templates most likely will be very simple and only embed the content and title. All the rest of the page chrome is likely to be picked up by Master or Layout pages. 模板很可能非常简单,只嵌入内容和标题。所有其余的页面chrome很可能被Master 母版或布局页面 Layout pages.拾取。
Dropping Files into your Site(将文件放入您的站点)
At this point you can just drop .md files into your site. The files should be routed to the MarkdownHttpHandler which in turn renders the Markdown to HTML and calls your template with the Context.Items item that contains the model, which is then rendered by your customized template. 这时你可以直接将 .md 文件放入您的站点。文件应该被路由到 MarkdownHttpHandler,它依次将Markdown渲染为HTML,并使用Context.Items项目去调用你的模板。而Context.Items项目中包含了这个模型,然后由自定义模板呈现该模型。
This is great to add some documentation or other text heavy content to your site. 这对于在站点中添加一些文档或其他文本内容非常有用。
Customizing the Markdown Pipeline(定制Markdown管道)
This parser uses the MarkDig Markdown parser which supports creating a custom pipeline. By default the parser is configured with most add-on features enabled. if you want to explicitly customize this list - either to minimize for performance, or for additional features you can override the static MarkdownParserMarkdig.OnCreateMarkdigPipeline function during application startup. 该解析器使用支持创建自定义管道的**MarkDig Markdown解析器。默认情况下,解析器配置为启用了大多数附加功能。如果你想显式地自定义这个列表——要么为了性能最小化,要么为了额外的功能,你可以覆盖静态的MarkdownParserMarkdig.OnCreateMarkdigPipeline函数**,在应用程序启动时。
When this Func<bool,MarkdigPipeline> is set, this function is called instead of the default pipeline build logic. 当设置Func<bool,MarkdigPipeline> 时,将调用此函数而不是默认的管道构建逻辑。
Call this during application startup since the parser gets cached after first access. A good place as part of Application_Init processing: 在应用程序启动期间调用这个函数,因为解析器在第一次访问后被缓存。作为Application_Init处理的一部分的一个好地方:
void Application_Start(object sender, EventArgs e)
{
    // OPTIONAL - override parser pipeline addins(覆盖解析器管道插件)
    MarkdownParserMarkdig.OnCreateMarkdigPipeline = (usePragmaLines) =>
    {
        var builder = new Markdig.MarkdownPipelineBuilder()
            .UseEmphasisExtras()
            .UsePipeTables()
            .UseGridTables()
            .UseAutoLinks() // URLs are parsed into anchors
            .UseAutoIdentifiers(AutoIdentifierOptions.GitHub)
            .UseYamlFrontMatter()
            .UseEmojiAndSmiley(true);

        if (usePragmaLines)
            builder = builder.UsePragmaLines();

        return builder;
    };

}
Note that the parser is cached so if you change this value anywhere but in startup code, you can explicitly force the parser to refresh with: 注意,解析器是缓存的,所以如果你在启动代码之外的任何地方更改了这个值,你可以显式地强制解析器用以下方式刷新:
Markdown.Parse("ok",forceReload: true);
Adding Code Highlighting
If you’d like to highlight your code snippets with syntax highlighting I recommend Highlight.js. Using this easy to use library you can add the following to a page to get syntax coloring for code snippets: 如果你想用语法高亮显示你的代码片段,我推荐highlight .js。使用这个易于使用的库,您可以将以下内容添加到页面中,以获得代码片段的语法着色:
<link rel="stylesheet" href="//cdnjs.cloudflare.com/ajax/libs/highlight.js/9.12.0/styles/dracula.min.css" />
<script src="//cdnjs.cloudflare.com/ajax/libs/highlight.js/9.12.0/highlight.min.js"></script>

<script>
    function highlightCode() {
        var pres = document.querySelectorAll("pre>code");
        for (var i = 0; i < pres.length; i++) {
            hljs.highlightBlock(pres[i]);
        }
    }
    highlightCode();
</script>
Acknowledgements
This library uses the following excellent components:
1 Creating an ASP.NET Core Markdown TagHelper and Parser
几个月前,我写了一篇关于为WebForms创建字面Markdown控件的文章,其中我描述了一个简单的内容控件,它从标签内获取内容并解析嵌入的Markdown,然后产生HTML输出来代替它。我创建WebForms控件主要是出于自私的原因,因为我的内容网站上有大量的半静态内容,这些内容仍然生活在经典的ASP.NET ASPX页面中。
自从我写了那篇文章后,我收到了很多请求,希望写一个类似的ASP.NET Core版本,而且–回到我自己的私心–我也开始部署一些内容繁杂的网站,这些网站有大部分静态的html内容,使用ASP.NET Core和Razor Pages的Markdown会有很好的效果。所以是时候通过创建 TagHelper来建立一个ASP.NET Core版本了,我在这篇文章中介绍了这个版本。按照同样的思路,我还创建了一个通用的Markdown页面处理中间件组件,可以用来在任何ASP.NET Core站点中通用地提供任意的Markdown文档,我将在下周的单独帖子中介绍。
现在已经有很多Markdown TagHelper的实现,但我是**MarkDig Markdown解析器**的忠实粉丝,所以我着手创建一个ASP.NET Core Tag Helper,提供与我之前创建的WebForms控件同样的功能。
Get it
获取它 这个库提供
一个Markdown TagHelper
Markdown解析功能
Markdown页面处理中间件
允许你将Markdown页面作为HTML来处理 在这篇文章中,我介绍了前两者,Markdown页面处理器将在另一篇文章中介绍。 已打包的Westwind.AspnetCore.Markdown组件包括对代码或Razor页面的简单的Markdown解析支持,以及一个用于你的ASP.NET Core应用程序的TagHelper。
TagHelpers
TagHelpers是ASP.NET Core MVC的一项新功能,它很容易成为服务器端HTML生成方面最出色的改进之一。TagHelpers是嵌入到@Razor页面中的自含组件。TagHelpers看起来像HTML标签,与Razor表达式(@Expression)不同,在Razor页面的标准HTML内容中感觉很自然。
ASP.NET中许多现有的模型绑定和HTML helpers已经被TagHelpers和TagHelper行为所取代,它允许**你直接绑定到页面中的HTML控件**。例如,这里有一个与模型值绑定的输入标签。

另一个重要的观点是,创建你自己的TagHelper非常容易,这也是这篇文章的重点。创建TagHelper的接口主要是一个单一的方法接口,它接受一个Context输入以获得元素、标签和内容信息,以及一个必须为实际的TagHelper输出生成的输出字符串。使用这种方法感觉非常自然,使你可以很容易地创建自己的标签助手而不费吹灰之力。
TagHelper通过一个非常简单的==ProcessAsync()==接口封装了渲染逻辑,该接口在TagHelper定义的位置将一大块HTML内容渲染到页面中。ProcessAsync()方法接受一个TagHelper Context作为输入,让你获得输入的元素和属性,并提供一个输出,你可以编写字符串输出来生成你的嵌入内容。正如我们将看到的,只需要很少的代码就可以创建一个非常有用的TagHelper(and provides an output that you can write string output to generate your embedded content. As we’ll see it takes very little code to create a very useful TagHelper.)。
使用TagHelpers
为了**使用TagHelpers**,它们必须在MVC中注册,要么在页面中,要么更可能在项目的_ViewImports.cshtml页面中。
要创建一个标签助手,你通常需要做这些事情:
- 创建一个新的类并继承自TagHelper
- 通过ProcessAsync()或Process()创建你的TagHelper实现
- 在_ViewImports.cshtml中注册你的TagHelper
- 在你的页面中引用你的TagHelper
Creating the MarkdownTagHelper Class
For the <markdown> TagHelper I want to create a content control whose content can be retrieved and parsed as Markdown and then converted into HTML. Optionally you can also use a Markdown property to bind Markdown for rendering - so if you have Markdown as part of data in your model you can bind it to this property/attribute in lieu of static content you provide.创建MarkdownTagHelper类 对于 TagHelper,我想创建一个**内容控件,其内容可以被检索和解析为Markdown,然后转换为HTML**。你也可以选择使用一个**Markdown属性**来绑定Markdown进行渲染–所以如果你的模型中有Markdown作为数据的一部分,你可以将其绑定到这个属性/attribute中,以代替你提供的静态内容。
[HtmlTargetElement("markdown")]
public class MarkdownTagHelper : TagHelper
{
    [HtmlAttributeName("normalize-whitespace")]
    public bool NormalizeWhitespace { get; set; } = true;

    [HtmlAttributeName("markdown")]
    public ModelExpression Markdown { get; set; }

    public override async Task ProcessAsync(TagHelperContext context, TagHelperOutput output)
    {
        await base.ProcessAsync(context, output);

        string content = null;
        if (Markdown != null)
            content = Markdown.Model?.ToString();

        if (content == null)
            content = (await output.GetChildContentAsync(NullHtmlEncoder.Default))
                            .GetContent(NullHtmlEncoder.Default);

        if (string.IsNullOrEmpty(content))
            return;

        content = content.Trim('\n', '\r');

        string markdown = NormalizeWhiteSpaceText(content);

        var parser = MarkdownParserFactory.GetParser();
        var html = parser.Parse(markdown);

        output.TagName = null;  // Remove the <markdown> element
        output.Content.SetHtmlContent(html);
    }
}
在你可以在页面中使用TagHelper之前,你需要在MVC应用程序中注册它,在_ViewImports.cshtml中插入以下内容。
@addTagHelper *, Westwind.AspNetCore.Markdown
Now you’re ready to use the TagHelper:
<markdown>This is **Markdown Text**. Render me!</markdown>
正如你所看到的,处理markdown的实际处理的代码非常短而且容易理解。它抓取**元素的内容或markdown属性**,然后将其传递给Markdown解析器来处理。解析器将Markdown文本变成HTML,然后用output.Content.SetHtmlContent()将其写成HTML内容。
这段代码对Markdown解析器进行了抽象,因此解析器在未来可以更容易地被替换,而不影响TagHelper的代码。在找到MarkDig之前,我经历了几次Markdown解析器的迭代,我在许多地方使用这段代码来添加Markdown解析功能。一会儿我再来谈谈Markdown解析器。
Markdown属性和数据绑定
除了内容之外,你还可以绑定markdown属性,它允许程序化分配和数据绑定。
@model MarkdownModel
@{
    Model.MarkdownText = "This is some **Markdown**!";
}

<markdown markdown="Model.MarkdownText" />
The markdown attribute accepts binding expressions you can bind Markdown for display from model values or other expressions easily. markdown属性接受绑定表达式,你可以轻松地从模型值或其他表达式中绑定Markdown进行显示。
规范化Markdown文本
为Markdown使用TagHelper或Control的一个问题是,Markdown**希望在处理Markdown文本时没有边际**。 如果你有像这样的Markdown。
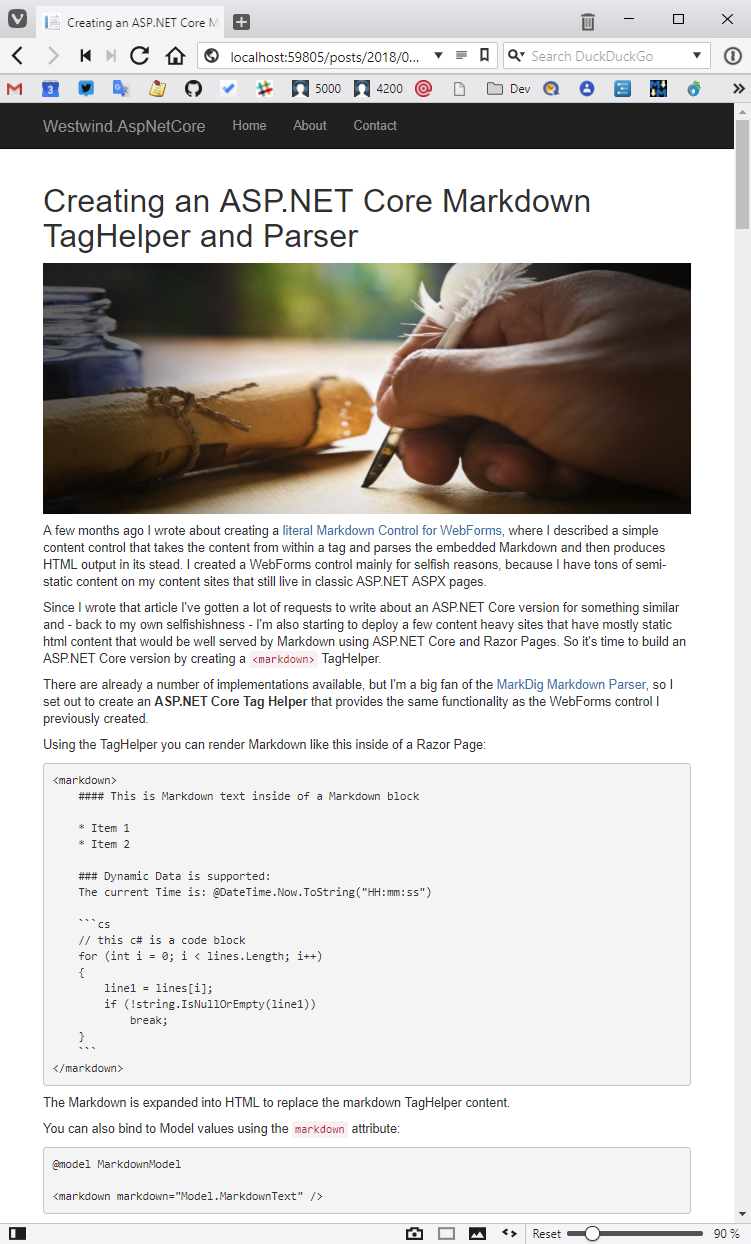
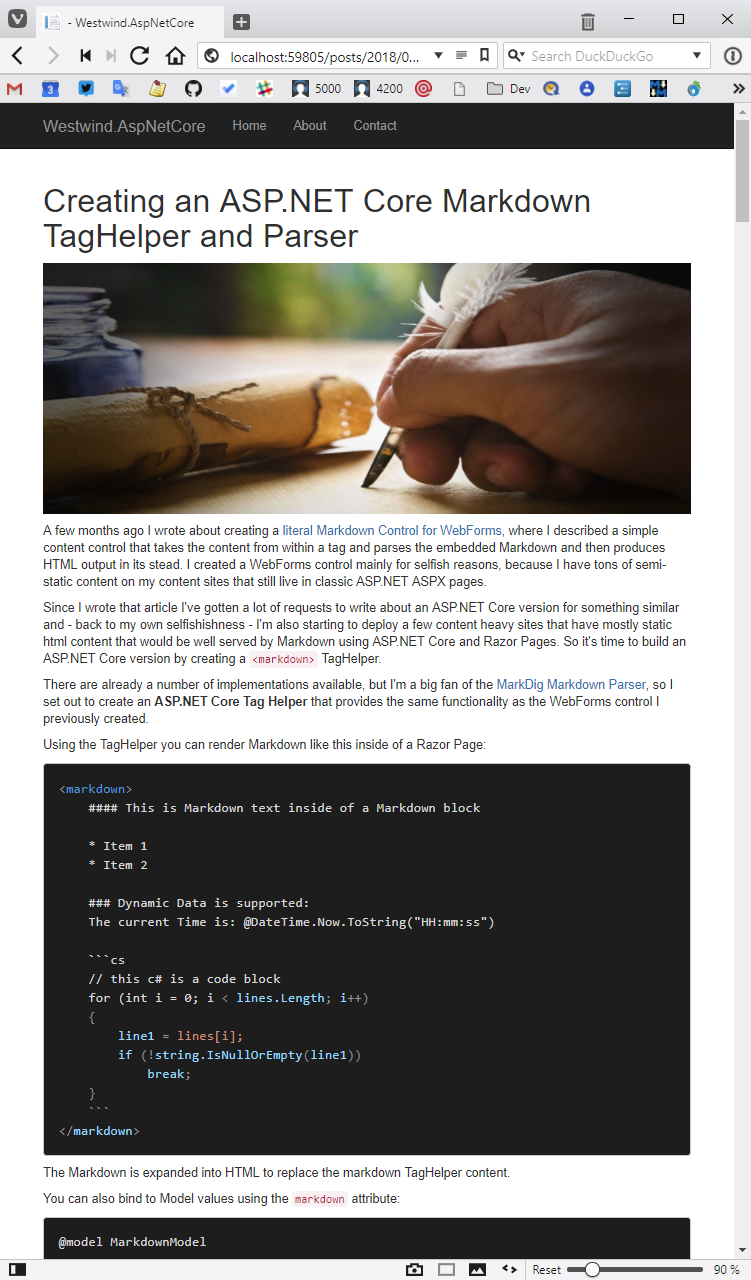
If you have Markdown like this:
<markdown>
    #### This is Markdown text inside of a Markdown block

    * Item 1
    * Item 2

    ### Dynamic Data is supported:
    The current Time is: @DateTime.Now.ToString("HH:mm:ss")

    ```cs
    // this c# is a code block
    for (int i = 0; i < lines.Length; i++)
    {
        line1 = lines[i];
        if (!string.IsNullOrEmpty(line1))
            break;
    }
    ```
</markdown>
and leave this Markdown in its raw form with the indent, the Markdown parser would render the entire Markdown text as a code block, because the text is indented with 4 spaces which is constitutes a code block in Markdown. Not what we want here!
并让这个Markdown以其原始形式缩进,Markdown分析器会把整个Markdown文本渲染成一个代码块,因为这个文本缩进了4个空格,这在Markdown中构成一个代码块。这不是我们想要的。
这就是==NormalizeWhiteSpace属性起作用的地方。此标志(默认情况下为True)确定**是否从嵌入的Markdown块中删除前导重复空白==**。 以下是删除前导空格的代码:
string NormalizeWhiteSpaceText(string text)
{
    if (!NormalizeWhitespace || string.IsNullOrEmpty(text))
        return text;

    var lines = GetLines(text);
    if (lines.Length < 1)
        return text;

    string line1 = null;

    // find first non-empty line
    for (int i = 0; i < lines.Length; i++)
    {
        line1 = lines[i];
        if (!string.IsNullOrEmpty(line1))
            break;
    }

    if (string.IsNullOrEmpty(line1))
        return text;

    string trimLine = line1.TrimStart();
    int whitespaceCount = line1.Length - trimLine.Length;
    if (whitespaceCount == 0)
        return text;

    StringBuilder sb = new StringBuilder();
    for (int i = 0; i < lines.Length; i++)
    {
        if (lines[i].Length > whitespaceCount)
            sb.AppendLine(lines[i].Substring(whitespaceCount));
        else
            sb.AppendLine(lines[i]);
    }

    return sb.ToString();
}

string[] GetLines(string s, int maxLines = 0)
{
    if (s == null)
        return null;

    s = s.Replace("\r\n", "\n");

    if (maxLines < 1)
        return s.Split(new char[] { '\n' });

    return s.Split(new char[] { '\n' }).Take(maxLines).ToArray();
}
这段代码的工作原理是查看第一行非空行并检查前导空白。它捕捉这些空白,然后从内容的所有行中删除相同的前导空白。只要Markdown块在所有行中使用一致的空白(即所有标签或所有n个空格等),这就可以了。
如果文档中的normalize-whitespace="false",你仍然可以使用TagHelper,但你必须确保文本在保存的Razor文件中是左对齐的。如果你使用Visual Studio,这很难,因为它会试图重新格式化文档并重新引入空白,所以这个属性的默认值是true。 要看这个类的完整代码,你可以在Github上查看代码。
Razor Expressions in Markdown
If you look back at the Markdown example above you might have noticed that the embedded Markdown includes a @Razor expression inside of the <markdown> tag. Markdown中的Razor表达式 如果你回顾一下上面的Markdown例子,你可能已经注意到,嵌入的Markdown包括标签内的一个@Razor表达式。
The following works as you would expect:
<markdown>
The current Time is: **@DateTime.Now.ToString("HH:mm:ss")**
</markdown>
Razor在将内容传递给TagHelper之前会处理表达式,所以在这个例子中,当Markdown解析启动时,日期已经被展开了。
Razor Expressions and Encoding
If you look at the code that parses the content of the Razor tag helper element you’ll notice this nasty syntax: 如果你看一下解析Razor标签辅助元素内容的代码,你会发现这个讨厌的语法
if (content == null)
 content = (await output.GetChildContentAsync(NullHtmlEncoder.Default))
          .GetContent(NullHtmlEncoder.Default);
This is necessary to ensure that any expressions evaluated are not HTML encoded when parsed. Razor Expressions encode by default and that’s not what we want inside of the Markdown content here, so the
NullHtmlEncoder.Defaultessentially creates a pass-through encoder that does nothing and simply returns the raw output of an expression. Keep this in mind when building your own tag helpers that work with content. 这是必要的,以确保任何被评估的表达式在解析时不会被HTML编码。Razor Expressions默认编码,这不是我们在这里想要的Markdown内容,所以NullHtmlEncoder.Default本质上创建了一个直通的编码器,它什么都不做,只是返回表达式的原始输出。在建立你自己的与内容相关的标签助手时,请牢记这一点
这非常酷–你基本上可以在原地使用Razor的大部分功能。只要确保你从你的Razor表达式和代码中生成Markdown兼容的文本。
Markdown Parsing with Markdig
The TagHelper above relies on a customized MarkdownParser implentation. As mentioned this component uses the MarkDig Markdown parser, but I added some abstraction around the Markdown Parser as I’ve switched parsers frequently in the past before settling pretty solidly on MarkDig. 上面的TagHelper依赖于一个定制的MarkdownParser植入。如前所述,这个组件使用MarkDig的Markdown解析器,但我在Markdown解析器周围添加了一些抽象,因为我在过去经常更换解析器,然后才非常坚定地选择MarkDig。
Parsing Markdown with Markdig is pretty simple, and if you want to be quick about it, you can easily create a function that does the following to parse Markdown using MarkDig: 用Markdig解析Markdown是非常简单的,如果你想快速处理,你可以很容易地创建一个函数,用MarkDig来解析Markdown。
public static class Markdown
{
    public static string Parse(string markdown)
    {
        var pipeline = new MarkdownPipelineBuilder()   //配置管道
                             .UseAdvancedExtensions()
                             .Build();
        return Markdown.ToHtml(markdown, pipeline); //定制你希望Markdown被解析的方式
    }
}
MarkDig uses a configuration pipeline of support features that you can add on top of the base parser. The example above adds a number of common extensions (like Github Flavored Markdown, List Extensions etc.), but you can also add each of the components you want to customize exactly how you want Markdown to be parsed. MarkDig使用一个支持功能的配置管道,你可以在基本分析器的基础上添加。上面的例子添加了一些常见的扩展(比如Github风味的Markdown,列表扩展等),但你也可以添加你想要的每一个组件,以准确地定制你希望Markdown被解析的方式。
The code above is not super efficient as the pipeline needs to be recreated for each parse operation and that’s part of the reason that I built a small abstraction layer around the Markdown parser so the parser can be easily switched without affecting the rest of the application and so that the generated Pipeline can be cached for better performance. 上面的代码并不是超级高效的,因为管道需要为每个解析操作重新创建,这也是我在Markdown解析器周围建立一个小的抽象层的部分原因,所以解析器可以很容易地被切换而不影响应用程序的其他部分,这样生成的管道可以被缓存以获得更好的性能。
A MarkdownParserFactory
The first thing is a Markdown Parser factory that provides an IMarkdownParser interface which has little more than that a Parse() method 首先是一个Markdown Parser工厂,它提供了一个IMarkdownParser接口,该接口除了有一个Parse()方法外,没有什么其他功能。:
public interface IMarkdownParser
{
    string Parse(string markdown);
}
然后工厂产生接口,这时MarkDig的硬编码实现已经到位。工厂还缓存了解析器实例,因此它可以被重复使用,而**不需要在每次解析操作中重新加载整个解析管道pipeline**。
/// <summary>
/// Retrieves an instance of a markdown parser  检索markdown解析器的实例
/// </summary>
public static class MarkdownParserFactory
{
    /// <summary>
    /// Use a cached instance of the Markdown Parser to keep alive  使用Markdown Parser的缓存实例来保持存活
    /// </summary>
    static IMarkdownParser CurrentParser;

    /// <summary>
    /// Retrieves a cached instance of the markdown parser
    /// </summary>
    /// <param name="forceLoad">Forces the parser to be reloaded - otherwise previously loaded instance is used  强制重新加载解析器-否则使用先前加载的实例</param>
    /// <param name="usePragmaLines">If true adds pragma line ids into the document that the editor can sync to 如果为true,则将pragma行id添加到编辑器可以同步到的文档中/param>
    /// <returns>Mardown Parser Interface</returns>
    public static IMarkdownParser GetParser(bool usePragmaLines = false,
                                            bool forceLoad = false)
    {
        if (!forceLoad && CurrentParser != null)
            return CurrentParser;

        CurrentParser = new MarkdownParserMarkdig(usePragmaLines, forceLoad);//处理解析器管道的实际配置,并将Markdown解析为HTML

        return CurrentParser;
    }
}
Finally there’s the actual MarkDigMarkdownParser implementation that’s responsible for handling the actual configuration of the parser pipeline and parsing the Markdown to HTML. The class inherits from a MarkdownParserBase class that provides a few optional pre and post processing features such as font awesome font-embedding, yaml stripping (which is not built into MarkDig but not other parsers) etc. 最后是实际的**MarkDigMarkdownParser实现,它负责处理解析器管道的实际配置,并将Markdown解析为HTML**。该类继承自MarkdownParserBase类,该类提供了一些可选的前处理和后处理功能,如字体、字体嵌入、yaml剥离(MarkDig没有内置这种功能,但其他解析器没有)等。
/// <summary>
/// Wrapper around the MarkDig parser that provides a cached
/// instance of the Markdown parser. Hooks up custom processing.
/// </summary>
public class  MarkdownParserMarkdig : MarkdownParserBase
{
    public static MarkdownPipeline Pipeline;  //解析器管道

    private readonly bool _usePragmaLines;

    public MarkdownParserMarkdig(bool usePragmaLines = false, bool force = false, Action<MarkdownPipelineBuilder> markdigConfiguration = null)
    {
        _usePragmaLines = usePragmaLines;
        if (force || Pipeline == null)
        {
            var builder = CreatePipelineBuilder(markdigConfiguration);
            Pipeline = builder.Build();
        }
    }

    /// <summary>
    /// Parses the actual markdown down to html
    /// </summary>
    /// <param name="markdown"></param>
    /// <returns></returns>
    public override string Parse(string markdown)
    {
        if (string.IsNullOrEmpty(markdown))
            return string.Empty;

        var htmlWriter = new StringWriter();
        var renderer = CreateRenderer(htmlWriter);

        Markdig.Markdown.Convert(markdown, renderer, Pipeline);

        var html = htmlWriter.ToString();

        html = ParseFontAwesomeIcons(html);

        //if (!mmApp.Configuration.MarkdownOptions.AllowRenderScriptTags)
        html = ParseScript(html);

        return html;
    }

    public virtual MarkdownPipelineBuilder CreatePipelineBuilder(Action<MarkdownPipelineBuilder> markdigConfiguration)
        {
            MarkdownPipelineBuilder builder = null;

            // build it explicitly
            if (markdigConfiguration == null)
            {
                builder = new MarkdownPipelineBuilder()
                    .UseEmphasisExtras()
                    .UsePipeTables()
                    .UseGridTables()
                    .UseFooters()
                    .UseFootnotes()
                    .UseCitations()
                    .UseAutoLinks() // URLs are parsed into anchors
                    .UseAutoIdentifiers(AutoIdentifierOptions.GitHub) // Headers get id="name"
                    .UseAbbreviations()
                    .UseYamlFrontMatter()
                    .UseEmojiAndSmiley(true)
                    .UseMediaLinks()
                    .UseListExtras()
                    .UseFigures()
                    .UseTaskLists()
                    .UseCustomContainers()
                    .UseGenericAttributes();

                //builder = builder.UseSmartyPants();

                if (_usePragmaLines)
                    builder = builder.UsePragmaLines();

                return builder;
            }


            // let the passed in action configure the builder
            builder = new MarkdownPipelineBuilder();
            markdigConfiguration.Invoke(builder);

            if (_usePragmaLines)
                builder = builder.UsePragmaLines();

            return builder;
        }

        protected virtual IMarkdownRenderer CreateRenderer(TextWriter writer)
        {
            return new HtmlRenderer(writer);
        }
    }

    protected virtual IMarkdownRenderer CreateRenderer(TextWriter writer)
    {
        return new HtmlRenderer(writer);
    }
}
这个类的关键之处在于,它可以用来配置Markdown解析器如何渲染成HTML。 这需要一些设置,但一旦完成,你现在就可以做了。
var parser = MarkdownParserFactory.GetParser();
var html = parser.Parse(markdown);
and that’s what the Markdown TagHelper uses to get a cached MarkdownParser instance for processing. 而这正是Markdown TagHelper用来获取一个缓存的MarkdownParser实例进行处理的。
Overriding MarkDig Pipeline with Configuration
This component uses the MarkDig Markdown Parser which allows for explicit feature configuration via many of its built-in extensions. The default configuration enables the most commonly used Markdown features and defaults to Github Flavored Markdown for most settings. 该组件使用MarkDig Markdown解析器,该解析器允许通过其许多内置扩展进行明确的功能配置。默认配置启用了最常用的Markdown功能,并在大多数设置中默认为Github Flavored Markdown。
If you need to customize what features are supported you can override the pipeline creation explicitly in the Startup.ConfigureServices method and calling services.AddMarkdown(): 如果你需要自定义支持哪些功能,你可以在==Startup.ConfigureServices 方法中明确覆盖管道创建,并调用services.AddMarkdown()==。
csharpservices.AddMarkdown(config =>
{
    // Create custom MarkdigPipeline
    // using MarkDig; for extension methods
    config.ConfigureMarkdigPipeline = builder =>
    {
        builder.UseEmphasisExtras(Markdig.Extensions.EmphasisExtras.EmphasisExtraOptions.Default)
            .UsePipeTables()
            .UseGridTables()
            .UseAutoIdentifiers(AutoIdentifierOptions.GitHub) // Headers get id="name"
            .UseAutoLinks() // URLs are parsed into anchors
            .UseAbbreviations()
            .UseYamlFrontMatter()
            .UseEmojiAndSmiley(true)
            .UseListExtras()
            .UseFigures()
            .UseTaskLists()
            .UseCustomContainers()
            .UseGenericAttributes();
    };
});
This code gets passed an empty MarkDigPipelineBuilder that you can use to create a custom parser pipeline with just the features you need. When set this configuration is used every time the Markdown parser instance is created instead of the default behavior. 这段代码会被传递给一个空的MarkDigPipelineBuilder,你可以用它来创建一个只具有你需要的功能的自定义解析器管道。当设置这个配置时,每次创建Markdown解析器实例时都会使用这个配置,而不是默认的行为(前面的MarkdownParserMarkdig中有默认的相关配置)。
Markdown管线配置选项
该库还支持通过配置处理程序来配置Markdown pileline,该处理程序可以在Startup.Configure方法中设置。我将在我的下一篇文章中介绍配置的细节,内容是关于页面处理的Markdown中间件。
Standalone Markdown Processing
In addition to the TagHelper there’s also a static class that lets you easily process Markdown in code or inside of a RazorPage, using a static Markdown class: 除了TagHelper之外,还有一个静态类,可以让你在代码中或在RazorPage中轻松地处理Markdown,使用静态Markdown类。
csharppublic static class Markdown
{
    /// <summary>
    /// Renders raw markdown from string to HTML
    /// </summary>
    /// <param name="markdown"></param>
    /// <param name="usePragmaLines"></param>
    /// <param name="forceReload"></param>
    /// <returns></returns>
    public static string Parse(string markdown, bool usePragmaLines = false, bool forceReload = false)
    {
        if (string.IsNullOrEmpty(markdown))
            return "";

        var parser = MarkdownParserFactory.GetParser(usePragmaLines, forceReload);
        return parser.Parse(markdown);
    }

    /// <summary>
    /// Renders raw Markdown from string to HTML.
    /// </summary>
    /// <param name="markdown"></param>
    /// <param name="usePragmaLines"></param>
    /// <param name="forceReload"></param>
    /// <returns></returns>
    public static HtmlString ParseHtmlString(string markdown, bool usePragmaLines = false, bool forceReload = false)
    {
        return new HtmlString(Parse(markdown, usePragmaLines, forceReload));
    }
}
In code you can now do:
string html = Markdown.Parse(markdownText)
Inside of Razor code you can do:
<div>@Markdown.ParseHtmlString(Model.ProductInfoMarkdown)</div>
Summary
与WebForms控件一样,这一切都不是什么新鲜事,但我发现这是一个非常常见的用例,值得为这类功能提供一个可重用且易于访问的组件。通过一个小的Nuget包,很容易为内容嵌入和简单解析添加Markdown支持。
随着Markdown变得越来越普遍,大多数应用程序都可以受益于包括一些Markdown功能。对于内容站点,尤其是Markdown可以很好地适合在页面中创建实际的文本内容,这里讨论的<Markdown>控件实际上非常容易。
我最近帮助我的女朋友为她的网站设置了一个登录页面,并使用Markdown,我实际上能够在页面中设置一些内容块,让她轻松编辑自己的内容。这不可能与原始HTML一起使用。 享受
2 Creating a generic Markdown Page Handler using ASP.NET Core Middleware
Serving Markdown Files as HTML(将Markdown文件作为HTML提供 )
但是在很多情况下,即使是这些控件也会增加很多不必要的麻烦–最好是简单地转储一些Markdown文件,并将这些文件与适当的内容模板一起作为内容提供,这样这些页面就能融入到更大的网站的环境中。这通常意味着通过一个通用的模板来访问一个布局页面,并将Markdown内容呈现在其中。
通过使用普通的Markdown文件,编辑这些文件更容易,当你把它们托管在像Github这样的 repo中时,它们可以直接显示为渲染的Markdown。简而言之,这是一个类似的用例,但只用于显示内容,是文档网站或甚至像一个只有文件的博客的理想选择。 所以在这篇文章中,我将描述一个**通用的中间件实现**,它允许你把Markdown文件放到一个文件夹中,并让它们得到服务–要么是.md扩展文件,要么是基于文件名的无扩展的Urls,没有扩展。
Generic Markdown Processing Middleware
通用的Markdown处理中间件
直接处理Markdown文件的想法并不新鲜–它是独立的文档和CMS/Blog生成器中的一个常见功能。 在我的许多动态网站中,我经常有一些信息页面(如关于,服务条款,联系我们,支持等),这些页面基本上是静态的,而对于这些简单的Markdown格式化是一个完美的选择。 此外,许多网站还需要文档,并有一个单独的区域来实际记录一个有简单Markdown文件的网站。你只使用Markdown文本,并把网站铬留给一个通用配置的模板,以渲染网站的可重用部分。当创建内容时,你所做的就是写Markdown - 你可以专注于内容而忘记布局物流。
What do we need to serve Markdown Pages?
以下是为 "静态 "markdown页面服务的要求:
- A ‘wrapper’ page that provides the site chrome 一个提供网站铬的 "包装 "页面
- A content area into which the markdown gets dropped 一个放置markdown的内容区
- The actual rendered Markdown text from the file 从文件中实际呈现的Markdown文本
- Optional Yaml Parsing for title and headers 可选的Yaml对标题和页眉的解析
- Optional title parsing based on a header or the file name 可选的基于标题或文件名的标题解析
So, today I sat down to build the start of some generic middleware that processes Markdown content from disk and renders it directly using a configurable MVC View into which the Markdown content is rendered to provide the ‘container’ page that provides the styling and site chrome that you are likely to need in order to display your Markdown. This template can contain self contained HTML page content, or it can reference a _Layout page to provide the same site chrome that the rest of your site uses. 所以,今天我坐下来建立了一些通用的中间件,它可以从磁盘上处理Markdown内容,并直接使用可配置的MVC视图进行渲染,Markdown内容被渲染到其中,以提供 "容器 "页面,提供你可能需要的样式和网站铬,以显示你的Markdown。这个模板可以包含自带的HTML页面内容,或者它可以引用一个_Layout页面来提供你网站其他部分所使用的相同的 site chrome。
The idea is that I can set up one or more folders (or the entire site) for serving markdown files with an .md extension or extensionless Urls and then serve the Markdown files into a configurable View template. 这个想法是,我可以设置一个或多个文件夹(或整个网站),为带有.md扩展名的markdown文件或无扩展名的Urls提供服务,然后将Markdown文件提供给一个可配置的View模板。
The middleware is a relatively simple implementation that looks for a configured folder and extensionless urls within (think Docs for documentation or Posts folder for Blog posts) or .md files in the configured folder. When it finds either, the URL is processed by loading the underlying Markdown file, rendering it to HTML and simply embedding it into the specified View template. 该中间件是一个相对简单的实现,它寻找一个配置的文件夹和其中的无扩展的Urls(想想文档的Docs或博客文章的Posts文件夹)或配置文件夹中的.md文件。当它找到这两种文件时,通过加载底层的Markdown文件来处理URL,将其渲染成HTML并简单地嵌入到指定的View模板中。
Setting up the Markdown MiddleWare
要使用这个功能,你需要做以下工作:
- Use
AddMarkdown()to configure the page processing 配置页面处理 - Use
UseMarkdown()to hook up the middleware 挂接中间件 - Create a Markdown View Template (default is:
~/Views/__MarkdownPageTemplate.cshtml) - Create
.mdfiles for your content 为你的内容创建.md文件
Basic Configuration
The first step is to configure the Markdown processor by telling it which folders to look at. You specify a site relative folder, an optional MVC View or Page Template (the template has to exist) and a few optional parameters. 第一步是配置Markdown处理器,告诉它要看哪些文件夹。你指定一个网站的相对文件夹,一个可选的MVC视图或页面模板(模板必须存在)和一些可选的参数。
As usual for ASP.NET Core Middleware, you need to both hook up ConfigureServices() configuration and engage the Middleware in Configure(). 对于ASP.NET Core中间件来说,你需要在ConfigureServices()配置中挂钩,并在Configure()中使用中间件。
The following configures up a /posts/ folder for processing for Markdown files 下面配置了一个/posts/文件夹,用于处理Markdown文件:
The following configures up a /posts/ folder for processing for Markdown files:
csharppublic void ConfigureServices(IServiceCollection services)
{
    services.AddMarkdown(config =>
    {
        // Simplest: Use all default settings - usually all you need
        config.AddMarkdownProcessingFolder("/posts/", "~/Pages/__MarkdownPageTemplate.cshtml");
    });

    // We need MVC so we can use a customizable Razor template page
    services.AddMvc();
}
You then also need to hook up the Middleware in the Configure() method. This code is different for the 3.x and 2.x of .NET Core as the routing mechanics have changed 然后你还需要在Configure()方法中挂上中间件。这段代码对于.NET核心的3.x和2.x版本是不同的,因为路由机制已经改变。.
.NET Core 3.x
csharppublic void Configure(IApplicationBuilder app)
{
    // if you use default files make sure you do it before markdown middleware
    app.UseDefaultFiles(new DefaultFilesOptions()
    {
        DefaultFileNames = new List<string> { "index.md", "index.html" }
    });

    // required for all Markdown features
    app.UseMarkdown();

    app.UseStaticFiles();

    // the following enables MVC and Razor Pages -- needed only for Markdown Pages
    app.UseRouting();

    // needed only for Markdown Pages
    app.UseEndpoints(endpoints =>
    {
        // endpoints.MapRazorPages();  // optional

        // MVC routing is required for Markdown Pages
        endpoints.MapDefaultControllerRoute();
    });
}
注意,如果你只使用Markdown解析或标签助手,你不需要任何路由或MVC部分。只有当你使用Markdown页面渲染时才需要这些。
Create a Razor Host Template
Next we need a Razor template that will host the rendered Markdown. This template is the “site chrome” that surrounds a rendered Markdown page. Each folder you configure can have its own template, so it’s possible to vary the template. The template is just a Razor page that receives MarkdownModel which includes among other things a Model.RenderedMarkdown that you can embed into the page. 接下来我们需要一个Razor模板来承载渲染好的Markdown。这个模板是围绕着渲染的Markdown页面的 “站点铬”。你配置的每个文件夹都可以有它自己的模板,所以有可能改变模板。模板只是一个接收MarkdownModel的Razor页面,其中包括一个Model.RenderedMarkdown,你可以把它嵌入到页面中。
你可以创建的最简单的模板看起来像这样:
@model Westwind.AspNetCore.Markdown.MarkdownModel
@{
    ViewBag.Title = Model.Title;
    Layout = "_Layout";
}
<div style="margin-top: 40px;">
    @Model.RenderedMarkdown
</div>
The template has really nothing in it except the rendered markdown. All the rest of the ‘site chrome’ will be picked up by the _layout.cshtml page which provides the over look and feel of the page 模板中除了渲染的标记外,真的什么都没有。所有其余的 "site chrome "将被_layout.cshtml页面接收,它提供了页面的整体外观和感觉。
Note that you can do whatever you want in the template. You don’t have to use a _layout page - you can create a standalone page, or a page with partials and sections or whatever you want. All you have to make sure is there 请注意,你可以在模板中做任何你想做的事情。你不必使用_layout页面–你可以创建一个独立的页面,或者一个带有分页和章节的页面,或者任何你想要的。你所要确保的是那里:
- Make sure you have a
@model Westwind.AspNetCore.Markdown.MarkdownModel - Make sure you call
@Model.RenderedMarkdownto embed the rendered HTML - Pick up the page title from
Model.Title从Model.Title中拾取页面标题
Note that the title parsing is optional, but it is enabled by default. The middleware checks for YAML header and title: property or a # Header tag in the top 10 lines of content 注意,标题解析是可选的,但它在默认情况下是启用的。中间件会检查YAML标题和title: 属性,或者在内容的前10行有# Header标签。
Test it out
With this basic configuration code in place you should now be able to place a markdown file with a .md anywhere into the /posts/ folder somewhere and render it. I took my last Weblog post’s Markdown file and simply dumped it into a folder like this 有了这些基本的配置代码,你现在应该能够把一个带有.md的标记文件放到/posts/文件夹的某个地方,并进行渲染。我把我的最后一篇Weblog文章的Markdown文件简单地转储到一个像这样的文件夹中。:
I can now go to:
text
http://localhost:59805/posts/2018/03/23/MarkdownTagHelper.md
or the extensionless version(无扩展版本):
text
http://localhost:59805/posts/2018/03/23/MarkdownTagHelper
The default configuration works both with an .md extension or no extension. When no extension is specified the middleware looks at each extensionless request and tries to append .md and checks if a file exists then renders it 默认配置在有.md扩展名或没有扩展名的情况下都能工作。当没有指定扩展名时,中间件会查看每个无扩展名的请求,并尝试附加.md,并检查文件是否存在,然后将其渲染出来。
有了这些,你现在就可以像这样渲染页面:
Keep in mind this is pretty much a stock ASP.NET Core project - it uses the stock Bootstrap template and I haven’t made any other changes to the layout or page templates, yet the markdown file just works as a drop in file 请记住,这几乎是一个库存ASP.NET Core项目–它使用库存Bootstrap模板,我没有对布局或页面模板做任何其他改动,但markdown文件只是作为一个投放文件使用。
More Cowbell
Ok the above is the basics, lets look at a few more configuration and customization options here. You can好了,以上是基础知识,让我们看看这里还有一些配置和定制选项。你可以:
- Customize the Razor template 定制Razor模板
- Configure folders that are handled 配置被处理的文件夹
- Configure each folder’s options 配置每个文件夹的选项
A better Template: Adding Syntax Coloring(添加语法着色)
Most likely you’ll want to spruce up things a little bit. If you’re doing software related stuff like documentation or a blog posts one of the first things you’ll want is syntax highlighting. 最有可能的是,你想把事情弄得更漂亮一点。如果你在做与软件有关的事情,如文档或博客文章,你首先需要的就是语法高亮。
I’m a big fan of highlightjs which comes with most common syntax languages I care about, and provides a number of really nice themes including vs2015 (VS Code Dark), visualstudio, monokai, twilight and a couple of github flavors 我是Highlightjs的忠实粉丝,它与我关心的大多数常见的语法语言一起提供了许多非常好的主题,包括vs2015(VS Code Dark)、visualstudio、monokai、twilight和一些github风味。
The code below explicitly uses the Visual Studio (Code) Dark theme (vs2015) that also use on Weblog site 下面的代码明确地使用了Visual Studio(代码)Dark主题(vs2015),该主题也在Weblog网站上使用:
@model Westwind.AspNetCore.Markdown.MarkdownModel
@{
    Layout = "_Layout";
}
@section Headers {
    <style>
        h3 {
            margin-top: 50px;
            padding-bottom: 10px;
            border-bottom: 1px solid #eee;
        }
        /* vs2015 theme specific*/
        pre {
            background: #1E1E1E;
            color: #eee;
            padding: 0.7em !important;
            overflow-x: auto;
            white-space: pre;
            word-break: normal;
            word-wrap: normal;
        }

            pre > code {
                white-space: pre;
            }
    </style>
}
<div style="margin-top: 40px;">
    @Model.RenderedMarkdown
</div>

@section Scripts {
    <script src="~/lib/highlightjs/highlight.pack.js"></script>
    <link href="~/lib/highlightjs/styles/vs2015.css" rel="stylesheet" />
    <script>
        setTimeout(function () {
            var pres = document.querySelectorAll("pre>code");
            for (var i = 0; i < pres.length; i++) {
                hljs.highlightBlock(pres[i]);
            }
        });

    </script>
}
HighlightJs from CDN
The provided highlight JS package includes a customized set of languages that I use most commonly and it also includes a custom language (FoxPro) that doesn’t ship on the CDN. You can however also pick up HighlightJs directly off a CDN with 所提供的Highlight JS软件包包括一套我最常用的自定义语言,它还包括一种CDN上没有的自定义语言(FoxPro)。不过,你也可以直接从CDN上获取HighlightJs:
<script src="https://cdnjs.cloudflare.com/ajax/libs/highlight.js/9.12.0/highlight.min.js"></script>
<link href="https://cdnjs.cloudflare.com/ajax/libs/highlight.js/9.12.0/styles/vs2015.min.css" rel="stylesheet" />
Here’s what the page looks like with the Syntax highlighting enabled 下面是启用语法高亮后的页面情况:
Better right?
Configuration Options
If you want more control over how the Markdown processing is done you can explicitly configure each of the folders you set up for Markdown handling. You can 如果你想对如何进行Markdown处理有更多的控制,你可以明确地配置你为Markdown处理所设置的每个文件夹。你可以:
- Configure
.mdfile and extensionless processing 配置.md文件和无扩展名处理 - Specify whether you want to extract for title in the Markdown content 指定你是否要对Markdown内容中的标题进行提取
- Hook in pre-processing code that is passed to the host template 钩住传递给主机模板的预处理代码
- Configure the Markdown Parser (Markdig) 配置Markdown解析器(Markdig)
The following sets up the /posts folder with some of the options explicitly set 下面设置了/posts文件夹,并明确设置了一些选项:
csharpservices.AddMarkdown(config =>
{
    // Simplest: Use all default settings - usually all you need
    config.AddMarkdownProcessingFolder("/docs/", "~/Pages/__MarkdownPageTemplate.cshtml");

    // Customized Configuration: Set FolderConfiguration options
    var folderConfig = config.AddMarkdownProcessingFolder("/posts/", "~/Pages/__MarkdownPageTemplate.cshtml");

    // Optional configuration settings
    folderConfig.ProcessExtensionlessUrls = true;  // default
    folderConfig.ProcessMdFiles = true; // default

    // Optional pre-processing
    folderConfig.PreProcess = (model, controller) =>
    {
        // controller.ViewBag.Model = new MyCustomModel();
    };

    // optional custom MarkdigPipeline (using MarkDig; for extension methods)
    config.ConfigureMarkdigPipeline = builder =>
    {
        builder.UseEmphasisExtras(Markdig.Extensions.EmphasisExtras.EmphasisExtraOptions.Default)
            .UsePipeTables()
            .UseGridTables()
            .UseAutoIdentifiers(AutoIdentifierOptions.GitHub) // Headers get id="name"
            .UseAutoLinks() // URLs are parsed into anchors
            .UseAbbreviations()
            .UseYamlFrontMatter()
            .UseEmojiAndSmiley(true)
            .UseListExtras()
            .UseFigures()
            .UseTaskLists()
            .UseCustomContainers()
            .UseGenericAttributes();
    };
}
If you want to improve performance a little, don’t use extensionless URLs for the markdown files. The way the implementation currently works extensionless URLs require intercepting every extensionless URL request and checking for a Markdown file with an .md extension. Using just .md files will only affect files that actually have an .md extension.
This can be mitigated with some caching behavior - I come back to that a bit later in this post.
The default Markdig configuration has most of the pipeline extensions enabled so most things just work, but if you want optimal performance for your Markdown processing explicitly whittling the list down to just what you need can yield better performance.
3 .NET 中的 Markdown 解析
首先需要的是一种在.NET中把Markdown解析为HTML的方法。这出乎意料地容易,因为有许多Markdown解析器可用于.NET。我喜欢使用的是MarkDig(https://github.com/lunet-io/markdig),它是一个相对较新的工具,速度非常快,并提供了一个很好的**可扩展性管道**,使它有可能建立自定义的Markdown扩展。
MarkDig 是开源的,可作为 NuGet 包添加到您的 .NET Core 或完整框架项目中:


 7213
7213

 被折叠的 条评论
为什么被折叠?
被折叠的 条评论
为什么被折叠?
 到【灌水乐园】发言


