


最近的一个小项目使用了 Spring-Boot + Vue 的前后端分离小项目,项目虽小,也五脏俱全,有自己的用户系统,因此就有了权鉴问题。
Java 领域里有两个权鉴框架比较出名 Shiro 和 Spring Security。这里我们使用了 Spring Security。
必须要了解的概念 CSRF & CORS
首先,前后端分离有一个避不开的问题:跨域。跨域问题的出现是因为浏览器的同源策略造成的,什么是同源策略,可以看官方说明: https://developer.mozilla.org/zh-CN/docs/Web/Security/Same-origin_policy。简单的说就是不允许在你的站内脚本执行其他域名下的资源(API)。浏览器碰到不符合同源策略的请求,便拒绝访问。
CSRF
CSRF(Cross-site request forgery)跨站请求伪造,也被称为“One Click Attack”或者Session Riding,通常缩写为CSRF或者XSRF,是一种对网站的恶意利用。尽管听起来像跨站脚本(XSS),但它与XSS非常不同,XSS利用站点内的信任用户,而CSRF则通过伪装成受信任用户的请求来利用受信任的网站。与XSS攻击相比,CSRF攻击往往不大流行(因此对其进行防范的资源也相当稀少)和难以防范,所以被认为比XSS更具危险性。
浏览器同源策略就是为了避免 CSRF 攻击。
CORS
由于现实使用中,很多需要跨域访问,所以 W3C 标准就提出了 CORS。
跨域资源共享(CORS) 是一种机制,它使用额外的 HTTP 头来告诉浏览器 让运行在一个 origin (domain) 上的Web应用被准许访问来自不同源服务器上的指定的资源。当一个资源从与该资源本身所在的服务器不同的域、协议或端口请求一个资源时,资源会发起一个跨域 HTTP 请求。
具体查看官方文档:https://developer.mozilla.org/zh-CN/docs/Web/HTTP/Access_control_CORS
简单里的理解,就是 CORS 提供了一种设置你的页面可以访问指定的域名下的资源(API)的方法。当然这些域名是你受信任的。从而避免了 CRSF 攻击。CORS 就像是一个过滤器。
注意:很多开发者在碰到跨域问题提时,通过搜索得到的答案就是直接设置 Oragin: * 这样的结果就是你的网页信任任何域名,虽然达到了跨域访问的目的,但是同时失去了 CORS 的意义,因为你设置了这个过滤器不过滤任何域
spring-boot + vue 解决跨域问题的简单方法
spring-boot + vue 是现在比较流行的前后端技术栈,在前端的 Vue 中,一般使用 axios 进行后端的接口访问,编写好的 Vue 前端代码一般也是部署在 Nginx 服务器中,或者直接在 Node.js 环境运行了,这样前后端分离的情况下必然会有跨域访问的问题。
第一种解决方案
这种方案是直接的解决跨域问题的方案,就是吧 Vue 编译后的代码放到 Spring-boot 的 resources/static 目录下(当然你的 axios 的 BaseURL 改成 /api 类似这样不需要域名前缀了)。也就是前后端使用一个服务,这样自然不会有跨域问题了。实际上这已经不算是前后端分离了,只是前后端分离开发 ?)。
第二种解决方案 CORS
第二种解决方案当然是使用官方提供的方法:CORS。Spring 下有两种方式使用 CORS:
1. 使用注解
@CrossOrigin(origins = {"http://localhost:8080", "null"})
@RequestMapping(value = "/helloword", method = RequestMethod.Post)
public String helloword() {
    return "{\"message\": \"helloword\"}";
}
这种方式是在接口级上控制跨域访问,在前后端分离的架构下,这种方式显得不大合适。
2. 在配置类中设置 CORS
@Configuration
public class WebMvcConfig extends WebMvcConfigurerAdapter {
  @Override
  public void addCorsMappings(CorsRegistry registry) {
    registry.addMapping("/**")
            .allowedOrigins("http://localhost:8080")
            .allowedMethods("POST", "GET", "PUT", "OPTIONS", "DELETE")
            .maxAge(3600)
            .allowCredentials(true);
  }
}
http://localhost:8080 是你的 Vue 项目的服务地址和端口号,这样 Spring boot 后端服务就允许 Vue 前端跨域反问所有接口了。这样部署是不是显得有点麻烦,望大神告诉我是如何解决部署问题的。
spring boot + spring security + Vue
现在我们引入了 spring security 框架,来做权鉴。引入 pom2:
 <dependencies>
  ...
  <dependency>
    <groupId>org.springframework.boot</groupId>
    <artifactId>spring-boot-starter-security</artifactId>
  </dependency>
  ...
 </dependencies>
增加一个简单的 Spring security 配置类型 WebSecurityConfig.java:
@Configuration
@EnableGlobalMethodSecurity(prePostEnabled = true)
public class WebSecurityConfig extends WebSecurityConfigurerAdapter {
  @Autowired
  UserService userService; // 这里是你的用户及权限表的操作 Service

  @Override
  protected void configure(AuthenticationManagerBuilder auth) throws Exception {
    // 这里做用户登录判断用户名密码
    auth.userDetailsService(new UserDetailsService() {
      @Override
      public UserDetails loadUserByUsername(String username) throws UsernameNotFoundException {
        UserEntity user = userService.getUserByName(username); // 从你的数据库中取出用户
        if (user == null) {
          throw new UsernameNotFoundException("用户名不存在");
        }
        return user;
      }
    }).passwordEncoder(new BCryptPasswordEncoder()); // 使用 BCryptPasswordEncoder 加盐加密
  }

  @Override
  protected void configure(HttpSecurity http) throws Exception {
    http.authorizeRequests()
      .requestMatchers(CorsUtils::isPreFlightRequest).permitAll() // 这句比较重要,放过 option 请求
      .antMatchers("/css/**", "/index").permitAll()
      .antMatchers("/license/**").hasRole("ADMIN")

      // 无权访问是返回 json 格式数据。
      .and().httpBasic().authenticationEntryPoint(new AuthenticationEntryPoint() {
        @Override
        public void commence(HttpServletRequest httpServletRequest, HttpServletResponse httpServletResponse,
          AuthenticationException e) throws IOException, ServletException {
          ResultModel rm = ResultModel.fail("need login", "");
          rm.setCode("401");
          httpServletResponse.getWriter().write(JSON.toJSONString(rm));
        }
      })

      // 登录响应
      .and().formLogin().failureHandler(new AuthenticationFailureHandler() {
        @Override
        public void onAuthenticationFailure(HttpServletRequest req, HttpServletResponse resp,
            AuthenticationException e) throws IOException {
          resp.setContentType("application/json;charset=utf-8");
          ResultModel rm = null;
          if (e instanceof BadCredentialsException || e instanceof UsernameNotFoundException) {
            rm = ResultModel.fail("账户名或者密码输入错误!", "");
          } else if (e instanceof LockedException) {
            rm = ResultModel.fail("账户被锁定,请联系管理员!", "");
          } else if (e instanceof CredentialsExpiredException) {
            rm = ResultModel.fail("密码过期,请联系管理员!", "");
          } else if (e instanceof AccountExpiredException) {
            rm = ResultModel.fail("账户过期,请联系管理员!", "");
          } else if (e instanceof DisabledException) {
            rm = ResultModel.fail("账户被禁用,请联系管理员!", "");
          } else {
            rm = ResultModel.fail("登录失败!", "");
          }
          rm.setCode("401");
          resp.setStatus(401);
          PrintWriter out = resp.getWriter();
          out.write(JSON.toJSONString(rm));
          out.flush();
          out.close();
        }
      }).successHandler(new AuthenticationSuccessHandler() {
        @Override
        public void onAuthenticationSuccess(HttpServletRequest req, HttpServletResponse resp, Authentication auth)
            throws IOException {
          resp.setContentType("application/json;charset=utf-8");
          Object curUser = SecurityContextHolder.getContext().getAuthentication().getPrincipal();
          ResultModel rm = ResultModel.success("登录成功!", curUser);
          ObjectMapper om = new ObjectMapper();
          PrintWriter out = resp.getWriter();
          out.write(om.writeValueAsString(rm));
          out.flush();
          out.close();
        }
      }).permitAll()

      // 退出登录
      .and().logout().logoutSuccessHandler(new LogoutSuccessHandler() {
        @Override
        public void onLogoutSuccess(HttpServletRequest req, HttpServletResponse resp, Authentication authentication)
            throws IOException, ServletException {
          resp.setContentType("application/json;charset=utf-8");
          ResultModel rm = ResultModel.success("注销成功!");
          PrintWriter out = resp.getWriter();
          out.write(JSON.toJSONString(rm));
          out.flush();
          out.close();
        }
      }).permitAll()

      // 这里还是要关闭crsf因为crsf还有token之类的安全防护
      // 这就是这种方式不安全的原因吧
      .and().csrf().disable();
  }
}
这样后端代码就轻松搞定了。
当你很开心的取打开前端开始登录以后,你会发现,只有登录接口是正常的,其他接口都会告诉你 need login 也就是你还是处于未登录状态,明明登录接口都调用成功了,为什么还是未登录呢?
这个估计是很多初次接触 Spring security 有使用了前后端分离同学的疑惑。其实原因很简单,Spring security 是使用 cookies-session 机制来验证用户状态的,前后端分离以后,前端有自己的服务,后端设置 cookies 当然是失败的,也就是说你的前端无法保存后端设置的 cookies。F12 可以看到 cookies 里没有 JSESSION 字段。
这是难题,怎么办呢,这样 Spring security 就没办法整合进来了,我们来看下一种奇怪的解决方案。
nuxt proxy 解决 cookies-ssesion 问题
既然 Spring security 无法整合的原因是 cookies-ssesion 无法保存引起的,那我们是不是可以在前端和后端之间加一个代理呢,让所有的请求都有代理完成:
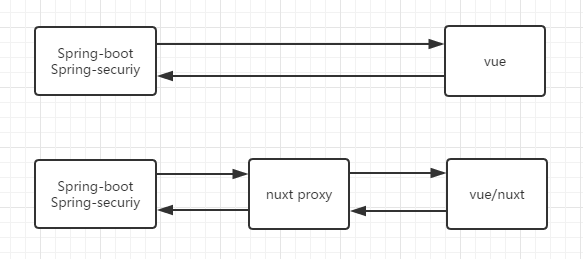
这里为了方便我们直接使用了 @nuxt/proxy @nuxt/proxy 是 nuxt 框架的一个模块,他使用 http-proxy-middleware 作为底层实现,构建了一个代理模块。
当然我们的前端也就使用 nuxt 框架了,要注意的是,使用这个模块后,就必须在 nuxt 环境下运行了,也就是说你的前端不能使用 nuxt generate 命令编译成静态文件,也不能使用 spa 模式编译出 js 文件直接扔到 nginx 里运行了,因为 http-proxy-middleware 是在 node 环境下运行的。
我们在前端工程里配置 proxy, nuxt.config.js 配置片段如下
axios: {
  proxy: true
},

proxy: ['http://192.168.2.144:8080/'], // 你的后端地址
在开启前端,如果顺利的话应该不会再报错了。
最后的思考
这样是解决了跨域的问题和 Spring security session 的问题,有点强制整合的味道。但是这样做真的安全么?
- crsf 被禁用了安全么。
- 使用代理的方式,不会造成一些安全问题呢。
所以,最后我个人最后的结论,两种最终解决方案:
- 部署的时候吧前端代码打包到 spring-boot static 目录下整合发布,即使不是前后端分离了,小项目还是可以接受的。
- 使用 JWT,做无状态请求。


 1375
1375


 被折叠的 条评论
为什么被折叠?
被折叠的 条评论
为什么被折叠?
 到【灌水乐园】发言


