


要实现新闻客户端程序对应的布局文件如下:
<?xml version="1.0" encoding="utf-8"?>
<LinearLayout xmlns:android="http://schemas.android.com/apk/res/android"
    xmlns:tools="http://schemas.android.com/tools"
    android:id="@+id/activity_main"
    android:layout_width="match_parent"
    android:layout_height="match_parent"
    android:paddingBottom="@dimen/activity_vertical_margin"
    android:paddingLeft="@dimen/activity_horizontal_margin"
    android:paddingRight="@dimen/activity_horizontal_margin"
    android:paddingTop="@dimen/activity_vertical_margin"
    tools:context="com.example.bz0209.myapplication2.MainActivity">

    <FrameLayout
        android:layout_width="match_parent"
        android:layout_height="match_parent">

        <LinearLayout
            android:id="@+id/loading"
            android:visibility="invisible"
            android:layout_width="match_parent"
            android:layout_height="match_parent"
            android:gravity="center"
            android:orientation="vertical">

            <ProgressBar
                android:layout_width="wrap_content"
                android:layout_height="wrap_content" />
            <TextView
                android:layout_width="wrap_content"
                android:layout_height="wrap_content"
                android:text="正在加载信息..."/>
        </LinearLayout>

        <ListView
            android:id="@+id/lv_news"
            android:layout_width="match_parent"
            android:layout_height="match_parent"/>

    </FrameLayout>

</LinearLayout>
创建ListView item的布局:由于使用到了ListView控件,因此需要为ListView的item创建一个布局文件。代码如下:
<?xml version="1.0" encoding="utf-8"?>
<RelativeLayout xmlns:android="http://schemas.android.com/apk/res/android"
    android:layout_width="match_parent"
    android:layout_height="65dip">

    <com.loopj.android.image.SmartImageView
        android:id="@+id/siv_icon"
        android:layout_width="80dip"
        android:layout_height="60dip"
        android:layout_marginLeft="5dip"
        android:layout_marginTop="5dip"
        android:layout_marginBottom="5dip"
        android:scaleType="centerCrop"
        android:src="@mipmap/ic_launcher"
        android:layout_alignParentLeft="true"
        >
        </com.loopj.android.image.SmartImageView>

    <TextView
        android:id="@+id/tv_title"
        android:layout_width="wrap_content"
        android:layout_height="wrap_content"
        android:layout_marginLeft="5dip"
        android:layout_marginTop="10dip"
        android:layout_toRightOf="@+id/siv_icon"
        android:text="我是标题"
        android:maxLength="20"
        android:singleLine="true"
        android:ellipsize="end"
        android:textColor="#000000"
        android:textSize="18sp"
        />

    <TextView
        android:id="@+id/tv_description"
        android:layout_width="wrap_content"
        android:layout_height="wrap_content"
        android:layout_below="@+id/tv_title"
        android:layout_marginLeft="5dip"
        android:layout_marginTop="5dip"
        android:layout_toRightOf="@+id/siv_icon"
        android:text="我是描述"
        android:maxLength="16"
        android:singleLine="true"
        android:ellipsize="end"
        android:textColor="#99000000"
        android:textSize="14sp"/>

    <TextView
        android:id="@+id/tv_type"
        android:layout_width="wrap_content"
        android:layout_height="wrap_content"
        android:layout_alignParentRight="true"
        android:layout_alignParentBottom="true"
        android:layout_marginBottom="5dip"
        android:text="评论"
        android:textColor="#99000000"
        android:textSize="12sp"
        />

</RelativeLayout>
上述布局文件使用到自定义控件SmartImageView和三个分别用于展示新闻标题、新闻内容以及新闻评论数的TextView。需要注意这里的SmartImageView的一个属性Android:scaleType。这个属性是ImageView控件中的,它用来控制图片来匹配View的大小。
编写界面交互代码:用于实现获取服务器的NewsInfo.xml文件的解析并将解析的信息设置到ListView显示在界面上。代码如下:
package com.example.bz0209.myapplication2;

import android.graphics.Color;
import android.support.v7.app.AppCompatActivity;
import android.os.Bundle;
import android.view.View;
import android.view.ViewGroup;
import android.widget.BaseAdapter;
import android.widget.LinearLayout;
import android.widget.ListView;
import android.widget.TextView;
import android.widget.Toast;
import com.loopj.android.http.*;

import com.loopj.android.http.AsyncHttpClient;
import com.loopj.android.http.AsyncHttpResponseHandler;
import com.loopj.android.http.RequestHandle;
import com.loopj.android.image.SmartImageView;

import org.apache.http.Header;

import java.io.ByteArrayInputStream;
import java.io.UnsupportedEncodingException;
import java.util.List;

public class MainActivity extends AppCompatActivity {
    private ListView lv_news;
    private LinearLayout loading;
    private List<NewsInfo> newsInfos;

    private class NewsAdapter extends BaseAdapter{
        public int getCount(){
            return newsInfos.size();
        }

        @Override
        public Object getItem(int position) {
            return null;
        }

        @Override
        public long getItemId(int position) {
            return 0;
        }

        @Override
        public View getView(int position, View convertView, ViewGroup parent) {

            View view=View.inflate(MainActivity.this,R.layout.itme,null);
            SmartImageView siv= (SmartImageView) view.findViewById(R.id.siv_icon);
            TextView tv_title= (TextView) findViewById(R.id.tv_title);
            TextView tv_description = (TextView) findViewById(R.id.tv_description);
            TextView tv_type= (TextView) findViewById(R.id.tv_type);
            NewsInfo newsInfo=newsInfos.get(position);
            siv.setImageUrl(newsInfo.getIconPath(),R.drawable.a,R.mipmap.ic_launcher);
            tv_title.setText(newsInfo.getTitle());
            tv_description.setText(newsInfo.getDescription());
            int typoe=newsInfo.getType();
            switch (typoe){
                case 1:
                    tv_type.setText("评论"+newsInfo.getComment());
                    break;
                case 2:
                    tv_type.setTextColor(Color.RED);
                    tv_type.setText("专题");
                    break;
                case 3:
                    tv_type.setTextColor(Color.BLUE);
                    tv_type.setText("LIVE");
                    break;
            }
            return view;
        }
    }
    @Override
    protected void onCreate(Bundle savedInstanceState) {
        super.onCreate(savedInstanceState);
        setContentView(R.layout.activity_main);
        lv_news= (ListView) findViewById(R.id.lv_news);
        loading= (LinearLayout) findViewById(R.id.loading);
        fillData2();
    }
    private void fillData2(){
        AsyncHttpClient asyncHttpClient=new AsyncHttpClient();
        RequestHandle requestHandle = asyncHttpClient.get(getString(R.string.serverurl), new AsyncHttpResponseHandler() {
            @Override
            public void onSuccess(String content) {
                super.onSuccess(content);
                byte[] bytes = content.getBytes();
                ByteArrayInputStream bais = new ByteArrayInputStream(bytes);
                newsInfos = NewsInfoService.getNewsInfo(bais);
                if (newsInfos == null) {
                    Toast.makeText(MainActivity.this, "解析失败", Toast.LENGTH_LONG).show();
                } else {
                    loading.setVisibility(View.INVISIBLE);
                    lv_news.setAdapter(new NewsAdapter());
                }

            }
            public void onFailure(Throwable error, String content) {
                super.onFailure(error, content);
                Toast.makeText(MainActivity.this, "请求失败", Toast.LENGTH_LONG).show();
            }
        });

    }

    }
上述代码调用工具类NewInfoService的getNewsInfos方法解析xml文件的NewsInfo的List的集合。其中asyncHttpClient.get(getString(R.string.serverurl), new AsyncHttpResponseHandler() {}用于获取Values目录文件下的config.xml文件的标签为serverurl的值需要注意的是,config.xml文件并不是工程自带的配置文件而是自己创建的。
config.xml文件的代码如下:
<?xml version="1.0" encoding="utf-8"?>
<resources>
    <string name="serverurl" >http://172.20.103.1:8080/newInfo.xml</string>
</resources>
创建NewsInfo类:前面提到的适配ListView的item布局文件用到了NewsInfo javaBean对象。NewsInfo对象的新闻信息的JavaBean,代码如下
package com.example.bz0209.myapplication2;

/**
 * Created by Administrator on 2017/5/18.
 */

public class NewsInfo {
    private String iconPath;
    private String title;
    private String description;
    private int type;
    private long comment;

    public String getIconPath() {
        return iconPath;
    }

    public void setIconPath(String iconPath) {
        this.iconPath = iconPath;
    }

    public String getTitle() {
        return title;
    }

    public void setTitle(String title) {
        this.title = title;
    }

    public String getDescription() {
        return description;
    }

    public void setDescription(String description) {
        this.description = description;
    }

    public int getType() {
        return type;
    }

    public void setType(int type) {
        this.type = type;
    }

    public long getComment() {
        return comment;
    }

    public void setComment(long comment) {
        this.comment = comment;
    }

}
创建NewsInfoServer工具类用于解析xml文件:代码如下
package com.example.bz0209.myapplication2;
import com.google.gson.Gson;
import com.google.gson.reflect.TypeToken;

import java.io.ByteArrayInputStream;
import java.lang.reflect.Type;
import java.util.List;

/**
 * Created by Administrator on 2017/5/18.
 */
public class NewsInfoService {
    public static List<NewsInfo> getNewsInfo(ByteArrayInputStream json){
        Gson gson=new Gson();
        Type listType=new TypeToken<List<NewsInfo>>(){
        }.getType();
        List<NewsInfo> newsInfos = gson.fromJson(json,listType);
        return newsInfos;

    }

}
使用json解析的有点是它的体积小,在网络上传输省流量但缺点是他的语义性差解析JSON数据也有很多种方法,可以使用官方提供的JSONObject ,也可以使用谷歌的开源库GSON。另外,一些第三方的开源库如 Jackson、FastJSON等也非常不错。
配置服务器:需要从服务器上下载一个xml,因此需要开启tomcat根目录下找bin文件夹,运行该文件下的startuo.hat文件即可开启Tomcat服务器。然后在tomca的安装目录下打开webapps文件,将NewsInfo.xml文件放置在root文件下。
[
  {
    "icon": "http://192.168.1.109:8080/images/a.jpg",
    "title": "科技温暖世界",
    "content": "进入一个更有爱的领域",
    "type": "1",
    "comment": "69"
  },
  {
    "icon": "http://172.20.103.1:8080/images/b.jpg",
    "title": "《神武》",
    "content": "新美术资源盘点,视觉新体验",
    "type": "2",
    "comment": "35"
  },
  {
    "icon": "http://172.20.103.1:8080/images/c.jpg",
    "title": "南北车正式公布合并",
    "content": "南北车将于今日正式公布合并",
    "type": "3",
    "comment": "2"
  },
  {
    "icon": "http://172.20.103.1:8080/images/d.jpg",
    "title": "萌呆了!汪星人抱玩偶酣睡",
    "content": "汪星人抱玩偶酣睡,萌翻网友",
    "type": "1",
    "comment": "25"
  },
  {
    "icon": "http://172.20.103.1:8080/images/e.jpg",
    "title": "风力发电进校园",
    "content": "风力发电普进校园",
    "type": "2",
    "comment": "26"
  },
  {
    "icon": "http://172.20.103.1:8080/images/f.jpg",
    "title": "地球一小时",
    "content": "地球熄灯一小时",
    "type": "1",
    "comment": "23"
  },
  {
    "icon": "http://172.20.103.1:8080/images/g.jpg",
    "title": "最美公路",
    "content": "最美公路,难以想象",
    "type": "1",
    "comment": "23"
  }
]
注意的值代表图片的地址,因此需要在ROOT,目录下创建一个img的文件夹,添加相应的照片。
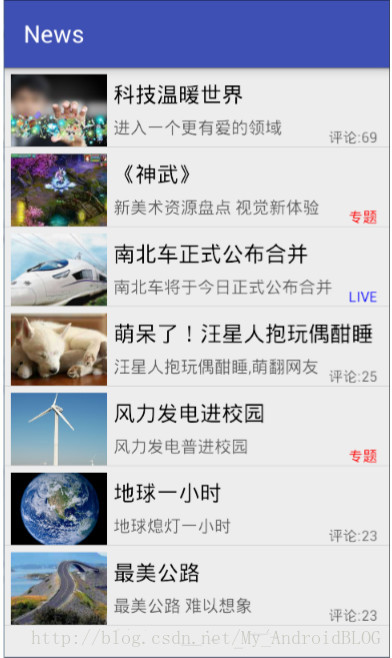
最后添加权限:
<uses-permission android:name="android.permission.INTERNET"/>实现效果如图:


 421
421


 被折叠的 条评论
为什么被折叠?
被折叠的 条评论
为什么被折叠?
 到【灌水乐园】发言


