


 本文详细介绍了如何在Docker环境下搭建MySQL主从复制系统,包括拉取镜像、配置主从服务器、设置只读属性等步骤,确保数据同步与系统稳定性。
文章目录
MySql主从(搭建)
一、搭建mysql主从
1.1 拉取镜像
docker pull mysql:5.7
docker run -p 3339:3306 --name my-master -e MYSQL_ROOT_PASSWORD=123456 -d mysql:5.7
docker run -p 3340:3306 --name my-slave -e MYSQL_ROOT_PASSWORD=123456 -d mysql:5.7
1.2 配置master
- 进入容器修改配置,先更新apt-get ,安装vim
apt-get update
apt-get install vim
cd /etc/mysql
vi my.cnf
- my.cnf配置信息如下:注意不要漏了 [mysqld]和server-id,不配置server-id 启动也会失败:
[mysqld]
## 同一局域网内注意要唯一
server-id=100
## 开启二进制日志功能,可以随便取(关键),配置次项表示开启bin-log日志,配置值代表bin-log文件名称
log-bin=mysql-bin
- 修改完配置后重启master
docker start my-master
- 配置slave账号
root@d1e4a1eb0bed:/# mysql -uroot -p
Enter password:
Welcome to the MySQL monitor.  Commands end with ; or \g.
Your MySQL connection id is 6
Server version: 5.7.28 MySQL Community Server (GPL)

Copyright (c) 2000, 2019, Oracle and/or its affiliates. All rights reserved.

Oracle is a registered trademark of Oracle Corporation and/or its
affiliates. Other names may be trademarks of their respective
owners.

Type 'help;' or '\h' for help. Type '\c' to clear the current input statement.

mysql>
mysql> CREATE USER 'slave'@'%' IDENTIFIED BY '123456';
Query OK, 0 rows affected (0.01 sec)

mysql> GRANT REPLICATION SLAVE, REPLICATION CLIENT ON *.* TO 'slave'@'%';
Query OK, 0 rows affected (0.00 sec)
- 查询 master 的 master_log_pos,这里查到的 Position 在后面配置slave的时候要用,
mysql> show master status;
+------------------+----------+--------------+------------------+-------------------+
| File             | Position | Binlog_Do_DB | Binlog_Ignore_DB | Executed_Gtid_Set |
+------------------+----------+--------------+------------------+-------------------+
| mysql-bin.000001 |     2425 |              |                  |                   |
+------------------+----------+--------------+------------------+-------------------+
1 row in set (0.00 sec)
1.3 配置Slave
- my.cnf 配置信息如下:
[mysqld]
## 设置server_id,注意要唯一
server-id=101
## 开启二进制日志功能,以备Slave作为其它Slave的Master时使用
log-bin=mysql-slave-bin
## relay_log配置中继日志
relay_log=edu-mysql-relay-bin
- 配置 slave 的主机
root@d8a4501c94b7:/# mysql -uroot -p
Enter password:
Welcome to the MySQL monitor.  Commands end with ; or \g.
Your MySQL connection id is 3
Server version: 5.7.28-log MySQL Community Server (GPL)

Copyright (c) 2000, 2019, Oracle and/or its affiliates. All rights reserved.

Oracle is a registered trademark of Oracle Corporation and/or its
affiliates. Other names may be trademarks of their respective
owners.

Type 'help;' or '\h' for help. Type '\c' to clear the current input statement.

mysql> change master to master_host='172.17.0.2', master_user='slave', master_password='123456', master_port=3306, master_log_file='mysql-bin.000001', master_log_pos= 2830, master_connect_retry=30;
Query OK, 0 rows affected, 2 warnings (0.08 sec)


start slave; --- 注意这里启动slave

show slave status\G;
-
需要注意的是 change master 这条命令需要正确,命令中的 master_host,master_user ,master_password ,master_port 容易理解分别是主机的ip,端口以及之前 master 上配置的slave同步账号,master_log_pos主要正确配置,就是前面在master 中查到的 Position,master_log_file 是同步的binlog文件;
-
如果 change master 有问题,那么show slave status\G; 可能会提示错误,正常情况show slave status\G;输出大概如下:
mysql> show slave status\G;
*************************** 1. row ***************************
               Slave_IO_State: Waiting for master to send event
                  Master_Host: 172.17.0.2
                  Master_User: slave
                  Master_Port: 3306
                Connect_Retry: 30
              Master_Log_File: mysql-bin.000001
          Read_Master_Log_Pos: 2425
               Relay_Log_File: edu-mysql-relay-bin.000002
                Relay_Log_Pos: 2091
        Relay_Master_Log_File: mysql-bin.000001
             Slave_IO_Running: Yes
            Slave_SQL_Running: Yes
              Replicate_Do_DB:
          Replicate_Ignore_DB:
           Replicate_Do_Table:
       Replicate_Ignore_Table:
      Replicate_Wild_Do_Table:
  Replicate_Wild_Ignore_Table:
                   Last_Errno: 0
                   Last_Error:
                 Skip_Counter: 0
          Exec_Master_Log_Pos: 2425
              Relay_Log_Space: 2302
              Until_Condition: None
               Until_Log_File:
                Until_Log_Pos: 0
           Master_SSL_Allowed: No
           Master_SSL_CA_File:
           Master_SSL_CA_Path:
              Master_SSL_Cert:
            Master_SSL_Cipher:
               Master_SSL_Key:
        Seconds_Behind_Master: 0
Master_SSL_Verify_Server_Cert: No
                Last_IO_Errno: 0
                Last_IO_Error:
               Last_SQL_Errno: 0
               Last_SQL_Error:
  Replicate_Ignore_Server_Ids:
             Master_Server_Id: 100
                  Master_UUID: 5722550e-2319-11ea-b15e-0242ac110002
             Master_Info_File: /var/lib/mysql/master.info
                    SQL_Delay: 0
          SQL_Remaining_Delay: NULL
      Slave_SQL_Running_State: Slave has read all relay log; waiting for more updates
           Master_Retry_Count: 86400
                  Master_Bind:
      Last_IO_Error_Timestamp:
     Last_SQL_Error_Timestamp:
               Master_SSL_Crl:
           Master_SSL_Crlpath:
           Retrieved_Gtid_Set:
            Executed_Gtid_Set:
                Auto_Position: 0
         Replicate_Rewrite_DB:
                 Channel_Name:
           Master_TLS_Version:
1 row in set (0.01 sec)
- 这里的 Seconds_Behind_Master 显示的是Slave 落后 Master 的时间,已经扣除了两台机器的时钟差距,显示的就是主从同步延迟时间;
1.4 验证
- 如果大致没问题,在主库创建数据库,即可在从库看到了;
二、Slave只读
2.1 设置只读的考虑
- 设置只读可以防止备库上执行修改语句,导致主备不一致;
- 防止切换过程由bug,比如双写,导致主备不一致
- 用readOnly来判断节点角色
状态查询:show global variables like “%read_only%”;
show global variables like "%read_only%"; 查询只读状态,如果set global read_only=1;,
则read_only为ON,
set global read_only=0; read_only 为OFF
- 注意 read_only 不会影响主从同步,因为同步是超级用户,只读限制的是非超级用户,(设置后root用户是可以写的)
2.2 readOnly设置
- 创建用户,授权增删改查到指定数据库
grant select,insert,update,delete on db_test.* to 'readUser'@'%' identified by '123456';
- set global read_only = 1 ; 全局设置只读后,再插入数据就会提示为只读,插入失败:
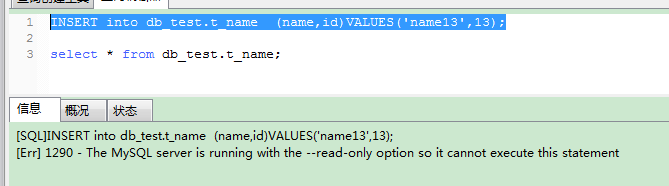
-
然后执行 set global read_only = 0 ; 后,就能继续插入了;
-
下面附上一段代码,read_only 是ON
    public static void main(String[] args) throws Exception {
        conn = DriverManager.getConnection(DB_URL, USER, PASS);
        String sql = "show global variables like \"%read_only%\";";
        Statement statement = conn.createStatement();
        ResultSet resultSet = statement.executeQuery(sql);
        while (resultSet.next()) {
            String key = resultSet.getString("Variable_name");
            String value = resultSet.getNString("Value");
            System.out.println(key + " ---> " + value);
        }
    }

innodb_read_only ---> OFF
read_only ---> ON
super_read_only ---> OFF
transaction_read_only ---> OFF
tx_read_only ---> OFF


 被折叠的 条评论
为什么被折叠?
被折叠的 条评论
为什么被折叠?
 到【灌水乐园】发言


