


1.概述
- DI(Dependency Injection, 依赖注入),当对象A需要依赖对象B的时候,Spring自动把对象B赋值给对象A的过程。
- 比如对象A需要操作数据库,以前我们总是要在A中自己编写代码来获得一个Connection对象,有了 spring我们就只需要告诉spring,A中需要一个Connection,至于这个Connection怎么构造,何时构造,A不需要知道。在系统运行时,spring会在适当的时候制造一个Connection,然后像打针一样,注射到A当中,这样就完成了对各个对象之间关系的控制。A需要依赖 Connection才能正常运行,而这个Connection是由spring注入到A中的,依赖注入的名字就这么来的。
- DI与IOC本质上是一样的。我理解DI倾向于对象间的关系、IOC倾向于对象的创建。为了实现对象间的关系,对象的创建是必须的,而对象的创建是为了实现对象间的关系,所以DI与IOC是互相依赖、相辅相成的。
2.举个栗子
我们有两个实体类Student和Teacher,Studnet对象需要依赖一个Teacher对象,可以在applicationContext.xml文件中进行配置。
- Student实体类
public class Student {

    private int id;
    private String name;
    private int age;
    private int tid;

    private Teacher teacher;	//需要一个Teacher对象

    public Student() {
    }

    public Student(int id, String name, int age, int tid) {
        this.id = id;
        this.name = name;
        this.age = age;
        this.tid = tid;
    }

    public Teacher(int id, String name) {
        this.id = id;
        this.name = name;
    }

    public int getId() {
        return id;
    }

    public void setId(int id) {
        this.id = id;
    }

    public String getName() {
        return name;
    }

    public void setName(String name) {
        this.name = name;
    }

    public int getAge() {
        return age;
    }

    public void setAge(int age) {
        this.age = age;
    }

    public int getTid() {
        return tid;
    }

    public void setTid(int tid) {
        this.tid = tid;
    }

    public Teacher getTeacher() {
        return teacher;
    }

    public void setTeacher(Teacher teacher) {
        this.teacher = teacher;
    }
- Teacher实体类
public class Teacher {

    private int id;
    private String name;

    public Teacher() {
    }

    public Teacher(int id, String name) {
        this.id = id;
        this.name = name;
    }

    public int getId() {
        return id;
    }

    public void setId(int id) {
        this.id = id;
    }

    public String getName() {
        return name;
    }

    public void setName(String name) {
        this.name = name;
    }
- 配置applicationContext.xml文件
在bean标签的property子标签中通过ref属性引用另一个bean对象即可完成依赖注入。
<?xml version="1.0" encoding="UTF-8"?>
<beans xmlns="http://www.springframework.org/schema/beans"
       xmlns:xsi="http://www.w3.org/2001/XMLSchema-instance"
       xsi:schemaLocation="http://www.springframework.org/schema/beans
        http://www.springframework.org/schema/beans/spring-beans.xsd">

    <bean id="student5" class="com.bear.sxt.pojo.Student">
        <!--bean类型,需要使用ref属性引用另一个bean对象-->
        <property name="teacher" ref="teacher"/>
    </bean>

    <!--被student对象引用的bean对象-->
    <bean id="teacher" class="com.bear.sxt.pojo.Teacher">
        <property name="id" value="1"/>
        <property name="name" value="DI测试"/>
    </bean>

</beans>
3.自动注入
观察上面的栗子我们可以看到Student对象中所引用的Teacher对象的属性名与Teacher对象的id是一样的。Spring提供了自动注入的方式,可以自动匹配注入对象与被注入对象。即无需进行下面的配置也可以完成依赖注入。
<property name="teacher" ref="teacher"/>
自动注入方式
配置applicationContext.xml文件,bean标签中的autowire属性进行自动注入。autowire标签有5个可选值。
- byname:通过名称自动注入,在Spring容器中找到与属性名称一致的id所属的bean然后进行注入。
- bytype:通过类型进行自动注入,在Spring容器中找到与属性类型一致的bean进行注入,这种方式要求该类型的bean只能有一个,不然会报错。(如Teacher类,使用这种自动注入方式时,只能有一个Teacher类的bean对象)
- byconstructor:通过构造函数进行自动注入,要求被注入依赖的对象拥有一个构造函数,该构造函数有且只有与所依赖的bean对象id同名的形式参数。(如Teacher类的bean对象id为teacher,则Student类中拥有一个构造函数,其只有一个形式参数,且参数类型为Teacher,参数名字为teacher)
    public Student(Teacher teacher) {
        this.teacher = teacher;
    }
- default:按照默认的方式进行自动注入,默认自动注入方式是通过beans标签的default-autowire属性进行指定的。如果bean标签不定义autowire属性,则默认定义为autowire=“default”。
- no:不进行自动注入。
3.1.配置
<?xml version="1.0" encoding="UTF-8"?>
<beans xmlns="http://www.springframework.org/schema/beans"
       xmlns:xsi="http://www.w3.org/2001/XMLSchema-instance"
       xsi:schemaLocation="http://www.springframework.org/schema/beans
        http://www.springframework.org/schema/beans/spring-beans.xsd"
        default-autowire="byName">

    <bean id="teacher" class="com.bear.sxt.pojo.Teacher">
        <property name="id" value="1"/>
        <property name="name" value="张三"/>
    </bean>

<!--    <bean id="teacher2" class="com.bear.sxt.pojo.Teacher">
        <property name="id" value="2"/>
        <property name="name" value="李四"/>
    </bean>-->

    <!--1.普通依赖注入方式,通过ref引用需要进行注入的对象-->
    <bean id="student1" class="com.bear.sxt.pojo.Student">
        <property name="teacher" ref="teacher"/>
    </bean>

    <!--2.通过属性名与id进行自动注入-->
    <bean id="student2" class="com.bear.sxt.pojo.Student" autowire="byName"/>

    <!--3.通过类型进行自动注入(该类型对象的实例只能有一个,否则会报错)-->
    <bean id="student3" class="com.bear.sxt.pojo.Student" autowire="byType"/>

    <!--4.通过构造函数进行注入-->
    <bean id="student4" class="com.bear.sxt.pojo.Student" autowire="constructor"/>

    <!--5.通过默认的注入方式进行注入(不填autowire属性默认使用默认注入方式)-->
    <!--默认的注入方式由beans标签的default-autowire属性指定-->
    <bean id="student5" class="com.bear.sxt.pojo.Student" autowire="default"/>

    <!--6.不进行自动注入-->
    <bean id="student6" class="com.bear.sxt.pojo.Student" autowire="no"/>
</beans>
3.2.测试
public class Test {
public static void main(String[] args) {
ApplicationContext ac = new ClassPathXmlApplicationContext("applicationContext.xml");
Student student1 = ac.getBean("student1", Student.class);
Student student2 = ac.getBean("student2", Student.class);
Student student3 = ac.getBean("student3", Student.class);
Student student4 = ac.getBean("student4", Student.class);
Student student5 = ac.getBean("student5", Student.class);
Student student6 = ac.getBean("student6", Student.class);
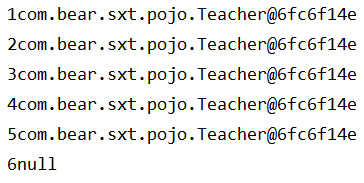
System.out.println("1" + student1.getTeacher());
System.out.println("2" + student2.getTeacher());
System.out.println("3" + student3.getTeacher());
System.out.println("4" + student4.getTeacher());
System.out.println("5" + student5.getTeacher());
System.out.println("6" + student6.getTeacher());
}
}
3.3结果


 208
208


 被折叠的 条评论
为什么被折叠?
被折叠的 条评论
为什么被折叠?
 到【灌水乐园】发言


