
Google了一下,发现很多答案是这样:
引入:
xmlns:app="http://schemas.Android.com/apk/res-auto"
然后利用:
app:contentInsetLeft="0dp"
app:contentInsetStart="0dp"
我试了试,不管怎么弄都没用,即使偶尔有用,也只在5.0上有效,5.0以下一样留有空白。
真正有效的操作是这样:
首先在style.xml中定义新的style,用于toolbar的theme,如下:
<style name="ToolbarTheme" parent="Widget.AppCompat.Toolbar">
<!
<item name="contentInsetStart">0dp</item>
<item name="contentInsetLeft">0dp</item>
</style>
然后在Application使用的AppTheme中使用起来,如下:
<style name="AppTheme" parent="Theme.AppCompat.Light.NoActionBar">
        <!-- Customize your theme here. -->
       //...
        <item name="toolbarStyle">@style/ToolbarTheme</item>
</style>
这样,Toolbar左边的空白就没有了。而且兼容2.x-6.0的机器。
2、 从其他地方拷贝代码到Android Studio中报错:
非法字符: '\ufeff'
原因是拷贝过来的代码文件编码是UTF-8+BOM的,而项目是UTF-8的。
解决方法是将要拷贝的代码文件用文本编辑器打开并保存为UTF-8格式即可。
3、 导入几张PNG图片后项目报错:
AAPT err(Facade for 1867677377): libpng error: Not a PNG file
Error:Execution failed for task ':app:mergeDebugResources'.
> Some file crunching failed, see logs for details
原因是导入的图片中有图片不是PNG格式(虽然我们命名为XXX.PNG)。
解决方法就是将图片用图片编辑工具打开,然后保存为PNG格式的就可以了。
4、 使用Picasso加载本地图片加载不出来。
原因是在Picasso2.5.2之后,要加载本地图片需要将file作为load()方法的参数,形如:
Picasso.with(getActivity()).load(new File(imagePath)).fit().into(vh.ivImage)
5、 在实现ListView多种布局的ItemView的功能时报错:
java.lang.ArrayIndexOutOfBoundsException: length=2
at android.widget.AbsListView$RecycleBin.addScrapView(AbsListView.java:6739)
at android.widget.ListView.measureHeightOfChildren(ListView.java:1275)
at android.widget.ListView.onMeasure(ListView.java:1175)
at android.view.View.measure(View.java:16497)
at android.widget.RelativeLayout.measureChild(RelativeLayout.java:689)
at android.widget.RelativeLayout.onMeasure(RelativeLayout.java:473)
at android.view.View.measure(View.java:16497)
at android.view.ViewGroup.measureChildWithMargins(ViewGroup.java:5125)
at android.widget.FrameLayout.onMeasure(FrameLayout.java:310)
at android.support.v7.widget.ContentFrameLayout.onMeasure(ContentFrameLayout.java:135)
at android.view.View.measure(View.java:16497)
at android.view.ViewGroup.measureChildWithMargins(ViewGroup.java:5125)
at android.support.v7.widget.ActionBarOverlayLayout.onMeasure(ActionBarOverlayLayout.java:391)
at android.view.View.measure(View.java:16497)
at android.view.ViewGroup.measureChildWithMargins(ViewGroup.java:5125)
at android.widget.FrameLayout.onMeasure(FrameLayout.java:310)
at android.view.View.measure(View.java:16497)
at android.view.ViewGroup.measureChildWithMargins(ViewGroup.java:5125)
at android.widget.LinearLayout.measureChildBeforeLayout(LinearLayout.java:1404)
at android.widget.LinearLayout.measureVertical(LinearLayout.java:695)
at android.widget.LinearLayout.onMeasure(LinearLayout.java:588)
at android.view.View.measure(View.java:16497)
at android.view.ViewGroup.measureChildWithMargins(ViewGroup.java:5125)
at android.widget.FrameLayout.onMeasure(FrameLayout.java:310)
at com.android.internal.policy.impl.PhoneWindow$DecorView.onMeasure(PhoneWindow.java:2291)
at android.view.View.measure(View.java:16497)
at android.view.ViewRootImpl.performMeasure(ViewRootImpl.java:1912)
at android.view.ViewRootImpl.measureHierarchy(ViewRootImpl.java:1109)
at android.view.ViewRootImpl.performTraversals(ViewRootImpl.java:1291)
at android.view.ViewRootImpl.doTraversal(ViewRootImpl.java:996)
at android.view.ViewRootImpl$TraversalRunnable.run(ViewRootImpl.java:5600)
at android.view.Choreographer$CallbackRecord.run(Choreographer.java:761)
at android.view.Choreographer.doCallbacks(Choreographer.java:574)
at android.view.Choreographer.doFrame(Choreographer.java:544)
at android.view.Choreographer$FrameDisplayEventReceiver.run(Choreographer.java:747)
at android.os.Handler.handleCallback(Handler.java:733)
at android.os.Handler.dispatchMessage(Handler.java:95)
at android.os.Looper.loop(Looper.java:136)
at android.app.ActivityThread.main(ActivityThread.java:5001)
at java.lang.reflect.Method.invokeNative(Native Method)
at java.lang.reflect.Method.invoke(Method.java:515)
at com.android.internal.os.ZygoteInit$MethodAndArgsCaller.run(ZygoteInit.java:785)
at com.android.internal.os.ZygoteInit.main(ZygoteInit.java:601)
at dalvik.system.NativeStart.main(Native Method)
- 1
- 2
- 3
- 4
- 5
- 6
- 7
- 8
- 9
- 10
- 11
- 12
- 13
- 14
- 15
- 16
- 17
- 18
- 19
- 20
- 21
- 22
- 23
- 24
- 25
- 26
- 27
- 28
- 29
- 30
- 31
- 32
- 33
- 34
- 35
- 36
- 37
- 38
- 39
- 40
- 41
- 42
- 43
- 44
- 45
- 46
- 1
- 2
- 3
- 4
- 5
- 6
- 7
- 8
- 9
- 10
- 11
- 12
- 13
- 14
- 15
- 16
- 17
- 18
- 19
- 20
- 21
- 22
- 23
- 24
- 25
- 26
- 27
- 28
- 29
- 30
- 31
- 32
- 33
- 34
- 35
- 36
- 37
- 38
- 39
- 40
- 41
- 42
- 43
- 44
- 45
- 46
原因在于item的view type必须从0开始,而且必须连续。正确写法就像这样:
        @Override
        public int getItemViewType(int position) {
            if(xxx){
                return 0;
            }else if(ooo){
                return 1;
            }else{
                return 2;
            }
        }
6、 使用TextView加载文本的时候不能换行,直接显示:
AAA\n111\n222
原因在于:当把字符串变量封装在对象中传递时,“\n”会被转换成”\\n”。
解决方法:将”\\n”转回”\n”即可
textView.setText(mUser.getSignature().replace("\\n", "\n"))
7、 执行完TranslateAnimation后调用控件的setVisibility(View.gone)失效
原因:调用了setFillAfter(true),导致不能隐藏控件
解决方法:调用控件的clearAnimation()方法。代码如下:
TranslateAnimation translateAnimation = new TranslateAnimation(Animation.RELATIVE_TO_SELF, 0, Animation.RELATIVE_TO_SELF, 0.5f,
                Animation.RELATIVE_TO_SELF, 0, Animation.RELATIVE_TO_SELF, 1f);
        translateAnimation.setFillAfter(true);
        translateAnimation.setDuration(1000);
        tv.startAnimation(translateAnimation);
        translateAnimation.setAnimationListener(new Animation.AnimationListener() {
            @Override
            public void onAnimationStart(Animation animation) {

            }

            @Override
            public void onAnimationEnd(Animation animation) {
                tv.clearAnimation();
                tv.setVisibility(View.GONE);
            }

            @Override
            public void onAnimationRepeat(Animation animation) {

            }
        });
- 1
- 2
- 3
- 4
- 5
- 6
- 7
- 8
- 9
- 10
- 11
- 12
- 13
- 14
- 15
- 16
- 17
- 18
- 19
- 20
- 21
- 22
- 23
- 1
- 2
- 3
- 4
- 5
- 6
- 7
- 8
- 9
- 10
- 11
- 12
- 13
- 14
- 15
- 16
- 17
- 18
- 19
- 20
- 21
- 22
- 23
8、 BitmapFactory.decodeResource(Resources res, int id)的使用方法:
Resources res = getContext().getResources()
int id = R.drawable.image
Bitmap b = BitmapFactory.decodeResource(res, id)
9、 当Json数据以键值对的方式传递时,既要获取键又要获取值,这时就要用到JsonObject.keys()方法获取全部的键,然后再遍历这些键取出对应的值。但是有一个问题就是遍历取出的值是没有顺序的,不能按传递下来的顺序展示数据。
解决办法:将获取到的键值用SortedMap装载即可。代码如下:
private SortedMap<String, Object> m = new TreeMap<>();

public void g(JSONObject jo){
        Iterator<String> keys = jo.keys();
        while(keys.hasNext()){
            String key = keys.next();
            Object value = jo.opt(key);
            m.put(key,value);
        }
    }
10 、这是在学习Android6.0运行时权限时遇到的问题,一个简单的打电话的demo,其中startActivity(intent)始终报错:
Call requires permission which may be rejected by user. Code should explicitly check to see if permission is available.
代码如下:
Intent intent = new Intent(Intent.ACTION_CALL)
Uri data = Uri.parse("tel:" + "10086")
intent.setData(data)
startActivity(intent)
解决办法:
加上判断语句,如果获取到了权限才能启动打电话的功能。问题解决。
if (ContextCompat.checkSelfPermission(this, Manifest.permission.CALL_PHONE) == PackageManager.PERMISSION_GRANTED) {
Intent intent = new Intent(Intent.ACTION_CALL)
Uri data = Uri.parse("tel:" + "10086")
intent.setData(data)
startActivity(intent)
}
11、 Android Studio升级到2.0之后在运行项目的时候总会报错:
Error:Execution failed for task ':xxx:clean'.
> Unable to delete directory:path
后面根据stackoverflow上的一个答案解决了这个发恼。
解决办法:
首先,下载LockHunter.exe。下载下来后,不用运行,不用改名,直接放到一个目录下,我是放在D盘根目录下的。
然后在Module的gradle.build中加入下面的配置代码,Sync Now就可以愉快的运行程序了。
task clean(type: Exec) {
    ext.lockhunter = '\"D:\\LockHunter.exe\"'
    def buildDir = file(new File("build"))
    commandLine 'cmd', "$lockhunter", '/delete', '/silent', buildDir
}
stackoverflow地址:Error: Execution failed for task ‘:app:clean’. Unable to delete file
12、 在cmd中输入adb shell显示:

解决办法:在cmd中利用cd 命令进入到sdk目录中的adb.exe所在目录,然后利用adb命令。如下图:
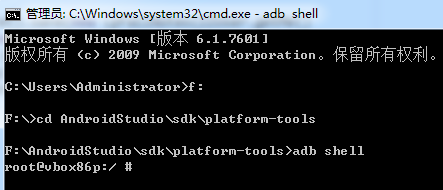
如果在platform-tools中没有找到adb.exe,那么就在tools目录里。
13、 服务端传下来的json数据中的中文是乱码。就象这样:

可以看见,today_question是乱码了。解决方法:
首先解析出today_question,然后利用URLDecoder.decode()方法将字符串按指定编码转换。
代码如下:
String question = jo.optString("today_question")
question = URLDecoder.decode(question, "utf-8")
最后得到的question就是中文了。


 594
594

 被折叠的 条评论
为什么被折叠?
被折叠的 条评论
为什么被折叠?
 到【灌水乐园】发言


