


本节主要介绍简单的字符设备驱动与应用程序的互动
以下为字符设备驱动结构图:
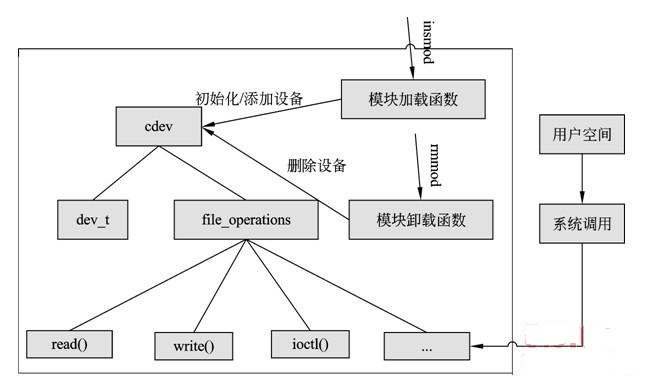
此例首先给出一个简单的字符设备驱动程序的内核模块,通过insmod工具将此模块添加进系统之中,再由mknod工具创建一个设备文件节点,最后通过一个效应用程序来验证即调用前面设备驱动程序所提供的服务.
字符设备源码如下:
/* just for learning && funning

filename: char_test.c

author:九虫

email:804390291@qq.com

*/

#include<linux/module.h>
#include<linux/kernel.h>
#include<linux/fs.h>
#include<linux/slab.h>
#include<linux/cdev.h>
#include <asm/uaccess.h>
MODULE_LICENSE("GPL");
MODULE_AUTHOR("@zxdb_jiuchong");
MODULE_DESCRIPTION("A char device test");
#define MEM_SIZE  0x1000
typedef struct my_chr_dev
{
    struct cdev chr_dev;
    unsigned char mem[MEM_SIZE];
} my_cdev,*pmy_cdev;
static pmy_cdev global_devp;
static dev_t ndev;/*number of device(the type is u_long)*/
static int chr_open(struct inode *nd,struct file*filp)
{
    int major=MAJOR(nd->i_rdev);
    int minor=MINOR(nd->i_rdev);
    printk("In our chr_open,major=%d,minor=%d\n",major,minor);
    filp->private_data=global_devp;
    return 0;
}
static ssize_t chr_read(struct file *filp ,char __user*buf,size_t size, loff_t* off)
{
    unsigned long p=(unsigned long)*off;//
    unsigned long count=size;
    int ret=0;
    pmy_cdev dev=filp->private_data;
    if(p>=MEM_SIZE)return 0;
    if(count>MEM_SIZE-p)count=MEM_SIZE-p;
    /*kernel ---> user*/
    if(copy_to_user(buf,(void*)(dev->mem+p),count))ret=-1;
    else{
        *off+=count;
        ret=count;
        printk(KERN_INFO"read %lu bytes(s) from %lu\n",count,p);
    }


    printk("In our chr_read() function\n");
    return 0;
}
static ssize_t chr_write(struct file*filp,const char __user* buf,size_t size,loff_t* off )
{
    unsigned long p=(unsigned long)*off;//
    unsigned long count=size;
    int ret=0;
    pmy_cdev dev=filp->private_data;
    if(p>=MEM_SIZE)return 0;
    if(count>MEM_SIZE-p)count=MEM_SIZE-p;
    /*kernel <--- user*/
    if(copy_from_user((void*)(dev->mem+p),buf,count))ret=-1;
    else{
        *off+=count;
        ret=count;
        printk(KERN_INFO"writen  %lu bytes(s) from %lu\n",count,p);
    }


    printk("In our chr_write() function\n");
    return 0;
}
static int  chr_ioctl( struct file* filp, unsigned int cmd, unsigned long arg)
{
    pmy_cdev dev=filp->private_data;
    /*...*/
    switch(cmd)
    {
        case 0:/*use 0 to init mem*/
            memset(dev->mem,0,MEM_SIZE);
            printk("case 0 in our ioctl()\n");
            break;
        case 1:/*use 1 to init mem*/
            memset(dev->mem,1,MEM_SIZE);
            printk("case 1 in our ioctl()\n");
            break;

        default:/*o_o! Can't support this case...*/
            return -1;

    }
    printk("In our chr_iosctl() function\n");
    return 0;
}
struct file_operations chr_ops=
{
    .owner=THIS_MODULE,
    .open=chr_open,
    .read=chr_read,
    .write=chr_write,
    .unlocked_ioctl=chr_ioctl,
};
static int demo_init(void)
{
    global_devp=kmalloc(sizeof(my_cdev),GFP_KERNEL);
    if(!global_devp)goto fail_end;
    cdev_init(&(global_devp->chr_dev),&chr_ops);
    if((alloc_chrdev_region(&ndev,0,1,"chr_dev"))<0)goto fail_end;
    printk("demo_init() :major =%d,minor=%d\n",MAJOR(ndev),MINOR(ndev));
    if((cdev_add(&( global_devp->chr_dev),ndev,1))<0)
        goto  fail_end;
    return 0;
fail_end:
    return -1;
}
static void demo_exit(void)
{
    printk("Removing ch_dev module...\n");
    cdev_del(&( global_devp->chr_dev));
    unregister_chrdev_region(ndev,1);
    kfree( global_devp);
}
module_init(demo_init);
module_exit(demo_exit);
Makefile源码:
#
#filename:Makefile
#
obj-m:=char_test.o
KERNELDIR?=/lib/modules/$(shell uname -r)/build
PWD:=$(shell pwd)
default:
        $(MAKE) -C $(KERNELDIR) M=$(PWD) modules
clean:
        rm -f *.o *.ko *.mod.c
.PHONY:default clean
测试源码:
/*
filename:main.c
*/
#include<stdio.h>
#include<fcntl.h>
#include<unistd.h>

#define  CHR_DEV "/dev/char_test"

int main()
{
int ret;
char buf[32]="zxdb_jiuchong";
int fd =open(CHR_DEV,O_RDONLY|O_NDELAY);
if(fd<0)
{
printf("open file %S failed\n",CHR_DEV);
return -1;
}
read(fd,buf,32);
close(fd);
return 0;
}
接下来就是:编译、加载安装模块、创建一个设备文件节点以及测试设备文件了。
怎样?很简单吧!
本程序测试环境为ubuntu12.04LTS,如果因为系统的原因你无法运行成功,那就O_O了,
你可能会对运行得到的结果感觉有点失望,但是这点结果可能也会激发你更大的兴趣。
如果是后者,那本文就有了意义,而且记住这不是结束,这只是一个开始。
good luck!!!
未完待续。。。


 793
793

 被折叠的 条评论
为什么被折叠?
被折叠的 条评论
为什么被折叠?
 到【灌水乐园】发言


