


一、在进入实践之前我先介绍一下基本的需求和配置情况:
计划配置7台Centos虚拟机,1个服务端程序,2个client程序,保持长连接
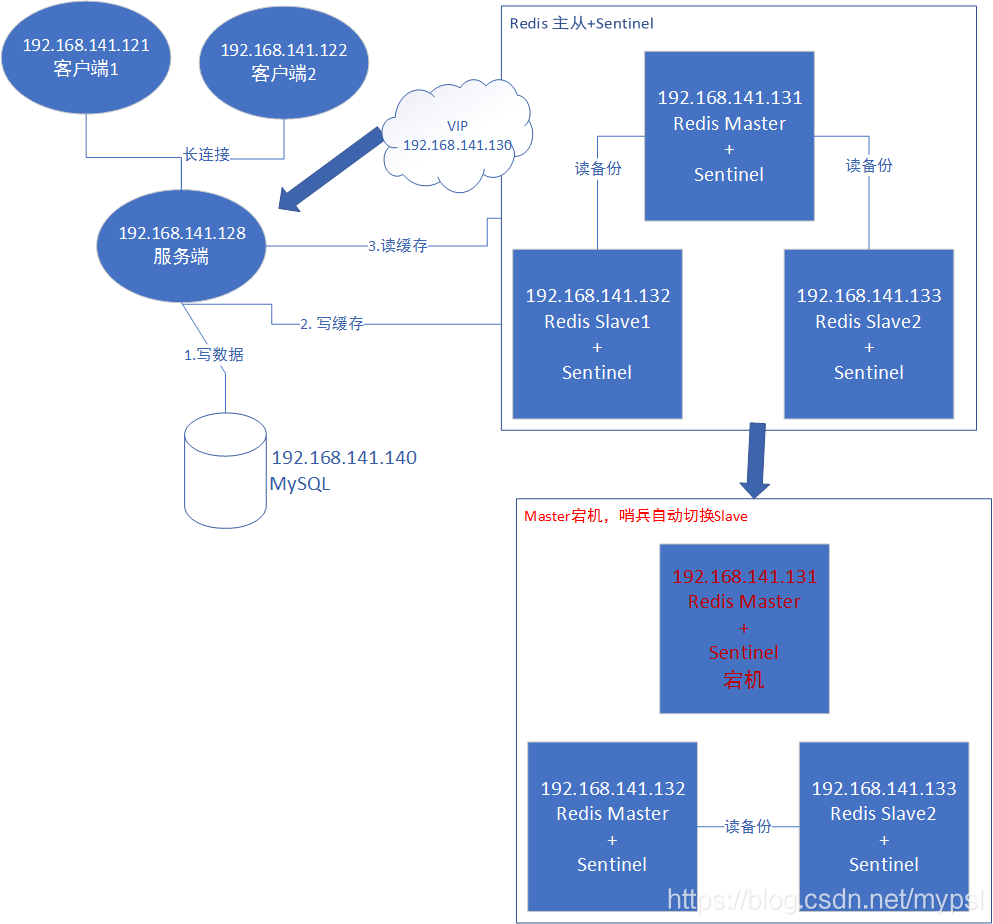
192.168.141.128 服务端
192.168.141.121 客户端1
192.168.141.122 客户端2
1个Redis Master端,2个Redis Slave端,并在Master配置VIP192.168.141.130
192.168.141.131 Redis Master + Sentinel读写
192.168.141.132 Redis Slave1 + Sentinel只读,主从备份
192.168.141.133 Redis Slave2 + Sentinel只读,主从备份
1个Mysql数据库
192.168.141.141 MySQL
服务器数据处理逻辑这样实现:
如果是读数据:
服务端先到Redis查找,
若有,直接返回,
若没有,到MySQL中去查找并返回,
若没有,提示并返回。
如果是写数据:
服务器先写MySQL数据库,
然后再写Redis。
Redis依托VIP对外提供服务,3台redis通过主从部署实现数据自动同步;
3台Redis启动哨兵模式部署,模拟Master宕机可自动切换选举slave晋升为新Master。
客户端保持与服务器长连接,无论Redis服务是否宕机,查询写入数据和读出数据一致性;
二、Redis的配置
安装好3台redis后,需要在/etc/redis路径下添加配置文件redis.conf、sentinel.conf
# redis.conf
port 6379 #端口
daemonize yes #开启后台守护进程
bind 0.0.0.0 #绑定地址,默认是127.0.0.1,0.0.0.0表示绑定所有地址
pidfile "/var/run/redis_6379.pid"
logfile "/var/log/redis/redis_6379.log"
protected-mode no #关闭保护模式
# 注意!如果是slave需要增加下面这句
# slaveof 192.168.141.131 6379
由于初始设定192.168.141.131为master,所以其余两台slave需要在配置文件中手动修改一下
sentinel monitor mymaster 192.168.141.131 6379 2
# sentinel.conf
daemonize yes #开启后台守护进程
port 26379
bind 0.0.0.0  #绑定所有地址
logfile "/var/log/redis_sentinel.log"  #哨兵日志
pidfile /var/run/sentinel.pid
sentinel monitor mymaster 192.168.141.131 6379 2
sentinel deny-scripts-reconfig yes
sentinel down-after-milliseconds mymaster 5000
sentinel failover-timeout mymaster 60000
protected-mode no
sentinel client-reconfig-script mymaster /opt/notify_master.sh
增加/opt/notify_master.sh脚本文件,在发生主从切换时执行VIP切换
#!/bin/bash

touch /var/log/redis_host_switch.log
echo "master change to $6" >> /var/log/redis_host_switch.log

MASTER_IP=$6 #第六个参数是新主redis的ip地址

LOCAL_IP='192.168.141.131' #这里记得要改,每台服务器写自己的本地ip即可

VIP='192.168.141.130'

NETMASK='24'

INTERFACE='ens33' #网卡接口设备名称


if [ ${MASTER_IP} = ${LOCAL_IP} ]; then
	echo "add vip to new master" >> /var/log/redis_host_switch.log

	/usr/sbin/ip addr add ${VIP}/${NETMASK} dev ${INTERFACE} #将VIP绑定到该服务器上

	/usr/sbin/arping -q -c 3 -A ${VIP} -I ${INTERFACE}

	exit 0

else
	echo "remove vip from local" >> /var/log/redis_host_switch.log

	/usr/sbin/ip addr del ${VIP}/${NETMASK} dev ${INTERFACE} #将VIP从该服务器上删除

	exit 0

fi

exit 1
最后就是手动初始化VIP,在master完成配置后拷贝到其余slave上,我把过程写成了脚本run.sh
# 在master节点192.168.141.131执行VIP新增
ip addr add 192.168.141.130/24 dev ens33 #绑定vip到网卡上
arping -q -c 3 -A 192.168.141.130 -I ens33 #arp抑制

# 复制配置文件
cp redis.conf  sentinel.conf /etc/redis/
cp notify_master.sh /opt/

# 复制配置文件到slave 132
scp redis.conf root@192.168.141.132:/etc/redis/
scp sentinel.conf root@192.168.141.132:/etc/redis/
scp notify_master.sh root@192.168.141.132:/opt/

# 复制配置文件到slave 133
scp redis.conf root@192.168.141.133:/etc/redis/
scp sentinel.conf root@192.168.141.133:/etc/redis/
scp notify_master.sh root@192.168.141.133:/opt/

# 启动master
redis-server /etc/redis/redis.conf
redis-sentinel /etc/redis/sentinel.conf
三、在mysql数据库中初始化一个表,马上就可以开始进行服务器的编码了
drop database if exists testdb;
create database if not exists testdb default character set gbk;
use testdb;

drop table if exists user;
create table if not exists user(
	id int not null auto_increment,
	name VARCHAR(64),
	age INT,
	description VARCHAR(1000),
	primary key(id));

insert into user (name,age,description) values('cindy',11,'like flower');
我们想要在客户端输入:get cindy,服务服务器返回“like flower”
redis端的数据大致如下:
127.0.0.1:6379> keys *
1) "jack"
2) "cindy"
127.0.0.1:6379> get cindy
"like_flower"
服务器端代码,myserver.cpp
#include <iostream>
#include <cstdlib>
#include <sys/socket.h>
#include <sys/epoll.h>
#include <netinet/in.h>
#include <arpa/inet.h>
#include <fcntl.h>
#include <unistd.h>
#include <stdio.h>
#include <errno.h>
#include <string.h>
#include <sstream>
#include <vector>
#include <hiredis/hiredis.h>
#include <mysql/mysql.h>

using namespace std;

#define MAXLINE 1024
#define OPEN_MAX 100
#define LISTENQ 20
#define SERV_PORT 5000
#define INFTIM 1000

static redisContext * _context = NULL;
static MYSQL * _myConn = NULL;

void freeMyConn()
{
	if (NULL != _myConn)
    {

		mysql_close(_myConn);
        _myConn = N
最低0.47元/天 解锁文章


 被折叠的 条评论
为什么被折叠?
被折叠的 条评论
为什么被折叠?
 到【灌水乐园】发言


