


前言:在之前的文章中已经写了apk的打包流程、安装流程,今天就是梳理一下apk系列的最后的流程--app启动流程。经过今天的梳理以后咱们就可以对apk包是怎么编译生成的、apk是怎么被安装到安卓手机的、用户点击了桌面icon以后app是怎么启动起来的 整个流程有清晰的认知和了解了。
下面先附上前面文章的传送门:
在开始分析app启动流程之前,我们先回想下平时是怎么启动一个App的:Android系统桌面->点击应用图标->启动App。
从这个过程来看,只要弄明白下面两个问题就可以解决我们“App如何被启动”的疑问。
在最开始先将apk启动涉及的“三个进程”,“六个大类”进行介绍一下:
- Android系统桌面是什么?
- 点击应用图标后Android系统执行了什么操作?
三个进程:
Launcher进程:整个App启动流程的起点,负责接收用户点击屏幕事件,它其实就是一个Activity,里面实现了点击事件,长按事件,触摸等事件,可以这么理解,把Launcher想象成一个总的Activity,屏幕上各种App的Icon就是这个Activity的button,当点击Icon时,会从Launcher跳转到其他页面。
SystemServer进程:这个进程在整个的Android进程中是非常重要的一个,地位和Zygote等同,它是属于Application Framework层的,Android中的所有服务,例如AMS, WindowsManager, PackageManagerService等等都是由这个SystemServer fork出来的。
App进程:你要启动的App所运行的进程。
六个大类:
ActivityManagerService:(AMS)AMS是Android中最核心的服务之一,主要负责系统中四大组件的启动、切换、调度及应用进程的管理和调度等工作,其职责与操作系统中的进程管理和调度模块相类似,因此它在Android中非常重要,它本身也是一个Binder的实现类。
Instrumentation:监控应用程序和系统的交互。
ActivityThread:应用的入口类,通过调用main方法,开启消息循环队列。ActivityThread所在的线程被称为主线程。
ApplicationThread:ApplicationThread提供Binder通讯接口,AMS则通过代理调用此App进程的本地方法。
ActivityManagerProxy:AMS服务在当前进程的代理类,负责与AMS通信。
ApplicationThreadProxy:ApplicationThread在AMS服务中的代理类,负责与ApplicationThread通信。
可以说,启动的流程就是通过这六个大类在这三个进程之间不断通信的过程。
先搞清楚Android系统桌面是什么?
在Android系统中,Activity是视图存在的根本,那么我们可以通过命令 adb shell dumpsys activity activities 判断是哪个Activity为我们呈现桌面视图的。
以小米为例,通过USB连上电脑后,输入命令 adb shell dumpsys activity activities 得到结果如下:
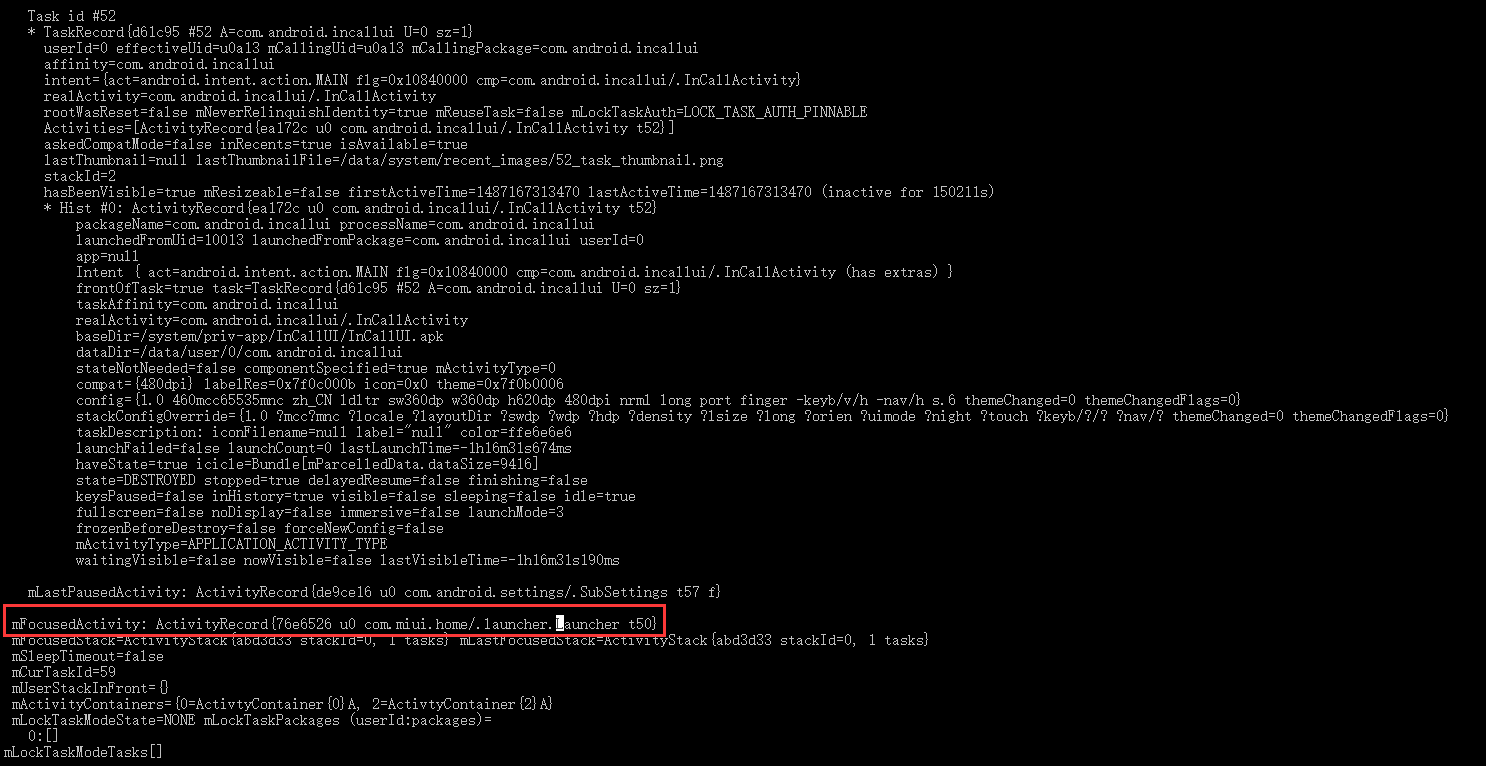
在上图可以看到,显示桌面视图的Activity是com.miui.home包下的名为Launcher的Activity。
下面我copy了一张Launcher的这个Activity:

再来说说点击App图标后Android系统执行了什么操作?
既然Launcher是Activity,那就意味着我们点击桌面的事件可以表达为:呈现Android桌面视图(View)->点击View上某个应用图标->产生点击事件->点击事件被响应->通知Android系统的某个/某些进程->Android系统执行某些操作->启动App。
先看一下Launcher如何响应由我们产生的点击事件的:
/**
 * Launches the intent referred by the clicked shortcut.
 *
 * @param v The view representing the clicked shortcut.
 */
public void onClick(View v) {
    // Make sure that rogue clicks don't get through while allapps is launching, or after the
    // view has detached (it's possible for this to happen if the view is removed mid touch).
    if (v.getWindowToken() == null) {
        return;
    }

    if (!mWorkspace.isFinishedSwitchingState()) {
        return;
    }

    Object tag = v.getTag();
    if (tag instanceof ShortcutInfo) {
        // Open shortcut
        final Intent intent = ((ShortcutInfo) tag).intent;
        int[] pos = new int[2];
        v.getLocationOnScreen(pos);
        intent.setSourceBounds(new Rect(pos[0], pos[1],
                pos[0] + v.getWidth(), pos[1] + v.getHeight()));

        boolean success = startActivitySafely(v, intent, tag);

        if (success && v instanceof BubbleTextView) {
            mWaitingForResume = (BubbleTextView) v;
            mWaitingForResume.setStayPressed(true);
        }
    } else if (tag instanceof FolderInfo) {
        if (v instanceof FolderIcon) {
            FolderIcon fi = (FolderIcon) v;
            handleFolderClick(fi);
        }
    } else if (v == mAllAppsButton) {
        if (isAllAppsVisible()) {
            showWorkspace(true);
        } else {
            onClickAllAppsButton(v);
        }
    }
}
boolean startActivitySafely(View v, Intent intent, Object tag) {
    boolean success = false;
    try {
        success = startActivity(v, intent, tag);
    } catch (ActivityNotFoundException e) {
        Toast.makeText(this, R.string.activity_not_found, Toast.LENGTH_SHORT).show();
        Log.e(TAG, "Unable to launch. tag=" + tag + " intent=" + intent, e);
    }
    return success;
}
从上面代码来看,产生点击事件后,如果产生点击事件的View的Tag是ShortcutInfo(即启动应用的快捷方式),就会取得ShortcutInfo中保存的Intent(这个Intent指向我们要启动的App),然后执行startActivitySafely(v, intent, tag)方法,而startActivitySafely方法只是对startActivity方法的简单封装。
所以,Launcher响应我们产生的点击事件后,实际上就是启动一个新的Activity。
我们现在回想下在App开发时,每个App都需要有一个“MainActivity”,这个Activity必须在AndroidManifest.xml文件中有以下配置:
<intent-filter>
    <action android:name="android.intent.action.MAIN" />
    <category android:name="android.intent.category.LAUNCHER" />
</intent-filter>
在配置AndroidManifest.xml文件时,将Activity的Action指定为android.intent.action.MAIN,会使Activity在一个新的Task中启动(Task是一个Activity栈)。将category指定为android.intent.category.LAUNCHER,表示通过Intent启动此Activity时,只接受category为LAUNCHER的Intent。
所以,Launcher将会通过App的快捷方式(ShortcutInfo)得到应用的Intent,并通过这个Intent启动应用的“MainActivity”,从而启动应用。
到此我们研究的问题就从“App启动流程”变为“Activity启动流程”。
接下来我们就进入Launcher的startActivity方法里面探索“Activity启动流程”吧:在系统中其实Launcher是通过Binder通知ActivityManagerService启动Activity的。看下面的代码:
boolean startActivity(View v, Intent intent, Object tag) {
    intent.addFlags(Intent.FLAG_ACTIVITY_NEW_TASK);

    try {
        // Only launch using the new animation if the shortcut has not opted out (this is a
        // private contract between launcher and may be ignored in the future).
        boolean useLaunchAnimation = (v != null) &&
                !intent.hasExtra(INTENT_EXTRA_IGNORE_LAUNCH_ANIMATION);
        UserHandle user = (UserHandle) intent.getParcelableExtra(ApplicationInfo.EXTRA_PROFILE);
        LauncherApps launcherApps = (LauncherApps)
                this.getSystemService(Context.LAUNCHER_APPS_SERVICE);
        if (useLaunchAnimation) {
            ActivityOptions opts = ActivityOptions.makeScaleUpAnimation(v, 0, 0,
                    v.getMeasuredWidth(), v.getMeasuredHeight());
            if (user == null || user.equals(android.os.Process.myUserHandle())) {
                // Could be launching some bookkeeping activity
                startActivity(intent, opts.toBundle());
            } else {
                launcherApps.startMainActivity(intent.getComponent(), user,
                        intent.getSourceBounds(),
                        opts.toBundle());
            }
        } else {
            if (user == null || user.equals(android.os.Process.myUserHandle())) {
                startActivity(intent);
            } else {
                launcherApps.startMainActivity(intent.getComponent(), user,
                        intent.getSourceBounds(), null);
            }
        }
        return true;
    } catch (SecurityException e) {
        Toast.makeText(this, R.string.activity_not_found, Toast.LENGTH_SHORT).show();
        Log.e(TAG, "Launcher does not have the permission to launch " + intent +
                ". Make sure to create a MAIN intent-filter for the corresponding activity " +
                "or use the exported attribute for this activity. "
                + "tag="+ tag + " intent=" + intent, e);
    }
    return false;
}
在这个方法中,首先,将Intent的Flag设为Intent.FLAG_ACTIVITY_NEW_TASK,使得Android系统将创建一个新的Task来放置即将被打开的新Activity(应用的“MainActivity),然后获取一个布尔值以用于后续判断是否显示启动App的动画。
再然后获取Intent中是否传输了Parcelable格式的用户句柄,并通过Context.LAUNCHER_APPS_SERVICE获取用于在多用户情境下启动App的系统服务。
不管是否显示启动App的动画,最终都会执行startActivity(intent)或launcherApps.startMainActivity方法以启动应用的“MainActivity”。而launcherApps.startMainActivity只在用户句柄不为空且用户句柄不等于当前进程句柄时(其他用户的句柄)调用。
那为什么用户句柄会影响Activity的启动方式呢?
这一点和Android的多用户安全机制有关。
假设我们有用户A和用户B在使用同一台手机,用户A是无法访问到用户B的文件或者和用户B的App通信的。所以假如我们现在是用户A,但我们想启动用户B的App,是无法直接实现的,因为用户A没有权限访问到用户B的数据,即使我们在代码中强行把user id设为用户B的user id,交给内核执行时也会抛出SecurityException。因此我们需要取得用户A的句柄(和用户A相关的数据),将我们想启动的用户B的App的Intent、用户A的句柄交给内核,让拥有权限的Android系统服务(内核态进程)去访问用户B的数据并执行相关的操作。
假如是单用户情境,就会相对简单了。因为此时只有一个用户,而该用户始终有权限直接访问自己的数据。
接下来继续看startActivity(intent)如何启动Activity,进入Activity类后层层深入就可以看到最终调用的是startActivityForResult方法:
public void startActivityForResult(Intent intent, int requestCode, @Nullable Bundle options) {
    if (mParent == null) {
        Instrumentation.ActivityResult ar =
            mInstrumentation.execStartActivity(
                this, mMainThread.getApplicationThread(), mToken, this,
                intent, requestCode, options);
        if (ar != null) {
            mMainThread.sendActivityResult(
                mToken, mEmbeddedID, requestCode, ar.getResultCode(),
                ar.getResultData());
        }
        if (requestCode >= 0) {
            // If this start is requesting a result, we can avoid making
            // the activity visible until the result is received.  Setting
            // this code during onCreate(Bundle savedInstanceState) or onResume() will keep the
            // activity hidden during this time, to avoid flickering.
            // This can only be done when a result is requested because
            // that guarantees we will get information back when the
            // activity is finished, no matter what happens to it.
            mStartedActivity = true;
        }

        cancelInputsAndStartExitTransition(options);
        // TODO Consider clearing/flushing other event sources and events for child windows.
    } else {
        if (options != null) {
            mParent.startActivityFromChild(this, intent, requestCode, options);
        } else {
            // Note we want to go through this method for compatibility with
            // existing applications that may have overridden it.
            mParent.startActivityFromChild(this, intent, requestCode);
        }
    }
}
从代码上看,如果Launcher有mParent Activity,就会执行mParent.startActivityFromChild;如果没有,就会执行mInstrumentation.execStartActivity。进入mParent.startActivityFromChild方法会看到最终也是执行了mInstrumentation.execStartActivity。执行完成后,会取得一个ActivityResult对象,用于给调用者Activity传递一些数据,最后在Activity切换时显示Transition动画。
这里有一点需要指出的是:这里的ParentActivity指的是类似TabActivity、ActivityGroup关系的嵌套Activity。之所以要强调parent和child,是要避免混乱的Activity嵌套关系。
下面我们进入Instrumentation类看看execStartActivity方法:
public ActivityResult execStartActivity(
        Context who, IBinder contextThread, IBinder token, Activity target,
        Intent intent, int requestCode, Bundle options) {
    IApplicationThread whoThread = (IApplicationThread) contextThread;
    Uri referrer = target != null ? target.onProvideReferrer() : null;
    if (referrer != null) {
        intent.putExtra(Intent.EXTRA_REFERRER, referrer);
    }
    if (mActivityMonitors != null) {
        synchronized (mSync) {
            final int N = mActivityMonitors.size();
            for (int i=0; i<N; i++) {
                final ActivityMonitor am = mActivityMonitors.get(i);
                if (am.match(who, null, intent)) {
                    am.mHits++;
                    if (am.isBlocking()) {
                        return requestCode >= 0 ? am.getResult() : null;
                    }
                    break;
                }
            }
        }
    }
    try {
        intent.migrateExtraStreamToClipData();
        intent.prepareToLeaveProcess();
        int result = ActivityManagerNative.getDefault()
            .startActivity(whoThread, who.getBasePackageName(), intent,
                    intent.resolveTypeIfNeeded(who.getContentResolver()),
                    token, target != null ? target.mEmbeddedID : null,
                    requestCode, 0, null, options);
        checkStartActivityResult(result, intent);
    } catch (RemoteException e) {
        throw new RuntimeException("Failure from system", e);
    }
    return null;
}
首先,我们通过参数IBinder contextThread取得一个IApplicationThread类型的对象whoThread,而contextThread是由mMainThread.getApplicationThread()取得的ApplicationThread对象,此时mMainThread指的就是Launcher应用的主线程,所以whoThread指代的自然是Launcher的ApplicationThread。
因为Activity的onProvideReferrer()方法默认返回null,除非该方法被重写,而我们使用的Launcher并没有重写该方法,所以不用管referrer。
然后判断是否有ActivityMonitor,如果有,则即将要打开的Activity是否和ActivityMonitor中保存的IntentFilter匹配,如果匹配则增加ActivityMonitor的计数。大致是用于监控符合匹配规则的Activity的数量的。
最后调用ActivityManagerNative.getDefault().startActivity(whoThread, who.getBasePackageName(), intent, intent.resolveTypeIfNeeded(who.getContentResolver()), token, target != null ? target.mEmbeddedID : null, requestCode, 0, null, options);启动Activity,并检查启动是否成功。
换句话说,最终负责启动Activ
 最低0.47元/天 解锁文章


 1116
1116

 被折叠的 条评论
为什么被折叠?
被折叠的 条评论
为什么被折叠?
 到【灌水乐园】发言


