


一、Centos 7.9安装Oxidized
1、安装所需依赖
①安装make gcc等依赖
yum install make which sqlite-devel openssl-devel libssh2-devel gcc libicu-devel gcc-c++ libyaml libyaml-devel -y
②安装cmake最新版依赖
要求
cmake版本是3.5.1以上默认安装是2.8
- 下载安装包并解压
wget https://cmake.org/files/v3.29/cmake-3.29.3.tar.gz ; tar -zxf cmake*.tar.gz
- 编译、安装
cd cmake* ; ./bootstrap ; gmake -j `grep 'processor' /proc/cpuinfo | wc -l` ; gmake install
- 查看编译后的cmake版本并创建连接,最后查看cmake版本
/usr/local/bin/cmake --version
ln -s /usr/local/bin/cmake /usr/bin/
cmake --version
2、安装Ruby
下载
ruby并解压,因为默认yum安装的版本太低(要2.8以上)
- 卸载老版本ruby,有就卸载,没有则忽略
yum remove ruby ruby-devel
- 下载ruby
wget https://cache.ruby-lang.org/pub/ruby/3.1/ruby-3.1.2.tar.gz;tar -zxf ruby*.tar.gz
- 编译、安装
cd ruby*;./configure;make;sudo make install
- 查看下安装路径
which ruby
- 查看版本
ruby --version
yum install rubygems -y
gem -v
3、安装Oxidized
gem install oxidized
- 安装Oxidized-script,oxidized-web
gem install oxidized-script oxidized-web
- 运行Oxidized
oxidized
cat ~/.config/oxidized/config
[root@Oxidized ~]# oxidized
edit ~/.config/oxidized/config
[root@Oxidized ~]# cat ~/.config/oxidized/config
---
username: username
password: password
model: junos
resolve_dns: true
interval: 3600
use_syslog: false
debug: false
run_once: false
threads: 30
use_max_threads: false
timeout: 20
retries: 3
prompt: !ruby/regexp /^([\w.@-]+[#>]\s?)$/
rest: 127.0.0.1:8888
next_adds_job: false
vars: {}
groups: {}
group_map: {}
models: {}
pid: "/root/.config/oxidized/pid"
crash:
  directory: "/root/.config/oxidized/crashes"
  hostnames: false
stats:
  history_size: 10
input:
  default: ssh, telnet
  debug: false
  ssh:
    secure: false
  ftp:
    passive: true
  utf8_encoded: true
output:
  default: file
source:
  default: csv
model_map:
  juniper: junos
  cisco: ios
二、Almalinux安装Oxidized
1、改下源阿里云的源
先改下国内源,下载安装速度会快一些
- 执行以下命令
sed -e 's|^mirrorlist=|#mirrorlist=|g' \
      -e 's|^# baseurl=https://repo.almalinux.org|baseurl=https://mirrors.aliyun.com|g' \
      -i.bak \
      /etc/yum.repos.d/almalinux*.repo
- 执行以下命令生成缓存
dnf makecache
- 更新下系统
dnf update -y
2、安装扩展源
有些依赖默认库里面没有
dnf install -y epel-release
3、安装依赖
dnf install -y which sqlite-devel openssl-devel gcc make cmake pkgconfig libicu-devel gcc-c++ libgit2 libgit2-devel
4、安装 ruby
dnf install -y ruby ruby-devel
看下ruby版本和gem版本 要高于2.8
ruby --version
gem -v
5、安装Oxidized
gem install oxidized
- 安装
oxidized-script,oxidized-web
gem install oxidized-script oxidized-web
- 运行Oxidized,看下配置文件
oxidized
cat ~/.config/oxidized/config
[root@Oxidized ~]# oxidized
[root@Oxidized ~]# cat ~/.config/oxidized/config
---
username: username
password: password
model: junos
resolve_dns: true
interval: 3600
use_syslog: false
debug: false
run_once: false
threads: 30
use_max_threads: false
timeout: 20
retries: 3
prompt: !ruby/regexp /^([\w.@-]+[#>]\s?)$/
rest: 10.11.1.41:8888
next_adds_job: false
vars: {}
groups: {}
group_map: {}
models: {}
pid: "/root/.config/oxidized/pid"
crash:
  directory: "/root/.config/oxidized/crashes"
  hostnames: false
stats:
  history_size: 10
input:
  default: ssh, telnet
  debug: false
  ssh:
    secure: false
  ftp:
    passive: true
  utf8_encoded: true
output:
  default: file
source:
  default: csv
model_map:
  juniper: junos
  cisco: ios
三、Oxidized的配置、备份及登录验证
Oxidized 的组成
Oxidized: 文件文件默认存储在
~/.config/oxidized/目录下
configs: 设备配置文件存储目录;
config:oxidized主配置文件
crash: 所有的原始模块路径;
logs : 日志存储目录;
router.db文件: 被管网络设备详细信息
Sources 字段: 定位router.db文件的位置
Outputs 字段: 设备备份文件的存储位置
model 字段: 设备厂商所用的系统, 核心功能就是靠这个实现的
1、修改配置文件
vim ~/.config/oxidized/config
---
username: username				# 默认即可,在router.db中设置
password: password				# 默认即可,在router.db中设置
model: junos			 		# 默认即可,在router.db中设置
resolve_dns: true
interval: 3600					# 备份周期,单位是秒,默认1小时备份一次
use_syslog: false
debug: false
run_once: false
threads: 30				# 线程
use_max_threads: false
timeout: 20				# 超时时间
retries: 3				# 重试次数
prompt: !ruby/regexp /^([\w.@-]+[#>]\s?)$/
rest: 127.0.0.1:8888   	   # Web,默认只允许127.0.0.1:8888访问
next_adds_job: false
vars: {}
groups: {}
group_map: {}
models: {}
pid: "/root/.config/oxidized/pid"
crash:
  directory: "/root/.config/oxidized/crashes"
  hostnames: false
stats:
  history_size: 10
input:						# 连接设备模式
  default: ssh, telnet
  debug: false
  ssh:
    secure: false
  ftp:
    passive: true
  utf8_encoded: true
output:							# 导出设备配置文件的配置
  default: file
  file:
    directory: "/root/.config/oxidized/configs"
source:							# 加载router.db文件
  default: csv
  csv:
    file: "/root/.config/oxidized/router.db"  		  # 需要备份的网络设备,信息放在这里
    delimiter: !ruby/regexp /:/
    map:					# router.db格式设,备信息按照如下0、1、2、3、4、5录入
      name: 0     			# 设备名称
      ip: 1					# 管理地址
      model: 2				# 设备类型
      username: 3			# 设备登录用户
      password: 4			# 设备登录密码
      group: 5				# 设备组
    gpg: false
model_map:
  juniper: junos
  cisco: ios
2、创建router.db文件
1、格式
name:ip:model:username:password:group
要按照置文件定义的规则来写,不能有中文,不然会报错无法启动服务
vim /root/.config/oxidized/router.db
H3C:10.1.9.21:comware:Admin:r%&ux6%:group1
H3C2:10.1.9.22:comware:Admin:vibb4%gw:group1
HUAWEI:10.1.9.33:vrp:Admin:Huawei%2023:group2
2、文件规范
H3C名字
10.1.9.21设备地址
comware:model
Admin用户名
r%&mux6%:密码
group1分组
3、连接设备自定义的 SSH 端口
因为交换机安全加固,默认
ssh端口经使用自定义,导致无法使用ssh标准的22端口进行远程。自定义
ssh端口,使用备份xidized,需要修改下面配置。
1、修改配置文件
vim ~/.config/oxidized/config
source:							# 加载router.db文件
  default: csv
  csv:
    file: "/root/.config/oxidized/router.db"  		  # 需要备份的网络设备,信息放在这里
    delimiter: !ruby/regexp /:/
    map:					# router.db格式设,备信息按照如下0、1、2、3、4、5、6录入
      name: 0     			# 设备名称
      ip: 1					# 管理地址
      model: 2				# 设备类型
      username: 3			# 设备登录用户
      password: 4			# 设备登录密码
      group: 5				# 设备组
    vars_map:
      ssh_port: 6			# 自定义端口(这里需要注意语法,写错web服务会起不来)
    gpg: false
model_map:
  juniper: junos
  cisco: ios
2、创建Router.db文件
name:ip:model:username:password:group:sh_port
要按照置文件定义的规则来写,不能有中文,不然会报错无法启动服务
vim /root/.config/oxidized/router.db
H3C:10.1.9.21:comware:Admin:r%&mux6%:group1:22
H3C2:10.1.9.22:comware:Admin:vibb4%gw:group1:9527
HUAWEI:10.1.9.33:vrp:Admin:Huawei%2023:group2:22
4、开机自启
1、查找路径并复制目录
find / -name oxidized.service
# 查找oxidized.service路径

/usr/local/share/gems/gems/oxidized-0.30.1/extra/oxidized.service
cp /usr/local/share/gems/gems/oxidized-0.30.1/extra/oxidized.service /etc/systemd/system
# 将systemctl 管理文件复制到systemctl 目录
2、修改启动用户为root
vim /etc/systemd/system/oxidized.service
# 复制完成后编辑配置文件,启动用户修改为root
3、将用户改成root(在第15行)
# Put this file in /etc/systemd/system.
#
# To set OXIDIZED_HOME instead of the default,
# ~oxidized/.config/oxidized, uncomment (and modify as required) the
# "Environment" variable below so systemd sets the correct
# environment.

[Unit]
Description=Oxidized - Network Device Configuration Backup Tool
After=network-online.target multi-user.target
Wants=network-online.target

[Service]
ExecStart=/usr/local/bin/oxidized
User=root		# 这里
KillSignal=SIGKILL
#Environment="OXIDIZED_HOME=/etc/oxidized"
Restart=on-failure
RestartSec=300s

[Install]
WantedBy=multi-user.target
~
4、放通防火墙端口
firewall-cmd --zone=public --add-port=8888/tcp --permanent
firewall-cmd --reload
5、通过systemctl 管理 Oxidized 服务启动、开机启动、当前状态
systemctl start oxidized.service
# 启动Oxidized
systemctl enable oxidized.service
# 设置开机启动
systemctl status oxidized.service
# 当前状态
5、访问Web
1、备份界面截图
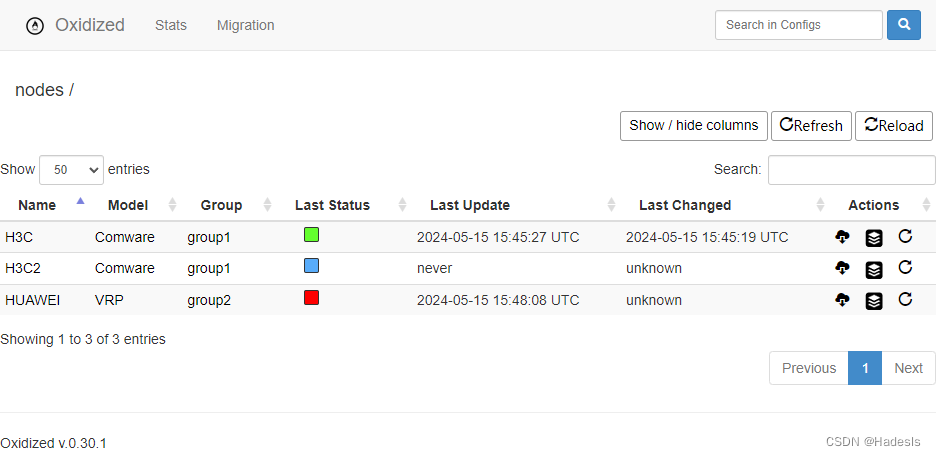
Last Status:
绿色(备份正常),蓝色(正在备份),红色(备份失败)
Last Update: 上一次备份的时间(配置文件里面默认1个小时自定义修改interval的值即可)
Last Changed: 配置文件发生改变的时间
Actions: 点击第一个图标就能看到设备备份文件内容,第二个图标为配置文件比对,第三个图标为手动强制备份
2、查看备份的文件
[root@Oxidized oxidized]# ll
total 20
-rw-r--r--. 1 root root 916 May 15 18:21 config
drwxr-xr-x. 2 root root  44 May 15 23:01 group1
drwxr-xr-x. 2 root root   6 May 15 18:42 logs
-rw-r--r--. 1 root root   6 May 15 22:58 pid
-rw-r--r--. 1 root root 145 May 15 22:11 router.db
[root@Oxidized group1]# ll
total 36
-rw-r--r--. 1 root root 10551 May 15 22:58 H3C
-rw-r--r--. 1 root root  9529 May 15 23:01 H3C2

[root@Oxidized group1]# cat H3C
# H3C Comware Software, Version 7.1.070, Release 6361
# Copyright (c) 2004-2023 New H3C Technologies Co., Ltd. All rights reserved.
# Last reboot reason : User reboot
#
# Boot image: flash:/s5130s_ei-cmw710-boot-r6361.bin
# Boot image version: 7.1.070, Release 6361
#   Compiled Dec 26 2023 11:00:00
# System image: flash:/s5130s_ei-cmw710-system-r6361.bin
# System image version: 7.1.070, Release 6361
#   Compiled Dec 26 2023 11:00:00

。。。。。。
搞定~!
6、时区修改
1、last update时区问题
因为时区问题,显示的时间和北京时间差
8个小时,需要修改一下job.rb和stats.rb配置。
find /* -name '*job.rb*'
# 查找job.rb
/usr/local/share/gems/gems/oxidized-0.30.1/lib/oxidized/job.rb
/usr/local/share/gems/gems/oxidized-0.26.3/lib/oxidized/job.rb

# 修改这两个
vim /usr/local/share/gems/gems/oxidized-0.30.1/lib/oxidized/job.rb
vim /usr/local/share/gems/gems/oxidized-0.26.3/lib/oxidized/job.rb


find / -name stats.rb
# 查找tats.rb
/usr/share/rubygems/rubygems/resolver/stats.rb
/usr/local/share/gems/gems/oxidized-0.30.1/lib/oxidized/node/stats.rb
/usr/local/share/gems/gems/oxidized-0.26.3/lib/oxidized/node/stats.rb

#修改这两个

vim /usr/local/share/gems/gems/oxidized-0.30.1/lib/oxidized/node/stats.rb
vim /usr/local/share/gems/gems/oxidized-0.26.3/lib/oxidized/node/stats.rb

# 将Time.now.utc改成Time.now
2、修改job.rb
job.rb一共三处(第7行、第9行、第11行)
module Oxidized
  class Job < Thread
    attr_reader :start, :end, :status, :time, :node, :config

    def initialize(node)
      @node         = node
      @start        = Time.now.utc				# 将Time.now.utc改成Time.now
      super do
        Oxidized.logger.debug "lib/oxidized/job.rb: Starting fetching process for #{@node.name} at #{Time.now.utc}"									 # 将Time.now.utc改成Time.now
        @status, @config = @node.run
        @end             = Time.now.utc			# 将Time.now.utc改成Time.now
        @time            = @end - @start
        Oxidized.logger.debug "lib/oxidized/job.rb: Config fetched for #{@node.name} at #{@end}"
      end
    end
  end
3、修改tats.rb
tats.rb只有一处(0.30.1在45行;0.26.3在44行)
 # vim /usr/local/share/gems/gems/oxidized-0.30.1/lib/oxidized/node/stats.rb
 44       def update_mtime
 45         @mtimes.push Time.now.utc		 # 将Time.now.utc改成Time.now
 46         @mtimes.shift
 47       end
# /usr/local/share/gems/gems/oxidized-0.26.3/lib/oxidized/node/stats.rb
 43       def update_mtime
 44         @mtimes.push Time.now.utc		 # 将Time.now.utc改成Time.now
 45         @mtimes.shift
 46       end
:wq保存退出,systemctl restart oxidized重启oxidized,再次访问web;Last Updateh和Last Changed的时区已恢复+0800
4、更新后的时间显示效果

7、登录验证
由于
Oxidized没有提供认证机制,通过Nginx认证,实现登录验证
1、安装Nginx
dnf install nginx httpd-tools -y

# 安装
systemctl start nginx
# 启动
systemctl enable nginx
# 开机启动
systemctl status nginx
# 查看Nginx状态是否正常运行
2、创建Nginx认证用户密码
htpasswd -c /etc/nginx/.htpasswd hadesr
# 用户名是 Hadesr
如果忘记了密码,编辑
/etc/nginx/.htpasswd下删除指定用户,这里只创建了一个hadesr用户。
3、配置Nginx代理
1、修改oxidized配置文件
首先修改
oxidized配置文件只监听本机的请求
vim ~/.config/oxidized/config
---
username: username
password: password
model: junos
resolve_dns: true
interval: 3600
use_syslog: false
debug: false
run_once: false
threads: 30
use_max_threads: false
timeout: 20
retries: 3
prompt: !ruby/regexp /^([\w.@-]+[#>]\s?)$/
rest: 127.0.0.1:8888							# 这里把之前改的IP改回127.0.0.1:8888
修改完成后重启
oxidized服务systemctl restart oxidized.service
2、配置Nginx代理
vim /etc/nginx/nginx.conf
user nginx;
worker_processes auto;
error_log /var/log/nginx/error.log;
pid /run/nginx.pid;

# Load dynamic modules. See /usr/share/doc/nginx/README.dynamic.
include /usr/share/nginx/modules/*.conf;

events {
    worker_connections 1024;
}

http {
    log_format  main  '$remote_addr - $remote_user [$time_local] "$request" '
                      '$status $body_bytes_sent "$http_referer" '
                      '"$http_user_agent" "$http_x_forwarded_for"';

    access_log  /var/log/nginx/access.log  main;

    sendfile            on;
    tcp_nopush          on;
    tcp_nodelay         on;
    keepalive_timeout   65;
    types_hash_max_size 4096;

    include             /etc/nginx/mime.types;
    default_type        application/octet-stream;

    # Load modular configuration files from the /etc/nginx/conf.d directory.
    # See http://nginx.org/en/docs/ngx_core_module.html#include
    # for more information.
    include /etc/nginx/conf.d/*.conf;

    server {
        listen       80;
        listen       [::]:80;
        server_name  _;
        root         /usr/share/nginx/html;
        auth_basic "oxidized auth access";
        auth_basic_user_file /etc/nginx/.htpasswd;				#  导入认证模块


        # Load configuration files for the default server block.
        include /etc/nginx/default.d/*.conf;

        location / {
        proxy_pass http://127.0.0.1:8888/;						 # 配置代理地址
        }

        error_page 404 /404.html;
        location = /404.html {
        }

        error_page 500 502 503 504 /50x.html;
        location = /50x.html {
        }
    }
3、如图所示

4、防火墙放通Nginx的80端
firewall-cmd --zone=public --add-port=80/tcp --permanent
firewall-cmd --reload
关闭selinux
如果无法打开页面请关闭
selinux
vim /etc/selinux/config
# This file controls the state of SELinux on the system.
# SELINUX= can take one of these three values:
#     enforcing - SELinux security policy is enforced.
#     permissive - SELinux prints warnings instead of enforcing.
#     disabled - No SELinux policy is loaded.
SELINUX=disabled			# 这里
# SELINUXTYPE= can take one of these three values:
#     targeted - Targeted processes are protected,
#     minimum - Modification of targeted policy. Only selected processes are protected.
#     mls - Multi Level Security protection.
SELINUXTYPE=targeted
修改完成后,重启系统生效,不想关闭的可以自行编写
selinux规则。
8、备份到外部
把数据同步到,共享网盘中,每天一次,同步的同时添加后缀名。
思路:先挂载共享,然后进行备份,备份完毕卸载共享(就当它是
伪离线备份吧!)或者可以做一下网络级别的离线备份,通过脚本联动,备份先开启交换机网络,备份结束给交换机信号关闭当前网络端口。
#!/bin/bash

# 挂载共享
mount -t cifs -o username="Backup",password="Hadesr.com" //10.10.10.10/home/Oxidized  /mnt/Share

# 等待5秒
sleep 5

# 定义要复制的目录列表
source_dirs=("/root/.config/oxidized/group1" "/root/.config/oxidized/group2")

# 定义复制后文件名的日期格式
date_format=$(date +%Y-%m-%d_%H-%M-%S)

# 复制文件并添加日期和.cfg扩展名
for source_dir in "${source_dirs[@]}"; do
  target_dir="/mnt/Share/$(basename "$source_dir")"
  mkdir -p "$target_dir"
  for file in "$source_dir"/*; do
    if [[ -f "$file" ]]; then
      base_name=$(basename "$file")
      if [[ "$base_name" != *".cfg" ]]; then
        cp "$file" "$target_dir/${base_name}_$date_format.cfg"
      else
        cp "$file" "$target_dir/"
      fi
    fi
  done
done

# 等待5秒
sleep 5

# 删除三天之前的文件
find /mnt/Share/group1 /mnt/Share/group2 -type f -mtime +3 -exec rm {} \;

# 等待5秒
sleep 5

# 执行卸载共享文件
umount /mnt/Share
然后设置个定时运行,每天晚上
23点30进行备份执行Backup.sh脚本
crontab -e
0 23 * * * /root/Backup.sh
完结~
最后来个最终截图吧
Oxidized界面:

共享文件夹界面:


 593
593

 被折叠的 条评论
为什么被折叠?
被折叠的 条评论
为什么被折叠?
 到【灌水乐园】发言


