


目录
本文将为我们提供使用CodeProject.AI Server检测浣熊的设置。我们将设置一个带有beta固件的Wyze cam来公开RTSP流,使用少量Python吸入该流,然后将帧从流发送到CodeProject.AI Server以执行对象检测。第二部分将讨论训练专门用于检测浣熊的模型。
介绍
我们中的许多人使用IP摄像机进行监控。有数百种相机可供选择,从便宜的(不是那么好)到功能齐全的,当然还有昂贵的。我很便宜,所以我使用Wyze cams。售价30美元、防水和无线。
我的目标——我的真正需要——是拥有一个系统,可以检测浣熊何时出现在我的阳台上,这样我就可以向这只毛茸茸的小动物倾泻火力和硫磺。
本文将为我们提供使用CodeProject.AI Server检测浣熊的基础知识。我们将设置一个带有beta固件的Wyze cam来公开RTSP流,使用少量Python吸入该流,然后将帧从流发送到CodeProject.AI Server以执行对象检测。第二部分将讨论训练专门用于检测浣熊的模型。
你之后做什么留给勇敢的读者。
设置Wyze Cam以提供RTSP视频流
Wyze不提供开箱即用的对来自其摄像机的视频流的访问,但他们确实提供了启用RTSP(实时流媒体协议)的 beta固件。RTSP是一种流媒体协议,Wyze cams的实现最初是作为测试版发布的,但后来由于稳定性问题而被删除,然后重新发布、更新、针对v3发布,然后被删除。它现在处于一种奇怪的不确定状态,但仍然可以使用下面的链接从Wyze下载固件。
要更新您的相机,请下载相应的固件并按照说明进行操作。请记住将bin文件重命名为demo.bin(V2)或demo_wcv3.bin (V3),并将文件放在SD卡的根目录中。
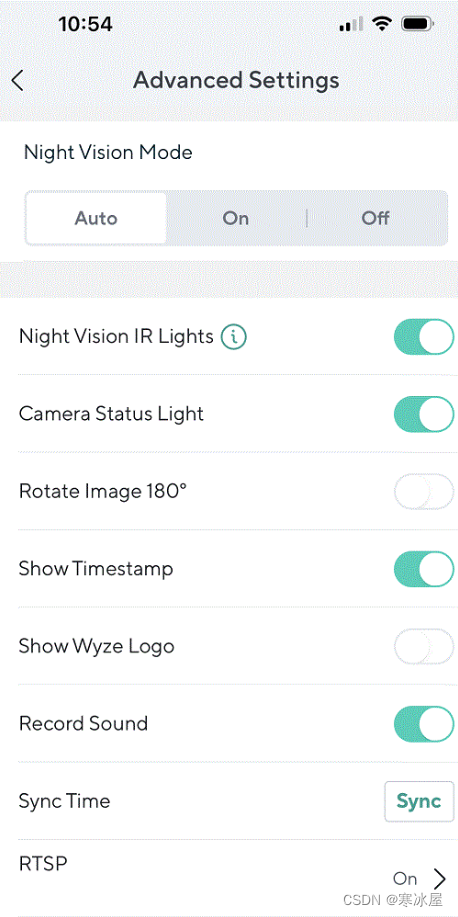
刷新更新固件并重新启动相机后,您将在Wyze应用程序中看到RTSP选项。只需选择相机,转到“设置”→“高级设置”,RTSP设置位于底部。
使用Python处理RTSP视频流
流的位置
RTSP流的位置使用以下形式的URL指定:
rtsp://<username>:<password>@<ip address>:<port>/<endpoint>
在Wyze应用程序的相机设置的高级设置中选择“RTSP”,系统将提示您生成URL。选择用户名和密码,您的URL将显示如下所示:
rtsp://user:pass@192.168.0.189/live
在这里,我选择了“用户名”和“密码”作为我的超安全凭据。cam的IP地址为192.160.0.189,它将使用默认端口。
查看流
我们使用imutils.video来抓取流并且使用OpenCV显示每一帧。这是令人尴尬的简单代码:
import cv2
import imutils
from imutils.video import VideoStream

rtsp_url = "rtsp://user:pass@192.168.0.189/live"

def main():

    vs = VideoStream(rtsp_url).start()    # Open the RTSP stream

    while True:

        # Grab a frame at a time
        frame = vs.read()
        if frame is None:
            continue

        # Resize and display the frame on the screen
        frame = imutils.resize(frame, width = 1200)
        cv2.imshow('WyzeCam', frame)

        # Wait for the user to hit 'q' for quit
        key = cv2.waitKey(1) & 0xFF
        if key == ord('q'):
            break

    # Clean up and we're outta here.
    cv2.destroyAllWindows()
    vs.stop()

if __name__ == "__main__":
    main()
处理流
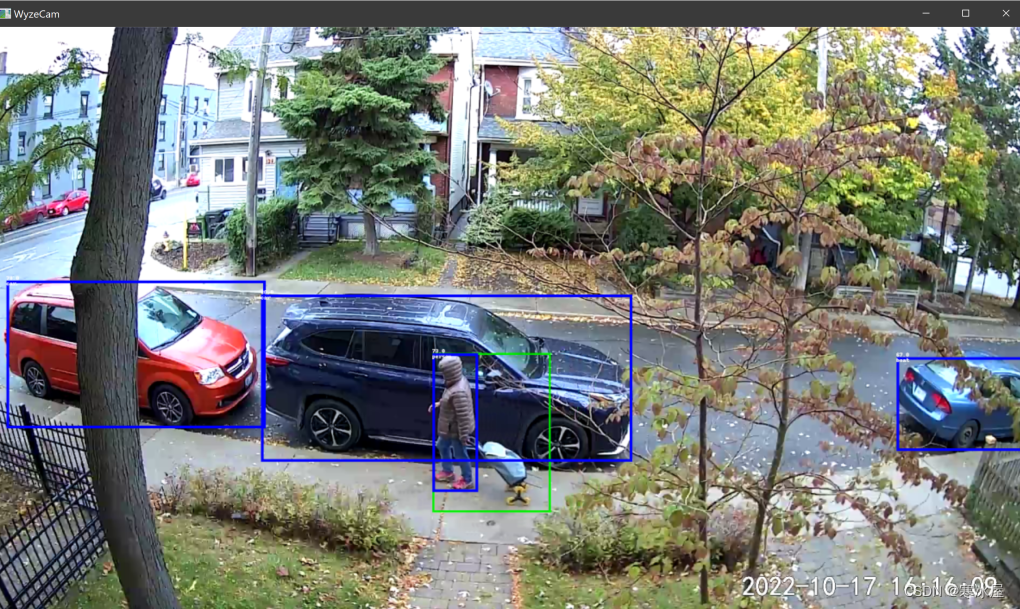
查看是一回事,但让我们让它做一些有用的事情:添加对象检测。
- 第1步 安装 CodeProject.AI Server。
- 第2步 将视频中的每一帧发送到CodeProject.AI服务器进行处理。
- 第3步 显示结果
首先,在代码中添加一个'do_detection'方法。此方法将获取一个帧,将其转换为适合发送到CodeProject.AI Server的形式,进行检测,然后使用检测到的项目的标签和边界框对框架进行注释。
import io
import requests
import numpy as np
from PIL import Image, ImageDraw

codeprojectai_api_url = 'http://localhost:32168/v1/vision/detection'

def do_detection(image):

    # Convert to format suitable for a POST
    buf = io.BytesIO()
    image.save(buf, format='PNG')
    buf.seek(0)

    # Send the image to CodeProject.AI Server and do some object detection.
    # Better to have a session object created once at the start and closed at
    # the end, but we keep the code simpler here for demo purposes
    with requests.Session() as session:
        response = session.post(codeprojectai_api_url,
                                files={"image": ('image.png', buf, 'image/png') },
                                data={"min_confidence": 0.5}).json()

    # Get the predictions (but be careful of a null return)
    predictions = response["predictions"]
    if (predictions is None):
        predictions = []

    # Draw each bounding box that was returned by the AI engine
    draw = ImageDraw.Draw(image)
    for object in predictions:
        label = object["label"]
        conf  = object["confidence"]
        y_max = int(object["y_max"])
        y_min = int(object["y_min"])
        x_max = int(object["x_max"])
        x_min = int(object["x_min"])

        draw.rectangle([(x_min, y_min), (x_max, y_max)], outline="red", width=5)
        draw.text((x_min, y_min), f"{label}")
        draw.text((x_min, y_min - 10), f"{round(conf*100.0,0)}")

    # ...and we're done
return image接下来,我们将从RTSP流中检索到每张图像,将其转换为我们可以POST到CodeProject.AI Server检测API的格式,然后将结果转换回我们最初收到帧的格式。
我们的main成为:
def main():

   # Open the RTSP stream
   vs = VideoStream(rtsp_url).start()

   while True:

       # Grab a frame at a time
       frame = vs.read()
       if frame is None:
           continue

       # Convert the frame to an image, pass to the detector, then convert back
       # to the original format so we can draw it
       image = Image.fromarray(frame)
       image = do_detection(image)
       frame = np.asarray(image)

       # Resize and display the frame on the screen
       frame = imutils.resize(frame, width = 1200)
       cv2.imshow('WyzeCam', frame)

       # Wait for the user to hit 'q' for quit
       key = cv2.waitKey(1) & 0xFF
       if key == ord('q'):
           break

   # Clean up and we're outta here.
   cv2.destroyAllWindows()
   vs.stop()
瞧。
结论
通过库存Wyze cam并更新其固件,我们能够访问RTSP流进行处理。从此流中提取帧的Python代码允许我们将帧发送到CodeProject.AI Server进行对象检测。
该代码包含在CodeProject.AI Server源代码中(在Demos/Python/ObjectDetect下)。整个文件长度不到100行。
我们编写CodeProject.AI Server是为了消除设置AI系统和项目的痛苦。我们处理运行时、包和将所有部分都安排到位,这样我们就可以直接跳到有趣的部分,比如检测垃圾熊猫。
请下载CodeProject.AI并试一试。添加你自己的模块,将其与你的应用程序集成,训练一些自定义模型,并使用它来学习一些关于人工智能的知识。
https://www.codeproject.com/Articles/5344693/Object-Detection-with-an-IP-Camera-using-Python-an


 被折叠的 条评论
为什么被折叠?
被折叠的 条评论
为什么被折叠?
 到【灌水乐园】发言


