


目录
什么是将本机视图/控件/应用程序嵌入到Avalonia中,为什么我们需要它?
用于示例的Avalonia、.NET和Visual Studio版本
我在Visual Studio 17.4.0 Preview 5.0中遇到的问题
适用于Windows和Linux的多目标示例,体系结构接近最佳
用于创建和销毁IPlatformHandle对象的可重用代码
显示作为Avalonia中的本机进程运行的Windows本机应用程序
如果需要将本机应用程序移植到多平台Avalonia,或者没有一些本机构建的复杂Avalonia控件,则将本机Windows和Linux控件嵌入到Avalonia应用程序中非常重要。我还介绍了通过IoC容器和动态加载在Avalonia中使用本机视图的最佳架构。最后,本文介绍如何将不同进程运行的本机窗口转换为Avalonia应用程序的可视部分。
介绍
什么是Avalonia?
请注意,本文和示例代码都已更新,可以使用最新版本的Avalonia - 11.0.6。
Avalonia是一个伟大的新开源包,它与WPF非常相似,但与WPF或UWP不同,它适用于大多数平台——Windows,MacOS和各种风格的Linux,并且在许多方面比WPF更强大。
要了解有关Avalonia的更多信息,请查看Avalonia网站上的文档,并查看我的其他Avalonia文章,从简单示例中的AvaloniaUI多平台UI编码开始。第1部分——AvaloniaUI构建基块。
什么是将本机视图/控件/应用程序嵌入到Avalonia中,为什么我们需要它?
如果Avalonia应用程序由于某种原因缺少一些复杂的视觉对象(控件或视图),这些视觉对象可能由特定公司自定义,而这些视觉对象可用,例如在Windows上作为WPF控件,则可以将这些WPF视觉对象嵌入到Avalonia应用程序中以在Windows上运行。当然,它们仅适用于提供此类视觉效果的平台。在没有可视化实现的其他平台上,开发人员可以选择例如提供类似”The view is not available yet for Linux."。
以下方案需要托管Avalonia的本机视觉效果:
1、当现有的单平台应用程序(例如,WPF应用程序)逐渐移动到多平台Avalonia时。
在这种情况下,不必等待每个视图和每个控件移植到Avalonia即可将结果呈现给客户端。您可以从移植Avalonia shell和一些最重要的视图开始,其余视图可以逐个移植。尚未移植的视图仅适用于窗口和其他平台,它们可以显示例如“正在进行中”消息。
2、有时,视图必须是本机的,因为使它们成为多平台会花费太多时间。在这种情况下,托管技术允许为每个平台显示适当的本机视图,例如,在Windows上运行应用程序将显示WPF视图,而在Linux上运行它将显示类似的本机Linux视图。
3、令人惊讶的是,Avalonia可以托管由其他进程创建的本机窗口,例如,如果运行多个WPF进程,每个进程控制一个WPF窗口,我们可以在单个Avalonia应用程序中显示所有这些窗口。从某种意义上说,Avalonia可以在视觉上将多个本机应用程序统一为单个Avalonia应用程序。我的最后一个示例将展示如何实现这一点。
用于本文中示例的平台
由于WSL2,在Windows 10和11上测试和调试Linux变得非常容易。相应地,这里的大多数示例都是在Windows 11和Linux(Ubuntu 20.04)上构建和测试的。不幸的是,我无法在Mac上轻松测试我的代码,因此本文不包含任何Mac示例。
若要查看使用WSL运行Avalonia应用程序,请查看在适用于Linux的Windows子系统(WSL)上运行和调试多平台.NET(.NET Core、.NET5和.NET6)GUI和控制台应用程序文章。
用于示例的Avalonia、.NET和Visual Studio版本
在本文中,我使用了Avalonia 11预览版4、.NET 6.0和Visual Studio 17.4.0预览版5.0。希望很快,Avalonia将成为完整版本11,然后,如果时间允许,我会将示例移植到它。
我使用Avalonia 11预览版4的主要原因是因为该分支与最新的稳定分支0.10.18之间存在一些深刻的变化,我希望示例易于转换为即将推出的Avalonia 11版本。
我在Visual Studio 17.4.0 Preview 5.0中遇到的问题
由于我们正在处理多个目标(Windows和Linux),我不得不将主项目文件从单个目标修改为多个目标,并让一些项目和包依赖项以当前目标为条件。对文件的这种修改并不总是立即生效——但有时,我不得不重新启动Visual Studio。如果您要重新处理本文中的示例,请记住这一点。
文章组织
- 首先,我展示了托管Windows和Linux简单本机视图的Avalonia窗口的简单示例。
- 然后,我提供了一些架构建议,将代码排列到单独的项目中,通过多平台视图模型重用通用功能,以及使用IoC容器使主项目的代码几乎独立于平台。
- 最后,我提供了一个示例,演示如何将在其自己的进程中运行的本机WPF窗口嵌入到Avalonia应用程序中。在这一点上,我没有类似的Linux示例,但计划在将来的某个时候添加它。
示例
示例位置
所有示例都位于 NP.Ava.Demos/HostingDemos 文件夹下的NP.Avalonia.Demos库中。
简单的Windows和Linux示例
简单的WinForms示例
运行示例
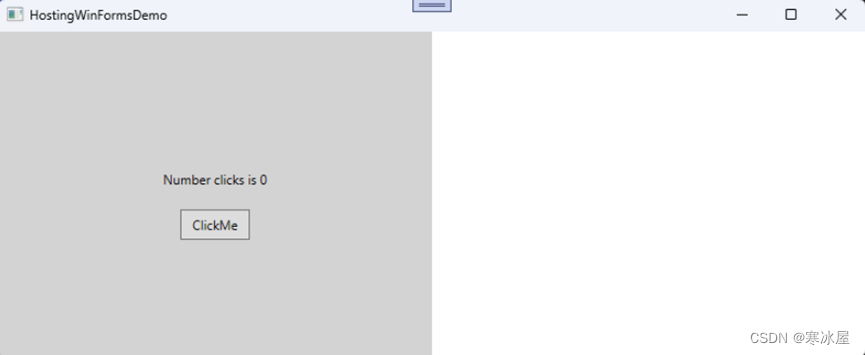
第一个示例演示如何将WinForm嵌入到Avalonia中。示例位于
HostingWinFormsDemo/HostingWinFormsDemo/HostingWinFormsDemo.sln解决方案。
打开解决方案,将主项目HostingWinFormsDemo设为启动项目,编译并运行。以下是您将看到的内容:
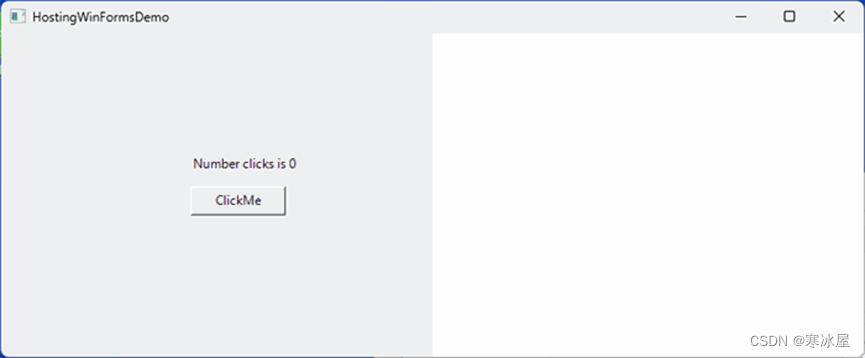
每次单击“ClickMe”按钮时,按钮上方的单击次数都会增加。
请注意,嵌入的winform仅垂直占据窗口的左半部分。这是为了表明由开发人员决定在哪里放置它以及分配给它多少空间——它不必占用整个窗口。事实上,Avalonia窗口的两个或多个部分可以被不同的本机嵌入式控件占用。
源代码
查看定义WinForms控件的MyWinFormsControl项目。它由定义可视控件的MyControl类和定义非可视视图模型的ClickCounterViewModel类组成。(是的,即使在编码WinForms时,我们也使用View-ViewModel模式)。
ClickCounterViewModel类包含两个属性:
- NumberClicks——指定按钮被点击的次数
- NumberClicksStr——要显示的结果字符串
这两个属性都是可通知的,这意味着它们在更改时触发INotifyPropertyChanged.PropertyChanged属性。
还有一个非常简单的方法:
public void IncreaseNumberClicks()
{
    NumberClicks++;
}
这将增加点击次数。
MyControl指定按钮MyButton和放置在按钮上方的标签ClickCounter。
控件中还定义了ClickCounterViewModel对象的实例:
public partial class MyControl: UserControl
{
    // the view model.
    ClickCounterViewModel _viewModel = new ClickCounterViewModel();
    ...
}
下面是带有注释的简单控件的完整代码:
public partial class MyControl: UserControl
{
    // the view model
    ClickCounterViewModel _viewModel = new ClickCounterViewModel();

    public MyControl()
    {
        InitializeComponent();

        // call _viewModel.IncreaseNumberClicks();
        // on a button click
        MyButton.Click += MyButton_Click!;

        // set the initial value for the label
        SetLabel();

        // trigger the label change on NumberClicks change within the view model
        _viewModel.PropertyChanged += _viewModel_PropertyChanged!;
    }

    // calls SetLabel (to set the Label) when NumberClickStr property changes
    // on the view model
    private void _viewModel_PropertyChanged(object sender, PropertyChangedEventArgs e)
    {
        if (e.PropertyName == nameof(ClickCounterViewModel.NumberClicksStr))
        {
            SetLabel();
        }
    }

    // sets the ClickCounter label's text from the NumberClicksStr property
    private void SetLabel()
    {
        this.ClickCounter.Text = _viewModel.NumberClicksStr;
    }

    // button click handler that calls IncreaseNumberClicks on the view model
    private void MyButton_Click(object sender, EventArgs e)
    {
        _viewModel.IncreaseNumberClicks();
    }
} 现在看看主项目HostingWinFormsDemo。这里最有趣的类是EmbedSample:
public class EmbedSample : NativeControlHost
{
    protected override IPlatformHandle CreateNativeControlCore(IPlatformHandle parent)
    {
        if (RuntimeInformation.IsOSPlatform(OSPlatform.Windows))
        {
            // on Windows, return the win32 handle to MyControl packed
            // as PlatformHandle object
            MyControl myControl = new MyControl();

            return new PlatformHandle(myControl.Handle, "Hndl");
        }

        // otherwise, return default
        return base.CreateNativeControlCore(parent);
    }

    protected override void DestroyNativeControlCore(IPlatformHandle control)
    {
        if (RuntimeInformation.IsOSPlatform(OSPlatform.Windows))
        {

            WinApi.DestroyWindow(control.Handle);

            return;
        }

        base.DestroyNativeControlCore(control);
    }
} EmbedSample是一个Avalonia控件,它派生自NativeControlHost并重写其创建本机控件的CreateNativeControlCore(...)方法,并将本机句柄返回给它(在我们的例子中,它是本机win-forms控件的win32句柄)。
它还包含要调用的DestroyNativeControlCore(...)方法的重写,以便在控件被销毁时清除本机句柄(在本例中为win32句柄)。
该EmbedSample控件通过MainWindow构造函数中的代码连接到窗口的可视化树:
public MainWindow()
{
    InitializeComponent();

    EmbedSample embedSample = new EmbedSample();

    embedSample.HorizontalAlignment = HorizontalAlignment.Stretch;
    embedSample.VerticalAlignment = VerticalAlignment.Stretch;

    // connect the EmbedSample
    MyContentControl.Content = new EmbedSample();
} 请注意,我们将embedSample控件的垂直和水平对齐方式设置为Stretch,因为否则在调整窗口大小时控件将不会填充额外的空间。
Avalonia XAML代码位于MainWindow.xaml文件中:
<Window xmlns="https://github.com/avaloniaui"
        xmlns:x="http://schemas.microsoft.com/winfx/2006/xaml"
        x:Class="HostingWindowsProcessDemo.MainWindow"
        Width="800"
        Height="300"
        Title="HostingWindowsProcessDemo">
    <Grid ColumnDefinitions="*,*">
         <ContentControl x:Name="WpfAppPlacementControl"/>
    </Grid>
</Window> ContentControl将占据窗口Grid面板的左半部分。
static unsafe classWinApi还有将win32 DestroyWindow(...)方法导入C#使其可用于其余功能:
public static unsafe class WinApi
{
    [DllImport("user32.dll", SetLastError = true)]
    public static extern bool DestroyWindow(IntPtr hwnd);
} 此WinApi.DestroyWindow(IntPtr hwnd)方法在EmbedSample.DestronNativeControlCore(...)重写中用于清理本机句柄:
protected override void DestroyNativeControlCore(IPlatformHandle control)
{
    if (RuntimeInformation.IsOSPlatform(OSPlatform.Windows))
    {
        // destroy win32 window
        WinApi.DestroyWindow(control.Handle);

        return;
    }

    base.DestroyNativeControlCore(control);
} 看看主项目文件HostingWinFormsDemo.csproj的XML代码。关于它,有几个要点需要记住:
- 项目的TargetFramework属性设置为net6.0-windows
- (而不是多平台NET6.0)。这意味着生成的代码仅适用于窗口。
- 有一个UseWindowsForms属性设置为true: <UseWindowsForms>true</UseWindowsForms>。这将自动将WinForms库添加到项目中。
- AllowUnsafeBlocks属性也设置为true: <AllowUnsafeBlocks>true</AllowUnsafeBlocks>。这将允许不安全的WinApi类导入Windows代码以在项目内使用。
最后,请注意app.manifest文件。它有一行重要的行:
<!-- Windows 10 and 11-->
<supportedOS Id="{8e0f7a12-bfb3-4fe8-b9a5-48fd50a15a9a}" />如果不取消注释此行,嵌入将无法在Windows 10和11上运行。
关于体系结构的重要说明
为了简化与嵌入本机代码直接相关的说明,上面的示例旨在包含本小节中描述的一些众所周知的体系结构问题。
有关从体系结构角度来看接近完美的示例,请查看下面的体系结构接近最佳架构的Windows和Linux的多目标示例部分。
请注意,为了示例的简单性和清晰度,我们将视图模型类ClickCounterViewModel放入与WinForms控件相同的项目中。一般来说,在处理实际项目时,应避免这样做。所有视图模型都应放置在其自己的纯非可视化多平台.NET项目中。这将避免混合视觉和非可视化代码的多个问题,并且还允许我们例如为不同的平台重用相同的视图模型。
另一个重要的事情是主项目HostingWinFormsDemo有一个单一的目标框架net6.0-windows(因此它只能在Windows上运行)。当我们在各种平台上使用本机控件时,主项目通常被编写为具有多个目标框架——而不是<TargetFramework>,<TagetFrameworks>元素在项目文件中使用,例如
<TargetFrameworks>net6.0;net6.0-windows</TargetFrameworks>示例中的EmbedSample控件直接创建WinForms MyControl控件——请参阅以下代码:
if (RuntimeInformation.IsOSPlatform(OSPlatform.Windows))
{
    // on Windows, return the win32 handle to MyControl packed
    // as PlatformHandle object
    MyControl myControl = new MyControl();

    return new PlatformHandle(myControl.Handle, "Hndl");
} 事实上,我们应该用更通用的东西代替EmbedSample控制,它不依赖于特定的嵌入式可视化实现。
主项目HostingWinFormsDemo直接依赖于winforms项目MyWinFormsControl,该项目基本上包含演示的视图。通常,为了分离关注点,最好使用动态加载和IoC容器来加载视图,有时也用于加载视图模型,以便可以独立开发、调试和测试外壳和视图。
简单的WPF示例
下一个示例演示如何将一个简单的WPF控件嵌入到Avalonia中。
解决方案是HostingWpfControlDemo/HostingWpfControlDemo/HostingWpfControlDemo.sln。
设置HostingWpfControlDemo为解决方案的启动项目,编译并运行示例,如下所示:

它的行为与上面的Winforms应用程序的行为完全相同——它在按钮上方显示按钮单击次数。
在描述项目的代码和体系结构时,我们将强调WinForms示例的差异,以避免重复。
WPF视图是在MyWpfControl视图和ClickCounterViewModel视图模型类的帮助下在WpfControl项目中生成的。
MyWpfControl.xaml 文件使用绑定和行为(来自Microsoft.Xaml.Behaviors.Wpf包引用)将TextBlock的Text和按钮的Click操作绑定到视图模型上定义的相应属性和方法。
<UserControl x:Class="WpfControl.MyWpfUserControl"
             xmlns="http://schemas.microsoft.com/winfx/2006/xaml/presentation"
             xmlns:x="http://schemas.microsoft.com/winfx/2006/xaml"
             xmlns:i="http://schemas.microsoft.com/xaml/behaviors">
    <Grid Background="LightGray">
        <StackPanel HorizontalAlignment="Center"
                    VerticalAlignment="Center">
            <TextBlock Text="{Binding Path=NumberClicksStr}"
                       HorizontalAlignment="Center"
                       Margin="20"/>

            <Button HorizontalAlignment="Center"
                    Padding="10,5"
                    Content="ClickMe">
                <i:Interaction.Triggers>
                    <i:EventTrigger EventName="Click">
                        <!-- Call the method IncreaseNumberClicks() on the view model-->
                        <i:CallMethodAction TargetObject="{Binding}"
                                            MethodName="IncreaseNumberClicks" />
                    </i:EventTrigger>
                </i:Interaction.Triggers>
            </Button>
        </StackPanel>
    </Grid>
</UserControl> 视图的DataContext属性分配给 MyWpfUserControl.xaml.cs 代码隐藏文件中(在视图的构造函数中)中的ClickCounterViewModel类型对象:
public partial class MyWpfUserControl : UserControl
{
    public MyWpfUserControl()
    {
        InitializeComponent();

        DataContext = new ClickCounterViewModel();
    }
} 与主项目HostWpfControlDemo中的上一个示例的主要变化是EmbedSample的内容。WPF控件不是win32对象,并且它们没有win32句柄。因此,我们将WPF控件置于WinForms ElementHost的控件(具有win32句柄)中。下面是该CreateNativeControlCore(...)方法的结果代码:
protected override IPlatformHandle CreateNativeControlCore(IPlatformHandle parent)
{
    if (RuntimeInformation.IsOSPlatform(OSPlatform.Windows))
    {
        // create the WPF view
        MyWpfUserControl myControl = new MyWpfUserControl();

        // use ElementHost to produce a win32 Handle for embedding
        ElementHost elementHost = new ElementHost();

        elementHost.Child = myControl;

        return new PlatformHandle(elementHost.Handle, "Hndl");
    }
    return base.CreateNativeControlCore(parent);
} 相应地,主csproj文件具有两个标志UseWindowsForms和UseWPF设置为true:
<UseWindowsForms>true</UseWindowsForms>
<UseWPF>true</UseWPF>简单的Linux示例
原始Linux示例位于HostingLinuxControlDemo\HostingLinuxControlDemo\HostingLinuxControlDemo.sln 解决方案中。使用微软的WSL,可以在Windows 10和11上运行和调试它。占位符详细描述了如何执行此操作。在Windows 11上,您仍然必须从sourceforge.com安装VcSrv,按照本文中描述的相同方式配置和启动它。
创建HostLinuxControlDemo项目——解决方案中的启动项目。
之后,将调试目标切换到WSL:
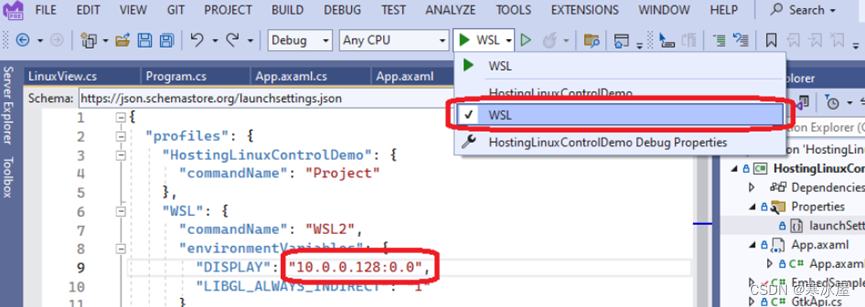
打开launchSettings.json文件,并在WSL2下更改其WSL/environmentVariable/DISPLAY值以匹配计算机的IP地址,如在适用于Linux的Windows子系统(WSL)上运行和调试多平台.NET(.NET Core、.NET5和.NET6)GUI和控制台应用程序
。
生成并运行应用程序。将启动以下应用程序:
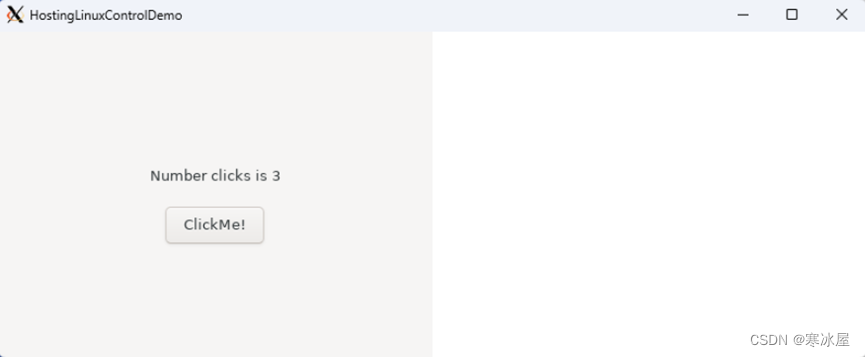
单击该按钮将增加按钮上方显示的点击次数。
我们的视图模型——ClickCounterViewModel与前面的示例完全相同。
LinuxView本身是使用GtkSharp——围绕Linux gtk功能的C#面向对象的包装器构建的。代码非常简单,我不会详细解释它,因为我们最关心的是嵌入。
在我们的主项目中有两个有趣的文件:EmbedSample.cs和GtkApi.cs。
GtkApi类导入了我们需要的两个Linux方法:
public static class GtkApi
{
    private const string GdkName = "libgdk-3.so.0";
    private const string GtkName = "libgtk-3.so.0";
    [DllImport(GdkName)]
    // return the X11 handle for the linux window
    public static extern IntPtr gdk_x11_window_get_xid(IntPtr window);

    [DllImport(GtkName)]
    // destroys the gtk window
    public static extern void gtk_widget_destroy(IntPtr gtkWidget);
} 我们的EmbedSample类使用这两个方法。gdk_x11_window_get_xid用于将X11句柄返回到我们需要用于嵌入Linux视图的窗口,而gtk_widget_destroy——在最后销毁Linux窗口。
这是EmbedSample代码:
public class EmbedSample : NativeControlHost
{
    private IntPtr? WidgetHandleToDestroy { get; set; }

    protected override IPlatformHandle CreateNativeControlCore(IPlatformHandle parent)
    {
        if (RuntimeInformation.IsOSPlatform(OSPlatform.Linux))
        {

            return GtkInteropHelper.RunOnGlibThread(() =>
            {
                // create the linux view
                LinuxView linuxView = new LinuxView();

                // store the widget handle for the window to destroy at the end
                WidgetHandleToDestroy = linuxView.Handle;

                // get Xid from Gdk window
                IntPtr xid = GtkApi.gdk_x11_window_get_xid(linuxView.Window.Handle);

                return new PlatformHandle(xid, "Xid");
            }).Result;
        }
        return base.CreateNativeControlCore(parent);
    }

    protected override void DestroyNativeControlCore(IPlatformHandle control)
    {
        if (RuntimeInformation.IsOSPlatform(OSPlatform.Linux))
        {
            GtkInteropHelper.RunOnGlibThread(() =>
            {
                if (WidgetHandleToDestroy != null)
                {
                    // destroy the widget handle of the window
                    GtkApi.gtk_widget_destroy(WidgetHandleToDestroy.Value);
                    WidgetHandleToDestroy = null;
                }
                return 0;
            }).Wait();

            return;
        }

        base.DestroyNativeControlCore(control);
    }
} 请注意,与Linux的所有交互都是在Avalonia的Avalonia.X11.Interop.GtkInterlopHelper.RunOnGlibThread(...)方法允许我们访问的特殊线程中进行的。
另请注意,这两个项目的TargetFramework是net6.0(与前面的示例中net6.0-windows不同)。
适用于Windows和Linux的多目标示例
此示例的代码位于 HostingNativeDemo/HostingNativeDemo/HostingNativeDemo.sln 解决方案下。
本演示的目的是展示如何在同一解决方案中组合Linux和WPF视图。主要解决方案是相应的多目标——它将net6.0用于Linux和将net6.0-windows用于Windows。
该示例以最直接的方式创建——其体系结构未优化。在下一小节中,我们将展示一个以相同方式工作的演示,但具有更好的架构、更好的关注点分离和更少的特定于平台的代码。
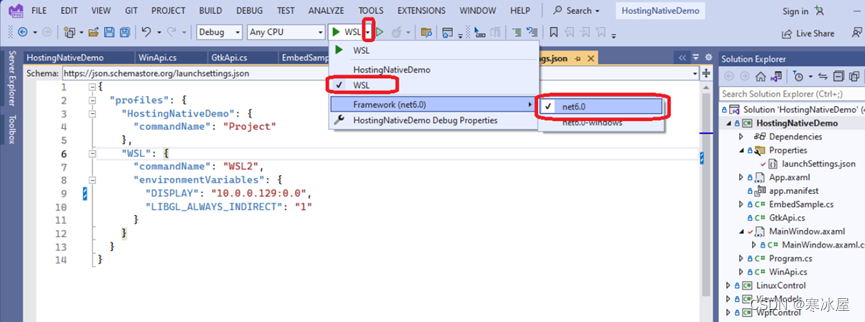
首先,编译并运行Windows的主解决方案。为此,首先选择要成为“HostingNativeDemo”的目标和net6.0-windows框架:
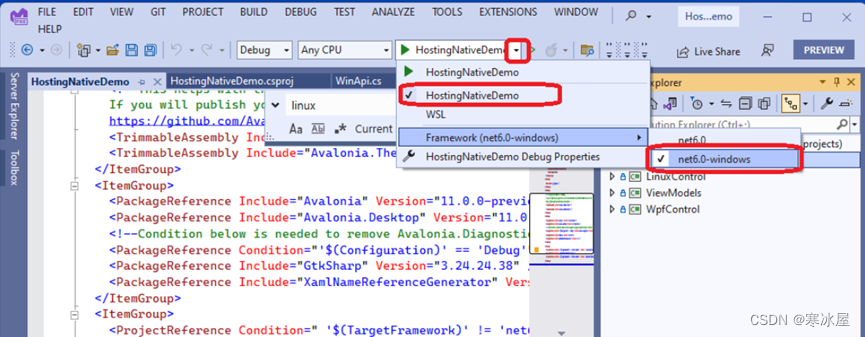
HostingNativeDemo成为启动项目并重建它,然后运行它。你会看到一个熟悉的画面:
现在通过选择WSL目标和net6.0框架切换到Linux:
重新生成主项目。同时启动VcSrv服务器,并在Properties/launchSettings.json文件中将变量DISPLAY设置为当前IP地址,如在适用于Linux的Windows子系统(WSL)上运行和调试多平台.NET(.NET Core、.NET5和.NET6)GUI和控制台应用程序。
运行该项目,您将拥有一个带有Linux文本和按钮的Linux窗口:

现在看一下代码。解决方案中有四个项目:
- HostingNativeDemo——主要项目
- WpfControl——承载WPF控件的项目(视图)
- LinuxView——托管Linux视图的项目
- ViewModels——托管WPF和Linux项目的视图模型的项目
对于本机WPF和本机Linux项目,我们唯一的新东西是,与前面的小节不同,视图模型(我们已经熟悉ClickCoutnerViewModel)在其自己的平台不可知的项目中被分解出来,以便它可以在Windows和Linux中重用。所有特定于平台的代码都与前面讨论的WPF和Linux示例中的代码完全相同。
需要解释的新代码仅在主项目中。
看看 HostingNativeDemo.csproj 项目文件。你可以看到它有很多语句,条件是框架是net6.0或net6.0-windows,例如
<PropertyGroup Condition=" '$(TargetFramework)' == 'net6.0-windows' " >
    <UseWindowsForms>true</UseWindowsForms>
    <UseWPF>true</UseWPF>
</PropertyGroup>
也是:
<PackageReference Condition=" '$(TargetFramework)' != 'net6.0-windows'
 " Include="GtkSharp" Version="3.24.24.38" />
和:
<ProjectReference Condition=" '$(TargetFramework)' != 'net6.0-windows'
 " Include="..\LinuxControl\LinuxControl.csproj" />
<ProjectReference Condition=" '$(TargetFramework)' == 'net6.0-windows'
" Include="..\WpfControl\WpfControl.csproj" /> 所有这些条件语句的目的是选择Windows(当目标框架为net6.0-windows)和Linux(当目标框架为net6.0时)所需的依赖项。
文件WinApi.cs和GtkApi.cs包含的功能类似于以前的Windows和Linux示例中的相同命名文件,只是它们的内容包装在预处理器条件中,仅在针对Windows或Linux编译时显示。以下是WinApi.cs文件的内容(仅在为Windows编译时才显示):
namespace HostingNativeDemo
{
// Only compile the class when WINDOWS is defined.
#if WINDOWS
    public static unsafe class WinApi
    {
        [DllImport("user32.dll", SetLastError = true)]
        public static unsafe extern bool DestroyWindow(IntPtr hwnd);
    }
#endif
}
以下是 GtkApi.cs 文件的内容(仅在为Linux编译时显示):
namespace HostingNativeDemo
{
// Only compile the class when WINDOWS is not defined.
#if !WINDOWS
    public static unsafe class GtkApi
    {
        private const string GdkName = "libgdk-3.so.0";
        private const string GtkName = "libgtk-3.so.0";
        [DllImport(GdkName)]
        // return the X11 handle for the linux window
        public static extern IntPtr gdk_x11_window_get_xid(IntPtr window);

        [DllImport(GtkName)]
        // destroys the gtk window or widget
        public static extern void gtk_widget_destroy(IntPtr gtkWidget);
    }
#endif
} 其他重要的更改在文件EmbedSample.cs中。它到处都有预处理器条件。基本上,预处理器条件确保它的工作方式与Windows下的WPF示例中的类和Linux下的Linux示例中的EmbedSample类完全相同:
#if WINDOWS
using System.Windows.Forms.Integration;
using ViewModels;
using WpfControl;
#else
using LinuxControl;
using Avalonia.X11.Interop;
#endif

...

public class EmbedSample : NativeControlHost
{
#if !WINDOWS
    private IntPtr? WidgetHandleToDestroy { get; set; }
#endif

    protected override IPlatformHandle CreateNativeControlCore(IPlatformHandle parent)
    {
#if WINDOWS
        if (RuntimeInformation.IsOSPlatform(OSPlatform.Windows))
        {

            MyWpfUserControl control = new MyWpfUserControl();
            control.DataContext = new ClickCounterViewModel();

            ElementHost host = new ElementHost{ Child = control };

            return new PlatformHandle(host.Handle, "Ctrl");

        }
#else
        if (RuntimeInformation.IsOSPlatform(OSPlatform.Linux))
        {
            return GtkInteropHelper.RunOnGlibThread(() =>
            {
                // create the linux view
                LinuxView linuxView = new LinuxView();

                // store the widget handle for the window to destroy at the end
                WidgetHandleToDestroy = linuxView.Handle;

                // get Xid from Gdk window
                IntPtr xid = GtkApi.gdk_x11_window_get_xid(linuxView.Window.Handle);

                return new PlatformHandle(xid, "Xid");
            }).Result;

        }
#endif

        return base.CreateNativeControlCore(parent);
    }

    protected override void DestroyNativeControlCore(IPlatformHandle control)
    {
#if WINDOWS
        if (RuntimeInformation.IsOSPlatform(OSPlatform.Windows))
        {
            // destroy the win32 window
            WinApi.DestroyWindow(control.Handle);

            return;
        }
#else
        if (RuntimeInformation.IsOSPlatform(OSPlatform.Linux))
        {
            GtkInteropHelper.RunOnGlibThread(() =>
            {
                if (WidgetHandleToDestroy != null)
                {
                    // destroy the widget handle of the window
                    GtkApi.gtk_widget_destroy(WidgetHandleToDestroy.Value);
                    WidgetHandleToDestroy = null;
                }
                return 0;
            }).Wait();

            return;
        }
#endif

        base.DestroyNativeControlCore(control);
    }
} 适用于Windows和Linux的多目标示例,体系结构接近最佳
使用shell和视图构建简介
前面的示例(与上面的其他示例相同)的目的是突出显示与Avalonia托管Windows和Linux本机控件(视图)相关的功能。我们牺牲了架构来实现嵌入的清晰度。
在此示例中,我们将实现与上一个示例(具有Windows和Linux目标的应用程序)相同的目标,但以实际项目中应有的方式优化其体系结构。特别:
- 我们的主要项目(模仿Shell)将不依赖于本机视图。相反,主项目应使用IoC容器动态加载本机视图。
- 我们将使用NativeEmbeddingControl和HandleBuilder类,而不是特定于控件的EmbedSample (记住它实际上是创建本机控件),它们将完全与视图无关,并可用于不同的本机视图。。
- 我们假设我们的本机视图是在某些项目中提供给我们的,这些项目由其他一些应用程序使用,不应修改。相应地,为了使它们的功能适应我们的IoC容器和动态加载,我们创建了两个非常简单的适配器项目——一个用于Linux,另一个用于Windows本机项目。
- 视图模型在其自己的非可视化多平台项目中分解出来(这在前面的示例中已经完成)。
- 模仿Shell的主项目几乎没有目标框架条件代码。99%的此类代码位于可重用的PolyFills项目中。
示例的代码结构概述
该示例位于HostingNativeWithIoCDemo/HostingNativeWithIoCDemo/HostingNativeWithIoCDemo.sln 解决方案下。启动项目是HostingNativeWithIoCDemo.csproj。
下面是解决方案资源管理器中显示的所有项目和解决方案文件夹:
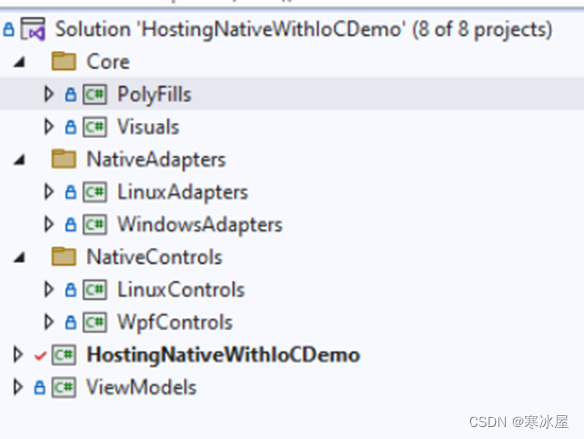
以下是所有项目和文件夹的说明(为简单起见,我排除了对多平台Avalonia项目的引用)。
1、HostingNativeWithIoCDemo是模仿命令行管理程序的启动项目。这取决于Core文件夹中的可重用项目。它还引用了我非常简单但功能强大的IoC包 NP.IoCy。下面将解释所有简单的IoCy调用。最重要的是,对于关注点分离,它不依赖于特定于平台的视图。通常,命令行管理程序不应了解视图或视图模型(特定于或不特定于平台)。
它的net6.0-windows目标取决于Microsoft.Xaml.Behavior.Wpf包(我使用ICommand而不是在单击按钮时调用视图模型方法)。我需要它,因为IoCy程序集解析程序仍然无法在不先将其加载到Shell中的情况下自动解析动态加载项目中的nuget包。此功能即将进入IoCy,然后shell将完全与目标无关。
2、核心文件夹包含两个(可能)可重用的视觉项目:
- PolyFills——包含几乎所有平台相关代码的项目。
- Visuals——包含可重用的NativeEmbeddingControl项目。此项目取决于PolyFills项目。
3、NativeControls 文件夹包含两个具有本机视图的项目:
- LinuxControls包含类LinuxView
- WpfControls包含类MyWpfUserControl
这两个本机类与前面示例中介绍的Linux和WPF本机控件(视图)完全相同。
4、ViewModels项目包含视图模型(我们已经熟悉以前的ClickCounterViewModel示例)在两个平台上重复使用。该项目是100%非可视化和多平台的(因此每个平台100%可重用)。
5、NativeAdapters 文件夹包含本机控件的IoCy适配器。适配器的目的是使本机视觉对象适应IoC容器。本机视图/控件通常被认为是不可修改的,因为它们可能用于不同的项目。潜在地,将视图合并到shell中的团队甚至可能没有它们的源代码,只能将它们用作nuget包。
这两个项目都依赖于一个微小但有用的NP.Utilities包,该包为IoCy提供属性(它们不需要整个IoCy,只需要属性)。此外,这两个项目都依赖于PolyFills项目(以允许它们创建PlatformHandle对象)。
-
- LinuxAdapters项目包含LinuxView类的适配器(具有IoCy属性的工厂方法)。它引用了LinuxControls项目。
- WindowsAdapters项目包含MyWpfUserControl类的适配器。它引用了WpfControls项目。
下面将给出Adapters的代码的详细信息。
下图显示了项目依赖项。关系图上的箭头从项referenceD目指向引用它的项目。源代码项目有一个粗体框架,而nuget包有一个更薄的框架:

有关生成和运行示例的说明
启动项目和本机控件(及其适配器)之间没有直接依赖关系。因此,您必须独立于启动项目HostingNativeWithIoCDemo构建(或更好地重新构建)NativeAdapters文件夹。每个适配器项目的生成后事件会将其发布(DLL和PDF)文件复制到与Adapter项目同名的目录中:
<main-proj-output-folder>\Plugins\Views 假设根文件夹是包含HostingNativeWithIoCDemo.sln解决方案文件的文件夹(同一文件夹还包含HostingNativeWithIoCDemo.csproj项目文件),LinuxAdapters项目的发布内容将被复制到新创建的
<root-folder>\bin\Debug\net6.0\Plugins\Views\LinuxAdapters 文件夹中,而WindowsAdapters发布内容将被复制到:
<root-folder>\bin\Debug\net6.0-windows\Plugins\Views\WindowsAdapters文件夹。在尝试运行启动项目之前,请确保这些文件夹已填充且是最新的。
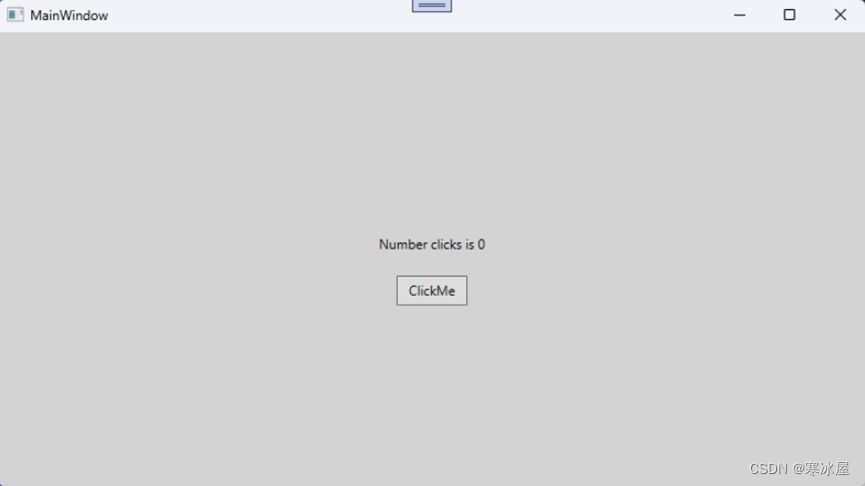
除了上面的说明之外,运行此项目应该与运行上一个示例中的项目完全相同(对于Windows和Linux)——适用于Windows和Linux的多目标示例。不要忘记运行VcSrv并更新Linux环境的Properties/launchSettings.json文件中的DISPLAY变量。
生成的应用程序将显示与上一示例中完全相同的布局和行为。
关于守则的血腥细节
本机控件和视图模型的代码与前面示例中的代码完全相同。因此,我们将主要关注以下两个主题:
- IoCy用于存储、创建、动态加载和使用视图作为容器创建、依赖项注入、动态加载对象的相关代码。
- 可重用的代码,用于创建和销毁要作为本机对象嵌入到Avalonia可视化树中的IPlatformHandle对象。
IoCy相关代码
看看NativeAdapters/WindowsAdapters项目下的WindowsControlsIoCFactory类。项目名称的多个(WindowsAdapters,不是WindowsAdapter,暗示可以放置多个Windows本机控件(或视图)适配器(尽管这里我们只使用一个)。这是代码:
[HasRegisterMethods]
public static class WindowsControlsIoCFactory
{
    [RegisterMethod(typeof(IPlatformHandle), resolutionKey: "ThePlatformHandle")]
    public static IPlatformHandle? CreateView()
    {
        // create the Windows native WPF control
        MyWpfUserControl control = new MyWpfUserControl();

        // assign its data context to our view model
        control.DataContext = new ViewModels.ClickCounterViewModel();

        // use the method from PolyFill project to create
        return HandleBuilder.BuildHandle(control);
    }
} 属性[HasRegisterMethods]和[RegisterMethod(...)]来自对NP.DependencyInjection包的引用。
[HasRegisterMethods]类属性意味着该类中有一些用于创建Container对象的IoCy工厂方法。这将使在注入程序集(DLL)中搜索这样的类变得更容易——而不是检查每个public类中的每个方法,我们首先检查public类,然后只在[HasRegisterMethods]属性标记的类中搜索工厂方法。
现在看一下返回IPlatformHandle?对象的CreateView()方法的RegisterMethod(...)属性:
[RegisterMethod(typeof(IPlatformHandle), resolutionKey: "ThePlatformHandle")]
public static IPlatformHandle? CreateView()
{
   ...
}属性的第一个参数——typeof(IPlatformHandle)使容器验证对象是否确实属于该类型。
参数resolutionKey可以是(与type属性一起)唯一标识容器内IoC对象创建单元的任何对象。最好(但不是必需)在所有容器对象(而不仅仅是相同创建类型的对象)中使用唯一的名称或枚举值。我们将对象称为“ClickCounterView”。
请注意,还有一个我们没有使用的重要参数——isSingleton——通过将其设置为true,您可以创建一个单例对象。我们不需要它(因为无论如何,每个视图在可视化树中只使用一次,不能在可视化树中的两个不同位置使用)。
现在看看NativeAdapters/LinuxAdapters项目中的LinuxControlsIoCFactory:
[HasRegisterMethods]
public static class LinuxControlsIoCFactory
{
    [RegisterMethod(typeof(IPlatformHandle),  resolutionKey: "ClickCounterView")]
    public static IPlatformHandle? CreateView()
    {
        // HandleBuilder.BuildObjAndHandle will run the LinuxView
        // and IPlatformHandle creation code
        return HandleBuilder.BuildObjAndHandle(() => new LinuxView());
    }
} 代码非常相似,只是我们调用return HandleBuilder.BuildObjAndHandle(() => new LinuxView());来创建并为LinuxView返回IPlatformHandle对象。我们使用不同方法的原因是,LinuxView()构造函数以及所有相关操作都需要在GtkInteropHelper.RunOnGlibThread(...)HandleBuilder.BuildObjAndHandle(...)提供的特殊Avalonia线程中完成。 确保所有LinuxView相关操作都在该线程中完成。
现在,我将介绍如何IoCy向容器注入包含视图的程序集,以及主项目如何检索View对象。
看看 项目HostingNativeWithIoCDemo下的App.axaml.cs文件。我们将IoCContainer定义为一个static属性,程序集注入和容器创建在其OnFrameworkInitializationCompleted()方法中完成:
public partial class App : Application
{
    ...

    public static IDependencyInjectionContainer Container { get; }

    public override void OnFrameworkInitializationCompleted()
    {
         var containerBuilder = new ContainerBuilder();

        // Assembly injection
        containerBuilder.InjectPluginsFromSubFolders($"Plugins{Path.DirectorySeparatorChar}Views");

        // build the container.
        Container = containerBuilder.Build();

        ...
    }
} 请注意,我们正在从主项目可执行目录下的“Plugins/Views”文件夹中的所有子文件夹中注入代码。这是PostBuild事件复制所有本机适配器发布文件的位置。
创建句柄并使用句柄生成可视化树的代码位于MainWindow.axaml.cs文件中,作为MainWindow()构造函数的一部分:
public MainWindow()
{
    InitializeComponent();

    // create the embedSample control
    NativeEmbeddingControl embedSample = new NativeEmbeddingControl();

    // create the platform handle from the container.
    IPlatformHandle? platformHandle =
            App.Container.Resolve<IPlatformHandle?>("ClickCounterView");

    // assign the embedSample handle to platformHandle
    embedSample.Handle = platformHandle;

    // set the Content of MyContentControl to be embedSample object.
    MyContentControl.Content = embedSample;
} 用于创建和销毁IPlatformHandle对象的可重用代码
此代码位于两个项目中,位于 Core 文件夹下的PolyFills和Visuals。
视觉项目仅包含一个控件NativeEmbeddingControl——该控件继承自Avalonia的NativeControlHost。它有一个Avalonia的StyledProperty Handle(类似于WPF的DependencyProperty)。它还覆盖了NativeControlHost的两个方法:CreateNativeControlCore(...)和DestroyNativeControlCore(...):
public class NativeEmbeddingControl : NativeControlHost
{
   ...

    protected override IPlatformHandle CreateNativeControlCore(IPlatformHandle? parent)
    {
        if (Handle != null)
        {
            // if handle property is not null, return it
            return Handle;
        }

        // otherwise call method of the base class
        return base.CreateNativeControlCore(parent!);
    }

    protected override void DestroyNativeControlCore(IPlatformHandle? handle)
    {
        // call extension method HandleBuilder.DestroyHandle() of PolyFill project
        handle.DestroyHandle();
    }
} PolyFill项目吸收了在Windows和Linux实现之间进行选择的复杂性。它的类WinApi和GtkApi导入创建和销毁本机IPlatformHandle对象所需的本机Windows和Linux方法。它们与前面示例的相同命名类完全相同。
最复杂的类是HandleBuilder。它都充斥着预处理器#if , #else和#endif方向。它包含用于从WinForm,WPF或GtkSharp控件构建(和销毁)IPlatformHandle对象的实现。
HandleBuilder大多数代码与前面的示例相同。唯一的区别是仅为Linux创建的ControlWrapper类。它实现了IPlatformHandle接口+ Destroy()方法的INativeControlHostDestroyableControlHandle。原因是在Linux小部件的情况下,返回IPlatformHandle的接口需要具有X11窗口句柄,而在销毁窗口时,应该在窗口的Gtk句柄上调用gtk_widget_destroy(...)。因此,我们必须保留两个句柄——Gtk窗口句柄和X11窗口句柄。在上面的示例中,我们添加了private IntPtr? WidgetHandleToDestroy { get; set; }到EmbedSample类作为第二个句柄。在这里,我们希望保持我们的NativeEmbeddingControl漂亮、干净和平台独立;因此,我们创建了一个更复杂的ControlWrapper类型的IPlatformHandle对象,该对象保留这两个句柄并在需要时销毁正确的句柄(类似于在Avalonia示例中完成的方式)。
显示作为Avalonia中的本机进程运行的Windows本机应用程序
最有趣的例子留到最后。打开HostingWindowsProcessDemo/HostingWindowsProcessDemo/HostingWindowsProcessDemo.sln 解决方案。它包含两个项目——主项目HostingWindowsProcessDemo和另一个项目WpfApp。有趣的部分是WpfApp它是一个独立的WPF应用程序,而不是一个DLL。您可以使其成为启动项目并在没有主项目的情况下运行它。它将显示已经熟悉的点击计数器视图:
现在,使HostingWindowsProcessDemo项目成为解决方案中的启动项目。重建WpfApp项目;其“生成后”事件将把它复制到以下位置:
<HostingWindowsProcessDemo-localtion>/bin/Debug/net6.0-windows/AppsToHost/WpfApp文件夹。
现在生成并运行HostingWindowsProcessDemo项目。它将启动自己的窗口MainWindow,然后它也将启动WpfApp应用程序并将WpfAppWindow的窗口放在其主窗口的左半部分:
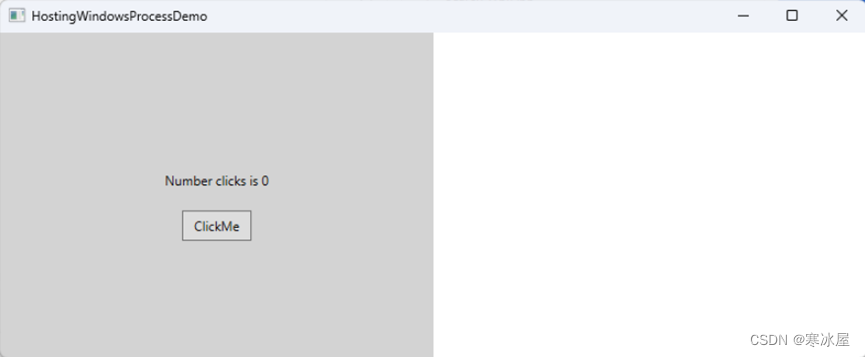
仍在单独进程中运行的单独应用程序实例 WpfApp.exe可视地成为主窗口的一部分!!!
实现它的代码集中在HostingWindowsProcessDemo项目的两个文件中——MainWindow.axaml.cs和EmbeddedProcessWindow.cs文件。
MainWindow.axaml.cs 文件定义了以下功能:
public partial class MainWindow : Window
{
    // path to WpfApp.exe
    public const string WpfAppProcessPath = @"AppsToHost\WpfApp\WpfApp.exe";

    public MainWindow()
    {
        InitializeComponent();

        // handle Opened event for the window
        this.Opened += MainWindow_Opened;
    }

    private async void MainWindow_Opened(object? sender, System.EventArgs e)
    {
        // create EmbeddedProcessWindow object passing the path to it
        var wpfAppEmbeddedProcessWindow =
            new EmbeddedProcessWindow(WpfAppProcessPath);

        // start the process and wait for the process'
        // MainWindowHandle to get populated
        await wpfAppEmbeddedProcessWindow.StartProcess();

        // assign the wpfAppEmbeddedProcessWindow to the
        // content control in the left half of the MainWindow
        WpfAppPlacementControl.Content = wpfAppEmbeddedProcessWindow;
    }
} 下面是EmbeddedProcessWindow类的代码:
public class EmbeddedProcessWindow : NativeControlHost
{
    public string ProcessPath;
    private Process _p;

    public IntPtr ProcessWindowHandle { get; private set; }

    public EmbeddedProcessWindow(string processPath)
    {
        ProcessPath = processPath;
    }

    public async Task StartProcess()
    {
        // start the process
        Process p = Process.Start(ProcessPath);

        _p = p;

        _p.Exited += _p_Exited;

        // wait until p.MainWindowHandle is non-zero
        while (true)
        {
            await Task.Delay(200);

            if (p.MainWindowHandle != (IntPtr)0)
                break;
        }

        // set ProcessWindowHandle to the MainWindowHandle of the process
        ProcessWindowHandle = p.MainWindowHandle;
    }

    protected override void OnAttachedToVisualTree(VisualTreeAttachmentEventArgs e)
    {
        // set the parent of the ProcessWindowHandle to be the main window's handle
        WinApi.SetParent(ProcessWindowHandle,
               ((Window) e.Root).PlatformImpl.Handle.Handle);

        // modify the style of the child window

        // get the old style of the child window
        long style = WinApi.GetWindowLongPtr(ProcessWindowHandle, -16);

        // modify the style of the ChildWindow - remove the embedded window's
        // frame and other attributes of a stand alone window.
        // Add child flag
        style &= ~0x00010000;
        style &= ~0x00800000;
        style &= ~0x80000000;
        style &= ~0x00400000;
        style &= ~0x00080000;
        style &= ~0x00020000;
        style &= ~0x00040000;
        style |= 0x40000000; // child

        HandleRef handleRef =
            new HandleRef(null, ProcessWindowHandle);

        // set the new style of the schild window
        WinApi.SetWindowLongPtr(handleRef, -16, (IntPtr)style);

        base.OnAttachedToVisualTree(e);
    }

    protected override IPlatformHandle CreateNativeControlCore(IPlatformHandle parent)
    {
        if (RuntimeInformation.IsOSPlatform(OSPlatform.Windows))
        {
            // return the ProcessWindowHandle
            return new PlatformHandle(ProcessWindowHandle, "ProcWinHandle");
        }
        else
        {
            return base.CreateNativeControlCore(parent);
        }
    }

    private void _p_Exited(object? sender, System.EventArgs e)
    {

    }
} EmbeddedProcessWindow继承自NativeControlHost。它在其构造函数中接收可执行文件的路径:
public string ProcessPath { get; }

...

public EmbeddedProcessWindow(string processPath)
{
    ProcessPath = processPath;
}然后在它的async void StartProcess()中,它等到Process的MainWindowHandle属性收到进程的主窗口的Handle(变为非零)并将其分配给ProcessWindowHandle属性:
public async Task StartProcess()
{
    // start the process
    Process p = Process.Start(ProcessPath);

    _p = p;

    _p.Exited += _p_Exited;

    // wait until p.MainWindowHandle is non-zero
    while (true)
    {
        await Task.Delay(200);

        if (p.MainWindowHandle != (IntPtr)0)
            break;
    }

    // set ProcessWindowHandle to the MainWindowHandle of the process
    ProcessWindowHandle = p.MainWindowHandle;
} 然后在EmbeddedProcessWindow控件附加到主窗口的可视化树后,它修改其窗口样式(删除窗口框架和按钮,使窗口——子窗口等),并通过调用WinApi.SetParent(...)方法将其父级设置为主窗口:
protected override void OnAttachedToVisualTree(VisualTreeAttachmentEventArgs e)
{
    // modify the style of the child window

    // get the old style of the child window
    long style = WinApi.GetWindowLongPtr(ProcessWindowHandle, -16);

    // modify the style of the ChildWindow - remove the embedded window's frame,
    // buttons, etc. and other attributes of a stand alone window.
    // Add child flag
    style &= ~0x00010000;
    style &= ~0x00800000;
    style &= ~0x80000000;
    style &= ~0x00400000;
    style &= ~0x00080000;
    style &= ~0x00020000;
    style &= ~0x00040000;
    style |= 0x40000000; // child

    HandleRef handleRef =
        new HandleRef(null, ProcessWindowHandle);

    // set the new style of the schild window
    WinApi.SetWindowLongPtr(handleRef, -16, (IntPtr)style);

    // set the parent of the ProcessWindowHandle to be the main window's handle
    WinApi.SetParent(ProcessWindowHandle,
                    ((Window)e.Root).PlatformImpl.Handle.Handle);

    base.OnAttachedToVisualTree(e);
} 最后,NativeControlHost.CreateNativeControlCore(...)的覆盖将返回new PlatformHandle(ProcessWindowHandle, "ProcWinHandle");(ProcessWindowHandle之前已在OnAttachedToVisualTree(...)中设置):
protected override IPlatformHandle CreateNativeControlCore(IPlatformHandle parent)
{
    if (RuntimeInformation.IsOSPlatform(OSPlatform.Windows))
    {
        // return the ProcessWindowHandle
        return new PlatformHandle(ProcessWindowHandle, "ProcWinHandle");
    }
    else
    {
        return base.CreateNativeControlCore(parent);
    }
}
结论
在本文中,我提供了嵌入Windows和Linux视图/控件的Avalonia应用程序的简单而详细的示例。它从演示如何嵌入WinForms,WPF和GtkSharp应用程序的简单应用程序开始。
然后,我提供了两个示例,演示如何使同一应用程序在Windows上嵌入WPF控件,并在Linux上嵌入类似的Linux控件。第一个示例非常简单地突出了本机嵌入功能,而第二个示例演示了嵌入具有接近最佳体系结构的本机视图(视图和主项目是独立的,视图由IoC容器创建)。
最后一个示例演示如何将来自不同WPF进程的窗口嵌入到Avalonia应用程序中。最后一个示例仅针对Windows(10和11)构建,因为我在弄清楚如何从Linux上的进程句柄获取窗口X11 ID时遇到问题。如果时间允许,我会弄清楚,然后我将添加另一个部分来描述如何从不同的进程嵌入本机Linux窗口。
https://www.codeproject.com/Articles/5348155/Embedding-Native-Windows-and-Linux-Views-Controls


 881
881

 被折叠的 条评论
为什么被折叠?
被折叠的 条评论
为什么被折叠?
 到【灌水乐园】发言


