


准备
- 配置开发环境,详见上一篇帖子内容
- 下载mxVision用户指南一份 https://www.hiascend.com/document/detail/zh/30rc3/download
- 打开项目中的main.py文件,平复一下激动的心情
代码阅读
-
Init stream manager
    streamManagerApi = StreamManagerApi()
    ret = streamManagerApi.InitManager()
    if ret != 0:
        print("Failed to init Stream manager, ret=%s" % str(ret))
        exit()
初始化了一个流管理器,并判断是否执行成功,参见文档:

-
create stream
    pipeline_path = b"./pipeline/facial_expression_recognition.pipeline"
    ret = streamManagerApi.CreateMultipleStreamsFromFile(pipeline_path)
    if ret != 0:
        print("Failed to create Stream, ret=%s" % str(ret))
        exit()
首先制定了pipeline配置文件的路径,然后根据文件创建stream,参见文档:

后缀名为pipeline的文件是配置文件,可以用上述API创建业务流,pipeline文件在MindStudio中可以进行可视化编辑(拖拽,连线)。文档中提到,用代码也可以创建stream,类似UE中的C++与蓝图,我没有深入研究

-
input data
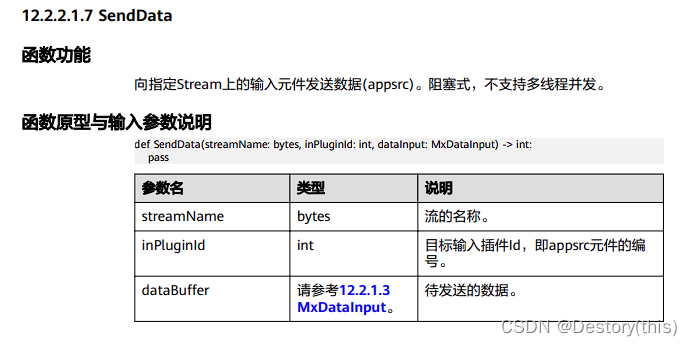
    img_path = "image/img_casestudy_static_20211220.jpg"
    dataInput = MxDataInput()
    try:
        with open(img_path, 'rb') as f:
            dataInput.data = f.read()
    except:
        print("No such image")
        exit()

    ret = streamManagerApi.SendData(streamName, inPluginId, dataInput)
    if ret < 0:
        print("Failed to send data to stream")
        exit()
MxDataInput保存了读取到的图像数据,作为输入
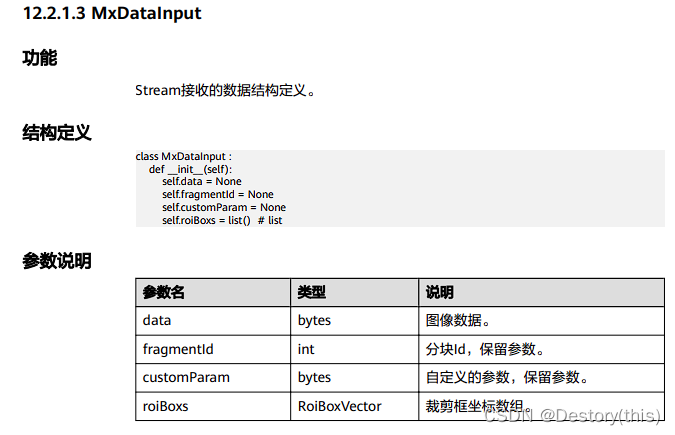
获取到数据后,发送到stream上的输入元件上
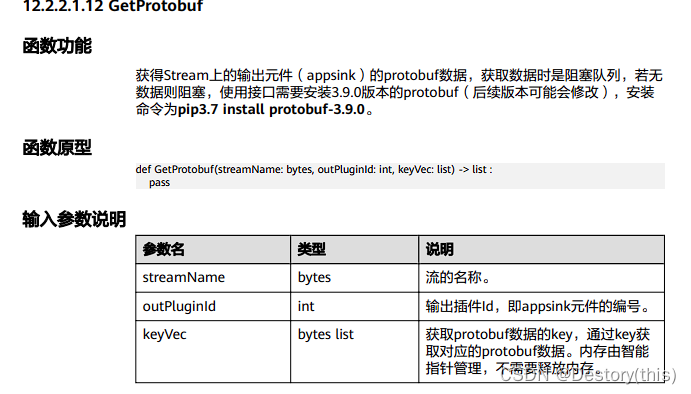
4. get ouput
keyVec = StringVector()
keyVec.push_back(b"mxpi_imagedecoder0") # 0.解码原图
keyVec.push_back(b"mxpi_distributor0_0") # 1.人脸位置
keyVec.push_back(b"mxpi_tensorinfer1") # 2.情绪分类结果
infer_result = streamManagerApi.GetProtobuf(streamName, 0, keyVec)

if infer_result.size() == 0:
    print("infer_result is null")
    exit()
if infer_result.size() < 3:
    print("No area of the face was detected in the picture")
    exit()
GetProtobuf用来获取输出元件上的数据,参见:
这里已经是取得运行结果了(三个值mxpi_imagedecoder0、mxpi_distributor0_0、mxpi_tensorinfer1),和我看了文档预期的需要调用GetResult方法不一致,那我改一行试试
	output = streamManagerApi.GetResult(streamName, 0)
    print(output.errorCode)
    print(output.data.hex())
结果不出意料的没什么用,data是两个字节,值分别为0x7b、0x7d,不理解
-
show result and release
下面就是根据结果绘制人脸锚框和表情标签(opencv基础,不做赘述)
	img = get_decoded_img(infer_result[0].messageBuf)
    face_locations = get_face_locations(infer_result[1].messageBuf)
    emotion_results = get_emotion_results(infer_result[2].messageBuf)

    for face_loc, emo in zip (face_locations, emotion_results):
        max_index = np.argmax(np.frombuffer(emo.tensorVec[0].dataStr, dtype = np.float32))

        y0 = face_loc.y0
        x0 = face_loc.x0
        y1 = face_loc.y1
        x1 = face_loc.x1
        height = y1 - y0
        width = x1 - x0
        cv2.rectangle(img, (int(x0), int(y0)), (int(x1), int(y1)), (255, 0, 0), 2)
        cv2.putText(img, emotions[max_index], (int(x0), int(y0) - 1), cv2.FONT_HERSHEY_COMPLEX, 1, (255, 255, 0), 2)

    cv2.imwrite("./my_result.jpg", img)
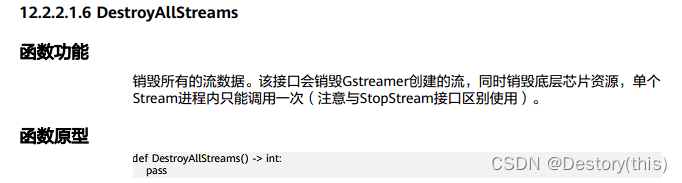
最后
streamManagerApi.DestroyAllStreams()


 1371
1371


 被折叠的 条评论
为什么被折叠?
被折叠的 条评论
为什么被折叠?
 到【灌水乐园】发言


