


文章目录
2.0 JDBC
2.1 配置单数据源
项目一:尝试Spring Boot自动装配数据源
创建
- 访问https://start.spring.io/
- 增加Spring Boot Actuator(健康检查、beans),H2 Database(H2数据库驱动),JDBC API(简化JDBC使用),Lombok(@Slf4j、@Data),Spring Web依赖(访问actuator)。
package com.example.demo;

import ch.qos.logback.classic.Logger;
import lombok.extern.slf4j.Slf4j;
import org.springframework.beans.factory.annotation.Autowired;
import org.springframework.boot.CommandLineRunner;
import org.springframework.boot.SpringApplication;
import org.springframework.boot.autoconfigure.SpringBootApplication;

import javax.sql.DataSource;
import java.sql.Connection;
import java.sql.SQLException;

@SpringBootApplication
@Slf4j   // lombok
@Order(value = 2)
public class DemoApplication implements CommandLineRunner {

	@Autowired   // 先根据类型查找,再根据名称查找
	private DataSource dataSource;

	public static void main(String[] args) {
		SpringApplication.run(DemoApplication.class, args);
	}

	/**
	 * CommandLineRunner接口的run方法会在Spring Beans都初始化之后,
	 * SpringApplication.run() 之前执行,适合应用程序启动之初的数据初始化工作。
	 * 也可以用ApplicationRunner接口,只是run方法的参数是ApplicationArguments对象
	 * 可以用@Order(value = 1)指定执行顺序
	 */
	@Override
	public void run(String... args) throws Exception {
		showConnection();
	}

	private void showConnection() throws SQLException {
		log.info("====================================================");
		log.info(dataSource.toString());
		Connection conn = dataSource.getConnection();
		log.info("====================================================");
		log.info(conn.toString());
		conn.close();
	}
}
package com.example.SingleDataSource1;

import lombok.extern.slf4j.Slf4j;
import org.springframework.boot.CommandLineRunner;
import org.springframework.core.annotation.Order;
import org.springframework.stereotype.Component;

@Component
@Order(value = 1)
@Slf4j
public class AAA implements CommandLineRunner {
    public void run(String... args) {
        log.info("AAAAAAAAAAAAAAAAAAAAAAAAAAAAAAAAAAAAAAAAAAAAA");
    }
}
查看应用程序有哪些bean
访问(安装JSON Viewer插件):
http://localhost:8080/actuator/beans
"dataSource": {
          "aliases": [

          ],
          "scope": "singleton",
          "type": "com.zaxxer.hikari.HikariDataSource",
          "resource": "class path resource [org/springframework/boot/autoconfigure/jdbc/DataSourceConfiguration$Hikari.class]",
          "dependencies": [
            "org.springframework.boot.autoconfigure.jdbc.DataSourceConfiguration$Hikari",
            "spring.datasource-org.springframework.boot.autoconfigure.jdbc.DataSourceProperties"
          ]
        }
原理
spring-boot-starter-actuator会引入spring-boot-starter。
spring-boot-starter会引入spring-boot-autoconfigure。
spring-boot-autoconfigure中的org.springframework.boot.autoconfigure.jdbc.DataSourceConfiguration类会自动注入HikariDataSource。
问题
如何添加修改数据源的配置
如何手动配置数据源
如何配置多个数据源
项目二:SpringMVC手动配置数据源
配置依赖
<?xml version="1.0" encoding="UTF-8"?>
<project xmlns="http://maven.apache.org/POM/4.0.0"
         xmlns:xsi="http://www.w3.org/2001/XMLSchema-instance"
         xsi:schemaLocation="http://maven.apache.org/POM/4.0.0 http://maven.apache.org/xsd/maven-4.0.0.xsd">
    <modelVersion>4.0.0</modelVersion>

    <groupId>geektime.spring.data</groupId>
    <artifactId>pure-spring-datasource-demo</artifactId>
    <version>1.0-SNAPSHOT</version>

    <properties>
        <spring.version>5.1.3.RELEASE</spring.version>
    </properties>

    <dependencies>
        <dependency>
            <groupId>org.springframework</groupId>
            <artifactId>spring-context</artifactId>
            <version>${spring.version}</version>
        </dependency>
        <dependency>
            <groupId>com.h2database</groupId>
            <artifactId>h2</artifactId>
            <version>RELEASE</version>
            <scope>runtime</scope>
        </dependency>
        <dependency>
            <groupId>org.apache.commons</groupId>
            <artifactId>commons-dbcp2</artifactId>
            <version>RELEASE</version>
        </dependency>
        <dependency>
            <groupId>org.springframework</groupId>
            <artifactId>spring-jdbc</artifactId>
            <version>${spring.version}</version>
        </dependency>
    </dependencies>
</project>
可以选择在配置文件中写bean
<bean id="dataSource" class="org.apache.commons.dbcp2.BasicDataSource"
      destroy-method="close">
    <property name="driverClassName" value="org.h2.Driver"/>
    <property name="url" value="jdbc:h2:mem:testdb"/>
    <property name="username" value="SA"/>
    <property name="password" value="SA"/>
</bean>
或者用java代码生成
package geektime.spring.data.datasourcedemo;

import org.apache.commons.dbcp2.BasicDataSourceFactory;
import org.springframework.beans.factory.annotation.Autowired;
import org.springframework.context.ApplicationContext;
import org.springframework.context.annotation.Bean;
import org.springframework.context.annotation.Configuration;
import org.springframework.context.support.ClassPathXmlApplicationContext;
import org.springframework.jdbc.datasource.DataSourceTransactionManager;
import org.springframework.transaction.PlatformTransactionManager;
import org.springframework.transaction.annotation.EnableTransactionManagement;

import javax.sql.DataSource;
import java.sql.Connection;
import java.sql.SQLException;
import java.util.Arrays;
import java.util.Properties;

// 标识为配置类,相当于<beans></beans>,用于创建多个bean,类本身也会作为bean
@Configuration
// 在SpringBoot启动类上加上@EnableTransactionManagement 开启事务的注解
// service包下的实现类中的方法上面加上@Transactional
@EnableTransactionManagement
public class DataSourceDemo {
    @Autowired
    private DataSource dataSource;

    /* 配置数据源 */
    @Bean(destroyMethod = "close")
    public DataSource dataSource() throws Exception {
        Properties properties = new Properties();
        properties.setProperty("driverClassName", "org.h2.Driver");
        properties.setProperty("url", "jdbc:h2:mem:testdb");
        properties.setProperty("username", "sa");
        return BasicDataSourceFactory.createDataSource(properties);
    }

    /* 事务管理 */
    @Bean
    public PlatformTransactionManager transactionManager() throws Exception {
        return new DataSourceTransactionManager(dataSource());
    }

    public void showDataSource() throws SQLException {
        System.out.println(dataSource.toString());
        Connection conn = dataSource.getConnection();
        System.out.println(conn.toString());
        conn.close();
    }

    public static void main(String[] args) throws SQLException {
        ApplicationContext applicationContext =
                new ClassPathXmlApplicationContext("applicationContext*.xml");
        showBeans(applicationContext);
        dataSourceDemo(applicationContext);
    }

    private static void showBeans(ApplicationContext applicationContext) {
        System.out.println(Arrays.toString(applicationContext.getBeanDefinitionNames()));
    }

    private static void dataSourceDemo(ApplicationContext applicationContext) throws SQLException {
        DataSourceDemo demo = applicationContext.getBean("dataSourceDemo", DataSourceDemo.class);
        demo.showDataSource();
    }
}
Spring Boot自动装配原理与数据源相关配置


项目三:尝试Spring Boot自动装配+参数配置
SpringBoot默认采⽤资源根⽬录下schema.sql⽂件进⾏创建表的初始化,使⽤data.sql进⾏插⼊初始化数据的⼯作。
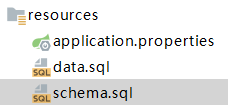
data.sql:
INSERT INTO FOO (ID, BAR) VALUES (1, 'aaa');
INSERT INTO FOO (ID, BAR) VALUES (2, 'bbb');
schema.sql:
CREATE TABLE FOO (ID INT IDENTITY, BAR VARCHAR(64));
配置文件:
spring.datasource.url=jdbc:h2:mem:tested
spring.datasource.username=root
spring.datasource.password=123456

spring.datasource.hikari.maximum-pool-size=5
spring.datasource.hikari.minimum-idle=5
spring.datasource.hikari.idleTimeout=600000
spring.datasource.hikari.connectionTimeout=30000
spring.datasource.hikari.maxLifetime=1800000

#------初始化内嵌数据库(springboot不配置以下内容,也会自动加载以下配置)-------
spring.datasource.initialization-mode=always
# 指定Schema (DDL)脚本
spring.datasource.schema=classpath:schema.sql
# 指定Data (DML)脚本
spring.datasource.data=classpath:data.sql
# 指定schema要使用的Platform
spring.datasource.platform=h2

# 是否启用h2控制台
spring.h2.console.enabled=true
# 配置h2控制台访问地址,http://localhost:8080/h2
spring.h2.console.path=/h2
package geektime.spring.data.datasourcedemo;

import lombok.extern.slf4j.Slf4j;
import org.springframework.beans.factory.annotation.Autowired;
import org.springframework.boot.CommandLineRunner;
import org.springframework.boot.SpringApplication;
import org.springframework.boot.autoconfigure.SpringBootApplication;
import org.springframework.jdbc.core.JdbcTemplate;

import javax.sql.DataSource;
import java.sql.Connection;
import java.sql.SQLException;
import java.util.List;
import java.util.Map;
import java.util.Set;

@SpringBootApplication
@Slf4j
public class DataSourceDemoApplication implements CommandLineRunner {
	@Autowired
	private DataSource dataSource;

	@Autowired
	private JdbcTemplate jdbcTemplate;

	public static void main(String[] args) {
		SpringApplication.run(DataSourceDemoApplication.class, args);
	}

	@Override
	public void run(String... args) throws Exception {
		showConnection();
		showData();
	}

	private void showConnection() throws SQLException {
		log.info(dataSource.toString());
		Connection conn = dataSource.getConnection();
		log.info(conn.toString());
		conn.close();
	}

	private void showData() {
		List<Map<String, Object>> maps = jdbcTemplate.queryForList("SELECT * FROM FOO");
		log.info("========================================================");
		for (Map m : maps) {
			log.info("" + m);
		}
//				.forEach(row -> log.info(row.toString()));
	}
}
2.2.配置多数据源
(1)不同数据源的配置要分开(即使数据源之间有很多配置是相同的)
(2)告诉系统、对应的设施(事务,ORM)使用哪个DataSource
1.排除Spring Boot依赖,使用Spring手工配置两组DataSource
pom.xml
<?xml version="1.0" encoding="UTF-8"?>
<project xmlns="http://maven.apache.org/POM/4.0.0" xmlns:xsi="http://www.w3.org/2001/XMLSchema-instance"
	xsi:schemaLocation="http://maven.apache.org/POM/4.0.0 https://maven.apache.org/xsd/maven-4.0.0.xsd">
	<modelVersion>4.0.0</modelVersion>

	<groupId>com.example</groupId>
	<artifactId>DoubleDataSource1</artifactId>
	<version>0.0.1-SNAPSHOT</version>


	<properties>
		<spring.version>5.1.3.RELEASE</spring.version>
	</properties>

	<dependencies>
		<dependency>
			<groupId>org.springframework</groupId>
			<artifactId>spring-context</artifactId>
			<version>${spring.version}</version>
		</dependency>
		<dependency>
			<groupId>org.springframework</groupId>
			<artifactId>spring-jdbc</artifactId>
			<version>${spring.version}</version>
		</dependency>

		<dependency>
			<groupId>org.apache.commons</groupId>
			<artifactId>commons-dbcp2</artifactId>
			<version>RELEASE</version>
		</dependency>
		<dependency>
			<groupId>com.h2database</groupId>
			<artifactId>h2</artifactId>
			<version>RELEASE</version>
			<scope>runtime</scope>
		</dependency>
	</dependencies>

</project>
applicationContext.xml
<?xml version="1.0" encoding="UTF-8"?>
<beans xmlns="http://www.springframework.org/schema/beans"
       xmlns:xsi="http://www.w3.org/2001/XMLSchema-instance"
       xmlns:context="http://www.springframework.org/schema/context"
       xsi:schemaLocation="http://www.springframework.org/schema/beans
        http://www.springframework.org/schema/beans/spring-beans.xsd
        http://www.springframework.org/schema/context
        http://www.springframework.org/schema/context/spring-context.xsd">

    <context:component-scan base-package="com.example" />
</beans>
package com.example.DoubleDataSource1;

import org.apache.commons.dbcp2.BasicDataSourceFactory;
import org.springframework.beans.factory.annotation.Autowired;
import org.springframework.context.ApplicationContext;
import org.springframework.context.annotation.Bean;
import org.springframework.context.annotation.Configuration;
import org.springframework.context.support.ClassPathXmlApplicationContext;
import org.springframework.jdbc.datasource.DataSourceTransactionManager;
import org.springframework.transaction.PlatformTransactionManager;
import org.springframework.transaction.annotation.EnableTransactionManagement;

import javax.sql.DataSource;
import java.sql.Connection;
import java.sql.SQLException;
import java.util.Arrays;
import java.util.Properties;

@Configuration
@EnableTransactionManagement
public class DoubleDataSource1Application {
	@Autowired
	@Qualifier("dataSource1")  // 当多个bean类名冲突,名字无法判断时,根据指定的别名注入
	DataSource dataSource;

	@Bean(destroyMethod = "close")
	public DataSource dataSource1() throws Exception {
		Properties properties = new Properties();
		properties.setProperty("driverClassName", "org.h2.Driver");
		properties.setProperty("url", "jdbc:h2:mem:testdb1");
		properties.setProperty("username", "sa");
		return BasicDataSourceFactory.createDataSource(properties); // dbcp
	}

	@Bean(destroyMethod = "close")
	public DataSource dataSource2() throws Exception {
		Properties properties = new Properties();
		properties.setProperty("driverClassName", "org.h2.Driver");
		properties.setProperty("url", "jdbc:h2:mem:testdb2");
		properties.setProperty("username", "sa");
		return BasicDataSourceFactory.createDataSource(properties); // dbcp
	}

	@Bean
	public PlatformTransactionManager transactionManager1() throws Exception {
		return new DataSourceTransactionManager(dataSource1());
	}

	@Bean
	public PlatformTransactionManager transactionManager2() throws Exception {
		return new DataSourceTransactionManager(dataSource2());
	}

	public void showDataSource1() throws SQLException {
		System.out.println(dataSource1.toString());
		Connection conn = dataSource1.getConnection();
		System.out.println(conn.toString());
		conn.close();
	}

	public void showDataSource2() throws SQLException {
		System.out.println(dataSource2.toString());
		Connection conn = dataSource2.getConnection();
		System.out.println(conn.toString());
		conn.close();
	}

	public static void main(String[] args) throws Exception {
		ApplicationContext applicationContext =
				new ClassPathXmlApplicationContext("applicationContext*.xml");
		showBeans(applicationContext);
		dataSourceDemo(applicationContext);
	}

	private static void showBeans(ApplicationContext applicationContext) {
		System.out.println(Arrays.toString(applicationContext.getBeanDefinitionNames()));
	}

	private static void dataSourceDemo(ApplicationContext applicationContext) throws SQLException {
		DoubleDataSource1Application demo = applicationContext.getBean("doubleDataSource1Application", DoubleDataSource1Application.class);
	}
}
2.与SpringBoot结合
SpringBoot的自动配置多数都是针对只有一个DataSource的,所以我在课程中提了,要么给主要的DataSource Bean增加@Primary注解,要么就把几个自动配置类排除掉。
(1)配置@Primary类型的Bean(两个Bean有主次之分)
(2)排除Spring Boot的自动配置,通过spring-boot-autoconfigure手动构建数据源(没有主次之分)(与使用Sring手动配置相比优点是:参数写在properties里,同一套代码使用多个数据库连接池)
package com.example.DoubleDataSource2;

import com.zaxxer.hikari.HikariConfig;
import com.zaxxer.hikari.HikariDataSource;
import lombok.extern.slf4j.Slf4j;
import org.apache.commons.dbcp2.BasicDataSource;
import org.springframework.beans.factory.annotation.Autowired;
import org.springframework.boot.CommandLineRunner;
import org.springframework.boot.SpringApplication;
import org.springframework.boot.autoconfigure.SpringBootApplication;
import org.springframework.boot.autoconfigure.jdbc.DataSourceAutoConfiguration;
import org.springframework.boot.autoconfigure.jdbc.DataSourceTransactionManagerAutoConfiguration;
import org.springframework.boot.autoconfigure.jdbc.JdbcTemplateAutoConfiguration;
import org.springframework.jdbc.core.JdbcTemplate;

import java.sql.Connection;
import java.sql.SQLException;

@SpringBootApplication(exclude = { DataSourceAutoConfiguration.class,
		DataSourceTransactionManagerAutoConfiguration.class,
		JdbcTemplateAutoConfiguration.class})
@Slf4j
public class DoubleDataSource2Application implements CommandLineRunner {

	@Autowired
	HikariDataSource fooDataSource;

	@Autowired
	BasicDataSource barDataSource;

	@Autowired
	RuoYiConfig ruoYiConfig;

	public static void main(String[] args) {
		SpringApplication.run(DoubleDataSource2Application.class, args);
	}

	@Override
	public void run(String... args) throws Exception {
		showConnection();
	}

	public void showConnection() throws SQLException {
		log.info("============================================开始");
		log.info(fooDataSource.toString());
		log.info("poolname:" + fooDataSource.getPoolName());
		Connection conn1 = fooDataSource.getConnection();
		log.info(conn1.toString());
		conn1.close();
		log.info("============================================");
		log.info(barDataSource.toString());
		log.info("username:" + barDataSource.getUsername());
		Connection conn2 = barDataSource.getConnection();
		log.info(conn2.toString());
		conn2.close();
		log.info("============================================");
		log.info("" + ruoYiConfig.getName() + "," + ruoYiConfig.getVersion());
		log.info("============================================结束");
	}
}
package com.example.DoubleDataSource2;

import com.zaxxer.hikari.HikariDataSource;
import lombok.extern.slf4j.Slf4j;
import org.apache.commons.dbcp2.BasicDataSource;
import org.springframework.boot.autoconfigure.jdbc.DataSourceProperties;
import org.springframework.boot.context.properties.ConfigurationProperties;
import org.springframework.context.annotation.Bean;
import org.springframework.context.annotation.Configuration;
import org.springframework.jdbc.core.JdbcTemplate;
import org.springframework.jdbc.datasource.DataSourceTransactionManager;
import org.springframework.transaction.PlatformTransactionManager;

import javax.annotation.Resource;
import javax.sql.DataSource;

@Configuration
@Slf4j
public class DataSourceConfig {

    @Bean
    @ConfigurationProperties("foo.datasource")
    public DataSourceProperties fooDataSourceProperties() {
        return new DataSourceProperties();
    }

    @Bean
    @ConfigurationProperties("spring.datasource.hikari")
    public HikariDataSource fooDataSource() {
        DataSourceProperties dataSourceProperties = fooDataSourceProperties();
        return dataSourceProperties.initializeDataSourceBuilder().type(HikariDataSource.class).build();
    }

    @Bean
    @Resource
    public PlatformTransactionManager fooTxManager(DataSource fooDataSource) {
        return new DataSourceTransactionManager(fooDataSource);
    }

    @Bean
    @Resource
    public JdbcTemplate foojdbcTemplate(DataSource fooDataSource) {
        return new JdbcTemplate(fooDataSource);
    }


    @Bean
    @ConfigurationProperties("bar.datasource")
    public DataSourceProperties barDataSourceProperties() {
        return new DataSourceProperties();
    }

    @Bean
    @ConfigurationProperties("spring.datasource.dbcp2")
    public BasicDataSource barDataSource() {
        DataSourceProperties dataSourceProperties = barDataSourceProperties();
        return dataSourceProperties.initializeDataSourceBuilder().type(BasicDataSource.class).build();
    }

    @Bean
    @Resource
    public PlatformTransactionManager barTxManager(DataSource barDataSource) {
        return new DataSourceTransactionManager(barDataSource);
    }

    @Bean
    @Resource
    public JdbcTemplate barjdbcTemplate(DataSource barDataSource) {
        return new JdbcTemplate(barDataSource);
    }
}
使用@ConfigurationProperties(prefix = “ruoyi”)从配置文件获取参数
package com.example.DoubleDataSource2;

import org.springframework.boot.context.properties.ConfigurationProperties;
import org.springframework.stereotype.Component;

@Component
@ConfigurationProperties(prefix = "ruoyi")
public class RuoYiConfig
{
    public String name;

    public String version;

    public String getName() {
        return name;
    }

    public void setName(String name) {
        this.name = name;
    }

    public String getVersion() {
        return version;
    }

    public void setVersion(String version) {
        this.version = version;
    }
}
management.endpoints.web.exposure.include=*
spring.output.ansi.enabled=ALWAYS

foo.datasource.url=jdbc:h2:mem:foo
foo.datasource.username=sa
foo.datasource.password=123456
spring.datasource.hikari.poolName=hikari-aaaa

bar.datasource.url=jdbc:h2:mem:bar
bar.datasource.username=Root
bar.datasource.password=123456
spring.datasource.dbcp2.userName=Root

ruoyi.name = Han
ruoyi.version = 1.1.0
增加dbcp2依赖
<dependency>
	<groupId>org.apache.commons</groupId>
	<artifactId>commons-dbcp2</artifactId>
	<version>RELEASE</version>
</dependency>
留言
Bean简单来讲就是由Spring容器创建并托管的实例。
@Resource是说我这个方法的参数要按照名字来注入其他的Bean。
2.3 HikariCP(日语:光)
HikariCP为什么快
(1)字节码级别优化(很多方法通过JavaAssist生成)。
(2)大量的小改进。用FastStatementList代替ArrayList,无锁集合ConcurrentBag,代理类的优化(用invokestatic代替了invokervirtual)
Spring Boot 2.x 自动配置HikariCP作为数据源的源码
Spring Boot 1.x 默认使用Tomcat连接池,因此需要移除tomcat-jdbc依赖,同时引入HikariCP依赖,spring.datasource.type=com.zaxxer.hikari.HikariDataSource指定数据源类型
Spring Boot 2.x 默认使用 HikariCP。配置 spring.datasource.hikari.*
查看spring-boot-autoconfigure2.6.7.jar 中 DataSourceConfiguration.class源码
@Configuration(proxyBeanMethods = false)
// class Path中有HikariDataSource.class
@ConditionalOnClass({HikariDataSource.class})
// Spring上下文中没有配置DataSource的Bean
@ConditionalOnMissingBean({DataSource.class})
@ConditionalOnProperty(
    name = {"spring.datasource.type"},
    havingValue = "com.zaxxer.hikari.HikariDataSource",
    matchIfMissing = true
)
static class Hikari {
    Hikari() {
    }

    @Bean
    @ConfigurationProperties(
        prefix = "spring.datasource.hikari"
    )
    HikariDataSource dataSource(DataSourceProperties properties) {
        HikariDataSource dataSource = (HikariDataSource)DataSourceConfiguration.createDataSource(properties, HikariDataSource.class);
        if (StringUtils.hasText(properties.getName())) {
            dataSource.setPoolName(properties.getName());
        }

        return dataSource;
    }
}
常用HikariCP配置参数
spring.datasource.url=jdbc:h2:mem:tested
spring.datasource.username=root
spring.datasource.password=123456

spring.datasource.hikari.maximum-pool-size=10
spring.datasource.hikari.minimum-idle=10
spring.datasource.hikari.idle-timeout=600000
spring.datasource.hikari.connection-timeout=30000
spring.datasource.hikari.max-lifetime=1800000
留言
数据库连接池应该设多大?
连接数 = ((核心数 * 2) + 有效磁盘数)
https://zhuanlan.zhihu.com/p/133996025
利用@ConfigurationProperties将属性的赋值放到配置文件中
https://blog.csdn.net/u014486725/article/details/124090043
https://blog.csdn.net/YooFale/article/details/84869869
2.4 Alibaba Druid
详细的监控
ExceptionSorter,针对主流数据库的返回码都有支持
SQL防注入
内置加密配置
众多拓展点,方便进行定制
项目一:手动配置Druid数据源
导入依赖
<dependency>
	<groupId>com.alibaba</groupId>
	<artifactId>druid-spring-boot-starter</artifactId>
	<version>1.1.10</version>
</dependency>
创建Druid数据源bean
package com.example.DruidDemo;

import com.alibaba.druid.pool.DruidDataSource;
import com.alibaba.druid.spring.boot.autoconfigure.DruidDataSourceBuilder;
import org.springframework.context.annotation.Bean;
import org.springframework.context.annotation.Configuration;
import org.springframework.jdbc.core.JdbcTemplate;

import javax.annotation.Resource;

@Configuration
public class DruidConfig {

    @Bean(name = "druidDataSource")
    public DruidDataSource druidDataSource() {
        DruidDataSource dataSource = DruidDataSourceBuilder.create().build();
        dataSource.setUrl("jdbc:h2:mem:foo");
        dataSource.setUsername("Sa");
        dataSource.setPassword("n/z7PyA5cvcXvs8px8FVmBVpaRyNsvJb3X7YfS38DJrIg25EbZaZGvH4aHcnc97Om0islpCAPc3MqsGvsrxVJw==");

        dataSource.setInitialSize(5);
        dataSource.setMaxActive(5);
        dataSource.setMinIdle(5);

        return dataSource;
    }

    @Bean(name = "jdbcTemplate")
    @Resource
    public JdbcTemplate jdbcTemplate(DruidDataSource druidDataSource) {
        return new JdbcTemplate(druidDataSource);
    }
}
package com.example.DruidDemo;

import com.alibaba.druid.pool.DruidDataSource;
import com.alibaba.druid.spring.boot.autoconfigure.DruidDataSourceAutoConfigure;
import lombok.extern.slf4j.Slf4j;
import org.springframework.beans.factory.annotation.Autowired;
import org.springframework.boot.CommandLineRunner;
import org.springframework.boot.SpringApplication;
import org.springframework.boot.autoconfigure.SpringBootApplication;
import org.springframework.boot.autoconfigure.jdbc.DataSourceAutoConfiguration;
import org.springframework.boot.autoconfigure.jdbc.DataSourceTransactionManagerAutoConfiguration;
import org.springframework.boot.autoconfigure.jdbc.JdbcTemplateAutoConfiguration;
import org.springframework.boot.context.properties.ConfigurationProperties;
import org.springframework.context.annotation.Bean;
import org.springframework.jdbc.core.JdbcTemplate;

import javax.sql.DataSource;
import java.sql.Connection;

@SpringBootApplication(exclude = DruidDataSourceAutoConfigure.class)
@Slf4j
public class DruidDemoApplication implements CommandLineRunner {

	@Autowired
	DruidDataSource druidDataSource;

	@Autowired
	private JdbcTemplate jdbcTemplate;

	public static void main(String[] args) {
		SpringApplication.run(DruidDemoApplication.class, args);
	}

	@Override
	public void run(String... args) throws Exception {
		log.info("=========================================");
		log.info(druidDataSource.getUrl());
		log.info(druidDataSource.getUsername());
		log.info(druidDataSource.getPassword());
		log.info("" +druidDataSource.getInitialSize());
		log.info("" + druidDataSource.getMaxActive());
		log.info("" + druidDataSource.getMinIdle());
		log.info(druidDataSource.toString());  // 没有创建
		DruidPooledConnection connection = druidDataSource.getConnection();
		log.info(druidDataSource.toString());  // 第一次使用的时候Druid会自己调用init()
	}
}
项目二:druid-spring-boot-starter自动配置
spring-boot-autoconfigure不支持对druid自动配置
<dependency>
	<groupId>org.springframework.boot</groupId>
	<artifactId>spring-boot-starter-jdbc</artifactId>
	<exclusions>
		<exclusion>  // 排除HikariCP
			<artifactId>HikariCP</artifactId>
			<groupId>com.zaxxer</groupId>
		</exclusion>
	</exclusions>
</dependency>

<dependency>
	<groupId>com.alibaba</groupId>
	<artifactId>druid-spring-boot-starter</artifactId>
	<version>1.1.10</version>
</dependency>
@SpringBootApplication
@Slf4j
public class DruidDemoApplication implements CommandLineRunner {

	@Autowired
	DataSource dataSource;

	@Autowired
	private JdbcTemplate jdbcTemplate;

	public static void main(String[] args) {
		SpringApplication.run(DruidDemoApplication.class, args);
	}

	@Override
	public void run(String... args) throws Exception {
		log.info("=========================================");
		log.info(dataSource.toString());
	}
}
Druid Filter
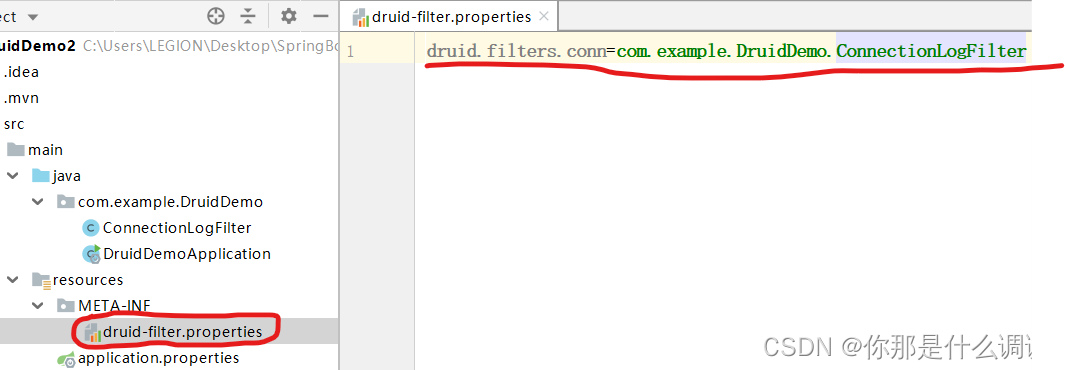
- 用于定制连接池操作的各种环节
- 可以继承FilterEventAdapter以便方便地实现Filter
- 在resources目录下增加META-INF/druid-filter.properties文件(配置filter类地址和对应地名称)
@Slf4j
public class ConnectionLogFilter extends FilterEventAdapter {  // 继承FilterEventAdapter

    @Override
    // 连接前打日志
    public void connection_connectBefore(FilterChain chain, Properties info) {
        log.info("BEFORE CONNECTION!");
    }

    @Override
    // 连接后打日志
    public void connection_connectAfter(ConnectionProxy connection) {
        log.info("AFTER CONNECTION!");
    }
}
spring.output.ansi.enabled=ALWAYS

spring.datasource.url=jdbc:h2:mem:foo
spring.datasource.username=sa

# 密码加密
spring.datasource.druid.filter.config.enabled=true
// 加密后地密码
spring.datasource.password=n/z7PyA5cvcXvs8px8FVmBVpaRyNsvJb3X7YfS38DJrIg25EbZaZGvH4aHcnc97Om0islpCAPc3MqsGvsrxVJw==
// 解密用的公钥
spring.datasource.druid.connection-properties=config.decrypt=true;config.decrypt.key=${public-key}
// 公钥
public-key=MFwwDQYJKoZIhvcNAQEBBQADSwAwSAJBALS8ng1XvgHrdOgm4pxrnUdt3sXtu/E8My9KzX8sXlz+mXRZQCop7NVQLne25pXHtZoDYuMh3bzoGj6v5HvvAQ8CAwEAAQ==

# Filter配置
# conn是自己实现地filter, config可以实现密码加解密功能, stat统计功能, 日志通过slf4j输出
spring.datasource.druid.filters=conn,config,stat,slf4j

# SQL防注入
spring.datasource.druid.filter.wall.enabled=true
spring.datasource.druid.filter.wall.db-type=h2
spring.datasource.druid.filter.wall.config.delete-allow=false   // 不能做删除操作
spring.datasource.druid.filter.wall.config.drop-table-allow=false    // 不能做删表操作

# 连接池属性
spring.datasource.druid.initial-size=5
spring.datasource.druid.max-active=5
spring.datasource.druid.min-idle=5

# 做检查
spring.datasource.druid.test-on-borrow=true
spring.datasource.druid.test-on-return=true
spring.datasource.druid.test-while-idle=true

# 配置可执行sql
spring.datasource.druid.filter.slf4j.enabled=true
spring.datasource.druid.filter.slf4j.statementExecutableSqlLogEnable=true
# 把druid.sql的日志级别设置为DEBUG
logging.level.druid.sql=debug
Druid密码加密解密
String password = "123456";
String[] arr = ConfigTools.genKeyPair(512);   // 获取私钥密钥
LOG.debug("privateKey:" + arr[0]);
LOG.debug("publicKey:" + arr[1]);
LOG.debug("password:" + ConfigTools.encrypt(arr[0], password));   // 用私钥对密码加密
https://vimsky.com/examples/detail/java-class-com.alibaba.druid.filter.config.ConfigTools.html
2.5 数据库连接池的选择
可靠性
性能
功能(SQL防注入)
可运维性(密码加密)
可拓展性(服务追踪中,执行SQL前打印TraceId和SpanId)
其他
2.6 Spring的JDBC操作类
spring-jdbc
- core,JdbcTemplete等相关核心接口和类(RowMapper)
- datasource,数据源相关的辅助类
- object,将基本的JDBC操作封装成对象
- support,错误码等其他辅助工具
通过注解定义Bean
- @Componet 通用的Bean
- @Repository 对数据库的操作
- @Service 对业务的服务
- @Controller
- @RestController 方便开发RESTFUL Web Service
简单的JDBC操作
JdbcTemplete
- query
- queryForObject
- queryForList
- queryForMap
- update 插入、删除、修改
- execute 通用方法
NamedParameterJdbcTemplate
在使用JdbcTemplate的使用实例中,SQL语句中的参数占位符都是?,当参数只有一个的时候,也许我们看不出什么问题,但是,当参数有了多个,很容易搞错参数的赋值顺序。
为了解决这个问题,Spring JDBC提供了NamedParameterJdbcTemplate,使用命名化的参数来替代原先的问号占位符。
项目代码
配置数据源参数
management.endpoints.web.exposure.include=health,beans

spring.datasource.url=jdbc:h2:mem:tested
spring.datasource.username=root
spring.datasource.password=123456

spring.datasource.hikari.maximum-pool-size=5
spring.datasource.hikari.minimum-idle=5
spring.datasource.hikari.idleTimeout=600000
spring.datasource.hikari.connectionTimeout=30000
spring.datasource.hikari.maxLifetime=1800000

#------初始化内嵌数据库(springboot不配置以下内容,也会自动加载以下配置)-------
spring.datasource.initialization-mode=always
# 指定Schema (DDL)脚本
spring.datasource.schema=classpath:schema.sql
# 指定Data (DML)脚本
spring.datasource.data=classpath:data.sql
# 指定schema要使用的Platform
spring.datasource.platform=h2

# 是否启用h2控制台
spring.h2.console.enabled=true
# 配置h2控制台访问地址,http://localhost:8080/h2
spring.h2.console.path=/h2
schema.sql
CREATE TABLE FOO (ID INT IDENTITY, BAR VARCHAR(64));
单条语句执行
@Repository
@Slf4j
public class FooDao {

    @Autowired
    private JdbcTemplate jdbcTemplate;

    /**
     * 查询操作
     */
    public void queryData() {
        // 返回一行、一列
        log.info("==================Count: {}", jdbcTemplate.queryForObject("SELECT COUNT(*) FROM FOO", Long.class));

        // 返回一行、多列
        List<String> list = jdbcTemplate.queryForList("SELECT BAR FROM FOO", String.class);
        list.forEach(s -> log.info("==================Bar: {}", s));

        // 返回多行、多列,结果转换为Map
        List<Map<String, Object>> maps = jdbcTemplate.queryForList("SELECT ID, BAR FROM FOO");
        log.info(maps.toString());
        maps.forEach(m -> {
            log.info("==================id-{}, bar-{}", m.get("ID"), m.get("BAR"));
        });

        // 返回多行、多列,结果映射为对象
        List<Foo> fooList = jdbcTemplate.query("SELECT * FROM Foo", new RowMapper<Foo>() {
            @Override
            public Foo mapRow(ResultSet rs, int rowNum) throws SQLException {
                return Foo.builder()
                        .id(rs.getLong(1))
                        .bar(rs.getString(2))
                        .build();
            }
        });
        fooList.forEach(f -> log.info("==================Foo: {}", f));
    }

    /**
     * 插入操作
     */
    public void insertData() {
        Arrays.asList("insert1", "insert2").forEach(bar -> {
            jdbcTemplate.update("INSERT INTO FOO (BAR) VALUES (?)", bar);
        });
    }
}
实体类Foo
@Data
@Builder
public class Foo {
    private long id;
    private String bar;
}
批处理操作
@Repository
public class BatchFooDao {

    @Autowired
    private JdbcTemplate jdbcTemplate;

    @Autowired
    private NamedParameterJdbcTemplate namedParameterJdbcTemplate;

    public void batchInsert() {
        ArrayList<String> list1 = new ArrayList<>(Arrays.asList("batch1", "batch2"));
        jdbcTemplate.batchUpdate("INSERT INTO FOO (BAR) VALUES (?)",
                new BatchPreparedStatementSetter() {
                    @Override
                    public void setValues(PreparedStatement ps, int i) throws SQLException {
                        ps.setString(1, list1.get(i));
                    }

                    @Override
                    public int getBatchSize() {
                        return list1.size();
                    }
                });

        List<Foo> list = new ArrayList<>();
        list.add(Foo.builder().id(100L).bar("batch3").build());
        list.add(Foo.builder().id(101L).bar("batch4").build());
        namedParameterJdbcTemplate
                .batchUpdate("INSERT INTO FOO (ID, BAR) VALUES (:id, :bar)",
                SqlParameterSourceUtils.createBatch(list));
    }
}
启动类
@SpringBootApplication
@Slf4j
public class SingleDataSource1Application implements CommandLineRunner {
	@Autowired
	private FooDao fooDao;

	@Autowired
	private BatchFooDao batchFooDao;

	public static void main(String[] args) {
		SpringApplication.run(SingleDataSource1Application.class, args);
	}

	@Override
	public void run(String... args) throws Exception {
		fooDao.insertData();
		batchFooDao.batchInsert();
		fooDao.queryData();
	}
}
2.7 Spring的事务抽象
Spring提供了一致的事务模型:
不管是使用JBDC、Hibernate还是Mybatis来操作数据,也不管使用的是DataSoure还是JTA的事务。在事务抽象里都能很好的把它统一在一起。
事务抽象的核心接口
PlatformTransactionManager(interface)
- DataSourceTransactionManager(class)
- HibernateTransactionManager(class)
- JtaTransactionManager(class)
public interface PlatformTransactionManager extends TransactionManager {
    TransactionStatus getTransaction(@Nullable TransactionDefinition definition) throws TransactionException;

    void commit(TransactionStatus status) throws TransactionException;

    void rollback(TransactionStatus status) throws TransactionException;
}
TransactionDefinition(class)
通过TransactionDefinition可以取得TransactionStatus。
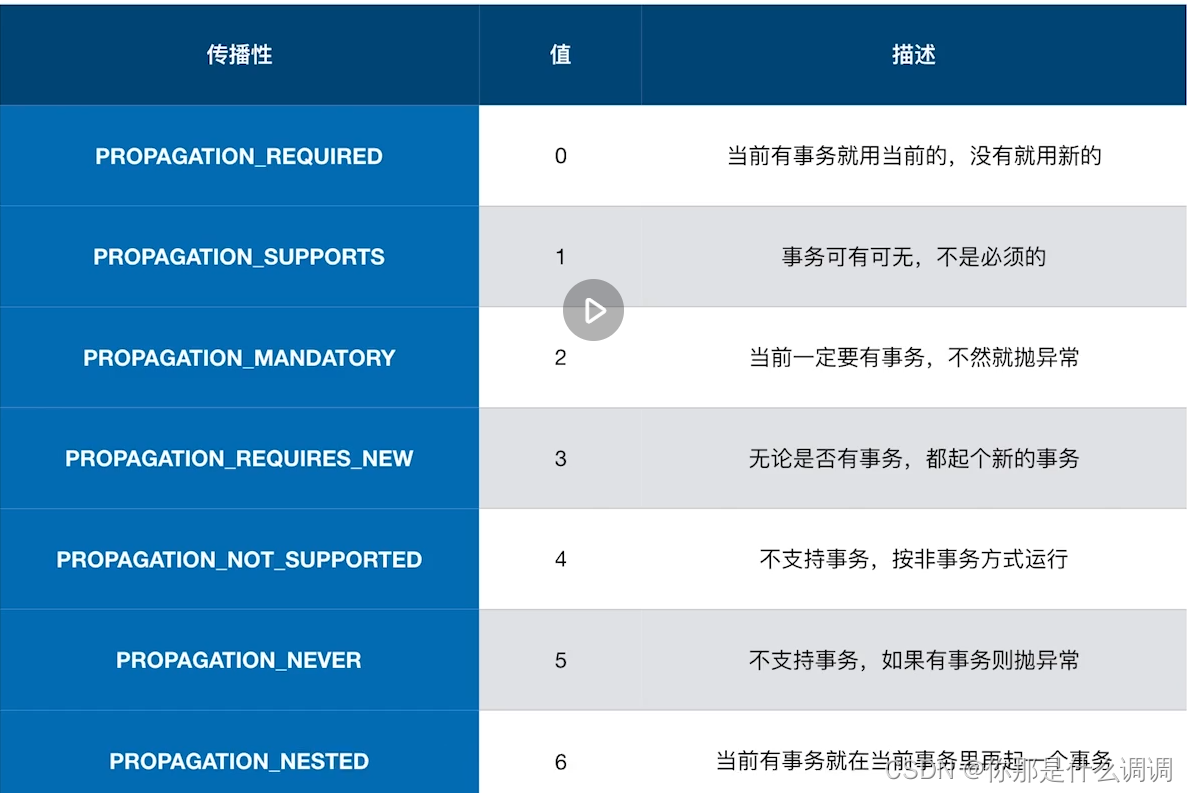
- Propagation 传播特性
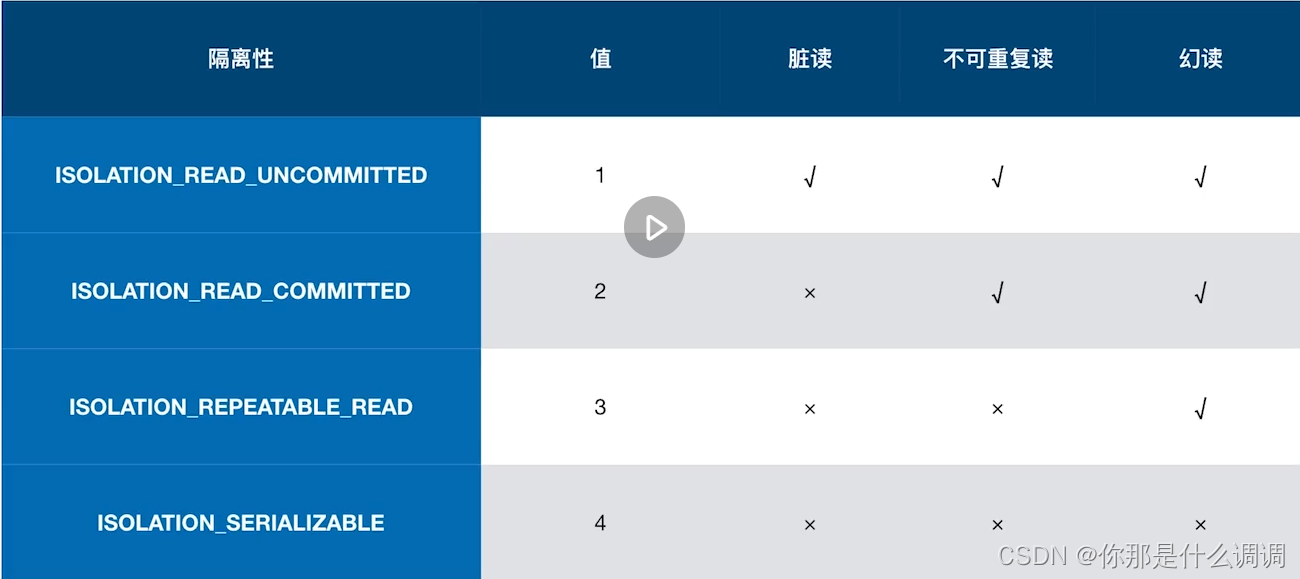
- Isolation 隔离性
- Timeout 事务的超时
- Read-only status 是否是只读
事务的传播特性
默认是REQUIRED级别。
事务的隔离性
2.8 事务抽象实例
编程式事务
(1)PlatformTransactionManager
@SpringBootApplication
@Slf4j
public class SingleDataSource1Application implements CommandLineRunner {
	@Autowired
	JdbcTemplate jdbcTemplate;

	@Autowired
	PlatformTransactionManager platformTransactionManager;

	public static void main(String[] args) {
		SpringApplication.run(SingleDataSource1Application.class, args);
	}

	@Override
	public void run(String... args) throws Exception {
		/* 事务定义类 */
		DefaultTransactionDefinition transactionDefinition = new DefaultTransactionDefinition();
		transactionDefinition.setPropagationBehavior(TransactionDefinition.PROPAGATION_REQUIRED);

		/* 返回事务对象 */
		TransactionStatus status = platformTransactionManager.getTransaction(transactionDefinition);

		try {
			log.info("====================================================");
			log.info("COUNT BEFORE TRANSACTION: {}", getCount());

			jdbcTemplate.update("INSERT INTO FOO (BAR) VALUES ('AAAA')");
			/* BAR1会报错 */
			jdbcTemplate.update("INSERT INTO FOO (BAR1) VALUES ('BBBB')");
			platformTransactionManager.commit(status);
		} catch (Exception e) {
			platformTransactionManager.rollback(status);
		}
		log.info("COUNT AFTER TRANSACTION: {}", getCount());
		log.info("====================================================");
	}

	private long getCount() {
		Long query = jdbcTemplate.queryForObject("SELECT COUNT(*) AS CNT FROM FOO", Long.class);
		return query;
	}
}
(2)transactionTemplate
public class TransactionTemplate extends DefaultTransactionDefinition implements TransactionOperations, InitializingBean {
	/**
	 * 有返回值:TransactionCallback
	 * 没有返回值:TransactionCallbackWithoutResult
	 */
	public <T> T execute(TransactionCallback<T> action) throws TransactionException {
		.....
	}
}
@SpringBootApplication
@Slf4j
public class SingleDataSource1Application implements CommandLineRunner {
	@Autowired
	private JdbcTemplate jdbcTemplate;

	@Autowired
	private TransactionTemplate transactionTemplate;

	public static void main(String[] args) {
		SpringApplication.run(SingleDataSource1Application.class, args);
	}

	@Override
	public void run(String... args) throws Exception {
		log.info("====================================================");
		log.info("COUNT BEFORE TRANSACTION: {}", getCount());
		transactionTemplate.execute(new TransactionCallbackWithoutResult() {
			@Override
			protected void doInTransactionWithoutResult(TransactionStatus transactionStatus) {
				try {
					jdbcTemplate.update("INSERT INTO FOO (ID, BAR) VALUES (1, 'aaa')");
					log.info("COUNT IN TRANSACTION: {}", getCount());
					throw new Exception();
				} catch (Exception e) {
					transactionStatus.setRollbackOnly();
				}
			}
		});
		log.info("COUNT AFTER TRANSACTION: {}", getCount());
		log.info("====================================================");
	}

	private long getCount() {
		Long query = jdbcTemplate.queryForObject("SELECT COUNT(*) AS CNT FROM FOO", Long.class);
		return query;
	}
}
声明式事务
Spring AOP:Java默认的动态代理方式做AOP。封装了AspectJ。
Spring的声明式事务是利用了AOP的Proxy,它在目标方法上做了一个封装。操作开始前启动事务,方法执行结束之后commit或者rollback。
基于注解的配置方式
@EnableTransactionManagement注解在Spring Boot工程中可以不用加
proxyTargetClass:false——基于接口的代理(JDK)。true——基于类的代理(CGLIB)。SpringBoot中有很多自动配置的,已经把proxyTargetClass设置为true了。
order:指定事务AOP的拦截的顺序,默认是最低的优先级。
在类上加@Transacational注解,则类里的public方法都会带上事务。而且属性都是用同一个。

实例
需要调用代理类才能执行到被代理增强的那些方法,如果是在方法内部调用的话,因为invokeInsertThenRollback本身是没有事务的,因此调用insertThenRollBack也不会有事务支持。
Spring Bean注入给其他人时,注入的不是A,而是B。所以通过Bean来调用时,调用的是B.xxx(),在A自身内部调用内部方法时,调用的还是A.xxx()
在自动注入的Bean上面加上@Lazy注解,防止循环依赖。
public interface FooService {
    void insertRecord();
    void insertThenRollback() throws RollbackException;
    void invokeInsertThenRollback() throws RollbackException;
}
@Component
public class FooServiceImpl implements FooService {
    @Autowired
    JdbcTemplate jdbcTemplate;

	@Autowired
	@Lazy
    FooService fooService;

    @Override
    @Transactional
    public void insertRecord() {
        jdbcTemplate.update("INSERT INTO FOO (BAR) VALUES ('AAA')");  // 插入一条
    }

    @Override
    @Transactional(rollbackFor = RollBackException.class)
    public void insertThenRollBack() throws RollBackException {
        jdbcTemplate.execute("INSERT INTO FOO (BAR) VALUES ('BBB')");  // 被回滚
        throw new RollBackException();
    }

    @Override
    public void invokeInsertThenRollback() throws RollBackException {
        /* 同级无法创建代理对象. 插入一条 */
        insertThenRollBack();
        /* (1)直接调用注入的实例,回滚 */
//        fooService.insertThenRollBack();
        /* (2)获取当前类的代理对象,再调用的代理对象的方法(其实是增强后的方法),回滚 */
//        FooService fooService = (FooService) AopContext.currentProxy();
//        fooService.insertThenRollBack();
    }
}
public class RollBackException extends Exception {
}
@SpringBootApplication
@Slf4j
public class SingleDataSource1Application implements CommandLineRunner {
	@Autowired
	FooService fooService;

	@Autowired
	JdbcTemplate jdbcTemplate;

	public static void main(String[] args) {
		SpringApplication.run(SingleDataSource1Application.class, args);
	}

	@Override
	public void run(String... args) throws Exception {
		fooService.insertRecord();
		log.info("AAA {}", getCount());

		try {
			fooService.insertThenRollBack();
		} catch (Exception e) {
			log.info("BBB {}", getCount());
		}

		try {
			fooService.invokeInsertThenRollback();
		} catch (Exception e) {
			log.info("BBB {}", getCount());
		}
	}

	private long getCount() {
		return jdbcTemplate.queryForObject("SELECT COUNT(*) AS CNT FROM FOO", Integer.class);
	}
}
2.8 Spring的JDBC异常抽象
Spring会将数据库操作的异常操作转换为DataAccessException。
无论使用何种数据访问方式,都能使用一样的异常。
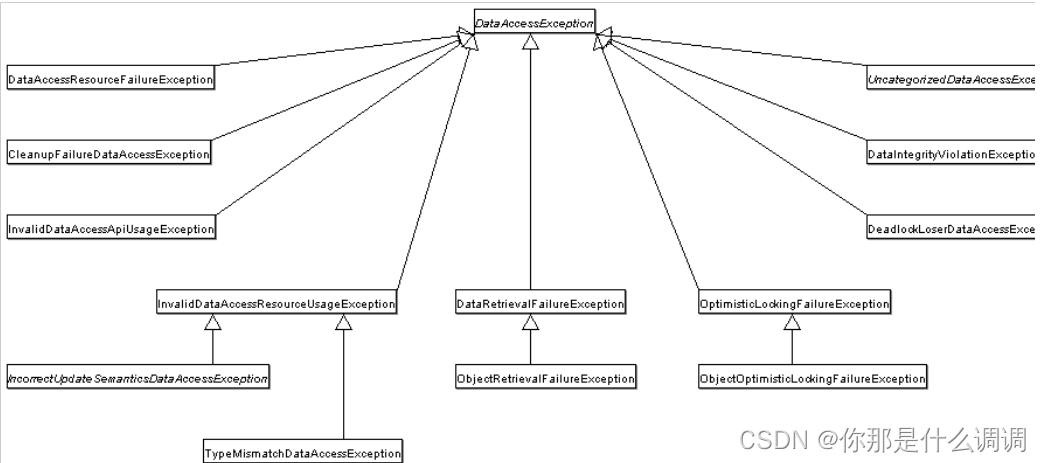
Spring是怎么认识错误码的
(1)通过SQLErrorCodeSQLExceptionTranslator类解析错误码
(2)在org/springframework/jdbc/support/sql-error-codes.xml定义各个数据库的errorCode。可以自己在classpath下定义sql-error-codes.xml,会覆盖掉官方文件
resources下新增sql-error-codes.xml
<?xml version="1.0" encoding="UTF-8"?>
<!DOCTYPE beans PUBLIC "-//SPRING//DTD BEAN 2.0//EN" "http://www.springframework.org/dtd/spring-beans-2.0.dtd">

<beans>
    <bean id="H2" class="org.springframework.jdbc.support.SQLErrorCodes">
        <property name="badSqlGrammarCodes">
            <value>42000,42001,42101,42102,42111,42112,42121,42122,42132</value>
        </property>
        <property name="duplicateKeyCodes">
            <value>23001,23505</value>
        </property>
        <property name="dataIntegrityViolationCodes">
            <value>22001,22003,22012,22018,22025,23000,23002,23003,23502,23503,23506,23507,23513</value>
        </property>
        <property name="dataAccessResourceFailureCodes">
            <value>90046,90100,90117,90121,90126</value>
        </property>
        <property name="cannotAcquireLockCodes">
            <value>50200</value>
        </property>
        <property name="customTranslations">
            <bean class="org.springframework.jdbc.support.CustomSQLErrorCodesTranslation">
                <property name="errorCodes" value="23001,23505" />
                <property name="exceptionClass"
                          value="com.example.SingleDataSource1.CustomDuplicatedKeyException" />
            </bean>
        </property>
    </bean>
</beans>
package com.example.SingleDataSource1;

import org.springframework.dao.DuplicateKeyException;

public class CustomDuplicatedKeyException extends DuplicateKeyException {
    public CustomDuplicatedKeyException(String msg) {
        super(msg);
    }

    public CustomDuplicatedKeyException(String msg, Throwable cause) {
        super(msg, cause);
    }
}
package com.example.SingleDataSource1;

import org.junit.Test;
import org.junit.runner.RunWith;
import org.springframework.beans.factory.annotation.Autowired;
import org.springframework.boot.test.context.SpringBootTest;
import org.springframework.jdbc.core.JdbcTemplate;
import org.springframework.test.context.junit4.SpringRunner;

@SpringBootTest
@RunWith(SpringRunner.class)
public class SingleDataSource1ApplicationTests {

	@Autowired
	private JdbcTemplate jdbcTemplate;

	@Test(expected = CustomDuplicatedKeyException.class)
	public void testThrowingCustomException() {
		jdbcTemplate.execute("INSERT INTO FOO (ID, BAR) VALUES (1, 'a')");
		jdbcTemplate.execute("INSERT INTO FOO (ID, BAR) VALUES (1, 'b')");
	}

}
package com.example.SingleDataSource1;

import lombok.extern.slf4j.Slf4j;
import org.springframework.boot.SpringApplication;
import org.springframework.boot.autoconfigure.SpringBootApplication;


@SpringBootApplication
@Slf4j
public class SingleDataSource1Application {

	public static void main(String[] args) {
		SpringApplication.run(SingleDataSource1Application.class, args);
	}
}
2.9 课程答疑
开发环境
(1)Lombok插件
如果IDEA版本在2020.3以上,不需要安装Lombok插件。
(2)Maven Helper插件
(3)Cygwin
(4)Docker
用于在本地启动一些演示用的依赖设施,MongoDB或Redis
Spring常用注解
(1)配置类与配置的注入
- @Configuration:标注一个类是配置类
- @Bean:将方法的返回对象变为Bean
- @ConfigurationProperties:将配置文件中的变量注入返回对象中
- @PropertySource:引入*.Properties或者 .yml
- @ImportResource:将xml配置文件中的bean加载到Application Context中。
/**
 - 写在启动类上
 */
@SpringBootApplication
@ImportResource({"classpath*:applicationContext.xml"})
public class ProductApplication {
}
/**
 - 创建一个单独的配置类来加载此XML bean定义文件。
 */
@Configuration
@ImportResource({"classpath*:applicationContext.xml"})
public class XmlConfiguration {
}
- @ComponentScan:
@SpringBootApplication包含了@ComponentScan
默认自动扫描加载启动类所在包及其子包。因此下图中A1、A2能加载到,B1加载不到
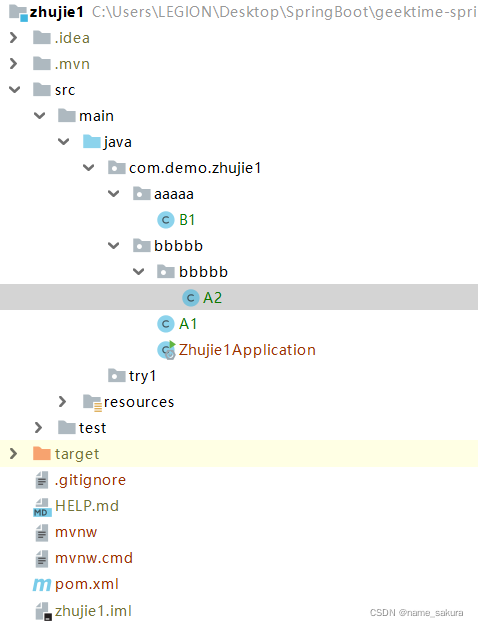
将B1也加入路径
@SpringBootApplication
@ComponentScan({"com.demo.zhujie1.aaaaa", "com.demo.zhujie1.bbbbb"})  // 加入B2路径,A1、A2路径也需要
@Slf4j
public class Zhujie1Application implements CommandLineRunner {
    @Autowired
    A1 a1;

    @Autowired
    A2 a2;

    @Autowired
    B1 b1;

    public static void main(String[] args) {
        SpringApplication.run(Zhujie1Application.class, args);
    }

    @Override
    public void run(String... args) {
        log.info(a1.getName());
        log.info(a2.getName());
        log.info(b1.getName());
    }
}
(2)Bean的定义
- @Component
- @Repository
- @Service
- @Controller
- @RestController
(3)注入相关
- @Autowired
- @Qualifier
- @Resource
- @Value
Actuator提供的Endpoint(端点)
- /actuator:展示所有端点
- /actuator/health:健康检查
- /actuator/info
- /actuator/beans:查看Beans
- /actuator/mappings:Web的URL映射
- /actuator/env:环境信息
- /actuator/conditions:查看代码某个配置在什么条件下生效
- /actuator/threaddump:当前线程活动的快照
(1)默认:
/actuator/health和/actuator/info可Web访问
(2)解禁所有Endpoint:
management.endpoints.web.exposure.include=*
(3)开启/actuator/shutdown:
management.endpoint.shutdown.enabled=true
curl -X POST "http://localhost:8080/actuator/shutdown"
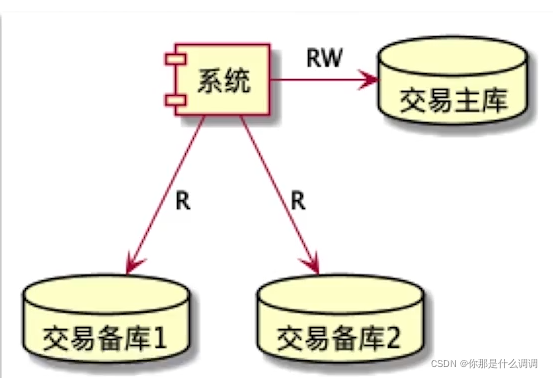
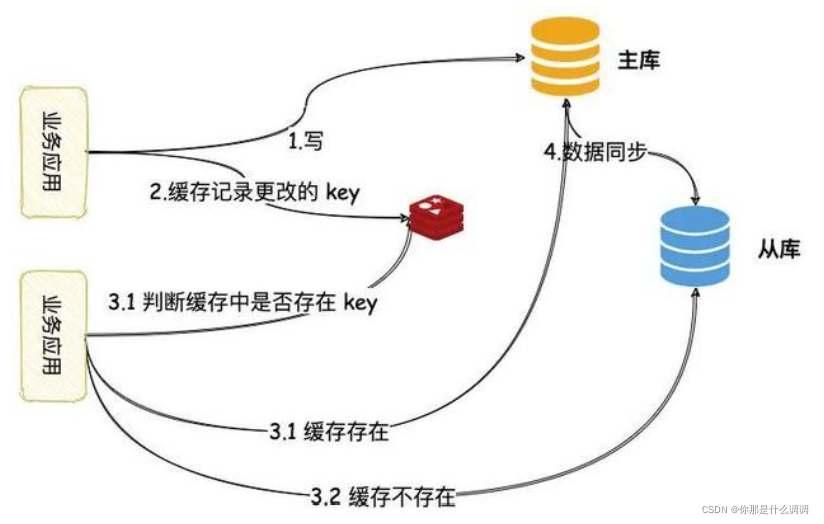
多数据源、读写分离、分库分表
https://baijiahao.baidu.com/s?id=1687119939271468578&wfr=spider&for=pc
访问几个完全不同的数据库:配置两个完全不同的DataSource
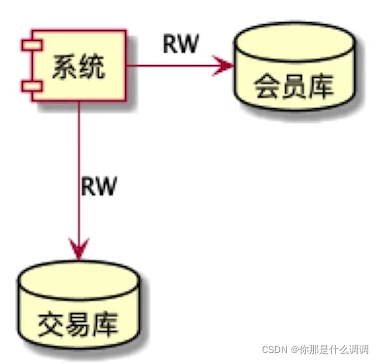
访问同一个库的主库与从库:主库做读写操作,从库做读操作
配置三个数据源(缺点是主从复制有延迟)。
使用中间件:淘宝TDDL,ShardingSphere client版本。
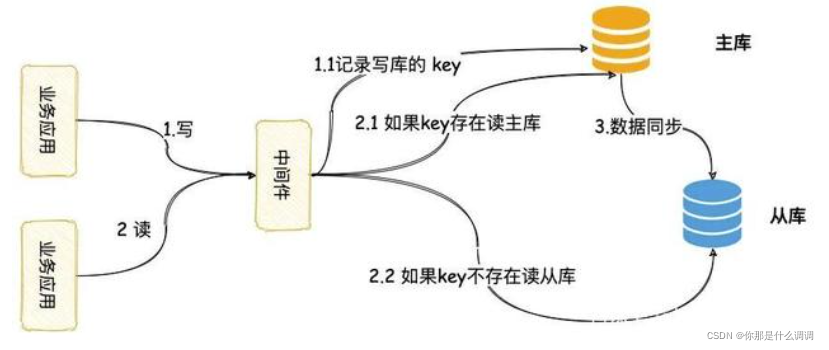
使用缓存:
访问一组做了分库分表的数据库
- 垂直分表:热门数据、冷门数据分开存储,大字段放在冷门数据表中。
- 垂直分库:按业务拆分,放到不同的库中,这些库分别部署在不同的服务器,解决单一服务器性能的- 瓶颈,同时提升整体架构的业务清晰度。
- 水平分表:解决单一表数据量过大的问题
- 水平分库:解决单一服务器数据量过大的问题
使用ShardingSphere
事务
Spring的声明式事务本质上是通过AOP增强了类的功能。
Spring的AOP本质上就是为了类做了一个代理,看似在调用自己写的类,实际用的是增强后的代理类。
常用传播特性
- REQUIRED:都在同一个事务中
- REQUIRES_NEW:父子之间事务不影响
- NOT_SUPPORTED:子方法以非事务方式运行
- NESTED:起两个事务,父事务异常,子事务也异常
测试代码
@Component
@Slf4j
public class FooServiceImpl implements FooService {
    @Autowired
    JdbcTemplate jdbcTemplate;

    @Autowired
    FooService fooService;

    @Override
    @Transactional(rollbackFor = RollbackException.class, propagation = Propagation.REQUIRED)
    public void insertThenRollBack() throws RollbackException {
        jdbcTemplate.execute("INSERT INTO FOO (BAR) VALUES ('BBB')");
        throw new RollbackException();
    }

    @Override
    @Transactional(rollbackFor = RollbackException.class)
    public void invokeInsertThenRollback() throws RollbackException {
        jdbcTemplate.execute("INSERT INTO FOO (BAR) VALUES ('AAA')");
        try {
            fooService.insertThenRollBack();
        } catch (RollbackException e) {
        }
//        throw new RollbackException();
    }
}
@SpringBootApplication
@EnableTransactionManagement(mode = AdviceMode.PROXY)  // 启动类上开启事务,默认开启
@Slf4j
public class DeclarativeTransactionDemoApplication implements CommandLineRunner {
	@Autowired
	FooService fooService;

	@Autowired
	JdbcTemplate jdbcTemplate;

	public static void main(String[] args) {
		SpringApplication.run(DeclarativeTransactionDemoApplication.class, args);
	}

	@Override
	public void run(String... args) throws Exception {
		try {
			fooService.invokeInsertThenRollback();
		} catch (Exception e) {

		}

		log.info("AAA: {}", getCount1());
		log.info("BBB: {}", getCount2());
	}

	private long getCount1() {
		return (long) jdbcTemplate.queryForList("SELECT COUNT(*) AS CNT FROM FOO WHERE BAR = 'AAA'")
				.get(0).get("CNT");
	}

	private long getCount2() {
		return (long) jdbcTemplate.queryForList("SELECT COUNT(*) AS CNT FROM FOO WHERE BAR = 'BBB'")
				.get(0).get("CNT");
	}
}
Alibaba Druid开启慢SQL日志
@Repository
public class FooService {
    @Autowired
    JdbcTemplate jdbcTemplate;

    @Transactional
    public void selectForUpdate() {
    	// 在where 后面查询条件是主键索引,唯一索引时候是行锁。查询条件是普通字段时候加的是表锁
        jdbcTemplate.queryForObject("select id from foo where id = 1 for update", Long.class);
        try {
            Thread.sleep(200);
        } catch (Exception e) {
        }
    }
}
@SpringBootApplication
@Slf4j
public class DruidDemoApplication implements CommandLineRunner {

	@Autowired
	DataSource dataSource;

	@Autowired
	private FooService fooService;

	public static void main(String[] args) {
		SpringApplication.run(DruidDemoApplication.class, args);
	}

	@Override
	public void run(String... args) throws Exception {
		log.info("=========================================");
		new Thread(() -> fooService.selectForUpdate()).start();
		new Thread(() -> fooService.selectForUpdate()).start();
	}
}
spring.output.ansi.enabled=ALWAYS

spring.datasource.url=jdbc:h2:mem:foo
spring.datasource.username=sa

# spring.datasource.druid.filter.stat.enabled=true
spring.datasource.druid.filter.stat.log-slow-sql=true
spring.datasource.druid.filter.stat.slow-sql-millis=100  // 超过100ms抓出来
CREATE TABLE FOO (ID INT IDENTITY, BAR VARCHAR(64));
INSERT INTO FOO (ID, BAR) VALUES (1, 'AAA');
结果:

注意事项
(1)没有特殊情况,不要在生产环境打开监控的Servlet
(2)removeAbandoned用于移除被遗弃的连接。ORM和JdbcTemplate不会发生连接泄露,不要开启removeAbandoned。
(3)testXxxx的使用需要注意(testOnBorrow和testOnReturn关闭、testWhileIdle开启 连接有一段时间不用会检查)
# 做检查
spring.datasource.druid.test-on-borrow = false
spring.datasource.druid.test-on-return = false
spring.datasource.druid.test-while-idle = true
(4)务必配置合理的超时时间


 136
136


 被折叠的 条评论
为什么被折叠?
被折叠的 条评论
为什么被折叠?
 到【灌水乐园】发言


