


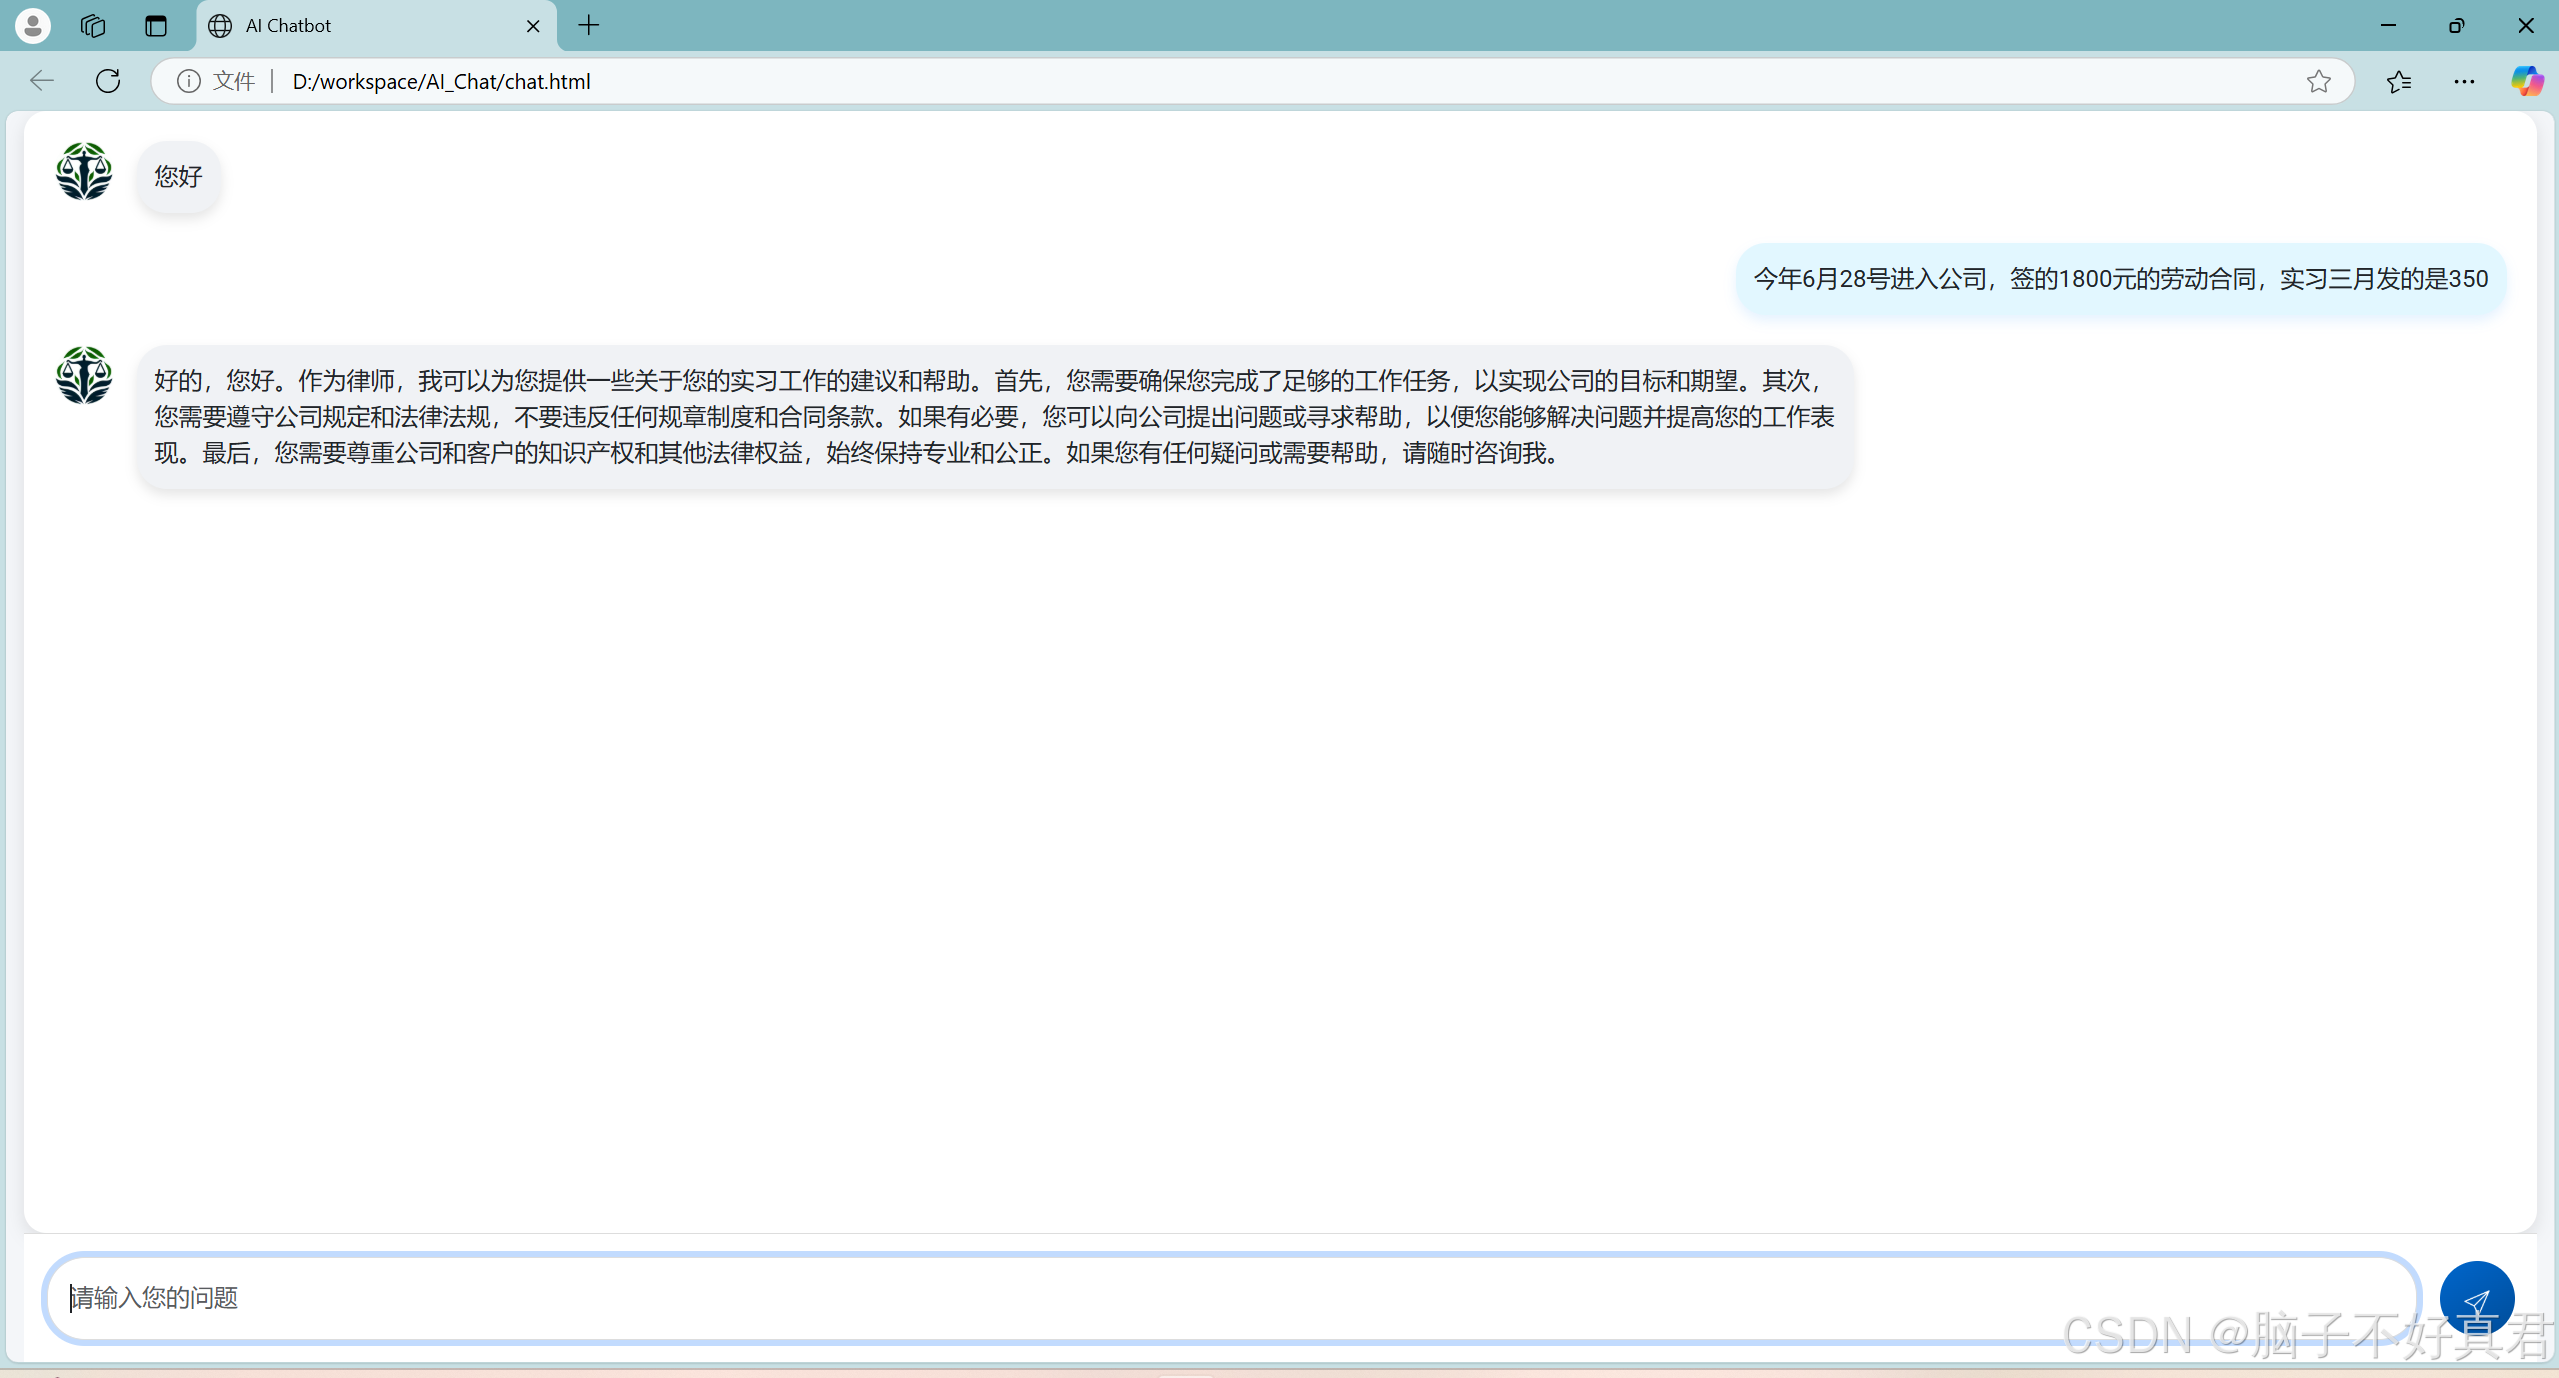
效果:
一、服务端
① 启动ollama serve(当然需要先下载安装ollama)

② 启动后端服务
后端连接ollama中的模型进行问答。
pip install fastapi uvicorn
from fastapi import FastAPI
from fastapi.responses import StreamingResponse
from pydantic import BaseModel
import litellm
from fastapi.middleware.cors import CORSMiddleware

app = FastAPI()

# 配置 CORS 中间件
app.add_middleware(
    CORSMiddleware,
    allow_origins=["*"],  # 允许所有来源,您可以根据需要修改为特定的来源
    allow_credentials=True,
    allow_methods=["*"],  # 允许所有方法
    allow_headers=["*"],  # 允许所有头部
)

# 定义请求体模型
class QuestionRequest(BaseModel):
    question: str

async def generate_ollama_response(question):
    """ Generate a streaming response using litellm """
    response = await litellm.acompletion(
        model="ollama/model_name", # 可以先在ollama中pull任意模型,然后修改model_name即可
        messages=[
            {"role": "system", "content": "扮演一名中国的法律考试助手,根据用户的问题给出恰当的答案,在必要的时候给出参考法条。"},
            {"role": "user", "content": question}
        ],
        api_base="http://localhost:11434",
        stream=True  # Enable streaming
    )

    async for chunk in response:
        content = chunk.choices[0].delta.content
        if content:
            yield content  # Yield text incrementally to simulate streaming

@app.post("/QA")
async def qa(request: QuestionRequest):
    return StreamingResponse(generate_ollama_response(request.question), media_type="text/plain")
使用 uvicorn main:app --reload 运行程序。 (程序命名为main.py)

③ 代码详解
1)导入依赖模块
from fastapi import FastAPI
from fastapi.responses import StreamingResponse
from pydantic import BaseModel
import litellm
from fastapi.middleware.cors import CORSMiddleware
FastAPI:用于创建 Web API 的框架,提供了高效、易用的异步支持。
StreamingResponse:FastAPI 内置的响应类,用于返回流式数据,让客户端可以边接收边处理返回的内容。
BaseModel (Pydantic):用于定义数据模型,帮助验证和解析请求体数据,确保输入数据符合预期的格式。
litellm:用于调用 AI 模型完成任务的库,这里用来生成文本回答。
CORSMiddleware:FastAPI 中间件,用于处理跨域请求(CORS),允许不同来源的前端访问后端接口。
2)创建 FastAPI 应用实例
app = FastAPI()
创建一个 FastAPI 应用实例 app,后续所有 API 接口和中间件的配置都基于这个实例进行设置。
3)配置 CORS 中间件
app.add_middleware(
    CORSMiddleware,
    allow_origins=["*"],  # 允许所有来源访问
    allow_credentials=True, # 允许携带认证信息(如 Cookies)
    allow_methods=["*"],  # 允许所有 HTTP 方法(如 GET, POST 等)
    allow_headers=["*"],  # 允许所有头部信息
)
解决跨域问题,使得前端(可能部署在其他域名或端口)能正常请求这个 API。
4)定义请求体模型
class QuestionRequest(BaseModel):
    question: str
作用:使用 Pydantic 定义一个数据模型 QuestionRequest,用来描述客户端请求的 JSON 数据格式。
详细说明:模型中只有一个字段 question,类型为字符串。
当客户端发送请求时,FastAPI 会自动将请求体解析为这个数据模型,并验证其中的数据是否满足定义的格式和类型要求。如果数据格式不符合,会自动返回错误响应。
5)定义生成流式响应的异步函数
async def generate_ollama_response(question):
    """ Generate a streaming response using litellm """
    response = await litellm.acompletion(
        model="ollama/model_name",  # 指定要使用的 AI 模型名称(需替换为实际模型名)
        messages=[
            {
                "role": "system",
                "content": "扮演一名中国的法律考试助手,根据用户的问题给出恰当的答案,在必要的时候给出参考法条。"
            },
            {"role": "user", "content": question}
        ],
        api_base="http://localhost:11434",
        stream=True  # 启用流式传输
    )

    async for chunk in response:
        content = chunk.choices[0].delta.content
        if content:
            yield content  # 每当有新的内容时,立刻 yield 返回
函数作用:
接受用户的提问 question 作为参数。
调用 litellm.acompletion 异步函数请求 AI 模型生成回答。
参数说明:model="ollama/model_name":指定 AI 模型,这里使用的是一个占位名称,需要根据实际情况替换为具体模型名称。
messages:对话消息列表,其中包含两个角色:system:系统消息,用来定义 AI 模型的行为与角色(此处要求扮演中国的法律考试助手)。user:用户消息,将客户端传入的问题作为内容。
api_base:指定 AI 服务所在的地址(这里假定运行在本地 localhost:11434)。
stream=True:开启流式响应,即模型会逐步生成回答而不是一次性返回完整结果。
异步生成器:使用 async for 循环遍历 AI 模型返回的每个数据块(chunk)。
从每个 chunk 中提取实际的文本内容 content。
如果存在内容,则通过 yield 语句逐步返回该内容,从而实现流式传输,客户端可以边接收边显示生成的文本。
6)定义 API 路由
@app.post("/QA")
async def qa(request: QuestionRequest):
    return StreamingResponse(generate_ollama_response(request.question), media_type="text/plain")
接口定义:
通过 @app.post("/QA") 装饰器定义一个 POST 类型的接口,路由路径为 /QA。
请求体解析:函数参数 request: QuestionRequest 表示该接口接收的请求体必须符合 QuestionRequest 模型,即必须包含一个 question 字段。
返回流式响应:调用之前定义的异步生成器函数 generate_ollama_response,传入 request.question 作为参数。
使用 StreamingResponse 将生成器返回的内容包装为流式响应,媒体类型设置为 text/plain,使客户端能够接收到文本流。
二、客户端
<!DOCTYPE html>
<html lang="en">
<head>
  <meta charset="UTF-8" />
  <meta name="viewport" content="width=device-width, initial-scale=1.0" />
  <title>AI Chatbot</title>
  <!-- 引入 Bootstrap 和 Google Fonts -->
  <link
    href="https://cdn.jsdelivr.net/npm/bootstrap@5.3.0-alpha1/dist/css/bootstrap.min.css"
    rel="stylesheet"
  />
  <link
    href="https://fonts.googleapis.com/css2?family=Roboto:wght@400;500&display=swap"
    rel="stylesheet"
  />
  <style>
    body {
      font-family: 'Roboto', sans-serif;
      background-color: #f4f6f9;
      display: flex;
      flex-direction: column;
      height: 100vh;
      margin: 0;
    }
    /* 让 #app 使用整个页面高度 */
    #app {
      height: 100vh;
    }
    /* 聊天框铺满除输入框外的区域 */
    #chat {
      flex-grow: 1;
      overflow-y: auto;
      padding: 20px;
      background-color: #fff;
      border-radius: 15px;
      margin: 0; /* 移除外边距 */
      box-shadow: 0 4px 12px rgba(0, 0, 0, 0.1);
    }
    .message {
      display: flex;
      margin-bottom: 20px;
    }
    .question {
      justify-content: flex-end;
    }
    .question .text {
      background-color: #e2f7ff;
      padding: 12px;
      border-radius: 20px;
      max-width: 70%;
      box-shadow: 0 4px 8px rgba(0, 123, 255, 0.1);
    }
    .answer {
      justify-content: flex-start;
    }
    .answer .avatar {
      width: 40px;
      height: 40px;
      border-radius: 50%;
      margin-right: 15px;
    }
    .answer .text {
      background-color: #f0f2f5;
      padding: 12px;
      border-radius: 20px;
      max-width: 70%;
      box-shadow: 0 4px 8px rgba(0, 0, 0, 0.1);
    }
    #question-form {
      display: flex;
      align-items: center;
      padding: 15px;
      border-top: 1px solid #ddd;
      background-color: #fff;
    }
    #question {
      flex-grow: 1;
      padding: 15px;
      border-radius: 25px;
      border: 1px solid #ddd;
      font-size: 16px;
    }
    button {
      margin-left: 15px;
      background: linear-gradient(145deg, #0066cc, #004d99);
      color: #fff;
      border: none;
      padding: 15px;
      font-size: 16px;
      border-radius: 50%;
      width: 50px;
      height: 50px;
      cursor: pointer;
    }
    button:hover {
      background: linear-gradient(145deg, #004d99, #0066cc);
    }
    /* 设置按钮图案的大小 */
    button img {
      width: 20px;
      height: 20px;
    }
    .spinner {
      border: 4px solid rgba(0, 0, 0, 0.1);
      border-left-color: #007bff;
      border-radius: 50%;
      width: 30px;
      height: 30px;
      animation: spin 1s linear infinite;
      margin: 10px;
    }
    @keyframes spin {
      to {
        transform: rotate(360deg);
      }
    }
  </style>
</head>
<body>
  <div id="app" class="container-fluid d-flex flex-column">
    <div id="chat">
      <!-- 使用 Vue 的 v-for 渲染消息 -->
      <div v-for="(msg, index) in messages" :key="index" :class="['message', msg.type]">
        <template v-if="msg.type === 'question'">
          <div class="text">{{ msg.text }}</div>
        </template>
        <template v-else>
          <img src="lawyer-logo.png" class="avatar" alt="Avatar" />
          <div class="text">{{ msg.text }}</div>
        </template>
      </div>
    </div>

    <!-- 加载动画,仅在获取数据时显示 -->
    <div v-if="loading" class="d-flex align-items-center justify-content-center">
      <div class="spinner"></div>
    </div>

    <!-- 输入框及发送按钮 -->
    <form id="question-form" @submit.prevent="sendQuestion">
      <input
        type="text"
        id="question"
        v-model="newQuestion"
        class="form-control"
        placeholder="请输入您的问题"
        autocomplete="off"
      />
      <button type="submit">
        <img src="https://img.icons8.com/ios/50/ffffff/sent.png" alt="Send" />
      </button>
    </form>
  </div>

  <!-- 引入 Vue 3 -->
  <script src="https://unpkg.com/vue@3/dist/vue.global.prod.js"></script>
  <script>
    const { createApp, ref, onMounted } = Vue;
    createApp({
      setup() {
        const messages = ref([]);
        const newQuestion = ref('');
        const loading = ref(false);

        // 从本地存储中加载历史记录
        onMounted(() => {
          const saved = localStorage.getItem('chatHistory');
          if (saved) {
            messages.value = JSON.parse(saved);
          }
          // 如果没有历史记录,则显示初始问候
          if (messages.value.length === 0) {
            addAnswer("您好");
          }
          scrollToBottom();
        });

        // 保存聊天记录
        function saveChatHistory() {
          localStorage.setItem('chatHistory', JSON.stringify(messages.value));
        }

        // 添加用户问题
        function addQuestion(text) {
          messages.value.push({ type: 'question', text });
          saveChatHistory();
          scrollToBottom();
        }

        // 添加回答
        function addAnswer(text) {
          messages.value.push({ type: 'answer', text });
          saveChatHistory();
          scrollToBottom();
        }

        // 滚动到底部
        function scrollToBottom() {
          setTimeout(() => {
            const chatDiv = document.getElementById('chat');
            chatDiv.scrollTop = chatDiv.scrollHeight;
          }, 0);
        }

        // 发送问题并获取回答(字逐渐显示)
        async function sendQuestion() {
          const question = newQuestion.value.trim();
          if (!question) return;
          addQuestion(question);
          newQuestion.value = '';
          loading.value = true;

          // 先插入一个空的回答项,用于逐字显示
          const answerIndex = messages.value.length;
          messages.value.push({ type: 'answer', text: '' });
          scrollToBottom();

          try {
            const response = await fetch('http://127.0.0.1:8000/QA', {
              method: 'POST',
              headers: { 'Content-Type': 'application/json' },
              body: JSON.stringify({ question })
            });

            const reader = response.body.getReader();
            const decoder = new TextDecoder();

            while (true) {
              const { value, done } = await reader.read();
              if (done) break;
              const chunk = decoder.decode(value, { stream: true });
              // 模拟逐字显示效果
              for (let char of chunk) {
                messages.value[answerIndex].text += char;
                await new Promise((resolve) => setTimeout(resolve, 50));
                scrollToBottom();
              }
            }
            saveChatHistory();
          } catch (error) {
            console.error("Error:", error);
          } finally {
            loading.value = false;
          }
        }

        return { messages, newQuestion, sendQuestion, loading };
      }
    }).mount('#app');
  </script>
</body>
</html>
1)主要结构说明
<head> 部分:
引入了 Bootstrap 提供的 CSS 框架,使页面响应式并具有美观的默认样式。
使用 Google Fonts 加载了 “Roboto” 字体。
内部 <style> 标签定义了整个页面的样式(后面会详细讲解)。
<body> 部分:
整个应用被包裹在一个 id="app" 的容器中,这也是 Vue 的挂载点。
聊天区域 (#chat):用于显示所有对话消息。消息采用 Vue 的 v-for 指令进行循环渲染,不同消息类型(用户提问或 AI 回答)采用不同的模板。
加载动画:当请求正在处理中时,会显示一个旋转的 loading 图标。
输入区域:由一个文本输入框和一个提交按钮组成。提交表单时调用 Vue 定义的 sendQuestion 方法。
2)CSS 样式
body {
  font-family: 'Roboto', sans-serif;
  background-color: #f4f6f9;
  display: flex;
  flex-direction: column;
  height: 100vh;
  margin: 0;
}
#app {
  height: 100vh;
}
#chat {
  flex-grow: 1;
  overflow-y: auto;
  padding: 20px;
  background-color: #fff;
  border-radius: 15px;
  margin: 0;
  box-shadow: 0 4px 12px rgba(0, 0, 0, 0.1);
}
.message {
  display: flex;
  margin-bottom: 20px;
}
.question {
  justify-content: flex-end;
}
.question .text {
  background-color: #e2f7ff;
  padding: 12px;
  border-radius: 20px;
  max-width: 70%;
  box-shadow: 0 4px 8px rgba(0, 123, 255, 0.1);
}
.answer {
  justify-content: flex-start;
}
.answer .avatar {
  width: 40px;
  height: 40px;
  border-radius: 50%;
  margin-right: 15px;
}
.answer .text {
  background-color: #f0f2f5;
  padding: 12px;
  border-radius: 20px;
  max-width: 70%;
  box-shadow: 0 4px 8px rgba(0, 0, 0, 0.1);
}
#question-form {
  display: flex;
  align-items: center;
  padding: 15px;
  border-top: 1px solid #ddd;
  background-color: #fff;
}
#question {
  flex-grow: 1;
  padding: 15px;
  border-radius: 25px;
  border: 1px solid #ddd;
  font-size: 16px;
}
button {
  margin-left: 15px;
  background: linear-gradient(145deg, #0066cc, #004d99);
  color: #fff;
  border: none;
  padding: 15px;
  font-size: 16px;
  border-radius: 50%;
  width: 50px;
  height: 50px;
  cursor: pointer;
}
button:hover {
  background: linear-gradient(145deg, #004d99, #0066cc);
}
button img {
  width: 20px;
  height: 20px;
}
.spinner {
  border: 4px solid rgba(0, 0, 0, 0.1);
  border-left-color: #007bff;
  border-radius: 50%;
  width: 30px;
  height: 30px;
  animation: spin 1s linear infinite;
  margin: 10px;
}
@keyframes spin {
  to {
    transform: rotate(360deg);
  }
}
整体布局:
body 和 #app 使用了 Flex 布局,确保整个页面高度占满屏幕,并垂直排列内容。
聊天区域 (#chat):
通过 flex-grow: 1 占满除输入框以外的所有空间,并设置 overflow-y: auto 保证消息内容超出时可以滚动查看。
消息气泡样式:
用户提问(question 类)右对齐,背景色为淡蓝色;
AI 回答(answer 类)左对齐,并在消息前显示一个头像(lawyer-logo.png)。
输入区与按钮:
输入框占据大部分宽度,并有圆角和边框;
发送按钮设计为圆形,并使用渐变背景,同时在按钮上显示发送图标。
加载动画:
定义了一个简单的 CSS 动画,通过 @keyframes spin 实现旋转效果。
3)Vue 3 脚本部分
const { createApp, ref, onMounted } = Vue;
createApp({
  setup() {
    // 定义响应式变量
    const messages = ref([]);
    const newQuestion = ref('');
    const loading = ref(false);

    // 页面加载时执行的逻辑
    onMounted(() => {
      // 尝试从 localStorage 中加载历史聊天记录
      const saved = localStorage.getItem('chatHistory');
      if (saved) {
        messages.value = JSON.parse(saved);
      }
      // 如果没有历史记录,则添加初始问候
      if (messages.value.length === 0) {
        addAnswer("您好");
      }
      scrollToBottom();
    });

    // 保存聊天记录到 localStorage
    function saveChatHistory() {
      localStorage.setItem('chatHistory', JSON.stringify(messages.value));
    }

    // 添加用户提问到消息列表
    function addQuestion(text) {
      messages.value.push({ type: 'question', text });
      saveChatHistory();
      scrollToBottom();
    }

    // 添加回答到消息列表
    function addAnswer(text) {
      messages.value.push({ type: 'answer', text });
      saveChatHistory();
      scrollToBottom();
    }

    // 使聊天窗口滚动到最新消息
    function scrollToBottom() {
      setTimeout(() => {
        const chatDiv = document.getElementById('chat');
        chatDiv.scrollTop = chatDiv.scrollHeight;
      }, 0);
    }

    // 处理发送问题并获取回答
    async function sendQuestion() {
      const question = newQuestion.value.trim();
      if (!question) return;
      // 将用户问题添加到聊天记录中
      addQuestion(question);
      newQuestion.value = '';
      loading.value = true;

      // 先在消息列表中插入一个空的回答,用于后续逐字显示生成的回答内容
      const answerIndex = messages.value.length;
      messages.value.push({ type: 'answer', text: '' });
      scrollToBottom();

      try {
        // 向后端发送 POST 请求,调用 /QA 接口(对应之前的 Python 后端)
        const response = await fetch('http://127.0.0.1:8000/QA', {
          method: 'POST',
          headers: { 'Content-Type': 'application/json' },
          body: JSON.stringify({ question })
        });

        // 获取响应体的可读流
        const reader = response.body.getReader();
        const decoder = new TextDecoder();

        // 逐块读取后端返回的流数据
        while (true) {
          const { value, done } = await reader.read();
          if (done) break;
          // 将二进制数据解码成字符串
          const chunk = decoder.decode(value, { stream: true });
          // 模拟逐字显示的效果:对每个字符逐一添加,并设置小延时
          for (let char of chunk) {
            messages.value[answerIndex].text += char;
            await new Promise((resolve) => setTimeout(resolve, 50));
            scrollToBottom();
          }
        }
        saveChatHistory();
      } catch (error) {
        console.error("Error:", error);
      } finally {
        loading.value = false;
      }
    }

    // 将需要绑定到模板中的数据和方法返回
    return { messages, newQuestion, sendQuestion, loading };
  }
}).mount('#app');
响应式数据与生命周期钩子
使用 ref 定义了三个响应式变量:
messages:存放所有聊天记录(包括用户问题和 AI 回答)。
newQuestion:绑定输入框的值,保存用户当前输入的问题。
loading:标记是否正在等待后端响应,控制加载动画的显示。
在 onMounted 钩子中:
尝试从浏览器的 localStorage 中加载历史聊天记录,实现页面刷新后依然保留对话记录。
如果没有历史记录,则调用 addAnswer 显示初始问候 “您好”。
消息处理函数
addQuestion(text) 和 addAnswer(text) 分别将用户提问和 AI 回答添加到 messages 数组中,同时保存记录并滚动到底部。
scrollToBottom() 利用 DOM 操作使聊天容器始终滚动到最新消息处。
发送问题与接收流式回答
sendQuestion() 是整个交互的核心:首先检查输入是否为空,然后调用 addQuestion 将用户的问题添加到聊天记录中。
清空输入框并设置 loading 为 true,表明正在等待回答。
在 messages 数组中先插入一条空的回答记录,用于后续逐字显示后端返回的数据。
使用 fetch 方法向 Python 后端的 /QA 接口发送 POST 请求,传递 JSON 格式的 { question }。(注意:后端的接口地址为 http://127.0.0.1:8000/QA,需要与后端部署时的地址保持一致)
获取响应流后,利用 reader.read() 循环逐步读取后端传来的数据块。
对每个数据块,使用 TextDecoder 解码成字符串,并通过一个 for 循环逐字追加到对应的回答消息中,同时设置 50 毫秒的延时,以模拟“打字机”效果。
完成后保存聊天记录,并将 loading 状态恢复为 false。
与后端的交互
当前端通过 fetch 向 /QA 发送请求时,后端(即之前讲解的 Python 代码)接收到包含 question 字段的 JSON 数据后,会调用 AI 模型生成回答,并以流式方式返回文本。
前端的代码利用流式读取和逐字追加的方式,实现了实时显示 AI 回答的效果,增强用户体验。


 2614
2614

 被折叠的 条评论
为什么被折叠?
被折叠的 条评论
为什么被折叠?
 到【灌水乐园】发言


