


蜂鸣器与继电器
1.原理图

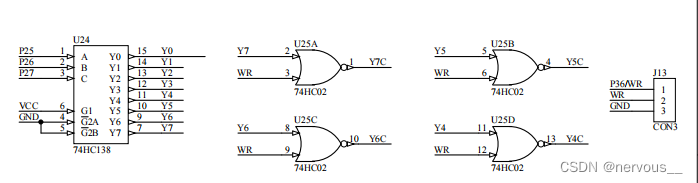
74HC138、74HC573的使用LED跑马灯已经介绍过了,不在赘述了。值得注意的是:ULN2003输入,输出的电平是反转的,即IN1输入0时,OUT输出1。
由原理图可知,继电器以及蜂鸣器都是低电平有效的。
2.代码
#include <STC15F2K60S2.H>
sbit HC138_A = P2^5;
sbit HC138_B = P2^6;
sbit HC138_C = P2^7;
sbit buzzer = P0^6;
sbit relay = P0^4;
unsigned char i = 0;
void Delay(unsigned int t)//注意数据是否超出,unsigned char 0~255
{
	while(t--);
	while(t--);
}
void HC_138(unsigned char n)
{
	switch(n)
	{
		case 7:
			P2 = (P2 & 0x1f)|0xE0; // 1 1 1
			break;
		case 6:
			P2 = (P2 & 0x1f)|0xC0; // 1 1 0
			break;
		case 5:
			P2 = (P2 & 0x1f)|0xA0; // 1 0 1
			break;
		case 4:
			P2 = (P2 & 0x1f)|0x80; // 1 0 0
			break;
		case 3:
			P2 = (P2 & 0x1f)|0x60; // 0 1 1
			break;
		case 2:
			P2 = (P2 & 0x1f)|0x40; // 0 1 0
			break;
		case 1:
			P2 = (P2 & 0x1f)|0x20; // 0 0 1
			break;
	}

}
void OutPutP0(unsigned char channel,unsigned char dat)
{
	HC_138(channel);
	P0 = dat;
}
void System_init()
{
	HC_138(5);
	P0 = 0x00;
}

void LED_running()
{

	for(i=0;i<3;i++)
	{
		OutPutP0(4,0xFF);
		Delay(60000);
		Delay(60000);
		OutPutP0(4,0x00);
		Delay(60000);
		Delay(60000);
	}
	for(i=1;i<=8;i++)
	{
		OutPutP0(4,(0xff<<i));
		Delay(50000);
	}
	OutPutP0(5,0x10);
	Delay(50000);
	OutPutP0(5,0x00);
	Delay(50000);
	for(i=1;i<=8;i++)
	{
		OutPutP0(4,~(0xff<<i));
		Delay(50000);
	}
	OutPutP0(5,0x40);
	Delay(1000);
	OutPutP0(5,0x00);
	Delay(1000);
}
void main()
{
	System_init();
	while(1)
	{
		LED_running();
	}

}
注意:
void HC_138(unsigned char n)
{
switch(n)
{
case 7:
P2 = (P2 & 0x1f)|0xE0; // 1 1 1
break;
case 6:
P2 = (P2 & 0x1f)|0xC0; // 1 1 0
break;
case 5:
P2 = (P2 & 0x1f)|0xA0; // 1 0 1
break;
case 4:
P2 = (P2 & 0x1f)|0x80; // 1 0 0
break;
case 3:
P2 = (P2 & 0x1f)|0x60; // 0 1 1
break;
case 2:
P2 = (P2 & 0x1f)|0x40; // 0 1 0
break;
case 1:
P2 = (P2 & 0x1f)|0x20; // 0 0 1
break;
}}
这段代码尽量能够自己写,可以通过该函数直接控制Y的低电平使能。
3.问题
需要使用蜂鸣器、继电器的时候记得将J6的跳帽接到ON上,别犯低级错误!!!
数码管静态显示
1.原理图
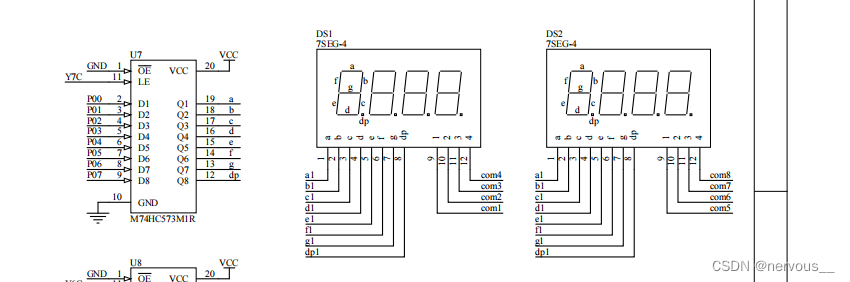


数码管通过com口控制那个数码管显示,a1-g1以及dp,控制一个数码管的显示内容,对应的段选如下
共阴数码管
1.共阴不带小数点0-F段码为:{0x3f,0x06,0x5b,0x4f,0x66,0x6d,0x7d,0x07,0x7f,0x6f,0x77,0x7c,0x39,0x5e,0x79,0x71};
2.共阴带小数点0-F段码为:{0xbf,0x86,0xdb,0xcf,0xe6,0xed,0xfd,0x87,0xff,0xef,0xf7,0xfc,0xb9,0xde,0xf9,0xf1,0xbf,0x7f};
'0xbf'----'-' , '0x7f'----'.' ,前面的为0-15十六进制数
共阳数码管
3.共阳不带小数点0-F段码为:{0xc0,0xf9,0xa4,0xb0,0x99,0x92,0x82,0xf8,0x80,0x90,0x88,0x83,0xc6,0xa1,0x86,0x8e};
4.共阳带小数点0-F段码为:{0x40,0x79,0x24,0x30,0x19,0x12,0x02,0x78,0x00,0x10,0x08,0x03,0x46,0x21,0x06,0x0e};
2.代码
#include <STC15F2K60S2.H>
unsigned char code SMG_duanma[18] = {0xc0,0xf9,0xa4,0xb0,0x99,0x92,0x82,0xf8,0x80,0x90,0x88,0x83,0xc6,0xa1,0x86,0x8e};
void Delay(unsigned int t)//数码管显示需要加入延时,否则显示不出来
{
	while(t--);
	while(t--);
}
void Init_HC138(unsigned char n)
{
	switch(n)
	{
		case 7:
			P2 = (P2 & 0x1f)|0xe0;
			break;
		case 6:
			P2 = (P2 & 0x1f)|0xc0;
			break;
		case 5:
			P2 = (P2 & 0x1f)|0xa0;
			break;
		case 4:
			P2 = (P2 & 0x1f)|0x80;
			break;
		case 3:
			P2 = (P2 & 0x1f)|0x60;
			break;
		case 2:
			P2 = (P2 & 0x1f)|0x40;
			break;
		case 1:
			P2 = (P2 & 0x1f)|0x20;
			break;
	}
}
void system_init()
{
	Init_HC138(5);
	P0 = 0x00;  //关闭蜂鸣器和继电器
}
void SMGshow(unsigned char dat,unsigned char pos)//pos:0-7
{
	Init_HC138(6);  //选择数码管的位置
	P0 = 0x01<<pos;
	Init_HC138(7);  //数码管显示内容
	P0 = dat;
}
void SMG_static()
{
	unsigned char i,j;
	for(i=0;i<8;i++)//每个数码管一次显示0-9
	{
		for(j=0;j<10;j++)
		{
			SMGshow(SMG_duanma[j],i);
			Delay(60000);
		}
	}
	for(j=0;j<16;j++)//数码管全部显示0-F
	{
		Init_HC138(6);  //选择数码管的位置
		P0 = 0xff;
		Init_HC138(7);  //数码管显示内容
		P0 = SMG_duanma[j];
		Delay(60000);//数码管显示需要加入延时
	}
}
void main()
{
	system_init();
	while(1)
	{
		SMG_static();
	}
}
数码管动态显示
1.原理图
原理图与数码管静态显示中的一致,动态显示也是通过数码管一个一个点亮,只是延时的时间比较端,人眼的视觉暂留等效应,导致看起可以一致显示,动态显示能够节省引脚。
2.代码
#include <STC15F2K60S2.H>
unsigned char month = 1;
unsigned char code SMG_duanma[18] = {0xc0,0xf9,0xa4,0xb0,0x99,0x92,0x82,0xf8,0x80,0x90,0x88,0x83,0xc6,0xa1,0x86,0x8e,0xbf,0x7f};
void Delay(unsigned int t)//数码管显示需要加入延时,否则显示不出来
{
	while(t--);//注意这里的while(t--)有一个就行,测试的时候发现有两个无法动态显示,当然也可以通过定时器进行延时

}
void Init_HC138(unsigned char n)
{
	switch(n)
	{
		case 7:
			P2 = (P2 & 0x1f) | 0xe0;
			break;
		case 6:
			P2 = (P2 & 0x1f) | 0xc0;
			break;
		case 5:
			P2 = (P2 & 0x1f) | 0xa0;
			break;
		case 4:
			P2 = (P2 & 0x1f) | 0x80;
			break;
		case 3:
			P2 = (P2 & 0x1f) | 0x60;
			break;
		case 2:
			P2 = (P2 & 0x1f) | 0x40;
			break;
		case 1:
			P2 = (P2 & 0x1f) | 0x20;
			break;
	}
}
void system_init()
{
	Init_HC138(5);
	P0 = 0XAE;//关闭蜂鸣器以及继电器
}
void SMG_show(unsigned char dat,unsigned char pos)//pos:0-7
{
	Init_HC138(6);//选择数码管位置
	P0 = 0x01<<pos;
	Init_HC138(7);//选择数码管显示内容
	P0 = SMG_duanma[dat];

}
void SMG_dynamics()
{
	SMG_show(2,0);
	Delay(300);
	SMG_show(0,1);
	Delay(300);
	SMG_show(2,2);
	Delay(300);
	SMG_show(3,3);
	Delay(300);
	SMG_show(16,4);
	Delay(300);
	SMG_show(17,5);
	Delay(300);
	SMG_show(month/10,6);
	Delay(300);
	SMG_show(month%10,7);
	Delay(300);
}
void Dynamatics_Delay(unsigned int t)//这里的延时需要用这种方式,让延时短一点。
{
	while(t--)
	{
		SMG_dynamics();
	}
}
void main()
{
	system_init();
	while(1)
	{
		SMG_dynamics();
		month++;
		if(month>12)
		month = 1;
		Dynamatics_Delay(100);
	}
}
3.问题
void Delay(unsigned int t)//数码管显示需要加入延时,否则显示不出来
{
while(t--);
}
注意:这里的while(t--)有一个就行,测试的时候发现有两个无法动态显示,当然也可以通过定时器进行延时 。
void Dynamatics_Delay(unsigned int t)
{
while(t--)
{
SMG_dynamics();
}
}
需要调用这种的刷新方式,直接延时的话时间需要短一点。
独立按键的基本操作与扩展应用
1.原理图
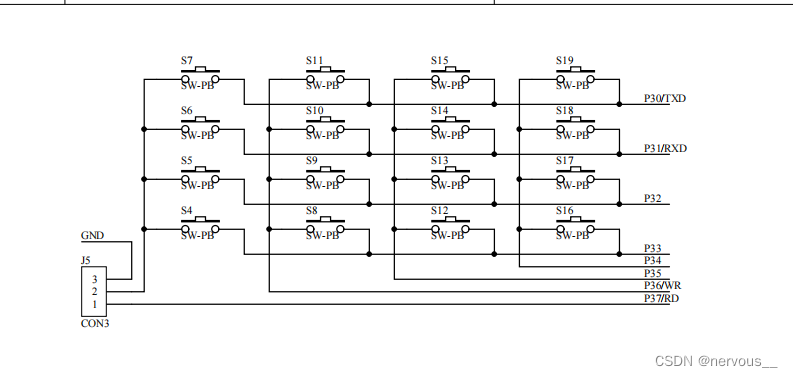
使用独立按键的时候,需要将J5跳帽接到独立按键!!!
当按键按下,对应的引脚就会产生一个低电平,通过读取引脚电平判断那个按键按下。
2.代码
#include <STC15F2K60S2.H>
unsigned char state = 0;
sbit S7 = P3^0;
sbit S6 = P3^1;
sbit S5 = P3^2;
sbit S4 = P3^3;

sbit L1 = P0^0;
sbit L2 = P0^1;
sbit L3 = P0^2;
sbit L4 = P0^3;
sbit L5 = P0^4;
sbit L6 = P0^5;

void Init_HC138(unsigned char n)
{
	switch(n)
	{
		case 7:
			P2 = (P2 & 0X1F)| 0xe0;
			break;
		case 6:
			P2 = (P2 & 0X1F)| 0xC0;
			break;
		case 5:
			P2 = (P2 & 0X1F)| 0xA0;
			break;
		case 4:
			P2 = (P2 & 0X1F)| 0x80;
			break;
		case 3:
			P2 = (P2 & 0X1F)| 0x60;
			break;
		case 2:
			P2 = (P2 & 0X1F)| 0x40;
			break;
		case 1:
			P2 = (P2 & 0X1F)| 0x20;
			break;
	}
}
void Delay(unsigned int n)
{
	while(n--);
}
void Scankeys_Alone()
{
	if(S7 == 0)
	{
		Delay(100);//按键消抖
		if(S7 == 0&&state == 0)
		{
			L1 = 0;
			state = 1;
		}
		else if(S7 == 0&&state == 1)
		{
			L1 = 1;
			state = 0;
		}
		while(S7 == 0);
	}
	if(S6 == 0)
	{
		Delay(100);//按键消抖
		if(S6 == 0&&state == 0)
		{
			L2 = 0;
			state = 2;
		}
		else if(state == 2)
		{
			L2 = 1;
			state = 0;
		}
		while(S6 == 0);
	}
	if(S5 == 0)
	{
		Delay(100);//按键消抖
		if(S5 == 0&& state ==1)
		{
			L3 = 0;
			while(S5 == 0);
			L3 = 1;
		}
		else if(S5 == 0&& state ==2)
		{
			L5 = 0;
			while(S5 == 0);
			L5 = 1;
		}
	}
	if(S4 == 0)
	{
		Delay(100);//按键消抖
		if(S4 == 0&&state == 1)
		{
			L4 = 0;
			while(S4 == 0);
			L4 = 1;
		}
		else if(S4 == 0&&state == 2)
		{
			L6 = 0;
			while(S4 == 0);
			L6 = 1;
		}
	}
}
void main()
{
	//system_init();
	Init_HC138(4);
	while(1)
	{
		Scankeys_Alone();
	}
}
注意while(S7 == 0);需要加上去,不然总是按键一按总是一闪一闪的。
3.问题
在强调一遍使用独立按键的时候,需要将J5跳帽接到独立按键!!!

矩阵键盘与其应用
1.原理图
原理图如上图所示,注意矩阵按键扫描的方式为:先扫描某一行(对某一行附0),再对某一列进行扫描检测,检测到低电平则可以知道按键按下的位置。
2.代码
#include <STC15F2K60S2.H>
sbit R1 = P3^0;
sbit R2 = P3^1;
sbit R3 = P3^2;
sbit R4 = P3^3;

sbit C1 = P4^4;
sbit C2 = P4^2;
sbit C3 = P3^5;
sbit C4 = P3^4;
unsigned char keynum =0;
unsigned char code SMG_duanma[18] = {0xc0,0xf9,0xa4,0xb0,0x99,0x92,0x82,0xf8,0x80,0x90,0x88,0x83,0xc6,0xa1,0x86,0x8e,0xbf,0x7f};
void Init_HC138(unsigned char n)
{
	switch(n)
	{
		case 7:
			P2 = (P2 & 0x1f)|0xe0;
			break;
		case 6:
			P2 = (P2 & 0x1f)|0xc0;
			break;
		case 5:
			P2 = (P2 & 0x1f)|0xa0;
			break;
		case 4:
			P2 = (P2 & 0x1f)|0x80;
			break;
		case 3:
			P2 = (P2 & 0x1f)|0x60;
			break;
		case 2:
			P2 = (P2 & 0x1f)|0x40;
			break;
		case 1:
			P2 = (P2 & 0x1f)|0x20;
			break;
	}
}
void Displaykeynum(unsigned char dat)
{
	Init_HC138(6);//选择数码管位置
	P0 = 0x01;
	Init_HC138(7);//显示数码管
	P0 = SMG_duanma[dat];
}
void Scankeymulti()
{
	R1 = 0;//对某一行扫描
	R2=R3=R4=1;
	C1=C2=C3=C4=1;//将所有的列附1
	if(C1 == 0)
	{
		while(C1 == 0);
		keynum = 0;
		Displaykeynum(keynum);
	}
	else if(C2 == 0)
	{
		while(C2 == 0);
		keynum = 1;
		Displaykeynum(keynum);
	}
	else if(C3 == 0)
	{
		while(C3 == 0);
		keynum = 2;
		Displaykeynum(keynum);
	}
	else if(C4 == 0)
	{
		while(C4 == 0);
		keynum = 3;
		Displaykeynum(keynum);
	}

	R2 = 0;
	R1=R3=R4=1;
	C1=C2=C3=C4=1;
	if(C1 == 0)
	{
		while(C1 == 0);
		keynum = 4;
		Displaykeynum(keynum);
	}
	else if(C2 == 0)
	{
		while(C2 == 0);
		keynum = 5;
		Displaykeynum(keynum);
	}
	else if(C3 == 0)
	{
		while(C3 == 0);
		keynum = 6;
		Displaykeynum(keynum);
	}
	else if(C4 == 0)
	{
		while(C4 == 0);
		keynum = 7;
		Displaykeynum(keynum);
	}

	R3 = 0;
	R2=R4=R1=1;
	C1=C2=C3=C4=1;
	if(C1 == 0)
	{
		while(C1 == 0);
		keynum = 8;
		Displaykeynum(keynum);
	}
	else if(C2 == 0)
	{
		while(C2 == 0);
		keynum = 9;
		Displaykeynum(keynum);
	}
	else if(C3 == 0)
	{
		while(C3 == 0);
		keynum = 10;
		Displaykeynum(keynum);
	}
	else if(C4 == 0)
	{
		while(C4 == 0);
		keynum = 11;
		Displaykeynum(keynum);
	}

	R4 = 0;
	R2=R1=R3=1;
	C1=C2=C3=C4=1;
	if(C1 == 0)
	{
		while(C1 == 0);
		keynum = 12;
		Displaykeynum(keynum);
	}
	else if(C2 == 0)
	{
		while(C2 == 0);
		keynum = 13;
		Displaykeynum(keynum);
	}
	else if(C3 == 0)
	{
		while(C3 == 0);
		keynum = 14;
		Displaykeynum(keynum);
	}
	else if(C4 == 0)
	{
		while(C4 == 0);
		keynum = 15;
		Displaykeynum(keynum);
	}
}
void main()
{
	while(1)
	{
		Scankeymulti();
	}

}
注意while(C1 == 0);“;”不要漏了,不然逻辑就错了。
3.问题
这款芯片的原理图有问题,需要将P3^6改为P4^2,P3^7改为P4^4!!!


 2677
2677


 被折叠的 条评论
为什么被折叠?
被折叠的 条评论
为什么被折叠?
 到【灌水乐园】发言


