


总结一下
写东西,真的是特别有助于加深理解
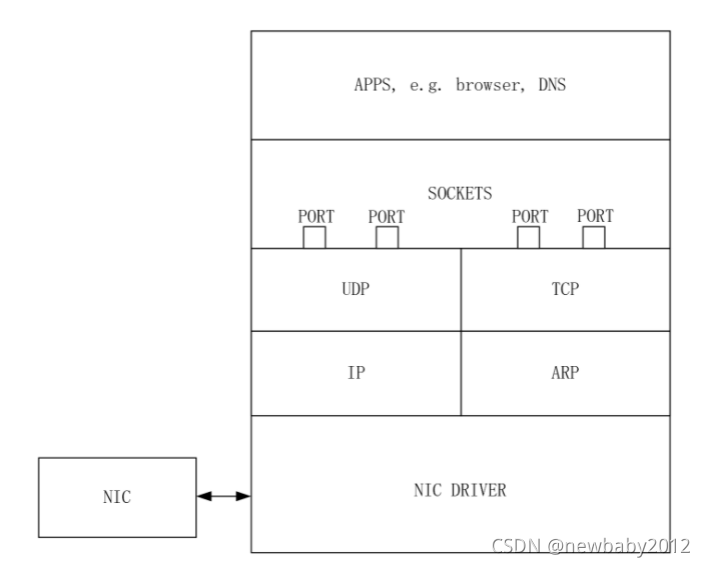
就是实现网卡的发送(e1000_transimit)和接收(e1000_recv),两者的实现基于两个队列(tx和rx),参考 MIT 6.S081 Lecture Notes | Xiao Fan (樊潇) 的第17章节, 下图NIC(network interface card),就是网卡
队列Ring的结构如下,

要发送消息时,tx的Tail向前移动一格;如果一个消息已经发送完毕,那么tx的Head向前移动一格;接收到一个消息时,head向前移动一格;软件读取tail指向的mbuf,然后向前移动一格,mbuf的结构体如下:
struct mbuf {
  struct mbuf  *next; // the next mbuf in the chain
  char         *head; // the current start position of the buffer
  unsigned int len;   // the length of the buffer
  char         buf[MBUF_SIZE]; // the backing store
};
代码如下:
int
e1000_transmit(struct mbuf *m)
{
  //
  // Your code here.
  //
  // the mbuf contains an ethernet frame; program it into
  // the TX descriptor ring so that the e1000 sends it. Stash
  // a pointer so that it can be freed after sending.
  //
  acquire(&e1000_lock);
  uint32 tx_index = regs[E1000_TDT];  // tail pointer
  if ((tx_ring[tx_index].status & E1000_TXD_STAT_DD) == 0) {
    release(&e1000_lock);
    return -1;
  } else if (tx_mbufs[tx_index] != 0) {
    mbuffree(tx_mbufs[tx_index]);
  }
  // fill in the mbuf ring
  tx_mbufs[tx_index] = m;
  // fill in the descriptor
  tx_ring[tx_index].addr = (uint64)m->head;
  tx_ring[tx_index].length = m->len;
  tx_ring[tx_index].cmd = E1000_TXD_CMD_EOP | E1000_TXD_CMD_RS;
  regs[E1000_TDT] = (tx_index + 1) % TX_RING_SIZE; // foward the tail by 1
  if (&tx_ring[tx_index] == 0 || tx_mbufs[tx_index] == 0) {
    release(&e1000_lock);
    return -1;
  }
  release(&e1000_lock);
  return 0;
}

static void
e1000_recv(void)
{
  //
  // Your code here.
  //
  // Check for packets that have arrived from the e1000
  // Create and deliver an mbuf for each packet (using net_rx()).
  //
  while (1) {
    uint32 rx_index = (regs[E1000_RDT]+1)%RX_RING_SIZE;
    if ((rx_ring[rx_index].status & E1000_RXD_STAT_DD) == 0) {
      break;
    }
    rx_mbufs[rx_index]->len = rx_ring[rx_index].length;
    net_rx(rx_mbufs[rx_index]);
    rx_mbufs[rx_index] = mbufalloc(0);
    // fill in the descriptor
    rx_ring[rx_index].addr = (uint64)rx_mbufs[rx_index]->head;
    rx_ring[rx_index].status = 0;
    regs[E1000_RDT] = rx_index;
  }
}
光改这个运行make qemu和nettests其实没用,还得make server执行server.py程序
整个流程,我描述一下,就是server.py用来监听26099端口
nettest用来发送消息,发送时会调用net.c的接口,根据协议类型调用不同的接口,udp,ip或者arp,比如调用udp时的调用链:
net_tx_udp() -> net_tx_ip() -> net_tx_eth() -> e1000_transmit(mbuf)
调用arp时调用链为:
net_tx_arp() -> net_tx_eth() -> e1000_transmit(mbuf)
以nettest的ping为例,下面的connect,其实是把socket连接(sport和dport端到端的连接)和某个文件描述符fd绑定,然后在fd上面进行读写
static void
ping(uint16 sport, uint16 dport, int attempts)
{
  int fd;
  char *obuf = "a message from xv6!";
  uint32 dst;
  dst = (10 << 24) | (0 << 16) | (2 << 8) | (2 << 0);


  if((fd = connect(dst, sport, dport)) < 0){
    fprintf(2, "ping: connect() failed\n");
    exit(1);
  }
....
    write(fd, obuf, strlen(obuf)) < 0
...
  char ibuf[128];
  int cc = read(fd, ibuf, sizeof(ibuf)-1);
  ....
}
解释server.py之前,先介绍下sock的结构体
struct sock {
  struct sock *next; // the next socket in the list
  uint32 raddr;      // the remote IPv4 address
  uint16 lport;      // the local UDP port number
  uint16 rport;      // the remote UDP port number
  struct spinlock lock; // protects the rxq
  struct mbufq rxq;  // a queue of packets waiting to be received
};
然后是server.py的代码:
while True:
    buf, raddr = sock.recvfrom(4096)
    print(buf.decode("utf-8"), file=sys.stderr)
    if buf:
        sent = sock.sendto(b'this is the host!', raddr)
recvfrom就是接收消息,而print用来打印接收到的消息,实验中是xxx,接收完消息以后,server也会发消息给raddr,其中raddr就是之前发消息给server的端口号,该端口号接收到消息以后,会调用e1000_recv()方法,处理消息,调用链是这样的
e1000_recv() -> net_rx() -> net_rx_ip() -> net_rx_udp() -> sockrecvudp(m, sip, dport, sport);
也就是最后走到了socket
不过还有一种调用链
e1000_recv() -> net_rx() -> net_rx_arp() -> net_tx_arp()
这是因为arp协议不基于socket,所以arp收到了消息以后,处理完,再直接调用net_tx_arp()来发送response


 773
773


 被折叠的 条评论
为什么被折叠?
被折叠的 条评论
为什么被折叠?
 到【灌水乐园】发言


