


Swagger的简单使用
1.目的
通过定义一套标准&完整的框架,用于生成+描述+调用+可视化RESTful风格的Web服务。
-
自动生成同步的在线文档
-
提供Web页面在线测试API
Springfox Reference Documentation 【Swagger官网】
遇事不决看官网
2.开始使用
2.1 引入依赖
        <!-- swagger -->
        <dependency>
            <groupId>io.springfox</groupId>
            <artifactId>springfox-spring-web</artifactId>
            <version>2.9.2</version>
        </dependency>
        <dependency>
            <groupId>io.springfox</groupId>
            <artifactId>springfox-swagger2</artifactId>
            <version>2.9.2</version>
        </dependency>
        <dependency>
            <groupId>io.springfox</groupId>
            <artifactId>springfox-swagger-ui</artifactId>
            <version>2.9.2</version>
        </dependency>
swagger2与Springboot的版本之间需要适配,否则项目启动时会报异常
Failed to start bean 'documentationPluginsBootstrapper'; nested exception is
本质还是版本适配的原因 所以一定要选择正确的版本
本次本地环境中新起的Springboot的版本号是2.7.2的,所以上面Swagger2的版本号为2.9.2并不适配… 无法启动,故经过一些尝试之后选择了3.0.0的swagger2
    <parent>
        <groupId>org.springframework.boot</groupId>
        <artifactId>spring-boot-starter-parent</artifactId>
        <version>2.7.2</version>
        <relativePath/> <!-- lookup parent from repository -->
    </parent>

    <!-- 我也不清楚引这些是否存在-->
        <dependency>
            <groupId>io.springfox</groupId>
            <artifactId>springfox-spring-web</artifactId>
            <version>3.0.0</version>
        </dependency>
        <dependency>
            <groupId>io.springfox</groupId>
            <artifactId>springfox-swagger2</artifactId>
            <version>3.0.0</version>
        </dependency>
        <dependency>
            <groupId>io.springfox</groupId>
            <artifactId>springfox-swagger-ui</artifactId>
            <version>3.0.0</version>
        </dependency>
        <dependency>
            <groupId>io.springfox</groupId>
            <artifactId>springfox-boot-starter</artifactId>
            <version>3.0.0</version>
        </dependency>
2.2编写配置文件
配置文件目录下添加配置文件,SwaggerConfig.java
@Configuration
@EnableSwagger2
public class SwaggerConfig {
}
在项目启动的配置文件application.xml中也要配上相应的说明
spring:
  mvc:
    pathmatch:
      matching-strategy: ant_path_matcher
弄好了配置文件之后,简单的启动服务器并访问
http://localhost:8099/swagger-ui/index.html

还是看看人家截图截🉐好一些的把 他的index url和我这个版本的不一致
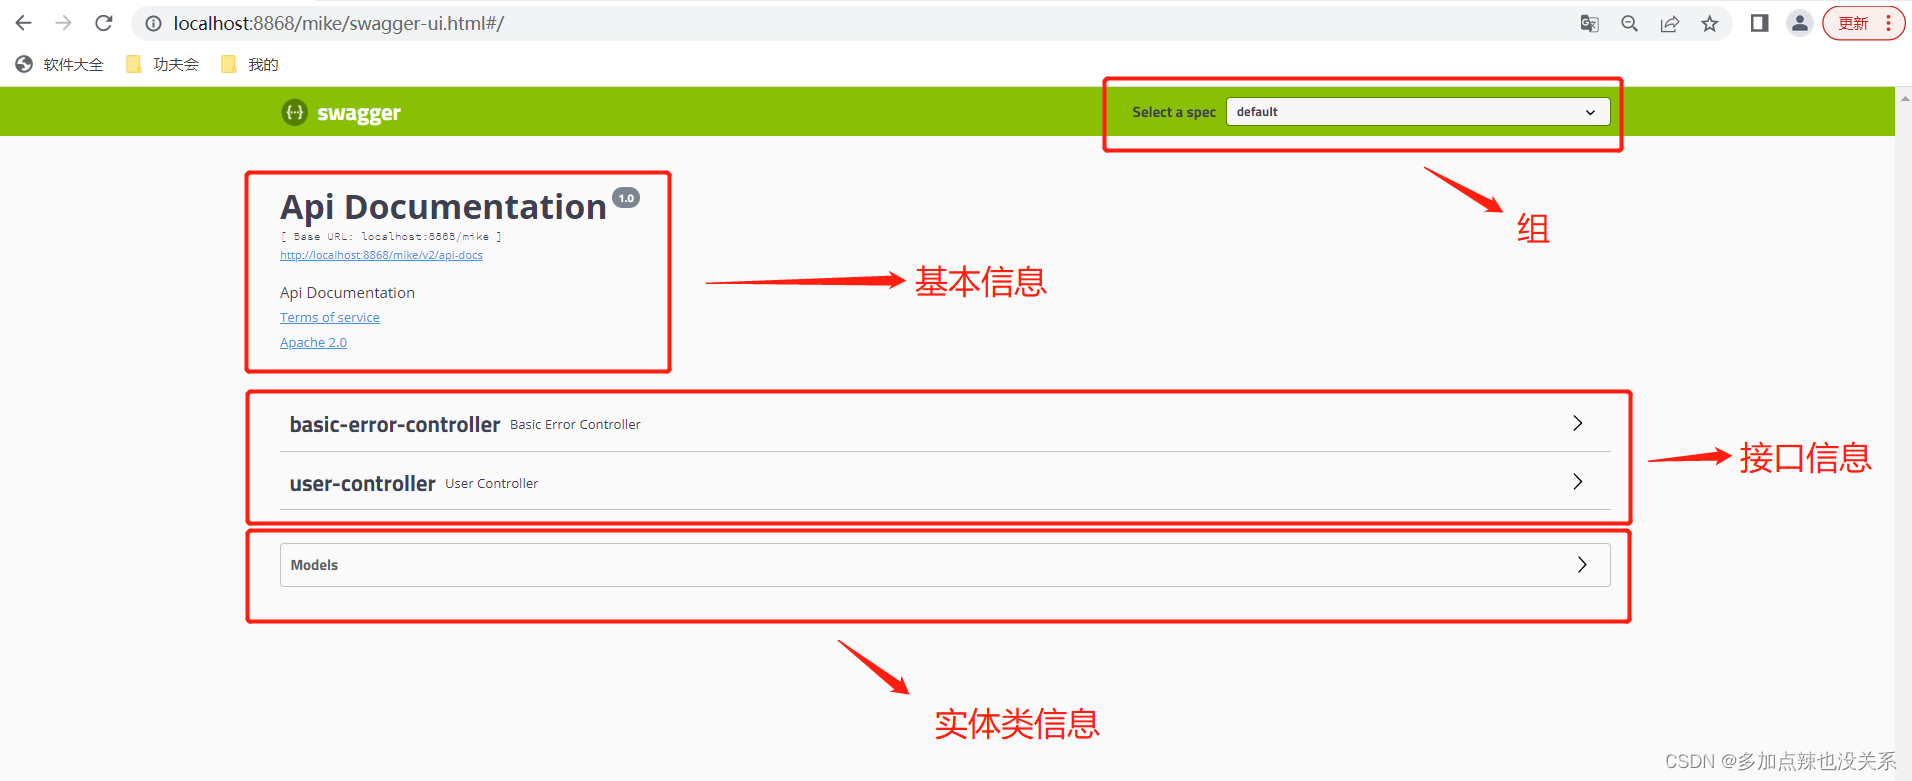
可以看到 Swagger 文档中大概有这四类信息
- 组
- 基本信息
- 接口信息
- 实体类信息
2.3配置基本信息
ApiInfo 中默认的基本设置
    title:Api Documentation
    description:Api Documentation
    version:1.0
    termsOfServiceUrl:urn:tos
    contact:无
    license:Apache 2.0
    licenseUrl:http://www.apache.org/licenses/LICENSE-2.0
向配置文件中添加基本的配置信息,不过多赘述,见样例知其意
    @Bean
    public Docket docket() {
        // 创建一个 swagger 的 bean 实例
        return new Docket(DocumentationType.SWAGGER_2)
                // 配置基本信息
                .apiInfo(apiInfo())
                ;
    }

    // 基本信息设置
    private ApiInfo apiInfo() {
        Contact contact = new Contact(
                "逆臣", // 作者姓名
                "https://blog.csdn.net/niaopuguan9492?type=blog", // 作者网址
                "test@163.com"); // 作者邮箱
        return new ApiInfoBuilder()
                .title("toyspringboot-接口文档") // 标题
                .description("工具学习和使用的demo 会主键丰富的") // 描述
                .termsOfServiceUrl("https://www.baidu.com") // 跳转连接
                .version("1.0") // 版本
                .license("Swagger的简单使用")
                .licenseUrl("https://blog.csdn.net/niaopuguan9492?type=blog")
                .contact(contact)
                .build();
    }
2.3设置扫描接口
    @Bean
    public Docket docket() {
        // 创建一个 swagger 的 bean 实例
        return new Docket(DocumentationType.SWAGGER_2)

                // 配置接口信息
                .select() // 设置扫描接口
                // 配置如何扫描接口
                .apis(RequestHandlerSelectors
                        //.any() // 扫描全部的接口,默认
                        //.none() // 全部不扫描
                        .basePackage("com.example.toyspringboot") // 扫描指定包下的接口,最为常用
                        //.withClassAnnotation(RestController.class) // 扫描带有指定注解的类下所有接口
                        //.withMethodAnnotation(PostMapping.class) // 扫描带有只当注解的方法接口

                )
                .paths(PathSelectors
                        .any() // 满足条件的路径,该断言总为true
                        //.none() // 不满足条件的路径,该断言总为false(可用于生成环境屏蔽 swagger)
                        //.ant("/user/**") // 满足字符串表达式路径
                        //.regex("") // 符合正则的路径
                )
                .build();
    }
2.4配置分组信息
默认分组是default,通过 .groupName(String) 可以设置分组
图为原始分组

可以通过如下进行修改👇
    @Bean
    public Docket docket() {
        // 创建一个 swagger 的 bean 实例
        return new Docket(DocumentationType.SWAGGER_2)
                .groupName(""逆臣(中文)"") // 修改组名为中文也可
                ;
    }
如果需要多个组,则需要配置多个docket()方法👇
//额外配置一个Docket 用于展示路径为/error的所有接口(基础接口)
@Bean
    public Docket docket2() {
        // 创建一个 swagger 的 bean 实例
        return new Docket(DocumentationType.SWAGGER_2)
                .groupName("Nichen") // 修改组名为 "Nichen"
                // 配置接口信息
                .select() // 设置扫描接口
                // 配置如何扫描接口
                .apis(RequestHandlerSelectors
                        .any() // 扫描全部的接口,默认
                )
                .paths(PathSelectors
                        .ant("/error") // 满足字符串表达式路径
                )
                .build();
    }
3.Swagger的开启
生产环境若开启Swagger那就直接信息安全警告,所以必须慎重慎重再慎重,不能沦为笑话
使用3个不同的配置文件分别表示开发,测试和生产,此处仅配置他们处于不同的端口
-
application.yml 全局
-
application-dev.yml 开发
-
application-test.yml 测试
-
application-prod.yml 生产
application.yml 内容如下,用于指定选择的环境:
spring:
  profiles:
    active: dev
可以通过代码判断此时是在什么环境:dev、test、pro,如果是在 pro 生产环境,则关闭 swagger
通过修改环境范围变量Profiles的可选值进行操作
import org.springframework.core.env.Environment;
import org.springframework.core.env.Profiles;
    /**
     * swagger 配置
     * @param environment 环境
     */
    @Bean
    public Docket docket(Environment environment) {

        // 设置环境范围
        Profiles profiles = Profiles.of("dev","test");
        // 如果在该环境返回内则返回:true,反之返回 false
        boolean flag = environment.acceptsProfiles(profiles);

        // 创建一个 swagger 的 bean 实例
        return new Docket(DocumentationType.SWAGGER_2)
                .enable(flag) // 是否开启 swagger:true -> 开启,false -> 关闭
                ;
    }
通过这样配置,当application.yml配置开启dev或者test环境时,可以顺利访问swagger,但是如果配置开启prod时,则swagger打不开。
4.常用注解使用
能够将接口中出现的相应的实体类展示在Models下。前文中的一个接口 /student/id_classname 接口所返回的就是一个StudentInfo的实体类,那么在Model中,我们就能看到关于其的信息👇

这些注解都来自于
import io.swagger.annotations.*;
@ApiModel
作用与类上面 描述基本信息。
-
value:提供类的一个备用名,如果不设置,默认情况下将使用
-
class 类的名称
-
description:对于类,提供一个详细的描述信息
-
parent:这个属性用于描述的是类的一些父类信息
-
discriminator:这个属性解释起来比较麻烦,因为这个类主要体现在断言当中
-
subTypes:可以通过这个属性,指定我们想要使用的子类
打上注解@ApiModel
@ApiModel(value = "学生信息",description = "是数据库中表STUDEN_TINFO的实体类")
@TableName(value ="STUDENT_INFO")
@Data
public class StudentInfo implements Serializable {}
那么启动之后,在Models中可以看到,确实发生了改变

@ApiModelProperty
添加和操作 属性模块的数据,详见@ApiModelProperty注解的用法
实体类的字段作介绍
// 貌似这个接口就value和name有点用阿 好像就只有value用用阿 用来补充说明一下
    @ApiModelProperty(value = "名字",
            name = "name",
            allowableValues = "32", // 限制此参数存储的长度
            access = "1", // 取1时允许从API文档中过滤属性
            notes = "学生的姓名", // 该字段的注释说明
            dataType = "String", //参数的数据类型
            required = false, // 非必须
            position = 1, // 显示地为模型排序
            hidden = false, // 是否隐藏在Swagger定义模型中,默认为false
            example = "1", // 属性的实例值
            readOnly = false, // 是否为只读 看情况貌似过时了
            reference = "id", // 作用为指定对对应类型定义的引用,重写指定的任何其他数据名称。
            allowEmptyValue = false) // 是否允许为空
    private String name;
@ApiOperation
某个方法或者接口 进行描述,详见Swagger @ApiOperation 注解详解
-
value:对该操作进行简单的描述,尽量控制在120字符以内。
-
notes:对操作的详细描述。
-
httpMethod:指定操作使用的HTTP方法类型,可选值 “GET”、“HEAD”、“POST”、“PUT”、“DELETE”、“OPTIONS”和“PATCH”。
-
tags:用来给操作打标签,Swagger UI 将在操作列表下面展示 tag 列表,每个 tag 下面展示拥有该 tag 的操作列表。实例代码:
    //对我来说可能还是value和notes用的比较多一点 tags也许用不上 但是看情况
    //一般来说都是一个功能一个接口
    @ApiOperation(value = "这里时用于修饰接口的注解@ApiOperation的value属性的值",
            notes = "这里时用于修饰接口的注解@ApiOperation的note属性的值",
            httpMethod = "GET")
    @GetMapping("/id_classname")
    @ResponseBody
    public StudentInfo getStudentInfo(
            @Param("id") Integer id,
            @Param("className") String className
    ){
        StudentInfo studentInfo = studentInfoService.selectByIdAndClassname(id, className);
        return studentInfo;
    }
那么打开就这样,主要还是解释清除以下这个接口是干嘛的,接口的HTTP方法类型这种。

@ApiParam
放在方法上或者参数上,字段说明,表示对参数的添加元数据
- name:参数名
- value:参数说明
- required:是否必填
    public StudentInfo getStudentInfo(
            @Param("id") Integer id,
            @Param("className") @ApiParam(value="这是传入的学生班级",required = true) String className
    ){
最后的效果图如下

5.接口调用
在对应处填好参再点点excute,就能看到响应了。


 3248
3248


 被折叠的 条评论
为什么被折叠?
被折叠的 条评论
为什么被折叠?
 到【灌水乐园】发言


