


目录 🚀🚀
创作不易多多支持
什么是MyBatis?
MyBatis 是⼀款优秀的持久层框架,它⽀持⾃定义 SQL、存储过程以及⾼级映射。MyBatis 去除了⼏乎所有的 JDBC 代码以及设置参数和获取结果集的⼯作。MyBatis 可以通过简单的 XML或注解来配置和映射原始类型、接⼝和 Java POJO(Plain Old Java Objects,普通⽼式 Java 对象)为数据库中的记录。
简单来说 MyBatis 是更简单完成程序和数据库交互的⼯具,也就是更简单的操作和读取数据库⼯具.
对于后端来说, 程序由以下两部分组成, 一个是后端程序, 一个是数据库.
- 数据库: 用来存放数据信息
- 后端程序: 用来增删改查用户信息

而想要通过应用程序访问到数据库, 要么手动登录到数据库, 使用最原始的sql语句进行检索或者是更改等操作, 但是使用这样的原始sql操作很不方便, 例如当查询量相当大的时候, 写sql语句的时间成本就成了一个难点.
于是后面就衍生出了使用高级语言来操作数据库, 让机器去操作机器的方式, 我们之后在背后设置检索的条件等即可. 例如于是各大数据库厂商就向各种高级编程语言提供了个性化的接口, 以便不同的语言去操作这个数据库, 例如我们java语言中的JDBC.
那么有了这个JDBC, 为什么我们java程序员还要去学习mybatis??
主要是因为JDBC的操作还是不够简洁, 甚至说是繁琐了, 我们回顾一下JDBC的流程:
- 引入相关依赖.
- 创建数据库连接池对象 : DataSource, 包括创建数据源, 验证用户名和密码.
- 通过DataSource 获取数据库连接对象Connection
- 编写带有占位符?的sql语句
- 通过Connection对象获取预编译对象, 然后对初始sql语句进行预编译
- 然后通过set方法注入参数
- 使用PreparedStatement的对象来执行sql.
- 处理结果
- close释放资源
下面是JDBC的一个例子:
public class JDBCInsert {
    public static void main(String[] args) throws SQLException {
        DataSource dataSource = new MysqlDataSource();
        ((MysqlDataSource)dataSource).setUrl("jdbc:mysql://127.0.0.1:3306/test?characterEncoding=utf8&useSSL=false");
        ((MysqlDataSource)dataSource).setUser("root");
        ((MysqlDataSource)dataSource).setPassword("238638");
        Connection connection = dataSource.getConnection();

        String sql = "insert into student values(18, '张三');";
        PreparedStatement statement = connection.prepareStatement(sql);
        int ret = statement.executeUpdate();
        System.out.println("ret = "+ ret);
    }
}
以上几步, 需要在每次使用数据库的时候, 都需要重复操作一次, 当然你可以自行将其封装成一个类, 这样或许更简洁, 但是仍然繁琐.
有没有另外一个更简单的方法来操作数据库呢? 当然有, 那就是mybatis, 这就是我们为什么要学习mybatis的原因
对于使用方面的疑问, 可以参考:
MyBatis的定位

MyBatis 也是⼀个 ORM 框架,ORM(Object Relational Mapping),即对象关系映射。在⾯向对象编程语⾔中,将关系型数据库中的数据与对象建⽴起映射关系,进⽽⾃动的完成数据与对象
的互相转换 :
1. 将输⼊数据(即传⼊对象)+SQL 映射成原⽣ SQL
2. 将结果集映射为返回对象,即输出对象
ORM 把数据库映射为对象:
- 数据库表(table)--> 类(class)
- 记录(record,⾏数据)--> 对象(object)
- 字段(field) --> 对象的属性(attribute)
⼀般的 ORM 框架,会将数据库模型的每张表都映射为⼀个 Java 类。
也就是说使⽤ MyBatis 可以像操作对象⼀样来操作数据库中的表,可以实现对象和数据库表之间的转换,接下来我们来看 MyBatis 的使⽤吧
接下来我们要实现的功能是:使⽤ MyBatis 的⽅式来读取⽤户表中的所有⽤户,我们使⽤个⼈博客的数据库和数据包,具体 SQL 如下
创建数据库和表
添加MyBatis框架⽀持
添加mybatis框架支持分为两种:
- 对原有的spring项目进行升级
- 创建一个全新的mybatis和spring boot的项目
spring项目升级mybatis
对原有项目进行升级, 也就是直接在spring中添加依赖:
<!-- 添加 MyBatis 框架 -->
<dependency>
    <groupId>org.mybatis.spring.boot</groupId>
    <artifactId>mybatis-spring-boot-starter</artifactId>
    <version>2.1.4</version>
</dependency>
<!-- 添加 MySQL 驱动 -->
<dependency>
    <groupId>mysql</groupId>
    <artifactId>mysql-connector-java</artifactId>
    <version>5.1.38</version>
    <scope>runtime</scope>
</dependency>
或者是使用插件来直接添加, 例如EditStarters:

在pom.xml文件中,右键, 然后生成:

搜索mybatis:

创建mybatis和spring boot项目
添加mybatis需要添加两个工具包, 一个是MyBatis Framework, 也就是mybatis框架, 另外一个就是数据库的驱动包. mysql数据库对应MySQL Driver

配置连接字符串和MyBatis
配置连接字符串
如果是application.yml, 添加如下信息:
# 数据库连接配置
spring:
  datasource:
    url: jdbc:mysql://localhost:3306/datasystem?characterEncoding=utf8&useSSL=false
    username: root
    password: 238638
    driver-class-name: com.mysql.cj.jdbc.Driver
注意:
如果使用mysql-connector-java 是5.x之前使用的是"com.mysql.jdbc.Driver", 如果是大于5.x版本的使用的是:"com.mysql.cj.jdbc.Driver".
数据库的选择通过url来设置, 同时连接的数据库名和密码需要自己进行更改.
配置MyBatis中的XML路径:
这个路径中保存的是查询数据库的具体操作sql语句
首先需要配置路径: 在resources/mapper 创建所有表的 xml文件:
# 数据库连接配置
spring:
  datasource:
    url: jdbc:mysql://localhost:3306/datasystem?characterEncoding=utf8&useSSL=false
    username: root
    password: 238638
    driver-class-name: com.mysql.cj.jdbc.Driver

# 配置 mybatis xml 的⽂件路径,在 resources/mapper 创建所有表的 xml ⽂件
mybatis:
  mapper-locations: classpath:mapper/**Mapper.xml
添加业务代码

首先添加用户实体类(User)
@Data
public class User {
    private Integer id;
    private String username;
    private String password;
    private String photo;
    private Date createTime;
    private Date updateTime;
}
添加 mapper 接⼝
package com.example.mybatis;

import com.example.mybatis.User.User;
import org.apache.ibatis.annotations.Mapper;

import java.util.List;

@Mapper
public interface UserMapper {
    public List<User> getAll();
}
添加 UserMapper.xml
<?xml version="1.0" encoding="UTF-8"?>
<!DOCTYPE mapper PUBLIC "-//mybatis.org//DTD Mapper 3.0//EN" "http://mybati
s.org/dtd/mybatis-3-mapper.dtd">
<mapper namespace="com.example.demo.mapper.UserMapper">


</mapper>
UserMapper.xml 查询所有⽤户的具体实现 SQL:
<?xml version="1.0" encoding="UTF-8"?>
<!DOCTYPE mapper PUBLIC "-//mybatis.org//DTD Mapper 3.0//EN" "http://mybati
s.org/dtd/mybatis-3-mapper.dtd">
<mapper namespace="com.example.demo.mapper.UserMapper">
    <select id="getAll" resultType="com.example.demo.model.User">
        select * from userinfo
    </select>
</mapper>
说明:
- <mapper> 标签: 需要指定namespace属性, 表示命名空间, 值为mapper接口的全限定名, 包括包名和类名
- <select> 查询标签 : 用来执行数据库的查询操作的:
- id: 是和interface中接口定义的方法名称一样的, 表示对接口的具体实现方法
- resultType: 是返回的数据类型, 也就是我们开头定义的实体类
添加Service服务层
@org.springframework.stereotype.Service
public class Service {
    @Resource
    private UserMapper userMapper;

    public List<User> getAll() {
        return userMapper.getAll();
    }

}
添加 Controller控制层
@RestController
@RequestMapping("/u")
public class Controller {
    @Resource
    private Service service;

    @RequestMapping("/getall")
    public List<User> getAll() {
        return service.getAll();
    }
}
使⽤ postman 测试

输出:


增删改查操作
接下来的增删改查也就只是修改<mapper> 标签中的语句了, 除了使用<select> 标签还可以使用其他sql标签:
- insert : <insert >
- update : <update>
- delete : <delete>
其中增删改在xml中是不需要增加resultType属性的
@Param注解
@Param注解是mybatis提供的一种方式, 用于在Mapper接口中指定参数的名称, 他可以用于解决Mapper接口中多个参数的问题, 下面是使用@Param注解的一个例子:
List<Student> selectNameAge(@Param("myname") String name, @Param("age") Integer age);在这个例子中, @Param注解被用于指定方法参数的名称, 这样在Mapper XML文件中就可以使用这些名称来引用这些参数了. 例如:
<select id="selectNameAge" resultType="Student">
  select * from student where name = #{myname} and age = #{age}
</select>
这里的#{myname} 和 #{age} 就是引用了@Param注解中指定的名称
但是, @Param注解中的value属性可以不写, 但是建议还是写上, 这样可以增加代码的可读性
List<Student> selectNameAge(@Param(value = "myname") String name, @Param(value = "age") Integer age);insert
controller层
前端需要将js的对象通过ajax转化成json格式的字符串, 然后通过@ResponseBody来接收解析json字符串.
@RequestMapping(value = "/add",method = RequestMethod.POST)
public Integer add(@RequestBody User user){
    return userService.getAdd(user);
}
mapper接口
默认返回受影响的行数
Integer add(User user);*mapper.xml
<insert id="add">
    insert into userinfo(username,password,photo,state) values(#{username},#{password},#{photo},1)
</insert>
postman测试

特殊添加: 返回自增id
还是以上面的insert为例子, 我们只需要修改*Mapper.xml中的内容即可:
<!-- 返回⾃增id -->
<insert id="add2" useGeneratedKeys="true" keyProperty="id">
    insert into userinfo(username,password,photo,state)
    values(#{username},#{password},#{photo},1)
</insert>- useGenerateKeys: 这是命名mybatis使用JDBC的getGenerateKeys 方法提取出来由数据库生成的主键, 默认为false;
- keyColumn: 设置生成键值在列表中的列名, 当主键列不是表中的第一列的时候, 是必须设置的, 如果生成列不止一个, 可以通过逗号分隔多个属性名称.
- keyProperty:指定能够唯⼀识别对象的属性,MyBatis 会使⽤ getGeneratedKeys 的返回
值或 insert 语句的 selectKey ⼦元素设置它的值,默认值:未设置(unset)。如果⽣成列
不⽌⼀个,可以⽤逗号分隔多个属性名称

有参数的select
mapper接口
User selectOne(@Param("id") Integer id);
controller层
    @RequestMapping("/getById")
    public User selectById(Integer id) {
        return userService.selectById(id);
    }
*mapper.xml
    <select id="selectById" resultType="com.example.test3.User.User">
        select * from userinfo where id = #{id}
    </select>
postman测试

输出:

参数占位符 #{} 和 ${}
预编译处理是指: MyBatis 在处理#{}, 会将SQL中的#{} 替换为?, 使用PreparedStatement的set方法来赋值
直接替换: 是MyBatis 在处理$ {} 时, 就是把 $ {} 替换成变量的值.
使⽤ ${sort} 可以实现排序查询,⽽使⽤ #{sort} 就不能实现排序查询了,因为当使⽤ #{sort} 查询时,如果传递的值为 String 则会加单引号,就会导致 sql 错误.
在Java中,#{}和${}都是MyBatis中用于参数绑定的占位符。它们的区别在于:
- #{} 用于预编译语句中的占位符, 可以放置SQL注入攻击, 因为#{} 会将传入的参数当做一个字符串, 自动进行转义处理, 而不是直接将参数的值拼接到SQL语句中去
- ${} 用于字符串替换, 会将传入的参数直接拼接到SQL语句中, 因此容易受到SQL注入攻击, 因此${} 只能用于传递列名或者表名等不需要转义的参数
下面是一些例子:
// 使用#{}进行参数绑定
@Select("SELECT * FROM user WHERE username = #{username} AND password = #{password}")
User getUser(@Param("username") String username, @Param("password") String password);

// 使用${}进行字符串替换
@Select("SELECT * FROM ${tableName} WHERE id = ${id}")
Map<String, Object> getById(@Param("tableName") String tableName, @Param("id") Long id);
SQL注入的一个例子:
select * from userinfo where username = '${username }' and password ='${password}'此时如果在password中传入' or 1 = '1''
select * from userinfo where username = '${username}' and password = '' or 1='1'那么整个句子的逻辑就变成了:
条件1 and 条件2 or 条件3
and优先级最高, 所以是:
(条件1 and 条件2) or 条件3
也就是说 我不管条件1还是条件2是否成立, 我只要条件3成立即可, 这个时候的条件3 为:
or 1='1'
明显为true, 那么即使password和username是错误的, 也可以返回用户信息.
update
controller层
    @RequestMapping("/update")
    public Integer update(Integer id, String name) {
        return userService.update(id, name);
    }
mapper接口
Integer update(Integer id, String name);*mapper.xml
<update id="update">
    update userinfo set username=#{name} where id = #{id}
</update>
postman测试


like 查询
like查询使用#{}报错
使用mysql内置函数concat()来处理, 实现如下代码:
<select id="findUserByName3" resultType="com.example.demo.model.User">
    select * from userinfo where username like concat('%',#{username},'%');
</select>
然后输入对应的正则表达式即可.
多表查询
返回字典映射:resultMap
使用场景: 字段名称和程序中类的字段名不同, 可以使用resultMap配置映射
一对一和一对多关系可以使用resultMap映射并查询数据.
下面是数据库字段和程序中类的字段不同的情况:


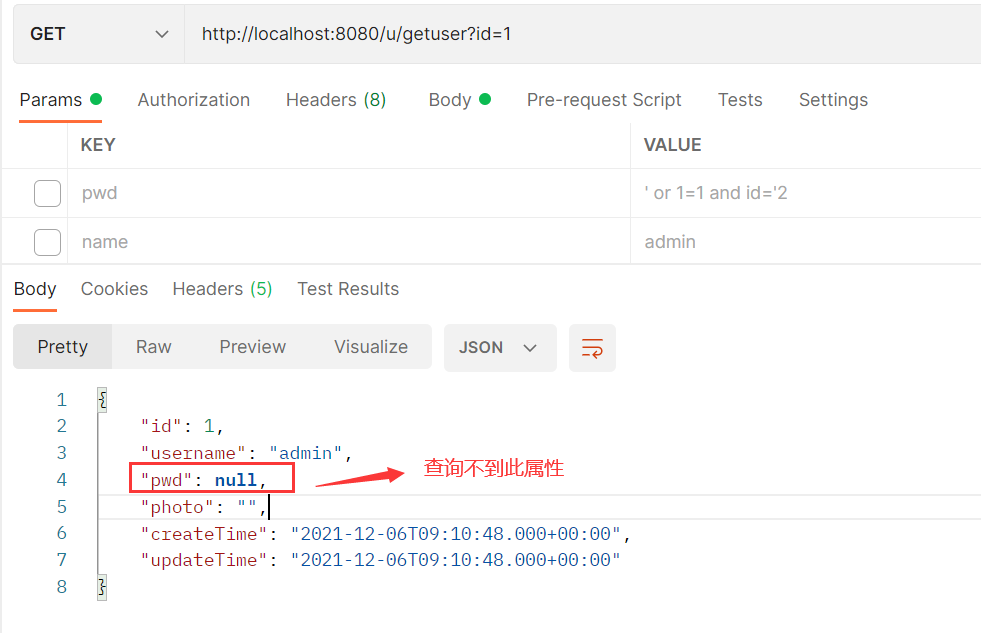
解析: 前端访问Controller, 传来查询请求, 请求查询id为1的对象, Controller传递请求去数据库中拿到了对象, 然后根据数据库中的对象, 将属性根据相同的字段名注入到程序中的类中, 然后将类转化为json字符串进行返回, 其中这个password字段找不到类中与之对应的字段, 本来是pwd, 但是程序无法识别, 所以这个pwd字段就只能空着. 结果返回:
这个时候就可以使用resultMap了
 column 为数据库中的字段名, property是要映射的类中的字段,type中的是要映射的实体类的全限定名, 包括包名. id为标识.
xml:
<resultMap id="BaseMap" type="com.example.demo.model.User">
    <id column="id" property="id"></id>
    <result column="username" property="username"></result>
    <result column="password" property="pwd"></result>
</resultMap>
<select id="getUserById" resultMap="com.example.demo.mapper.UserMapper.BaseMap">
    select * from userinfo where id=#{id}
</select>
select 标签中的resultMap 为resultMap标签中的id.

但是试想一下, 如果我是一个多表查询呢?? 那么映射的就不只有一个对象中的属性了, 那么这个resultMap中国的type属性该如何定义, 该是一起定义两个类吗? 还是单独写一个类, 包含这个两个类的所有字段? 或者是用别的方法? 这就是resultMap在多表查询中的疑问.
多表查询
一对一映射
一对一映射要使用<associate> 标签, 具体案例如下:
type 为一个ArticleInfo类, 它需要和user进行多表查询, 一篇文章对应一个作者,查询的结果需要展示ArticleInfo的所有字段和user的username字段:
    <resultMap id="BaseMap" type="com.example.demo.model.ArticleInfo">
        <id property="id" column="id"></id>
        <result property="title" column="title"></result>
        <result property="content" column="content"></result>
        <result property="createtime" column="createtime"></result>
        <result property="updatetime" column="updatetime"></result>
        <result property="uid" column="uid"></result>
        <result property="rcount" column="rcount"></result>
        <result property="state" column="state"></result>
        <association property="user"
                     resultMap="BaseMap"
                     columnPrefix="u_"
                     column="username">
        </association>
    </resultMap>
    <select id="getAll" resultMap="BaseMap">
        select a.*,u.username u_username from articleinfo a left join userinfo u on a.uid=u.id
    </select>
首先使用resultMap标签写好映射关系, 写完映射关系之后添加<associate>标签, <associate>标签的属性如下:
- property : 被关联的另外一个实体类的属性名
- resultMap : 用于配置一对一关联映射,指定关联的结果集映射,将基于该映射配置来组织⽤户数据
- columnPrefix : 如果省略当联表中如果有相同的字段,那么就会导致查询出错。
⽐如两篇⽂章都是⼀个⼈写的,如果没有 columnPrefix 就会导致查询的⽤户 id(因为和⽂章表 id 相同)查询出错.
ArticleInfo 实体类
import java.time.LocalDateTime;
@Data
public class ArticleInfo {
    private Integer id;
    private String title;
    private String content;
    private LocalDateTime createtime;
    private LocalDateTime updatetime;
    private Integer rcount;
    private User user;
}
ArticleController
@RequestMapping("/a")
@RestController
public class ArticleController {
    @Resource
    private ArticleService articleService;

    @RequestMapping("/getall")
    public List<ArticleInfo> getAll() {
        return articleService.getAll();
    }
}
⼀对多:⼀个⽤户多篇⽂章案例
    <resultMap id="BaseMap" type="com.example.demo.model.User">
        <id column="id" property="id" />
        <result column="username" property="username"></result>
        <result column="password" property="password"></result>
        <result column="photo" property="photo"></result>
        <collection property="alist" resultMap="com.example.demo.mapper.ArticleInfoMapper.BaseMap"
                    columnPrefix="a_">
        </collection>
    </resultMap>
    <select id="getUserById" resultMap="BaseMap">
        select u.*,a.title a_title from userinfo u
                                            left join articleinfo a on u.id=a.uid where u.id=#{id}
    </select>


 3万+
3万+


 被折叠的 条评论
为什么被折叠?
被折叠的 条评论
为什么被折叠?
 到【灌水乐园】发言


