


六月中就要去阿里巴巴实习了,部门使用的web框架是Webx,喜大普奔的发现Webx是开源的,所以认真学习一下。主要参考指导手册
Webx总体介绍
设计理念
这里有许多框架设计的真知灼见!
一个框架的好坏,往往并不是由他所实现的具体功能好坏所决定的,而是由其所使用的基础框架的好坏所决定的。
现在的软件设计都提倡模块化,扩展性,典型的例子就是Spring框架。
SpringExt
Webx Framework
Webx Framework才真正涉及WEB技术,它只负责一系列基础性的任务,并提供pipeline机制以定制WEB处理流程。
初始化Spring容器
<listener-class>com.alibaba.citrus.webx.context.WebxContextLoaderListener</listener-class>
以WebxContextLoaderListener代替Spring的ContextLoaderListener
初始化日志系统
Webx响应请求
增强request、response、session
调用pipeline进行进一步的处理
详细流程
<?xml version="1.0" encoding="UTF-8"?>
<web-app version="2.4" xmlns="http://java.sun.com/xml/ns/j2ee"
    xmlns:xsi="http://www.w3.org/2001/XMLSchema-instance"
    xsi:schemaLocation="
http://java.sun.com/xml/ns/j2ee http://java.sun.com/xml/ns/j2ee/web-app_2_4.xsd ">
...
<filter>
<filter-name>webx</filter-name> <filter-class>com.alibaba.citrus.webx.servlet.WebxFrameworkFilter</filter-class> <init-param>
            <param-name>excludes</param-name>
<param-value><!-- 需要被“排除”的URL路径,以逗号分隔,前缀!表示“包含”。例如/static, *.jpg, !/ uploads/*.jpg --></param-value>
        </init-param>
        <init-param>
            <param-name>passthru</param-name>
<param-value><!-- 需要被“略过”的URL路径,以逗号分隔,前缀!表示“不要略过”。例如/myservlet, *.jsp --></param-value>
        </init-param>
    </filter>
    <filter-mapping>
        <filter-name>webx</filter-name>
        <url-pattern>/*</url-pattern>
    </filter-mapping>
...
</web-app>
如上所示,所有的请求都会经过WebxFrameworkFilter的处理
详细处理流程如下图:
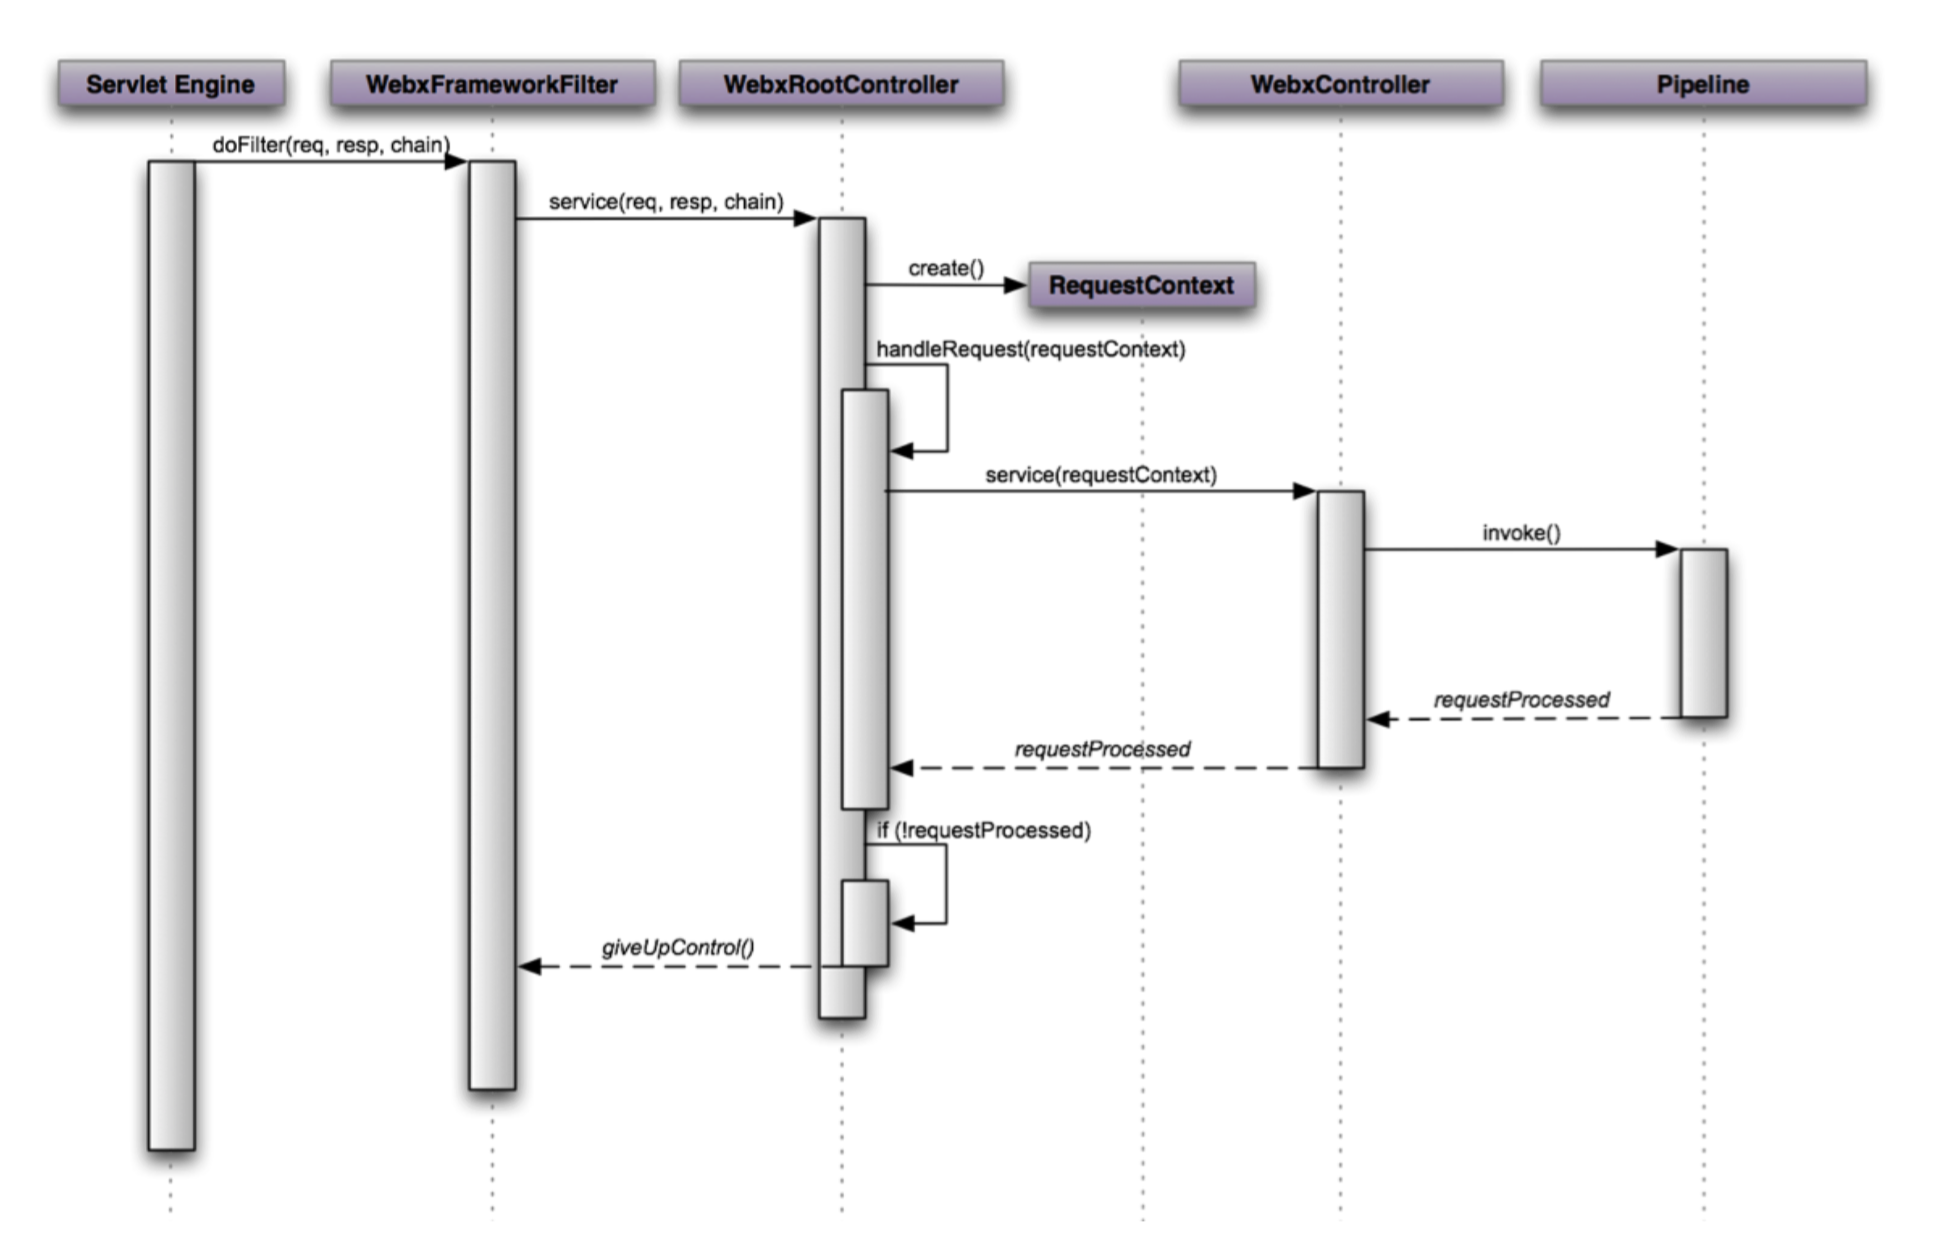
如上图所示,具体的处理流程由WebxRootController和WebxController决定。
定制Webx Framework
- 定制WebxRootController
WebxRootController是被所有子应用所共享的逻辑,WebxRootController的默认处理是增强request、response、session等 - 定制WebxController
WebxController和具体的子应用相对应。WebxController默认的逻辑是调用Pipeline的处理
Webx Turbine
页面驱动
约定胜于配置
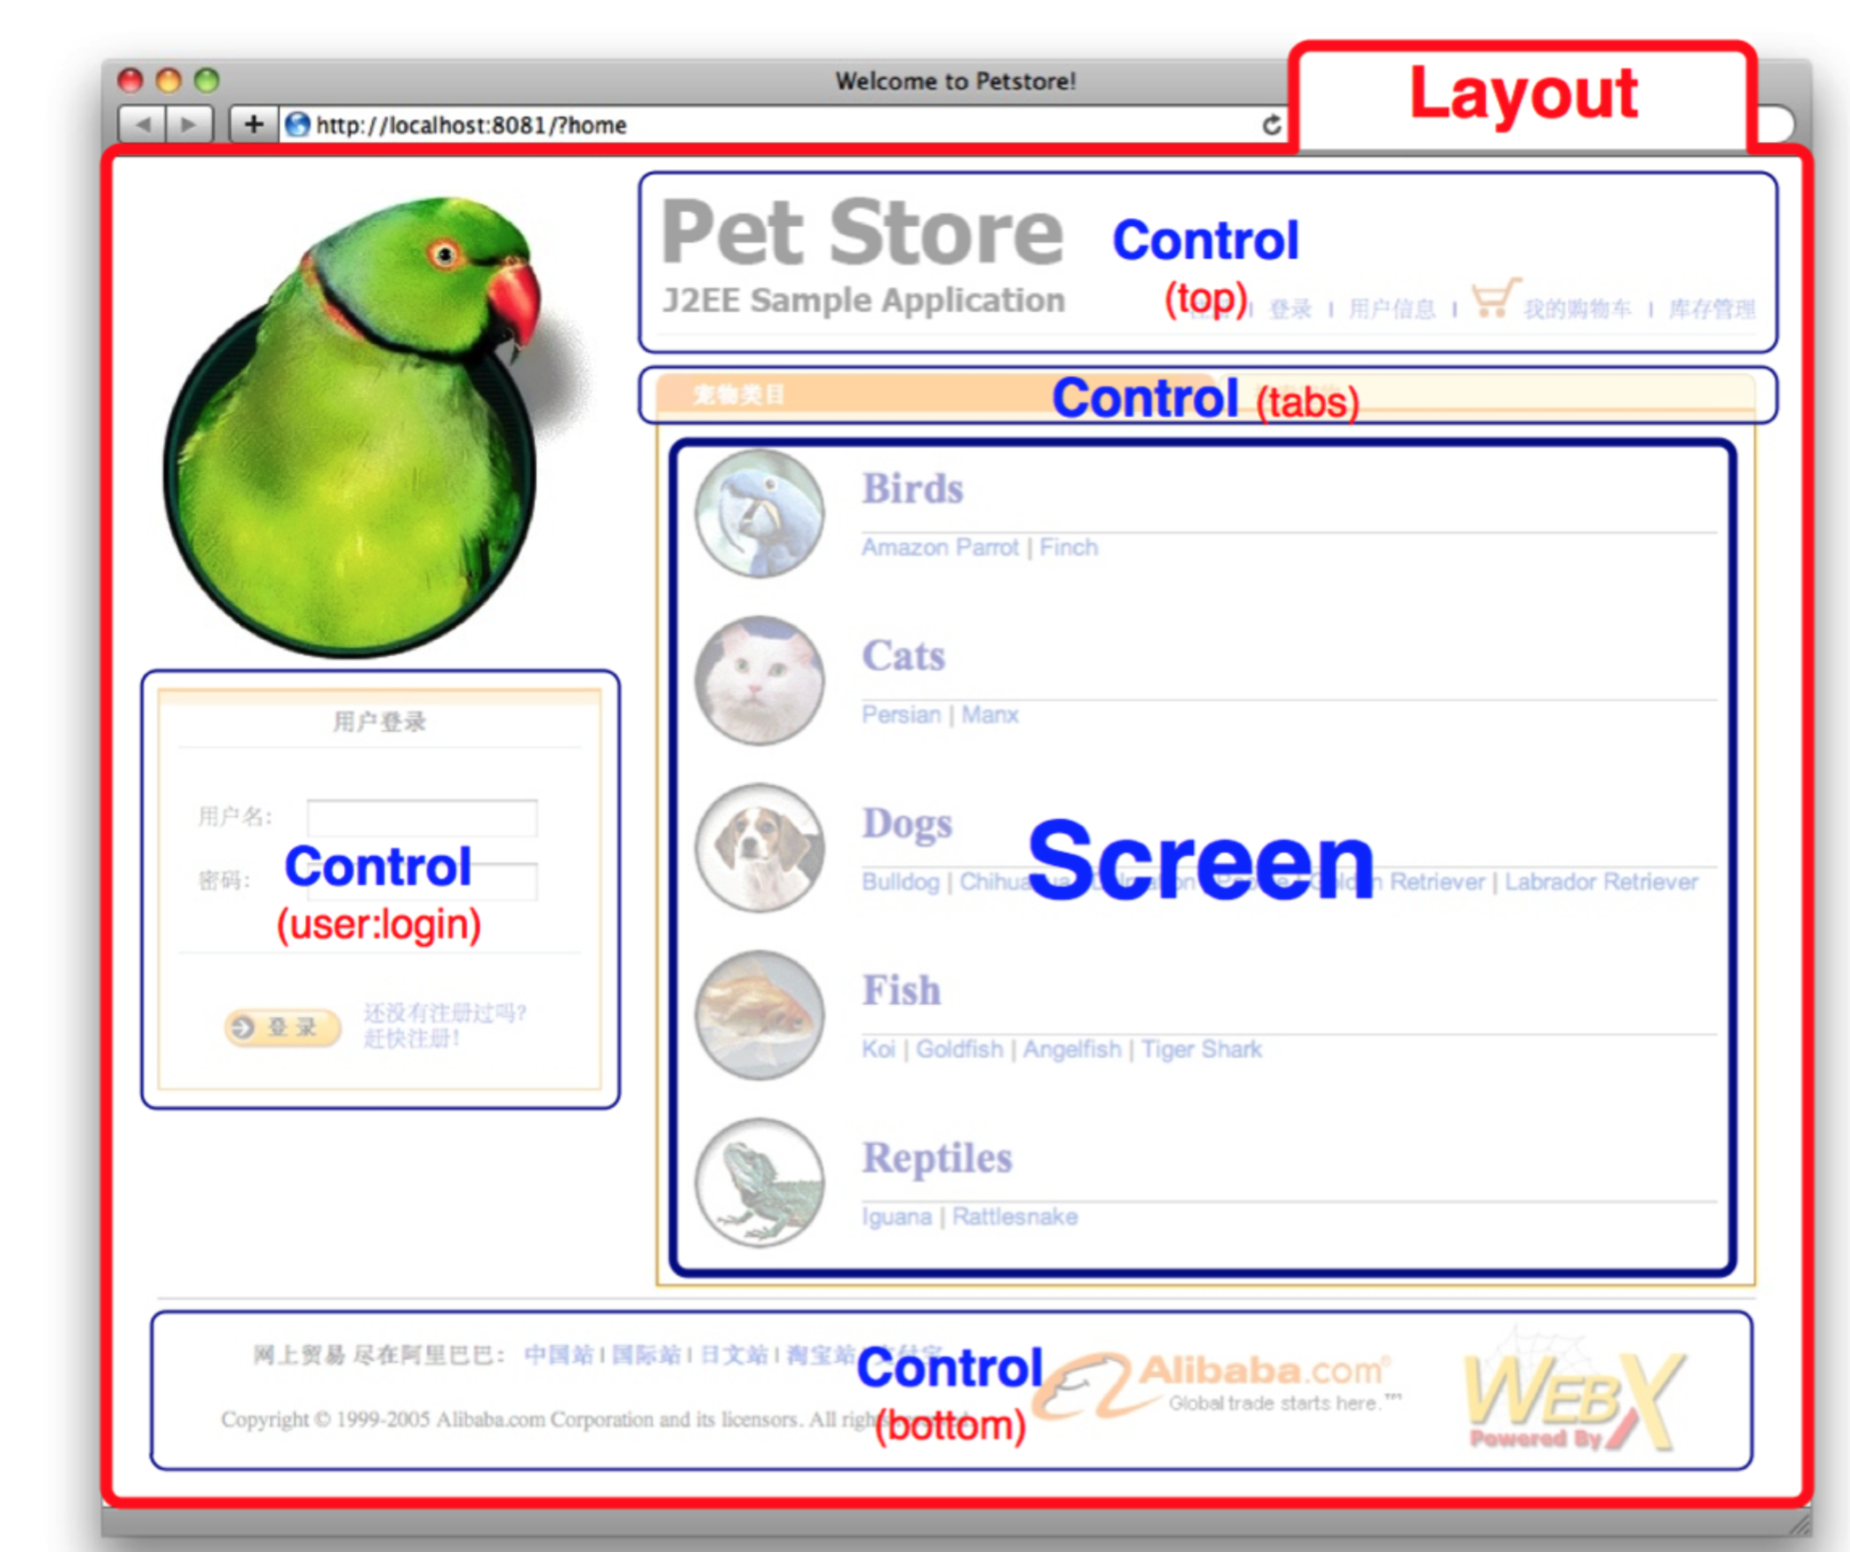
页面布局
页面一般由Screen、[Controller]、[Layout]部分组成
处理页面的基本流程
<services:pipeline xmlns="http://www.alibaba.com/schema/services/pipeline/valves">
<!-- 初始化turbine rundata,并在pipelineContext中设置可能会用到的对象(如rundata、utils),以便valve取得。 -->
    <prepareForTurbine />
<!-- 设置日志系统的上下文,支持把当前请求的详情打印在日志中。 -->
    <setLoggingContext />
<!-- 分析URL,取得target。 -->
    <analyzeURL homepage="homepage" />
<!-- 检查csrf token,防止csrf攻击和重复提交。假如request和session中的token不匹配,则出错,或显示expired页 面。 -->
    <checkCsrfToken />
    <loop>
        <choose>
<when>
<!-- 执行带模板的screen,默认有layout。 -->
                <pl-conditions:target-extension-condition extension="null, vm, jsp" />
                <performAction />
                <performTemplateScreen />
                <renderTemplate />
            </when>
            <when>
<!-- 执行不带模板的screen,默认无layout。 -->
                <pl-conditions:target-extension-condition extension="do" />
                <performAction />
                <performScreen />
            </when>
            <otherwise>
<!-- 将控制交还给servlet engine。 -->
                <exit />
            </otherwise>
</choose>
<!-- 假如rundata.setRedirectTarget()被设置,则循环,否则退出循环。 -->
        <breakUnlessTargetRedirected />
    </loop>
</services:pipeline>
pipeline.xml定义了WebController的处理逻辑对应payment项目,该文件存放在pmt-web子模块中,路径为pmt-web/src/main/webapp/WEB-INF/common/pipeline.xml web.xml文件也存放在该目录,由此可以猜想pmt-web子模块是web mvc的实现。所以要完成的渲染收银页路由应该也是在该部分完成。
<pl-valves:analyzeURL> 分析url获取target
Webx Turbine推崇约定胜于配置,request所请求的目标用一个抽象的target来表示,该target可以映射到action、screen、template等,具体映射规则由约定决定,按照约定就可以省去许多配置的步骤!!!
具体映射规则如下:
1. <pl-valves:performTemplateScreen> target映射成screen module类名的规则(screen module类名是什么意思?)
假设target为xxx/yyy/zzz,则Webx Turbine会依次查找以下的screen模块:
- screen.xxx.yyy.Zzz
- screen.xxx.yyy.zzz.Default
- screen.xxx.yyy.Default
- screen.xxx.Default
- screen.Default
如果找到上述的screen类,就会执行。screen类的功能通常是读取数据库,然后把模板需要的对象存放到Context中。例如
public class Default {
    public void execute(Context context) {
        context.put("list", new String[] {
                "Adobe Photoshop",
                "Adobe Acrobat",
                "Adobe Lightroom",
                "Apple Aperture",
                "Microsoft Office",
                "IntelliJ IDEA",
                "<<\"Objective-C\"指南>>"
        });
    }
}<pl-valves:renderTemplate>渲染模板用到两个规则
- target映射到screen template
假设target为xxx/yyy/zzz,则Webx Turbine会查找下面的screen模板:/templates/screen/xxx/yyy/zzz。若找不到,报404错误 - target映射到layout template
找到screen模板后,还会试着查找一下layout模板
- /template/layout/xxx/yyy/zzz
- /template/layout/xxx/yyy/default
- /template/layout/xxx/default
- /template/layout/default
- target映射到screen template
注意screen module类和screen模板的区别:
screen module类会将screen模板需要用到的对象存放到Context对象中以供screen模板使用!
Webx页面渲染流程
关于Webx中velocity模板渲染过程有如下困惑:
1. 为何在Java中put变量,在vm页面中可以获取这个值,是如何传递的
2. rundata、control等并没有在Java程序中put,为何可以在vm中直接引用这些对象
…
入口
PerformTemplateScreenValve类是渲染模板的入口,其invoke方法将会被调用。
下面以petstore实例了解渲染过程
表单验证服务
表单验证就是表单的输入必须符合一定的规范,比如用户名要求是由字母、数字、下划线组成。
表单验证完全可以由代码实现,但是这样做既繁杂又无趣。所以框架一般提供表单验证服务。
表单验证一般有如下形式:
1. 服务端批量验证
2. 客户端验证:利用JavaScript验证 难以验证需要后台支持的方式,比如检查验证码、确认注册用户ID未被占用等。
3. 服务端异步验证
4. 混合形式验证
设计
验证逻辑与表现逻辑分离
一些WEB框架将验证逻辑嵌在页面模板中,例如
<input type="text" name="loginId" value="${loginId}" />
<!-- 验证非空 -->
<form:required value="${loginId}">
  <strong>Login ID is required.</strong>
</form:required>
<!-- 正则检测 -->
<form:regexp value="${loginId}" pattern="^\w+$">
  <strong>Login ID is invalid.</strong>
</form:regexp>
这样存在易混淆和不可复用的问题
验证逻辑与应用代码分离
用Java代码实现表单验证的逻辑,例如:
public class LoginAction {
    @Required
    @Regexp("^\\w+$")
    private String loginId;
... }
Webx认为页面模板、应用代码并不关心表单验证的逻辑。所有的验证规则都应该写在一个单独的配置文件中。这样可以很方便的修改验证规则。
表单验证的流程
Webx表单验证服务示例
创建新数据
- 验证规则
form.xml中定义表单验证规则,示例如下:
<beans:beans xmlns:xsi="http://www.w3.org/2001/XMLSchema-instance" xmlns:services="http://www.alibaba.com/schema/services" xmlns:fm-conditions="http://www.alibaba.com/schema/services/form/conditions" xmlns:fm-validators="http://www.alibaba.com/schema/services/form/validators" xmlns:beans="http://www.springframework.org/schema/beans" xmlns:p="http://www.springframework.org/schema/p"
    xsi:schemaLocation="
        http://www.alibaba.com/schema/services
            http://localhost:8080/schema/services.xsd
        http://www.alibaba.com/schema/services/form/conditions
            http://localhost:8080/schema/services-form-conditions.xsd
        http://www.alibaba.com/schema/services/form/validators
            http://localhost:8080/schema/services-form-validators.xsd
        http://www.springframework.org/schema/beans
http://localhost:8080/schema/www.springframework.org/schema/beans/spring-beans.xsd ">
<services:form xmlns="http://www.alibaba.com/schema/services/form/validators">
">
    <services:group name="register">
     message>
message>
<services:field name="userId" displayName="登录名"> <required-validator>
<message>必须填写 ${displayName}</message> </required-validator>
<regexp-validator pattern="^[A-Za-z_][A-Za-z_0-9]*$">
<message>${displayName} 必须由字母、数字、下划线构成</message> </regexp-validator>
<string-length-validator minLength="4" maxLength="10">
<message>${displayName} 最少必须由${minLength}个字组成,最多不能超过${maxLength}个字</ </string-length-validator>
</services:field>
<services:field name="password" displayName="密码"> <required-validator>
<message>必须填写 ${displayName}</message> </required-validator>
<string-length-validator minLength="4" maxLength="10">
<message>${displayName} 最少必须由${minLength}个字组成,最多不能超过${maxLength}个字</
    </string-length-validator>
    <string-compare-validator notEqualTo="userId">
<message>${displayName} 不能与 ${userId.displayName} 相同</message> </string-compare-validator>
</services:field>
<services:field name="passwordConfirm" displayName="密码验证"> <required-validator>
<message>必须填写 ${displayName}</message> </required-validator> <string-compare-validator equalTo="password">
<message>${displayName} 必须和 ${password.displayName} 相同</message> </string-compare-validator>
            </services:field>
        </services:group>
    </services:form>
</beans:beans>
- form代表表单验证规则的配置
- group代表一组要验证的field
- 每个field有一个在组中唯一的名称,例如username,password
- 每个field中包含多个验证规则(validator)
- 每个规则包含一段文字描述(message)
- 页面模板
创建表单页面需要使用pull tool工具,配置如下:
<services:pull xmlns="http://www.alibaba.com/schema/services/pull/factories"> <form-tool />
...
</services:pull>
这样便定义了一个$form工具,这样便可以在模版中使用
#macro (registerMessage $field)
    #if (!$field.valid) $field.message #end
#end
<form action="" method="post">
  <input type="hidden" name="action" value="UserAccountAction"/>
  #set ($group = $form.register.defaultInstance)
<p>用户注册</p>
<dl> <dt>用户名</dt> <dd>
        <div>
            <input type="text" name="$group.userId.key" value="$!group.userId.value"/>
        </div>
        <div class="errorMessage">
            #registerMessage ($group.userId)
</div> </dd>
<dt>密码</dt> <dd>
<div>
<input type="password" name="$group.password.key" value="$!group.password.value"/>
        </div>
        <div class="errorMessage">
            #registerMessage ($group.password)
</div> </dd>
<dt>再输一遍密码</dt> <dd>
        <div>
            <input type="password" name="$group.passwordConfirm.key" value="$!
group.passwordConfirm.value"/>
        </div>
        <div class="errorMessage">
            #registerMessage ($group.passwordConfirm)
</div> </dd>
</dl> <p>
<input type="submit" name="event_submit_do_register" value="立即注册!"/> </p>
</form>- Java代码


 62
62

 被折叠的 条评论
为什么被折叠?
被折叠的 条评论
为什么被折叠?
 到【灌水乐园】发言


