


一、升级harbor v2.6.4 --> harbor-offline-installer-v2.11.0-rc3 --> v2.9.4 – 随记
漏洞信息:
CVE-2023-20902
	timing condition in Harbor 2.6.x and below, Harbor 2.7.2 and below,  Harbor 2.8.2 and below, and Harbor 1.10.17 and below allows an attacker with network access to create jobs/stop job tasks and retrieve job task information.
---
CVE-2022-46463
	an access control issue in Harbor v1.X.X to v2.5.3 allows attackers to access public and private image repositories without authentication. NOTE: the vendor's position is that this "is clearly described in the documentation as a feature."
环境信息:
harbor1 /nfs_server 1.101 、 harbor2 1.102 、 keepalived 1.200
随记内容:
#1
原版本 v2.6
升级到v2.11 (这玩意有问题,只能登录主ip ,副IP登不上,而且push一直 retry)
然后放弃v2.11 ,去弄v2.9. (这时候主/副都能登录了。)
虽说主副都是挂载nfs的 /data/harbor。 但是他双方的内容是不一致的,


#2 这时候去注释yml默认的pg,使用其external database。
搭建了个主从pgsql。不懂为啥harbor-core这时候报错了(说什么脏数据)
后面用了个非主流方法
(主IP还是使用内部的pgsql , 副IP使用外接pgsql,配置连接到主IP的 pgsql认他为主库)
主–部署pgsql的docker-compose.yml内容:
version: '2'

services:
  postgresql-master:
    image: bitnami/postgresql:11.14.0
    ports:
      - '5432:5432'
    volumes:
      - 'postgresql_master_data:/bitnami/postgresql'
    environment:
      - 'POSTGRESQL_USERNAME=harbor_db'
      - 'POSTGRESQL_PASSWORD=123'
      - 'POSTGRESQL_POSTGRES_PASSWORD=123'
      - 'POSTGRESQL_REPLICATION_MODE=master'
      - 'POSTGRESQL_REPLICATION_USER=repl_user'
      - 'POSTGRESQL_REPLICATION_PASSWORD=repl_password'
      - 'POSTGRESQL_SYNCHRONOUS_COMMIT_MODE=on'
      - 'POSTGRESQL_NUM_SYNCHRONOUS_REPLICAS=1'

volumes:
  postgresql_master_data:
    driver: local
从-部署pgsql的docker-compose.yml内容:
version: '2'

services:
  postgresql-slave:
    image: bitnami/postgresql:11.14.0
    ports:
      - '5432:5432'
    volumes:
      - 'postgresql_slave_data:/bitnami/postgresql'
    environment:
      - 'POSTGRESQL_USERNAME=harbor_db'
      - 'POSTGRESQL_PASSWORD=123'
      - 'POSTGRESQL_POSTGRES_PASSWORD=123'
      - 'POSTGRESQL_REPLICATION_MODE=slave'
      - 'POSTGRESQL_REPLICATION_USER=repl_user'
      - 'POSTGRESQL_REPLICATION_PASSWORD=repl_password'
      - 'POSTGRESQL_MASTER_HOST=10.xx.xx.xx'   #这里写master pg库的IP
      - 'POSTGRESQL_MASTER_PORT_NUMBER=5432'

volumes:
  postgresql_slave_data:
    driver: local
二、iptables处理nfs漏洞(目标主机showmount -e信息泄露(CVE-1999-0554)),并加固其他服务访问 – 随记。
环境信息
K8s 、docker 、nfs 、mysql、iptables
注意下面10.xx.xx.0/24 换成实际的环境IP段。
iptables -nL 看下结果

参考:
https://blog.csdn.net/sxf1061700625/article/details/126844812
https://blog.csdn.net/weixin_46516542/article/details/124279644
https://blog.csdn.net/baidu_35848778/article/details/132883593
执行的iptables语句
限制80 / 3306端口 ( /符号后面的端口,在-dports后换成对应的端口号即可)
iptables -I INPUT -p tcp -m multiport --dports 80 -j DROP
iptables -I INPUT -s 127.0.0.1 -p tcp -m multiport --dports 80 -j ACCEPT
iptables -I INPUT -s 10.xx.xx.0/24 -p tcp -m multiport --dports 80 -j ACCEPT
iptables -I INPUT -s 10.244.0.0/16 -p tcp -m multiport --dports 80 -j ACCEPT
iptables -I INPUT -s 10.96.0.0/12 -p tcp -m multiport --dports 80 -j ACCEPT

iptables -I DOCKER-USER -p tcp -m multiport --dports 80 -j DROP
iptables -I DOCKER-USER -s 127.0.0.1 -p tcp -m multiport --dports 80 -j ACCEPT
iptables -I DOCKER-USER -s 10.xx.xx.0/24 -p tcp -m multiport --dports 80 -j ACCEPT
iptables -I DOCKER-USER -s 10.244.0.0/16 -p tcp -m multiport --dports 80 -j ACCEPT
iptables -I DOCKER-USER -s 10.96.0.0/12 -p tcp -m multiport --dports 80 -j ACCEPT

iptables -I DOCKER -p tcp -m multiport --dports 80 -j DROP
iptables -I DOCKER -s 127.0.0.1 -p tcp -m multiport --dports 80 -j ACCEPT
iptables -I DOCKER -s 10.xx.xx.0/24 -p tcp -m multiport --dports 80 -j ACCEPT
iptables -I DOCKER -s 10.244.0.0/16 -p tcp -m multiport --dports 80 -j ACCEPT
iptables -I DOCKER -s 10.96.0.0/12 -p tcp -m multiport --dports 80 -j ACCEPT
限制22端口
iptables -A INPUT -p tcp --dport 22 -s 172.xx.xx.0/24 -j ACCEPT
iptables -A INPUT -p tcp --dport 22 -s 10.xx.xx.129/29 -j ACCEPT
限制其他端口
#### 集群内
iptables -I INPUT -p tcp -m multiport --dports 10250,2379,2380,6443 -j DROP
iptables -I INPUT -s 127.0.0.1 -p tcp -m multiport --dports 10250,2379,2380,6443 -j ACCEPT
iptables -I INPUT -s 10.xx.xx.0/24 -p tcp -m multiport --dports 10250,2379,2380,6443 -j ACCEPT
iptables -I INPUT -s 10.244.0.0/16 -p tcp -m multiport --dports 10250,2379,2380,6443 -j ACCEPT
iptables -I INPUT -s 10.96.0.0/12 -p tcp -m multiport --dports 10250,2379,2380,6443 -j ACCEPT
查看k8s / docker的相关ip段信息 (calico、 svc 、docker 等信息)
ip addr show

docker ip范围
docker network inspect bridge
		"Subnet": "172.17.0.0/16",

k8s的ip范围:
kubectl cluster-info dump | grep -i bind-address -A 6
	--cluster-cidr=10.244.0.0/16,2001:db8:42:0::/48

kubectl get cm -n kube-system  kubeadm-config   -oyaml
 podSubnet: 10.244.0.0/16,2001:db8:42:0::/48
 serviceSubnet: 10.96.0.0/12,2001:db8:42:1::/108
2.2 漏洞:目标主机rpcinfo -p信息泄露
#处理建议:
可以对目标主机进行"rpcinfo -p"操作,此操作将泄露大量ONC/Sun RPC Server相关信息。
* 在您的防火墙上禁止对内部网络的111(UDP/TCP)端口的访问,以限制未授权的RPC查询请求。
* 如果不需要RPC服务,关闭PORTMAP。
#处理方式:
iptables -I INPUT -p udp -m multiport --dports 111 -j DROP
iptables -I INPUT -s 127.0.0.1 -p udp -m multiport --dports 111 -j ACCEPT
iptables -I INPUT -s 10.xx.xx.0/24 -p udp -m multiport --dports 111 -j ACCEPT
iptables -I INPUT -s 10.2xx.0.0/16 -p udp -m multiport --dports 111 -j ACCEPT
iptables -I INPUT -s 10.9x.0.0/12 -p udp -m multiport --dports 111 -j ACCEPT

iptables -I INPUT -p tcp -m multiport --dports 111 -j DROP
iptables -I INPUT -s 127.0.0.1 -p tcp -m multiport --dports 111 -j ACCEPT
iptables -I INPUT -s 10.xx.xx.0/24 -p tcp -m multiport --dports 111 -j ACCEPT
iptables -I INPUT -s 10.2xx.0.0/16 -p tcp -m multiport --dports 111 -j ACCEPT
iptables -I INPUT -s 10.9x.0.0/12 -p tcp -m multiport --dports 111 -j ACCEPT
三、bclinux 8.6的OpenSSL 1.1.1k升级到OpenSSL 3.1.6 (2024年6月版本)(在线和离线rpm包安装方式)
背景描述:
由于OpenSSL 安全漏洞(CVE-2024-2511)), 而且openssl已经停止维护v1.1.1的。所以选择升级到v3.1.xx版本。
(生产环境是没外网没ISO镜像源的,只能在虚拟机先联网操作后,再去生产上操作。)
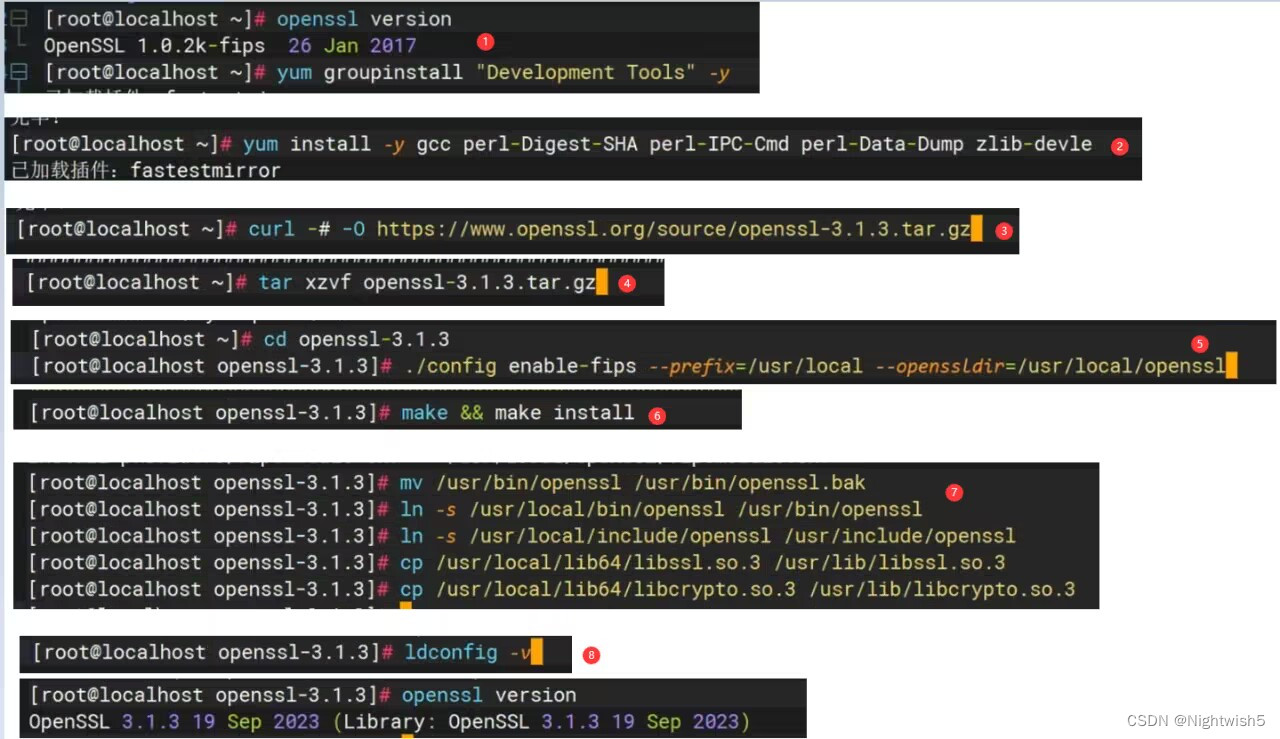
3.1 升级过程:
#0 当前openssl 版本
[root@localhost ~]# openssl version
OpenSSL 1.1.1k  FIPS 25 Mar 2021

PRETTY_NAME="BigCloud Enterprise Linux 8.6 (Core)"

#1 安装依赖
#yum groupinstall "Development Tools" -y
#yum install -y gcc perl-Digest-SHA perl-IPC-Cmd perl-Data-Dump zlib-devel

#实际yum的    rpm -Uvh *.rpm
yum install -y gcc make perl-IPC-Cmd  perl-Pod-Html

#2 下载openssl包
wget https://www.openssl.org/source/openssl-3.1.6.tar.gz
tar xf openssl-3.1.6.tar.gz

#3 编译安装
cd openssl-3.1.6
./config enable-fips --prefix=/usr/local --openssldir=/usr/local/openssl

make -j 16 && make install


#4 配置环境
#openssl文件位于/usr/local/bin下
#配置文件位于/usr/local/ssl下
#库文件位于/usr/local/lib64下

mv /usr/bin/openssl /usr/bin/openssl.bak

#5 创软连接 或复制(二选一)
ln -s /usr/local/bin/openssl /usr/bin/openssl
ln -s /usr/local/include/openssl /usr/include/openssl

#cp /usr/local/bin/openssl /usr/bin/openssl
#cp -rp /usr/local/include/openssl /usr/include/

#6 动态链接库(二选一)
#方法一
echo "/usr/local/lib64" > /etc/ld.so.conf.d/openssl.conf

#方法二  创软连或复制
#cp /usr/local/lib64/libssl.so.3  /usr/lib/libssl.so.3
#cp /usr/local/lib64/libcrypto.so.3 /usr/lib/libcrypto.so.3

#软连
#ln -s /usr/local/lib64/libssl.so.3 /usr/lib/libssl.so.3
#ln -s /usr/local/lib64/libcrypto.so.3 /usr/lib/libcrypto.so.3

#7 验证  END
ldconfig -v
]$  openssl version
OpenSSL 3.1.6 4 Jun 2024 (Library: OpenSSL 3.1.6 4 Jun 2024)
3.2 排障过程:(内容没排版,可略)
简单来说就是缺什么依赖/包,就去安装即可。
##### 报错1 you may need to install the IPC::Cmd module
所以
[root@localhost openssl-3.1.6]# yum install perl-IPC-Cmd
上次元数据过期检查:3:21:20 前,执行于 2024年06月14日 星期五 20时25分07秒。
依赖关系解决。
============================================================================================================================================================================
软件包 架构 版本 仓库 大小
============================================================================================================================================================================
安装:
perl-IPC-Cmd noarch 2:1.02-1.0.1.an8 AppStream 38 k
安装依赖关系:
perl-ExtUtils-MM-Utils noarch 1:7.34-1.0.1.an8 AppStream 16 k
perl-Locale-Maketext noarch 1.28-396.0.1.an8 AppStream 94 k
perl-Locale-Maketext-Simple noarch 1:0.21-421.0.1.an8 AppStream 78 k
perl-Module-CoreList noarch 1:5.20181130-1.0.1.an8 AppStream 81 k
perl-Module-Load noarch 1:0.32-395.0.1.an8 AppStream 16 k
perl-Module-Load-Conditional noarch 0.68-395.0.1.an8 AppStream 21 k
perl-Module-Metadata noarch 1.000033-395.0.1.an8 AppStream 39 k
perl-Params-Check noarch 1:0.38-395.0.1.an8 AppStream 21 k
perl-version x86_64 6:0.99.24-1.el8 AppStream 66 k
事务概要
============================================================================================================================================================================
安装 10 软件包
总下载:469 k
安装大小:1.3 M
确定吗?[y/N]: y
下载软件包:
(1/10): perl-ExtUtils-MM-Utils-7.34-1.0.1.an8.noarch.rpm 60 kB/s | 16 kB 00:00
(2/10): perl-IPC-Cmd-1.02-1.0.1.an8.noarch.rpm 120 kB/s | 38 kB 00:00
(3/10): perl-Locale-Maketext-Simple-0.21-421.0.1.an8.noarch.rpm 690 kB/s | 78 kB 00:00
(4/10): perl-Locale-Maketext-1.28-396.0.1.an8.noarch.rpm 256 kB/s | 94 kB 00:00
(5/10): perl-Module-Load-0.32-395.0.1.an8.noarch.rpm 260 kB/s | 16 kB 00:00
(6/10): perl-Module-Load-Conditional-0.68-395.0.1.an8.noarch.rpm 357 kB/s | 21 kB 00:00
(7/10): perl-Module-Metadata-1.000033-395.0.1.an8.noarch.rpm 742 kB/s | 39 kB 00:00
(8/10): perl-Params-Check-0.38-395.0.1.an8.noarch.rpm 353 kB/s | 21 kB 00:00
(9/10): perl-version-0.99.24-1.el8.x86_64.rpm 1.2 MB/s | 66 kB 00:00
(10/10): perl-Module-CoreList-5.20181130-1.0.1.an8.noarch.rpm 309 kB/s | 81 kB 00:00
----------------------------------------------------------------------------------------------------------------------------------------------------------------------------
总计 813 kB/s | 469 kB 00:00
运行事务检查
事务检查成功。
运行事务测试
事务测试成功。
运行事务
准备中 : 1/1
安装 : perl-version-6:0.99.24-1.el8.x86_64 1/10
安装 : perl-Module-CoreList-1:5.20181130-1.0.1.an8.noarch 2/10
安装 : perl-Module-Metadata-1.000033-395.0.1.an8.noarch 3/10
安装 : perl-Module-Load-1:0.32-395.0.1.an8.noarch 4/10
安装 : perl-Locale-Maketext-1.28-396.0.1.an8.noarch 5/10
安装 : perl-Locale-Maketext-Simple-1:0.21-421.0.1.an8.noarch 6/10
安装 : perl-Params-Check-1:0.38-395.0.1.an8.noarch 7/10
安装 : perl-Module-Load-Conditional-0.68-395.0.1.an8.noarch 8/10
安装 : perl-ExtUtils-MM-Utils-1:7.34-1.0.1.an8.noarch 9/10
安装 : perl-IPC-Cmd-2:1.02-1.0.1.an8.noarch 10/10
运行脚本: perl-IPC-Cmd-2:1.02-1.0.1.an8.noarch 10/10
验证 : perl-ExtUtils-MM-Utils-1:7.34-1.0.1.an8.noarch 1/10
验证 : perl-IPC-Cmd-2:1.02-1.0.1.an8.noarch 2/10
验证 : perl-Locale-Maketext-1.28-396.0.1.an8.noarch 3/10
验证 : perl-Locale-Maketext-Simple-1:0.21-421.0.1.an8.noarch 4/10
验证 : perl-Module-CoreList-1:5.20181130-1.0.1.an8.noarch 5/10
验证 : perl-Module-Load-1:0.32-395.0.1.an8.noarch 6/10
验证 : perl-Module-Load-Conditional-0.68-395.0.1.an8.noarch 7/10
验证 : perl-Module-Metadata-1.000033-395.0.1.an8.noarch 8/10
验证 : perl-Params-Check-1:0.38-395.0.1.an8.noarch 9/10
验证 : perl-version-6:0.99.24-1.el8.x86_64 10/10
已安装:
perl-ExtUtils-MM-Utils-1:7.34-1.0.1.an8.noarch perl-IPC-Cmd-2:1.02-1.0.1.an8.noarch perl-Locale-Maketext-1.28-396.0.1.an8.noarch
perl-Locale-Maketext-Simple-1:0.21-421.0.1.an8.noarch perl-Module-CoreList-1:5.20181130-1.0.1.an8.noarch perl-Module-Load-1:0.32-395.0.1.an8.noarch
perl-Module-Load-Conditional-0.68-395.0.1.an8.noarch perl-Module-Metadata-1.000033-395.0.1.an8.noarch perl-Params-Check-1:0.38-395.0.1.an8.noarch
perl-version-6:0.99.24-1.el8.x86_64
完毕!
#####报错 2
No C compiler found, please specify one with the environment variable CC,
[root@localhost openssl-3.1.6]# yum install gcc
上次元数据过期检查:3:23:34 前,执行于 2024年06月14日 星期五 20时25分07秒。
依赖关系解决。
============================================================================================================================================================================
软件包 架构 版本 仓库 大小
============================================================================================================================================================================
安装:
gcc x86_64 8.5.0-10.1.0.1.an8_6 AppStream 22 M
安装依赖关系:
annobin x86_64 10.29-3.0.1.an8 AppStream 116 k
cpp x86_64 8.5.0-10.1.0.1.an8_6 AppStream 10 M
glibc-devel x86_64 2.28-189.5.0.1.an8_6 BaseOS 79 k
glibc-headers x86_64 2.28-189.5.0.1.an8_6 BaseOS 483 k
isl x86_64 0.16.1-6.el8 AppStream 834 k
libasan x86_64 8.5.0-10.1.0.1.an8_6 BaseOS 411 k
libatomic x86_64 8.5.0-10.1.0.1.an8_6 BaseOS 23 k
libmpc x86_64 1.1.0-9.1.an8 AppStream 60 k
libubsan x86_64 8.5.0-10.1.0.1.an8_6 BaseOS 150 k
libxcrypt-devel x86_64 4.1.1-6.an8 BaseOS 24 k
事务概要
============================================================================================================================================================================
安装 11 软件包
总下载:35 M
安装大小:91 M
确定吗?[y/N]: y
下载软件包:
(1/11): annobin-10.29-3.0.1.an8.x86_64.rpm 227 kB/s | 116 kB 00:00
(2/11): isl-0.16.1-6.el8.x86_64.rpm 1.0 MB/s | 834 kB 00:00
(3/11): libmpc-1.1.0-9.1.an8.x86_64.rpm 381 kB/s | 60 kB 00:00
(4/11): glibc-devel-2.28-189.5.0.1.an8_6.x86_64.rpm 992 kB/s | 79 kB 00:00
(5/11): glibc-headers-2.28-189.5.0.1.an8_6.x86_64.rpm 880 kB/s | 483 kB 00:00
(6/11): libasan-8.5.0-10.1.0.1.an8_6.x86_64.rpm 1.4 MB/s | 411 kB 00:00
(7/11): libatomic-8.5.0-10.1.0.1.an8_6.x86_64.rpm 225 kB/s | 23 kB 00:00
(8/11): libubsan-8.5.0-10.1.0.1.an8_6.x86_64.rpm 1.3 MB/s | 150 kB 00:00
(9/11): libxcrypt-devel-4.1.1-6.an8.x86_64.rpm 287 kB/s | 24 kB 00:00
(10/11): gcc-8.5.0-10.1.0.1.an8_6.x86_64.rpm 3.9 MB/s | 22 MB 00:05
(11/11): cpp-8.5.0-10.1.0.1.an8_6.x86_64.rpm 1.3 MB/s | 10 MB 00:08
----------------------------------------------------------------------------------------------------------------------------------------------------------------------------
总计 4.3 MB/s | 35 MB 00:08
运行事务检查
事务检查成功。
运行事务测试
事务测试成功。
运行事务
准备中 : 1/1
运行脚本: glibc-headers-2.28-189.5.0.1.an8_6.x86_64 1/11
安装 : glibc-headers-2.28-189.5.0.1.an8_6.x86_64 1/11
安装 : libxcrypt-devel-4.1.1-6.an8.x86_64 2/11
安装 : glibc-devel-2.28-189.5.0.1.an8_6.x86_64 3/11
运行脚本: glibc-devel-2.28-189.5.0.1.an8_6.x86_64 3/11
安装 : libmpc-1.1.0-9.1.an8.x86_64 4/11
安装 : cpp-8.5.0-10.1.0.1.an8_6.x86_64 5/11
运行脚本: cpp-8.5.0-10.1.0.1.an8_6.x86_64 5/11
安装 : libubsan-8.5.0-10.1.0.1.an8_6.x86_64 6/11
运行脚本: libubsan-8.5.0-10.1.0.1.an8_6.x86_64 6/11
安装 : libatomic-8.5.0-10.1.0.1.an8_6.x86_64 7/11
运行脚本: libatomic-8.5.0-10.1.0.1.an8_6.x86_64 7/11
安装 : libasan-8.5.0-10.1.0.1.an8_6.x86_64 8/11
运行脚本: libasan-8.5.0-10.1.0.1.an8_6.x86_64 8/11
安装 : isl-0.16.1-6.el8.x86_64 9/11
运行脚本: isl-0.16.1-6.el8.x86_64 9/11
安装 : gcc-8.5.0-10.1.0.1.an8_6.x86_64 10/11
运行脚本: gcc-8.5.0-10.1.0.1.an8_6.x86_64 10/11
安装 : annobin-10.29-3.0.1.an8.x86_64 11/11
运行脚本: annobin-10.29-3.0.1.an8.x86_64 11/11
验证 : annobin-10.29-3.0.1.an8.x86_64 1/11
验证 : cpp-8.5.0-10.1.0.1.an8_6.x86_64 2/11
验证 : gcc-8.5.0-10.1.0.1.an8_6.x86_64 3/11
验证 : isl-0.16.1-6.el8.x86_64 4/11
验证 : libmpc-1.1.0-9.1.an8.x86_64 5/11
验证 : glibc-devel-2.28-189.5.0.1.an8_6.x86_64 6/11
验证 : glibc-headers-2.28-189.5.0.1.an8_6.x86_64 7/11
验证 : libasan-8.5.0-10.1.0.1.an8_6.x86_64 8/11
验证 : libatomic-8.5.0-10.1.0.1.an8_6.x86_64 9/11
验证 : libubsan-8.5.0-10.1.0.1.an8_6.x86_64 10/11
验证 : libxcrypt-devel-4.1.1-6.an8.x86_64 11/11
已安装:
annobin-10.29-3.0.1.an8.x86_64 cpp-8.5.0-10.1.0.1.an8_6.x86_64 gcc-8.5.0-10.1.0.1.an8_6.x86_64 glibc-devel-2.28-189.5.0.1.an8_6.x86_64
glibc-headers-2.28-189.5.0.1.an8_6.x86_64 isl-0.16.1-6.el8.x86_64 libasan-8.5.0-10.1.0.1.an8_6.x86_64 libatomic-8.5.0-10.1.0.1.an8_6.x86_64
libmpc-1.1.0-9.1.an8.x86_64 libubsan-8.5.0-10.1.0.1.an8_6.x86_64 libxcrypt-devel-4.1.1-6.an8.x86_64
完毕!
#### 3 编译的过程信息
[root@localhost openssl-3.1.6]# ./config enable-fips --prefix=/usr/local --openssldir=/usr/local/openssl
Configuring OpenSSL version 3.1.6 for target linux-x86_64
Using os-specific seed configuration
Created configdata.pm
Running configdata.pm
Created Makefile.in
Created Makefile
Created include/openssl/configuration.h
**********************************************************************
*** ***
*** OpenSSL has been successfully configured ***
*** ***
*** If you encounter a problem while building, please open an ***
*** issue on GitHub <https://github.com/openssl/openssl/issues> ***
*** and include the output from the following command: ***
*** ***
*** perl configdata.pm --dump ***
*** ***
*** (If you are new to OpenSSL, you might want to consult the ***
*** 'Troubleshooting' section in the INSTALL.md file first) ***
*** ***
**********************************************************************
[root@localhost openssl-3.1.6]# echo $?
0
##### 4
yum install make
##### 5 make install后报错
Can‘t locate Pod/Html.pm in @INC (you may need to install the Pod::Html module) (@INC contains: . /usr/local/lib64/perl5 /usr/local/share/perl5 /usr/lib64/perl5/vendor_perl /usr/share/perl5/vendor_perl /usr/lib64/perl5 /usr/share/perl5) at ./util/mkpod2html.pl line 14.
BEGIN failed--compilation aborted at ./util/mkpod2html.pl line 14.
make: *** [Makefile:29308:doc/html/man1/CA.pl.html] 错误 2
所以:
[root@localhost openssl-3.1.6]# yum install perl-Pod-Html
上次元数据过期检查:0:01:31 前,执行于 2024年06月15日 星期六 00时01分02秒。
依赖关系解决。
============================================================================================================================================================================
软件包 架构 版本 仓库 大小
============================================================================================================================================================================
安装:
perl-Pod-Html noarch 1.22.02-421.0.1.an8 AppStream 87 k
事务概要
============================================================================================================================================================================
安装 1 软件包
总下载:87 k
安装大小:36 k
确定吗?[y/N]: y
确定吗?[y/N]: y
下载软件包:
perl-Pod-Html-1.22.02-421.0.1.an8.noarch.rpm 362 kB/s | 87 kB 00:00
----------------------------------------------------------------------------------------------------------------------------------------------------------------------------
总计 361 kB/s | 87 kB 00:00
运行事务检查
事务检查成功。
运行事务测试
事务测试成功。
运行事务
准备中 : 1/1
安装 : perl-Pod-Html-1.22.02-421.0.1.an8.noarch 1/1
运行脚本: perl-Pod-Html-1.22.02-421.0.1.an8.noarch 1/1
验证 : perl-Pod-Html-1.22.02-421.0.1.an8.noarch 1/1
已安装:
perl-Pod-Html-1.22.02-421.0.1.an8.noarch
完毕!
离线rpm包:
### yum install 过程中下载的rpm包
#离线的系统环境,上传下面的rpm包。 然后 rpm -Uvh *.rpm 进行安装即可。
[root@localhost var]# find ./ -type f -name "*.rpm"
./cache/dnf/AppStream-ba7193d610770ffb/packages/perl-ExtUtils-MM-Utils-7.34-1.0.1.an8.noarch.rpm
./cache/dnf/AppStream-ba7193d610770ffb/packages/perl-IPC-Cmd-1.02-1.0.1.an8.noarch.rpm
./cache/dnf/AppStream-ba7193d610770ffb/packages/perl-Locale-Maketext-1.28-396.0.1.an8.noarch.rpm
./cache/dnf/AppStream-ba7193d610770ffb/packages/perl-Locale-Maketext-Simple-0.21-421.0.1.an8.noarch.rpm
./cache/dnf/AppStream-ba7193d610770ffb/packages/perl-Module-CoreList-5.20181130-1.0.1.an8.noarch.rpm
./cache/dnf/AppStream-ba7193d610770ffb/packages/perl-Module-Load-0.32-395.0.1.an8.noarch.rpm
./cache/dnf/AppStream-ba7193d610770ffb/packages/perl-Module-Load-Conditional-0.68-395.0.1.an8.noarch.rpm
./cache/dnf/AppStream-ba7193d610770ffb/packages/perl-Module-Metadata-1.000033-395.0.1.an8.noarch.rpm
./cache/dnf/AppStream-ba7193d610770ffb/packages/perl-Params-Check-0.38-395.0.1.an8.noarch.rpm
./cache/dnf/AppStream-ba7193d610770ffb/packages/perl-version-0.99.24-1.el8.x86_64.rpm
./cache/dnf/AppStream-ba7193d610770ffb/packages/annobin-10.29-3.0.1.an8.x86_64.rpm
./cache/dnf/AppStream-ba7193d610770ffb/packages/cpp-8.5.0-10.1.0.1.an8_6.x86_64.rpm
./cache/dnf/AppStream-ba7193d610770ffb/packages/gcc-8.5.0-10.1.0.1.an8_6.x86_64.rpm
./cache/dnf/AppStream-ba7193d610770ffb/packages/isl-0.16.1-6.el8.x86_64.rpm
./cache/dnf/AppStream-ba7193d610770ffb/packages/libmpc-1.1.0-9.1.an8.x86_64.rpm
./cache/dnf/AppStream-ba7193d610770ffb/packages/perl-Pod-Html-1.22.02-421.0.1.an8.noarch.rpm
./cache/dnf/BaseOS-d7f3346380282c5a/packages/glibc-devel-2.28-189.5.0.1.an8_6.x86_64.rpm
./cache/dnf/BaseOS-d7f3346380282c5a/packages/glibc-headers-2.28-189.5.0.1.an8_6.x86_64.rpm
./cache/dnf/BaseOS-d7f3346380282c5a/packages/libasan-8.5.0-10.1.0.1.an8_6.x86_64.rpm
./cache/dnf/BaseOS-d7f3346380282c5a/packages/libatomic-8.5.0-10.1.0.1.an8_6.x86_64.rpm
./cache/dnf/BaseOS-d7f3346380282c5a/packages/libubsan-8.5.0-10.1.0.1.an8_6.x86_64.rpm
./cache/dnf/BaseOS-d7f3346380282c5a/packages/libxcrypt-devel-4.1.1-6.an8.x86_64.rpm
./cache/dnf/BaseOS-d7f3346380282c5a/packages/make-4.2.1-11.an8.x86_64.rpm


##### 错误
error: Failed dependencies:
        perl(Time::HiRes) is needed by perl-IPC-Cmd-2:1.02-1.0.1.an8.noarch

yum install perl\(Time::HiRes\)
yum install yum-utils
yumdownloader --resolve perl-Time-HiRes


[root@GX-harbor-59 /home/nwom/opensslV3.1/openssl-yilaibao]$  rpm -Uvh perl-Time-HiRes-1.9758-2.0.1.an8.x86_64.rpm
Verifying...                          ################################# [100%]
Preparing...                          ################################# [100%]
Updating / installing...
   1:perl-Time-HiRes-4:1.9758-2.0.1.an################################# [100%]


##### 错误
you may need to install the Digest::SHA module

[root@GX-harbor-59 /home/nwom/opensslV3.1/openssl-yilaibao]$
[root@GX-harbor-59 /home/nwom/opensslV3.1/openssl-yilaibao]$  rpm -Uvh perl-Digest-SHA-6.02-1.el8.x86_64.rpm
Verifying...                          ################################# [100%]
Preparing...                          ################################# [100%]
Updating / installing...
   1:perl-Digest-SHA-1:6.02-1.el8     ################################# [100%]
参考:
bclinux官网镜像源:
https://mirrors.cmecloud.cn/bclinux/el8.6/BaseOS/x86_64/os/Packages/

https://www.bilibili.com/video/BV1cM411R7r8    《升级到 openssl  v3.1》
视频中博主的操作截图:
四、bclinux8.6 升级k8s集群 v1.23.17 --> v1.24.0 --> v1.24.17
环境信息:
#系统信息
[root@slave-57 ~]# uname -a
Linux slave-57 4.19.0-372.26.3.el8.bclinux.x86_64 #1 SMP Mon Dec 5 11:05:59 CST 2022 x86_64 x86_64 x86_64 GNU/Linux

BigCloud Enterprise Linux 8.6 (Core)

#原k8s集群信息:
[root@xx]$  kubectl get nodes
NAME           STATUS   ROLES                  AGE    VERSION
master-52   Ready    control-plane,master   142d   v1.23.17
master-54   Ready    control-plane,master   142d   v1.23.17
master-56   Ready    control-plane,master   142d   v1.23.17
slave-55    Ready    <none>                 142d   v1.23.17
slave-57    Ready    <none>                 142d   v1.23.17

由于漏洞信息(Kubernetes 输入验证错误漏洞(CVE-2023-3676)(CVE-2023-3955))、Kubernetes 安全漏洞(CVE-2023-2431)
受影响的产品和版本:Kubelet 1.27.0至1.27.1版本,1.26.0至1.26.4版本,1.25.0至1.25.9版本,1.24.13及之前版本。
4.0 前置操作
#所有节点操作
# 0、 导入所需要的镜像包:   (这里并不需要升级etcd、coredns)
]$  docker load -i k8s.tar
Loaded image: registry.aliyuncs.com/google_containers/etcd:3.5.3-0
Loaded image: registry.aliyuncs.com/google_containers/coredns:v1.8.6
Loaded image: registry.aliyuncs.com/google_containers/etcd:3.5.6-0

###主要使用到 下面的包:
Loaded image: registry.aliyuncs.com/google_containers/kube-apiserver:v1.24.0
Loaded image: registry.aliyuncs.com/google_containers/kube-controller-manager:v1.24.0
Loaded image: registry.aliyuncs.com/google_containers/kube-scheduler:v1.24.0
Loaded image: registry.aliyuncs.com/google_containers/kube-proxy:v1.24.0

Loaded image: registry.aliyuncs.com/google_containers/pause:3.7
Loaded image: registry.aliyuncs.com/google_containers/kube-controller-manager:v1.24.17
Loaded image: registry.aliyuncs.com/google_containers/kube-scheduler:v1.24.17
Loaded image: registry.aliyuncs.com/google_containers/kube-proxy:v1.24.17
Loaded image: registry.aliyuncs.com/google_containers/kube-apiserver:v1.24.17


###所需的rpm包:   cd /xx/packages

f46e0356e279308a525195d1ae939268faaea772a119cb752480be2b998bec54-kubelet-1.24.17-0.x86_64.rpm
2b0a91cdc51521c09c61f15da12d533a0e478e5d09f0326f079414b90fd77b03-kubeadm-1.24.17-0.x86_64.rpm
c3dc5ffa817d2c69bdd77494b5b9240568c4eb0d06b7b1bf3546bdab971741f5-kubectl-1.24.17-0.x86_64.rpm
cri-dockerd-0.3.14-3.el8.x86_64.rpm
363f3fbfa8b89bb978e2d089e52ba59847f143834f8ea1b559afa864d8c5c011-kubelet-1.24.0-0.x86_64.rpm
dda11ee75bc7fcb01e32512cefb8f686dc6a7383516b8b0828adb33761fe602e-kubeadm-1.24.0-0.x86_64.rpm
0c7a02e05273d05ea82ca13546853b65fbc257dd159565ce6eb658a0bdf31c9f-kubectl-1.24.0-0.x86_64.rpm


# 1 、安装cri-docker   根据自己环境下载对应的包 这里是el8的。 软件下载:https://github.com/Mirantis/cri-dockerd
rpm -ivh cri-dockerd-0.3.14-3.el8.x86_64.rpm


vim /usr/lib/systemd/system/cri-docker.service
#修改fd://后面的
ExecStart=/usr/bin/cri-dockerd --container-runtime-endpoint fd:// --network-plugin=cni --pod-infra-container-image=registry.aliyuncs.com/google_containers/pause:3.7

systemctl daemon-reload
systemctl  enable --now cri-docker
systemctl  status cri-docker

ll /var/run/cri-dockerd.sock
srw-rw---- 1 root docker 0 Jan  9 17:51 /var/run/cri-dockerd.sock
4.1 升级master节点
升级v1.24.0的操作 (之后v1.24.17的操作 重复一遍即可。)
#修改nodes节点信息
kubectl edit nodes master-52  #升v1.24.17时不做
修改为:
kubeadm.alpha.kubernetes.io/cri-socket: unix:///var/run/cri-dockerd.sock


#操作 kubeadm
yum install -y  dda11ee75bc7fcb01e32512cefb8f686dc6a7383516b8b0828adb33761fe602e-kubeadm-1.24.0-0.x86_64.rpm
#kubeadm upgrade plan
kubeadm upgrade apply v1.24.0    ##之后其他的master/worker节点就用kubeadm upgrade node
#驱逐
kubectl drain master-52 --ignore-daemonsets

#升级kubectl 、kubelet
yum install -y 0c7a02e05273d05ea82ca13546853b65fbc257dd159565ce6eb658a0bdf31c9f-kubectl-1.24.0-0.x86_64.rpm
yum install -y 363f3fbfa8b89bb978e2d089e52ba59847f143834f8ea1b559afa864d8c5c011-kubelet-1.24.0-0.x86_64.rpm

#修改env文件
vim /var/lib/kubelet/kubeadm-flags.env   #升v1.24.17时不做
修改为:
KUBELET_KUBEADM_ARGS="--pod-infra-container-image=registry.aliyuncs.com/google_containers/pause:3.7  --container-runtime=remote --container-runtime-endpoint=unix:///var/run/cri-dockerd.sock"

systemctl daemon-reload
systemctl restart kubelet
systemctl status kubelet

解除节点保护
[root@master-52 ~]# kubectl uncordon gx-master-52

#重启刚才没重启的pod  (看存活时间的来重启)
 kubectl get pod -A -owide | grep master-52
 kubectl delete pod calico-node-bx6h4 kube-proxy-svj7x   -n kube-system

此时验证:
#此时
[root@master/package]$  kubectl get nodes
NAME           STATUS   ROLES           AGE    VERSION
master-52   Ready    control-plane   142d   v1.24.0
master-54   Ready    control-plane   142d   v1.23.17
master-56   Ready    control-plane   142d   v1.23.17
slave-55    Ready    <none>          142d   v1.23.17
slave-57    Ready    <none>          142d   v1.23.17
4.2 升级worker节点
yum install -y dda11ee75bc7fcb01e32512cefb8f686dc6a7383516b8b0828adb33761fe602e-kubeadm-1.24.0-0.x86_64.rpm
#执行:
kubeadm upgrade node
	]$   kubeadm upgrade node
	[upgrade] Reading configuration from the cluster...
	[upgrade] FYI: You can look at this config file with 'kubectl -n kube-system get cm kubeadm-config -o yaml'
	[preflight] Running pre-flight checks
	[preflight] Skipping prepull. Not a control plane node.
	[upgrade] Skipping phase. Not a control plane node.
	[kubelet-start] Writing kubelet configuration to file "/var/lib/kubelet/config.yaml"
	[upgrade] The configuration for this node was successfully updated!
	[upgrade] Now you should go ahead and upgrade the kubelet package using your package manager.

 #回master执行
 kubectl drain slave-57 --ignore-daemonsets

 #回到worker节点
  yum install -y 0c7a02e05273d05ea82ca13546853b65fbc257dd159565ce6eb658a0bdf31c9f-kubectl-1.24.0-0.x86_64.rpm
 yum install -y 363f3fbfa8b89bb978e2d089e52ba59847f143834f8ea1b559afa864d8c5c011-kubelet-1.24.0-0.x86_64.rpm

 vim /var/lib/kubelet/kubeadm-flags.env  #升v1.24.17不做
 修改为:
KUBELET_KUBEADM_ARGS="--pod-infra-container-image=registry.aliyuncs.com/google_containers/pause:3.7  --container-runtime=remote --container-runtime-endpoint=unix:///var/run/cri-dockerd.sock"

# 修改节点套接字
[root@server2 ~]# kubectl edit nodes slave-57 #需要在master节点执行   #升v1.24.17不做
    kubeadm.alpha.kubernetes.io/cri-socket: unix:///var/run/cri-dockerd.sock

#重启kubelet
[root@slave-55 ~]# systemctl daemon-reload
[root@slave-55 ~]# systemctl restart kubelet
systemctl status kubelet


#解除节点保护
[root@server2 ~]# kubectl uncordon slave-57 #需要在master节点执行

###重启一些pod
kubectl get pod -owide -A | grep slave-57
kubectl delete pod calico-node-58hsq kube-proxy-wvghz   -n kube-system
参考博客:
https://blog.csdn.net/Gong_yz/article/details/129367570  (主要参考)
https://blog.csdn.net/cronaldo91/article/details/135194533
4.3 报错处理
在master54执行kubeadm upgrade node报错
#执行-v=5也是差不多结果。
[root@ master-54 /home/$  kubeadm upgrade node
[upgrade] Reading configuration from the cluster...
[upgrade] FYI: You can look at this config file with 'kubectl -n kube-system get cm kubeadm-config -o yaml'
unable to fetch the kubeadm-config ConfigMap: failed to getAPIEndpoint: could not retrieve API endpoints for node " master-54" using pod annotations: timed out waiting for the condition
To see the stack trace of this error execute with --v=5 or higher

##执行过程中   /var/log/message 信息
Jun 26 14:36:04  master-54 kubelet[2678165]: I0626 14:36:04.201461 2678165 scope.go:110] "RemoveContainer" containerID="1a2a8847aa4c3e425dc2d32e67708f913d7096ccf33b3dfaf02f3e7906078d5e"
Jun 26 14:36:04  master-54 kubelet[2678165]: E0626 14:36:04.201921 2678165 pod_workers.go:965] "Error syncing pod, skipping" err="failed to \"StartContainer\" for \"kube-apiserver\" with CrashLoopBackOff: \"back-off 5m0s restarting failed container=kube-apiserver pod=kube-apiserver- master-54_kube-system(6119e1900881a0ca4a96a88618277ebe)\"" pod="kube-system/kube-apiserver- master-54" podUID=6119e1900881a0ca4a96a88618277ebe
Jun 26 14:36:16  master-54 kubelet[2678165]: I0626 14:36:16.201568 2678165 scope.go:110] "RemoveContainer" containerID="1a2a8847aa4c3e425dc2d32e67708f913d7096ccf33b3dfaf02f3e7906078d5e"
Jun 26 14:36:16  master-54 kubelet[2678165]: E0626 14:36:16.202098 2678165 pod_workers.go:965] "Error syncing pod, skipping" err="failed to \"StartContainer\" for \"kube-apiserver\" with CrashLoopBackOff: \"back-off 5m0s restarting failed container=kube-apiserver pod=kube-apiserver- master-54_kube-system(6119e1900881a0ca4a96a88618277ebe)\"" pod="kube-system/kube-apiserver- master-54" podUID=6119e1900881a0ca4a96a88618277ebe

#这里发现他说kube-apiserver 出现CrashLoopBackOff 了。
[root@ master-54 /var/log]$  kubectl get pod -A -owide | grep api
kube-system   kube-apiserver                                    1/1     Running            11 (20h ago)     4d19h   1X.xx.xx.54      master-54   <none>           <none>
kube-system   kube-apiserver- master-52                       1/1     Running            1 (4h24m ago)    4h23m   1X.xx.xx.52      master-52   <none>           <none>
kube-system   kube-apiserver- master-54                       0/1     CrashLoopBackOff   249 (30s ago)    20h     1X.xx.xx.54      master-54   <none>           <none>
kube-system   kube-apiserver- master-56                       1/1     Running            2 (3h25m ago)    3h25m   1X.xx.xx.56      master-56   <none>           <none>


###处理方法 ,直接删了 kube-apiserver (谨慎操作!) (这里可能跟之前修复CVE2016时候 出现问题冲突报错了。)
[root@ master-54 /var/log]$  cd /etc/kubernetes/manifests/
[root@ master-54 /etc/kubernetes/manifests]$  ls
etcd.yaml  kube-apiserver.yaml  kube-controller-manager.yaml  kube-scheduler.yaml

[root@ master-54 /etc/kubernetes/manifests]$  kubectl delete -n kube-system  pod kube-apiserver kube-apiserver- master-54
pod "kube-apiserver" deleted
pod "kube-apiserver- master-54" deleted

The connection to the server 1x.xx.xx.58:6443 was refused - did you specify the right host or port?
### 等几分钟 ,自我修复。
4.x 执行过程(可略)
## 4.x.1  master节点执行 kubeadm upgrade node 的过程:
[root@ master-54 /home]$  kubeadm upgrade node
[upgrade] Reading configuration from the cluster...
[upgrade] FYI: You can look at this config file with 'kubectl -n kube-system get cm kubeadm-config -o yaml'
[preflight] Running pre-flight checks
[preflight] Pulling images required for setting up a Kubernetes cluster
[preflight] This might take a minute or two, depending on the speed of your internet connection
[preflight] You can also perform this action in beforehand using 'kubeadm config images pull'
[upgrade] Upgrading your Static Pod-hosted control plane instance to version "v1.24.0"...
[upgrade/etcd] Upgrading to TLS for etcd
[upgrade/etcd] Non fatal issue encountered during upgrade: the desired etcd version "3.5.3-0" is older than the currently installed "3.5.6-0". Skipping etcd upgrade
[upgrade/staticpods] Writing new Static Pod manifests to "/etc/kubernetes/tmp/kubeadm-upgraded-manifests4251516813"
[upgrade/staticpods] Preparing for "kube-apiserver" upgrade
[upgrade/staticpods] Renewing apiserver certificate
[upgrade/staticpods] Renewing apiserver-kubelet-client certificate
[upgrade/staticpods] Renewing front-proxy-client certificate
[upgrade/staticpods] Renewing apiserver-etcd-client certificate
[upgrade/staticpods] Moved new manifest to "/etc/kubernetes/manifests/kube-apiserver.yaml" and backed up old manifest to "/etc/kubernetes/tmp/kubeadm-backup-manifests-2024-06-26-14-49-33/kube-apiserver.yaml"
[upgrade/staticpods] Waiting for the kubelet to restart the component
[upgrade/staticpods] This might take a minute or longer depending on the component/version gap (timeout 5m0s)
[apiclient] Found 3 Pods for label selector component=kube-apiserver
[upgrade/staticpods] Component "kube-apiserver" upgraded successfully!
[upgrade/staticpods] Preparing for "kube-controller-manager" upgrade
[upgrade/staticpods] Renewing controller-manager.conf certificate
[upgrade/staticpods] Moved new manifest to "/etc/kubernetes/manifests/kube-controller-manager.yaml" and backed up old manifest to "/etc/kubernetes/tmp/kubeadm-backup-manifests-2024-06-26-14-49-33/kube-controller-manager.yaml"
[upgrade/staticpods] Waiting for the kubelet to restart the component
[upgrade/staticpods] This might take a minute or longer depending on the component/version gap (timeout 5m0s)
[apiclient] Found 3 Pods for label selector component=kube-controller-manager
[upgrade/staticpods] Component "kube-controller-manager" upgraded successfully!
[upgrade/staticpods] Preparing for "kube-scheduler" upgrade
[upgrade/staticpods] Renewing scheduler.conf certificate
[upgrade/staticpods] Moved new manifest to "/etc/kubernetes/manifests/kube-scheduler.yaml" and backed up old manifest to "/etc/kubernetes/tmp/kubeadm-backup-manifests-2024-06-26-14-49-33/kube-scheduler.yaml"
[upgrade/staticpods] Waiting for the kubelet to restart the component
[upgrade/staticpods] This might take a minute or longer depending on the component/version gap (timeout 5m0s)
[apiclient] Found 3 Pods for label selector component=kube-scheduler
[upgrade/staticpods] Component "kube-scheduler" upgraded successfully!
[upgrade] The control plane instance for this node was successfully updated!
[kubelet-start] Writing kubelet configuration to file "/var/lib/kubelet/config.yaml"
[upgrade] The configuration for this node was successfully updated!
[upgrade] Now you should go ahead and upgrade the kubelet package using your package manager.
## 4.x.2 master节点执行kubeadm upgrade plan的过程  (这个指令在worker节点执行的话会报错)
xxxe]$  kubeadm upgrade plan
[upgrade/config] Making sure the configuration is correct:
[upgrade/config] Reading configuration from the cluster...
[upgrade/config] FYI: You can look at this config file with 'kubectl -n kube-system get cm kubeadm-config -o yaml'
[preflight] Running pre-flight checks.
[upgrade] Running cluster health checks
[upgrade] Fetching available versions to upgrade to
[upgrade/versions] Cluster version: v1.24.0
[upgrade/versions] kubeadm version: v1.24.17
W0626 15:17:33.470007 1547246 version.go:104] could not fetch a Kubernetes version from the internet: unable to get URL "https://dl.k8s.io/release/stable.txt": Get "https://dl.k8s.io/release/stable.txt": context deadline exceeded (Client.Timeout exceeded while awaiting headers)
W0626 15:17:33.470093 1547246 version.go:105] falling back to the local client version: v1.24.17
[upgrade/versions] Target version: v1.24.17
W0626 15:17:43.483985 1547246 version.go:104] could not fetch a Kubernetes version from the internet: unable to get URL "https://dl.k8s.io/release/stable-1.24.txt": Get "https://dl.k8s.io/release/stable-1.24.txt": context deadline exceeded (Client.Timeout exceeded while awaiting headers)
W0626 15:17:43.484014 1547246 version.go:105] falling back to the local client version: v1.24.17
[upgrade/versions] Latest version in the v1.24 series: v1.24.17

Components that must be upgraded manually after you have upgraded the control plane with 'kubeadm upgrade apply':
COMPONENT   CURRENT       TARGET
kubelet     5 x v1.24.0   v1.24.17

Upgrade to the latest version in the v1.24 series:

COMPONENT                 CURRENT   TARGET
kube-apiserver            v1.24.0   v1.24.17
kube-controller-manager   v1.24.0   v1.24.17
kube-scheduler            v1.24.0   v1.24.17
kube-proxy                v1.24.0   v1.24.17
CoreDNS                   v1.8.6    v1.8.6
etcd                      3.5.6-0   3.5.6-0

You can now apply the upgrade by executing the following command:

        kubeadm upgrade apply v1.24.17

_____________________________________________________________________

The table below shows the current state of component configs as understood by this version of kubeadm.
Configs that have a "yes" mark in the "MANUAL UPGRADE REQUIRED" column require manual config upgrade or
resetting to kubeadm defaults before a successful upgrade can be performed. The version to manually
upgrade to is denoted in the "PREFERRED VERSION" column.

API GROUP                 CURRENT VERSION   PREFERRED VERSION   MANUAL UPGRADE REQUIRED
kubeproxy.config.k8s.io   v1alpha1          v1alpha1            no
kubelet.config.k8s.io     v1beta1           v1beta1             no
_____________________________________________________________________
## 4.x.3 master节点执行kubeadm upgrade apply v1.24.17的过程
[root@master-52 /home/]$  kubeadm upgrade apply v1.24.17
[upgrade/config] Making sure the configuration is correct:
[upgrade/config] Reading configuration from the cluster...
[upgrade/config] FYI: You can look at this config file with 'kubectl -n kube-system get cm kubeadm-config -o yaml'
[preflight] Running pre-flight checks.
[upgrade] Running cluster health checks
[upgrade/version] You have chosen to change the cluster version to "v1.24.17"
[upgrade/versions] Cluster version: v1.24.0
[upgrade/versions] kubeadm version: v1.24.17
[upgrade/confirm] Are you sure you want to proceed with the upgrade? [y/N]: y
[upgrade/prepull] Pulling images required for setting up a Kubernetes cluster
[upgrade/prepull] This might take a minute or two, depending on the speed of your internet connection
[upgrade/prepull] You can also perform this action in beforehand using 'kubeadm config images pull'
[upgrade/apply] Upgrading your Static Pod-hosted control plane to version "v1.24.17" (timeout: 5m0s)...
[upgrade/etcd] Upgrading to TLS for etcd
[upgrade/staticpods] Preparing for "etcd" upgrade
[upgrade/staticpods] Renewing etcd-server certificate
[upgrade/staticpods] Renewing etcd-peer certificate
[upgrade/staticpods] Renewing etcd-healthcheck-client certificate
[upgrade/staticpods] Moved new manifest to "/etc/kubernetes/manifests/etcd.yaml" and backed up old manifest to "/etc/kubernetes/tmp/kubeadm-backup-manifests-2024-06-26-15-19-39/etcd.yaml"
[upgrade/staticpods] Waiting for the kubelet to restart the component
[upgrade/staticpods] This might take a minute or longer depending on the component/version gap (timeout 5m0s)
[apiclient] Found 3 Pods for label selector component=etcd
[upgrade/staticpods] Component "etcd" upgraded successfully!
[upgrade/etcd] Waiting for etcd to become available
[upgrade/staticpods] Writing new Static Pod manifests to "/etc/kubernetes/tmp/kubeadm-upgraded-manifests1516825297"
[upgrade/staticpods] Preparing for "kube-apiserver" upgrade
[upgrade/staticpods] Renewing apiserver certificate
[upgrade/staticpods] Renewing apiserver-kubelet-client certificate
[upgrade/staticpods] Renewing front-proxy-client certificate
[upgrade/staticpods] Renewing apiserver-etcd-client certificate
[upgrade/staticpods] Moved new manifest to "/etc/kubernetes/manifests/kube-apiserver.yaml" and backed up old manifest to "/etc/kubernetes/tmp/kubeadm-backup-manifests-2024-06-26-15-19-39/kube-apiserver.yaml"
[upgrade/staticpods] Waiting for the kubelet to restart the component
[upgrade/staticpods] This might take a minute or longer depending on the component/version gap (timeout 5m0s)
[apiclient] Found 3 Pods for label selector component=kube-apiserver
[upgrade/staticpods] Component "kube-apiserver" upgraded successfully!
[upgrade/staticpods] Preparing for "kube-controller-manager" upgrade
[upgrade/staticpods] Renewing controller-manager.conf certificate
[upgrade/staticpods] Moved new manifest to "/etc/kubernetes/manifests/kube-controller-manager.yaml" and backed up old manifest to "/etc/kubernetes/tmp/kubeadm-backup-manifests-2024-06-26-15-19-39/kube-controller-manager.yaml"
[upgrade/staticpods] Waiting for the kubelet to restart the component
[upgrade/staticpods] This might take a minute or longer depending on the component/version gap (timeout 5m0s)
[apiclient] Found 3 Pods for label selector component=kube-controller-manager
[upgrade/staticpods] Component "kube-controller-manager" upgraded successfully!
[upgrade/staticpods] Preparing for "kube-scheduler" upgrade
[upgrade/staticpods] Renewing scheduler.conf certificate
[upgrade/staticpods] Moved new manifest to "/etc/kubernetes/manifests/kube-scheduler.yaml" and backed up old manifest to "/etc/kubernetes/tmp/kubeadm-backup-manifests-2024-06-26-15-19-39/kube-scheduler.yaml"
[upgrade/staticpods] Waiting for the kubelet to restart the component
[upgrade/staticpods] This might take a minute or longer depending on the component/version gap (timeout 5m0s)
[apiclient] Found 3 Pods for label selector component=kube-scheduler
[upgrade/staticpods] Component "kube-scheduler" upgraded successfully!
[upgrade/postupgrade] Removing the deprecated label node-role.kubernetes.io/master='' from all control plane Nodes. After this step only the label node-role.kubernetes.io/control-plane='' will be present on control plane Nodes.
[upgrade/postupgrade] Adding the new taint &Taint{Key:node-role.kubernetes.io/control-plane,Value:,Effect:NoSchedule,TimeAdded:<nil>,} to all control plane Nodes. After this step both taints &Taint{Key:node-role.kubernetes.io/control-plane,Value:,Effect:NoSchedule,TimeAdded:<nil>,} and &Taint{Key:node-role.kubernetes.io/master,Value:,Effect:NoSchedule,TimeAdded:<nil>,} should be present on control plane Nodes.
[upload-config] Storing the configuration used in ConfigMap "kubeadm-config" in the "kube-system" Namespace
[kubelet] Creating a ConfigMap "kubelet-config" in namespace kube-system with the configuration for the kubelets in the cluster
[kubelet-start] Writing kubelet configuration to file "/var/lib/kubelet/config.yaml"
[bootstrap-token] Configured RBAC rules to allow Node Bootstrap tokens to get nodes
[bootstrap-token] Configured RBAC rules to allow Node Bootstrap tokens to post CSRs in order for nodes to get long term certificate credentials
[bootstrap-token] Configured RBAC rules to allow the csrapprover controller automatically approve CSRs from a Node Bootstrap Token
[bootstrap-token] Configured RBAC rules to allow certificate rotation for all node client certificates in the cluster
[addons] Applied essential addon: CoreDNS
[addons] Applied essential addon: kube-proxy

[upgrade/successful] SUCCESS! Your cluster was upgraded to "v1.24.17". Enjoy!

[upgrade/kubelet] Now that your control plane is upgraded, please proceed with upgrading your kubelets if you haven't already done so.
## 4.x.4 worker节点执行kubeadm upgrade node的过程
	]$   kubeadm upgrade node
	[upgrade] Reading configuration from the cluster...
	[upgrade] FYI: You can look at this config file with 'kubectl -n kube-system get cm kubeadm-config -o yaml'
	[preflight] Running pre-flight checks
	[preflight] Skipping prepull. Not a control plane node.
	[upgrade] Skipping phase. Not a control plane node.
	[kubelet-start] Writing kubelet configuration to file "/var/lib/kubelet/config.yaml"
	[upgrade] The configuration for this node was successfully updated!
	[upgrade] Now you should go ahead and upgrade the kubelet package using your package manager.
五、 将另一个空闲节点加入k8s集群,再做升级
#master节点执行:
[root@master-54 /home/nwom/dockerImageTar]$  kubeadm token create --print-join-command
kubeadm join 1X.xx.xx.58:6443 --token 6h3mjx.xxx--discovery-token-ca-cert-hash sha256:f5c91cc3xxx


#worker节点执行:
[root@GX-slave-60 ~]$  kubeadm join 1X.xx.xx.58:6443 --token 6h3mjx.xxx --discovery-token-ca-cert-hash sha256:f5c91ccxxx
[preflight] Running pre-flight checks
        [WARNING Swap]: swap is enabled; production deployments should disable swap unless testing the NodeSwap feature gate of the kubelet
        [WARNING FileExisting-tc]: tc not found in system path
error execution phase preflight: [preflight] Some fatal errors occurred:
        [ERROR FileAvailable--etc-kubernetes-kubelet.conf]: /etc/kubernetes/kubelet.conf already exists
        [ERROR FileAvailable--etc-kubernetes-pki-ca.crt]: /etc/kubernetes/pki/ca.crt already exists
[preflight] If you know what you are doing, you can make a check non-fatal with `--ignore-preflight-errors=...`
To see the stack trace of this error execute with --v=5 or higher
[root@GX-slave-60 ~]$  echo $?
1
#报错处理 使用  kubeadm reset
[root@ slave-60 ~/k8s-bak]$  kubeadm reset
[reset] WARNING: Changes made to this host by 'kubeadm init' or 'kubeadm join' will be reverted.
[reset] Are you sure you want to proceed? [y/N]: y
[preflight] Running pre-flight checks
W0627 09:58:10.511418 3906685 removeetcdmember.go:80] [reset] No kubeadm config, using etcd pod spec to get data directory
[reset] No etcd config found. Assuming external etcd
[reset] Please, manually reset etcd to prevent further issues
[reset] Stopping the kubelet service
[reset] Unmounting mounted directories in "/var/lib/kubelet"
[reset] Deleting contents of config directories: [/etc/kubernetes/manifests /etc/kubernetes/pki]
[reset] Deleting files: [/etc/kubernetes/admin.conf /etc/kubernetes/kubelet.conf /etc/kubernetes/bootstrap-kubelet.conf /etc/kubernetes/controller-manager.conf /etc/kubernetes/scheduler.conf]
[reset] Deleting contents of stateful directories: [/var/lib/kubelet /var/lib/dockershim /var/run/kubernetes /var/lib/cni]

The reset process does not clean CNI configuration. To do so, you must remove /etc/cni/net.d

The reset process does not reset or clean up iptables rules or IPVS tables.
If you wish to reset iptables, you must do so manually by using the "iptables" command.

If your cluster was setup to utilize IPVS, run ipvsadm --clear (or similar)
to reset your system s IPVS tables.

The reset process does not clean your kubeconfig files and you must remove them manually.
Please, check the contents of the $HOME/.kube/config file.

###再次加入
[root@ slave-60 ~/k8s-bak]$
 kubeadm join 1X.xx.xx.58:6443 --token 6h3mjx.xxx --discovery-token-ca-cert-hash sha256:f5c91ccxxx

[preflight] Running pre-flight checks
        [WARNING FileExisting-tc]: tc not found in system path
[preflight] Reading configuration from the cluster...
[preflight] FYI: You can look at this config file with 'kubectl -n kube-system get cm kubeadm-config -o yaml'
[kubelet-start] Writing kubelet configuration to file "/var/lib/kubelet/config.yaml"
[kubelet-start] Writing kubelet environment file with flags to file "/var/lib/kubelet/kubeadm-flags.env"
[kubelet-start] Starting the kubelet
[kubelet-start] Waiting for the kubelet to perform the TLS Bootstrap...

This node has joined the cluster:
* Certificate signing request was sent to apiserver and a response was received.
* The Kubelet was informed of the new secure connection details.

Run 'kubectl get nodes' on the control-plane to see this node join the cluster.

[root@ slave-60 ~/k8s-bak]$  echo $?
0
#参考:
https://blog.csdn.net/qq_43591361/article/details/129598840 《K8S设置node加入集群》
https://www.cnblogs.com/wangzy-Zj/p/13130877.html 《Kubernetes 加入主节点报错》
六、 k8s处理污点,去除污点
原本master54是没有污点的。升级后自带原本污点了。

xxx-web-79c57d67d5-kn7nq           0/1     Pending   0               49m

kubectl describe -n xx pod xxx-web-79c57d67d5-kn7nq
kubectl get pod -n xx-oyaml xxx-web-79c57d67d5-kn7nq

##
#######
Events:
  Type     Reason            Age                From               Message
  ----     ------            ----               ----               -------
  Warning  FailedScheduling  19m                default-scheduler  0/5 nodes are available: 1 node(s) had untolerated taint {node-role.kubernetes.io/control-plane: }, 2 node(s) didn't match Pod's node affinity/selector, 2 node(s) had untolerated taint {node-role.kubernetes.io/master: }. preemption: 0/5 nodes are available: 5 Preemption is not helpful for scheduling.
  Warning  FailedScheduling  14m                default-scheduler  0/5 nodes are available: 1 node(s) had untolerated taint {node-role.kubernetes.io/control-plane: }, 2 node(s) didn't match Pod's node affinity/selector, 2 node(s) had untolerated taint {node-role.kubernetes.io/master: }. preemption: 0/5 nodes are available: 5 Preemption is not helpful for scheduling.
  Warning  FailedScheduling  46m (x2 over 51m)  default-scheduler  0/5 nodes are available: 1 node(s) had untolerated taint {node-role.kubernetes.io/control-plane: }, 1 node(s) were unschedulable, 2 node(s) had untolerated taint {node-role.kubernetes.io/master: }, 4 node(s) didn't match Pod's node affinity/selector. preemption: 0/5 nodes are available: 5 Preemption is not helpful for scheduling.
  Warning  FailedScheduling  26m (x4 over 41m)  default-scheduler  0/5 nodes are available: 1 node(s) had untolerated taint {node-role.kubernetes.io/control-plane: }, 2 node(s) had untolerated taint {node-role.kubernetes.io/master: }, 4 node(s) didn't match Pod's node affinity/selector. preemption: 0/5 nodes are available: 5 Preemption is not helpful for scheduling.
  Warning  FailedScheduling  22m                default-scheduler  0/5 nodes are available: 1 node(s) had untolerated taint {node-role.kubernetes.io/control-plane: }, 2 node(s) had untolerated taint {node-role.kubernetes.io/master: }, 4 node(s) didn't match Pod's node affinity/selector. preemption: 0/5 nodes are available: 5 Preemption is not helpful for scheduling.
###污点

NODE           TAINTS
master-52   [map[effect:NoSchedule key:node-role.kubernetes.io/master] map[effect:NoSchedule key:node-role.kubernetes.io/control-plane]]
master-54   [map[effect:NoSchedule key:node-role.kubernetes.io/control-plane]]
master-56   [map[effect:NoSchedule key:node-role.kubernetes.io/master] map[effect:NoSchedule key:node-role.kubernetes.io/control-plane]]
slave-55    <none>
slave-57    <none>


###处理方法:
kubectl taint node  master-54 node-role.kubernetes.io/control-plane:NoSchedule-
七、k8s升级后无法正常使用动态pvc的情况 (v1.23.17 --> v1.24.17)
#根据本文目录的 《第四节》升级K8s
大致信息:
1、没升级之前 k8s v1.23.17  , storageClass nfs  v4.0.2 , sts es正常使用动态pvc
2、升级之后  k8s v1.24.17  , storageClass nfs  v4.0.2  ,
但此时sts类型的es调用动态库sc , pvc一直pending,无法分配空间。sc的日志而且会报错(unexpected error getting claim reference: selfLink was empty, can't make reference)
注意v1.24后不能添加 /etc/kubernetes/manifests/kube-apiserver.yaml的(- --feature-gates=RemoveSelfLink=false
) ,因为已弃用,如果改了后k8s集群会无法正常使用。

###处理方法: 将sc nfs降级 storageClass nfs  v4.0.2  -->  storageClass nfs  v4.0.0

参考:https://blog.csdn.net/zfw_666666/article/details/126490241
#其他 helm方式安装 sc  nfs
解压nfs-subdir-external-provisioner-4.0.16.tgz
修改value.yaml文件。的image / tag / nfs server / 挂载路径 。 比如:

[root@master-54 nfs-subdir-external-provisioner]# cat values.yaml
replicaCount: 1
strategyType: Recreate

image:
  repository: 10.xx.xx.x3/system/nfs-subdir-external-provisioner
  tag: v4.0.0
  pullPolicy: IfNotPresent
imagePullSecrets: []

nfs:
  server: 10.xx.xx.6x
  path: /data/nfs_provisioner
  mountOptions:
  volumeName: nfs-subdir-external-provisioner-root
  # Reclaim policy for the main nfs volume
  reclaimPolicy: Retain


#安装部署
helm install -n kube-system nfs .
参考:https://blog.csdn.net/weixin_42555971/article/details/125004265


 396
396


 被折叠的 条评论
为什么被折叠?
被折叠的 条评论
为什么被折叠?
 到【灌水乐园】发言


