


创建Security步骤
1.新建空的maven项目
2.pom文件中加入依赖
<!--加入spring boot-->
<parent>
    <artifactId>spring-boot-parent</artifactId>
    <groupId>org.springframework.boot</groupId>
    <version>2.0.6.RELEASE</version>
</parent>

<!--指定依赖-->
<dependencies>
    <!--web开发相关依赖-->
    <dependency>
        <groupId>org.springframework.boot</groupId>
        <artifactId>spring-boot-starter-web</artifactId>
    </dependency>
    <!--spring security-->
    <dependency>
        <groupId>org.springframework.boot</groupId>
        <artifactId>spring-boot-starter-security</artifactId>
    </dependency>
</dependencies>

<build>
    <plugins>
        <plugin>
            <groupId>org.springframework.boot</groupId>
            <artifactId>spring-boot-maven-plugin</artifactId>
        </plugin>
    </plugins>
</build>
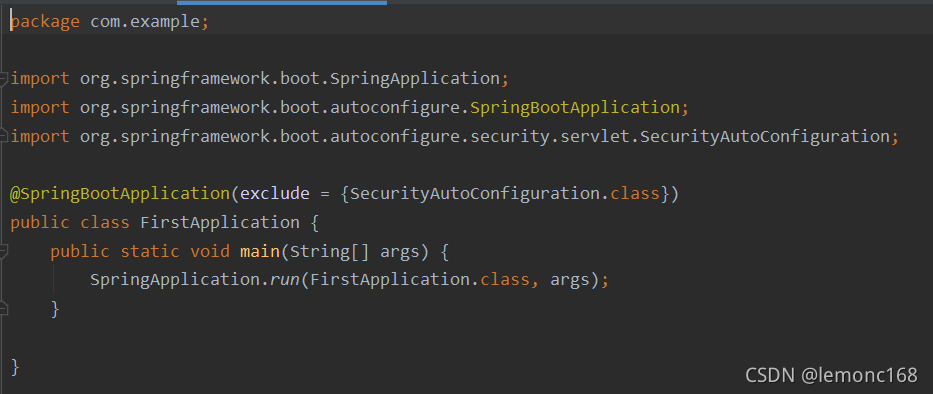
3.创建springboot启动类
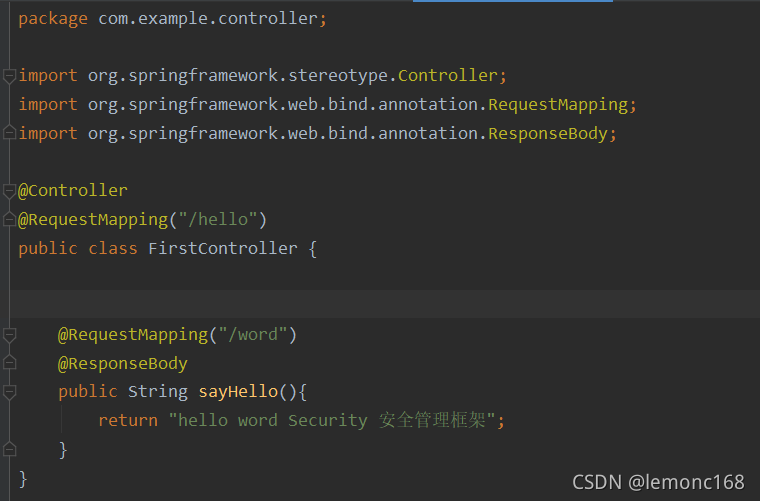
4.创建controller层访问接口
5.启动springboot进行接口访问,系统会在控制台会出现访问接口时候security的验证。
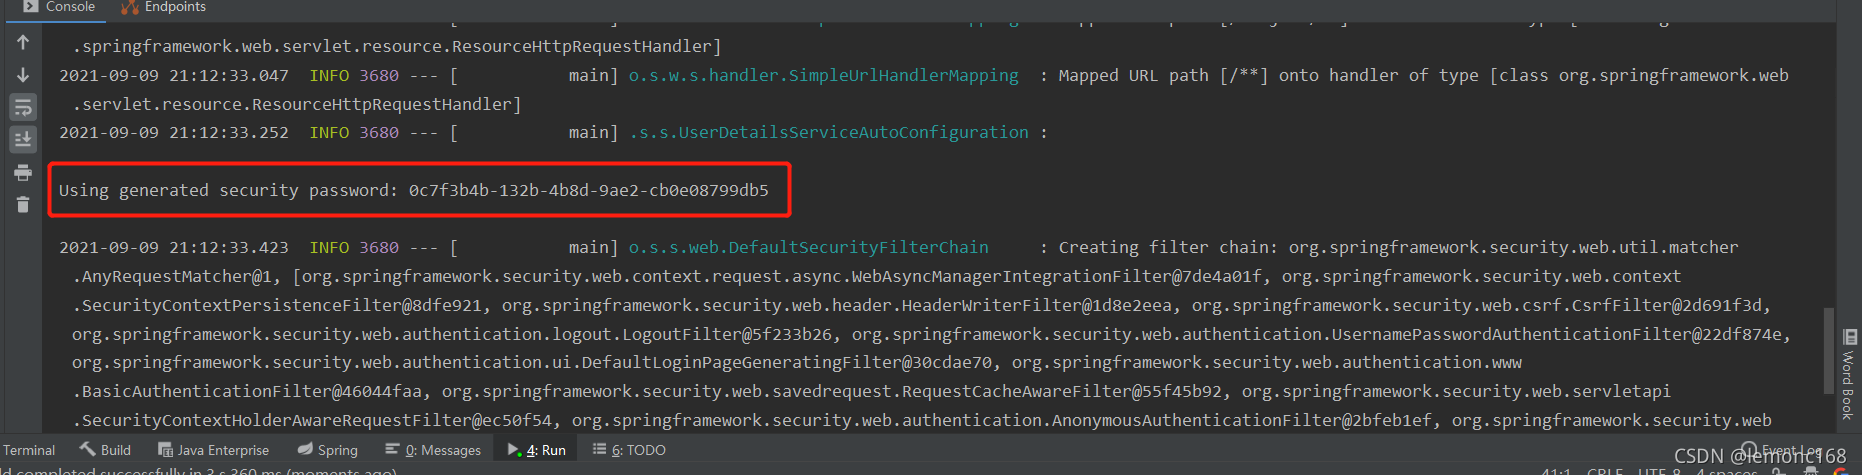
在访问时会有如下,则用户输入user,password为控制台上生成的一串uuid才可访问。
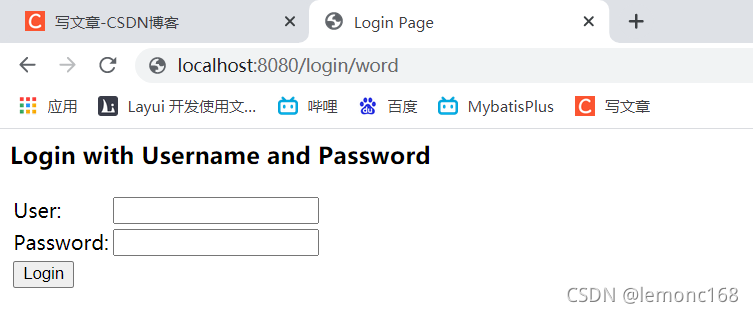
以上为security为我们做的用户验证,我们也可以自己定义用户验证。
6.第一种例子,基于自定义用户验证方式
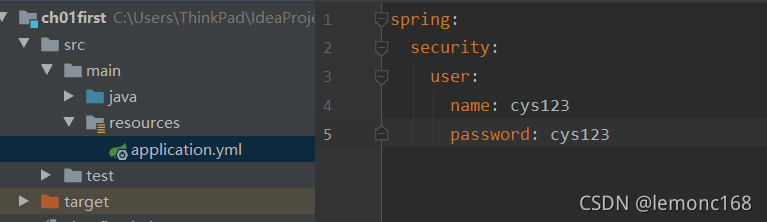
在resources目录下创建application.yml并设置用户验证的名字和密码
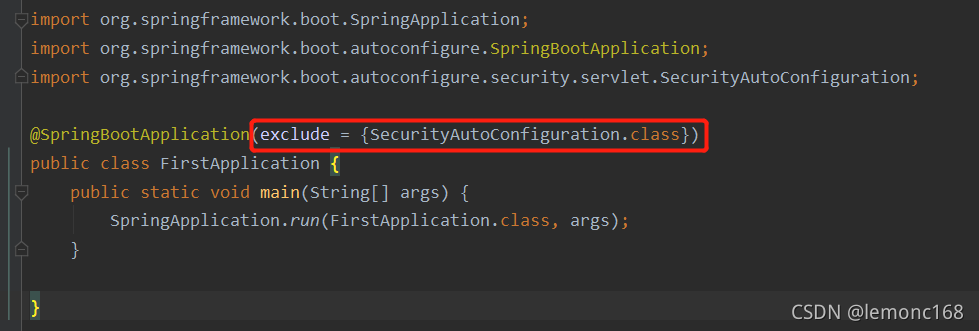
7.关闭security验证
排除security的配置,让它不启用
8.第二种例子,基于内存中的用户验证方式
(1)创建一个类继承WebSecurityConfigurerAdapter ,重写方法。实现自定义的认证信息。重写下面的方法。
Spring Security 5 版本要求密码加密,否则会报错。
@Configuration //表示当前类是一个配置类(相当于spring的xml配置文件),这个类方法的返回值是java对象,这些对象放入到spring容器中
@EnableWebSecurity //表示启用spring security安全框架的功能
package com.example.config;

import org.springframework.context.annotation.Bean;
import org.springframework.context.annotation.Configuration;
import org.springframework.security.config.annotation.authentication.builders.AuthenticationManagerBuilder;
import org.springframework.security.config.annotation.web.configuration.EnableWebSecurity;
import org.springframework.security.config.annotation.web.configuration.WebSecurityConfigurerAdapter;
import org.springframework.security.crypto.bcrypt.BCryptPasswordEncoder;
import org.springframework.security.crypto.password.PasswordEncoder;

@Configuration //表示当前类是一个配置类(相当于spring的xml配置文件),这个类方法的返回值是java对象,这些对象放入到spring容器中
@EnableWebSecurity   //表示启用spring security安全框架的功能
public class MyWebSecurityConfig extends WebSecurityConfigurerAdapter {

    @Override
    protected void configure(AuthenticationManagerBuilder auth) throws Exception {
        //super.configure(auth);  // 使用默认方式的时候,是在内存中存放了user和随机产生的UUID作为用户名和密码

        PasswordEncoder pe = passwordEncoder();
        auth.inMemoryAuthentication().withUser("admin").password(pe.encode("admin")).roles();
        auth.inMemoryAuthentication().withUser("zhangsan").password(pe.encode("123456")).roles();
        auth.inMemoryAuthentication().withUser("lisi").password(pe.encode("123456")).roles();

    }

    //创建密码的加密类
    @Bean
    public PasswordEncoder passwordEncoder(){
        // 创建PasswordEncoder的实现类,实现类的加密算法
        return new BCryptPasswordEncoder();
    }
}
9.角色Role的身份认证,同一个用户可以有不同的角色。同时可以开启对方法级别的认证。
基于角色的实现步骤:
(1)设置用户角色
继承WebSecurityConfigurerAdapter
重写configure方法,指定用户的roles
  auth.inMemoryAuthentication()
                .withUser("zhangsan")
                .password(passwordEncoder().encode("123456"))
                .roles("shanghaiAdmin"); //指定用户roles为"shanghaiAdmin"
(2)使用@EnableGlobalMethodSecurity(prePostEnabled = true)注解
/**
 * @EnableGlobalMethodSecurity: 启用方法级别的认证
 *          prePostEnabled: boolean , 默认是false
 *                  true:表示可以使用@PreAuthorize  和  @PostAuthorize
 */
(3)在controller处理器方法的上面加入角色的信息
指定方法可以访问的角色列表
 	@RequestMapping("/hello")
    @ResponseBody
    @PreAuthorize(value = "hasAnyRole('beijingAdmin','shanghaiAdmin')")//指定方法可以访问的角色列表
    public String helloTest(){
        return "创建用户角色访问模式";
    }
10.第三种例子:基于数据库jdbc用户验证方式。
从数据库mysql中获取用户的身份信息(用户名称、密码、角色)
在spring security框架对象用户信息的表示类是UserDetails。
UserDetails是一个接口,高度抽象的用户信息类(相当于User类)
源代码分析:在数据库访问框架jpa中有一个UserDetailsService 接口,该接口有一个方法返回UserDetails接口类。UserDetails接口类有一个User实现类。
UserDetailsService 接口:通过用户名,返回UserDetails接口
package org.springframework.security.core.userdetails;

public interface UserDetailsService {
    UserDetails loadUserByUsername(String var1) throws UsernameNotFoundException;
}
UserDetails接口类:UserDetails接口中存储了
package org.springframework.security.core.userdetails;

import java.io.Serializable;
import java.util.Collection;
import org.springframework.security.core.GrantedAuthority;

public interface UserDetails extends Serializable {
    Collection<? extends GrantedAuthority> getAuthorities();//权限列表

    String getPassword();

    String getUsername();

    boolean isAccountNonExpired(); //判断帐号是否已经过期

    boolean isAccountNonLocked(); //判断帐号是否已被锁定

    boolean isCredentialsNonExpired();  //认证是否过期

    boolean isEnabled(); //是否启用
}
user类

根据以上的源代码,我们可以定义一个类实现UserDetailsService 接口,通过UserDetailsService 接口中的方法从数据库中通过用户名查询返回UserDetails接口,再得到User用户的实现类。
(1)第一步:在原有的pom文件中加入 mysql 和 数据库访问框架jpa 依赖
<!-- mysql-->
    <dependency>
      <groupId>mysql</groupId>
      <artifactId>mysql-connector-java</artifactId>
    </dependency>

    <!--数据库访问框架jpa jpa:Java持久层API-->
    <dependency>
      <groupId>org.springframework.boot</groupId>
      <artifactId>spring-boot-starter-data-jpa</artifactId>
    </dependency>
(2)第二步:创建UserInfo的实体对象
package com.example.entity;


import javax.persistence.Entity;
import javax.persistence.GeneratedValue;
import javax.persistence.GenerationType;
import javax.persistence.Id;

//表名默认和类名一样的
@Entity //表示当前类是一个实体类,表示数据库中的一个表
public class UserInfo {

    @Id
    @GeneratedValue(strategy = GenerationType.IDENTITY)
    private Long id;
    private String username;
    private String password;
    private String role;

    public Long getId() {
        return id;
    }

    public void setId(Long id) {
        this.id = id;
    }

    public String getUsername() {
        return username;
    }

    public void setUsername(String username) {
        this.username = username;
    }

    public String getPassword() {
        return password;
    }

    public void setPassword(String password) {
        this.password = password;
    }

    public String getRole() {
        return role;
    }

    public void setRole(String role) {
        this.role = role;
    }
}
(3)第三步:依次创建Dao,Service,init对象,其中init是初始化UserInfo数据,将数据放在数据库中。
Dao
package com.example.dao;

import com.example.entity.UserInfo;
import org.springframework.data.jpa.repository.JpaRepository;

public interface UserInfoDao extends JpaRepository<UserInfo,Long> {

    //按照username查询数据库信息
    UserInfo findByUsername(String username);
}
Service
package com.example.service;

import com.example.entity.UserInfo;

public interface UserInfoService {

    //按照username查询数据库信息
    UserInfo findByUsername(String username);
}
ServiceImpl
package com.example.service.impl;

import com.example.dao.UserInfoDao;
import com.example.entity.UserInfo;
import com.example.service.UserInfoService;
import org.springframework.beans.factory.annotation.Autowired;
import org.springframework.stereotype.Service;

@Service
public class UserInfoServiceImpl implements UserInfoService {

    @Autowired
    private UserInfoDao userInfoDao;

    @Override
    public UserInfo findByUsername(String username) {
        UserInfo userInfo = userInfoDao.findByUsername(username);
        return userInfo;
    }
}
init
@Component
public class JdbcInit {

    @Autowired
    private UserInfoDao userInfoDao;

    @PostConstruct
    public void init(){
        BCryptPasswordEncoder encoder = new BCryptPasswordEncoder();
        UserInfo u = new UserInfo();
        u.setUsername("zhangsan");
        u.setPassword(encoder.encode("123456"));
        u.setRole("shanghaiAdmin");
        userInfoDao.save(u);


        u = new UserInfo();
        u.setUsername("lisi");
        u.setPassword(encoder.encode("123456"));
        u.setRole("beijingAdmin");
        userInfoDao.save(u);

    }
}
接下来来实现UserDetailsService 接口,来获取User对象
@Component("MyUserDetailService")
public class MyUserDetailService implements UserDetailsService {

    @Autowired
    private UserInfoDao userInfoDao;

    @Override
    public UserDetails loadUserByUsername(String username) throws UsernameNotFoundException {
        User user = null;
        UserInfo userInfo = null;
        if (username!=null){
            userInfo = userInfoDao.findByUsername(username);
            if (userInfo!=null){
                List<GrantedAuthority> list = new ArrayList<>();

                // 角色必须以ROLE_开头
                GrantedAuthority authority = new SimpleGrantedAuthority("ROLE_"+userInfo.getRole());
                list.add(authority);
                //创建User对象
                user = new User(userInfo.getUsername(), userInfo.getPassword(), list);
            }
        }
        return user;
    }
}
通过Config配置Spring Security的访问角色的配置(通过加载UserDetailsService 来获取用户的信息)
package com.example.config;

import org.springframework.beans.factory.annotation.Autowired;
import org.springframework.beans.factory.annotation.Qualifier;
import org.springframework.context.annotation.Configuration;
import org.springframework.security.config.annotation.authentication.builders.AuthenticationManagerBuilder;
import org.springframework.security.config.annotation.method.configuration.EnableGlobalMethodSecurity;
import org.springframework.security.config.annotation.web.configuration.EnableWebSecurity;
import org.springframework.security.config.annotation.web.configuration.WebSecurityConfigurerAdapter;
import org.springframework.security.core.userdetails.UserDetailsService;
import org.springframework.security.crypto.bcrypt.BCryptPasswordEncoder;


@Configuration
@EnableWebSecurity
@EnableGlobalMethodSecurity(prePostEnabled = true)
public class MyWebSecurityConfig extends WebSecurityConfigurerAdapter {

    @Autowired
    @Qualifier("MyUserDetailService")
    private UserDetailsService userDetailsService;

    @Override
    protected void configure(AuthenticationManagerBuilder auth) throws Exception {
//        super.configure(auth);
        auth.userDetailsService(userDetailsService).passwordEncoder(new BCryptPasswordEncoder());
    }
}
controller层
package com.example.controller;

import org.springframework.security.access.prepost.PreAuthorize;
import org.springframework.stereotype.Controller;
import org.springframework.web.bind.annotation.RequestMapping;
import org.springframework.web.bind.annotation.ResponseBody;

@Controller
public class TestController {

    @RequestMapping("/hello")
    @ResponseBody
    public String sayHello(){
        return "使用jdbc中的用户信息";
    }

    @RequestMapping("/a")
    @ResponseBody
    @PreAuthorize(value = "hasAnyRole('shanghaiAdmin')")
    public String aHello(){
        return "使用jdbc中的用户a信息";
    }

    @RequestMapping("/b")
    @ResponseBody
    @PreAuthorize(value = "hasAnyRole('beijingAdmin')")
    public String bHello(){
        return "使用jdbc中的用户b信息";
    }
}


 被折叠的 条评论
为什么被折叠?
被折叠的 条评论
为什么被折叠?
 到【灌水乐园】发言


