前言
报表中发现有中文乱码和中文字体不整齐(重叠)的情况,首先考虑的就是操作系统是否有中文字体,在CentOS 7中发现输入命令查看字体列表是提示命令无效:

如上图可以看出,不仅没有中文字体,连字体库都没有,那么接下来就记录一下在Linux CentOS 7中如何安装字体库以及中文字体。
安装字体库
在CentOS 4.x开始用fontconfig来安装字体库,所以输入以下命令即可:
<code class="hljs cmake has-numbering" style="display: block; padding: 0px; background: transparent; color: inherit; box-sizing: border-box; font-family: "Source Code Pro", monospace;font-size:undefined; white-space: pre; border-radius: 0px; word-wrap: normal;">yum -y <span class="hljs-keyword" style="color: rgb(0, 0, 136); box-sizing: border-box;">install</span> fontconfig</code><ul class="pre-numbering" style="box-sizing: border-box; position: absolute; width: 50px; background-color: rgb(238, 238, 238); top: 0px; left: 0px; margin: 0px; padding: 6px 0px 40px; border-right: 1px solid rgb(221, 221, 221); list-style: none; text-align: right;"><li style="box-sizing: border-box; padding: 0px 5px;">1</li></ul><ul class="pre-numbering" style="box-sizing: border-box; position: absolute; width: 50px; background-color: rgb(238, 238, 238); top: 0px; left: 0px; margin: 0px; padding: 6px 0px 40px; border-right: 1px solid rgb(221, 221, 221); list-style: none; text-align: right;"><li style="box-sizing: border-box; padding: 0px 5px;">1</li></ul>
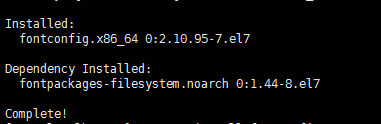
当看到下图的提示信息时说明已安装成功:
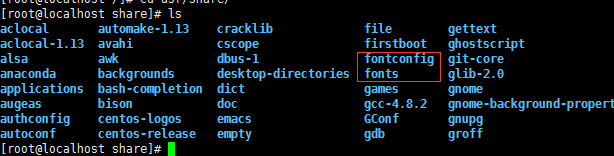
这时在/usr/shared目录就可以看到fonts和fontconfig目录了(之前是没有的):
接下来就可以给我们的字体库中添加中文字体了。
添加中文字体
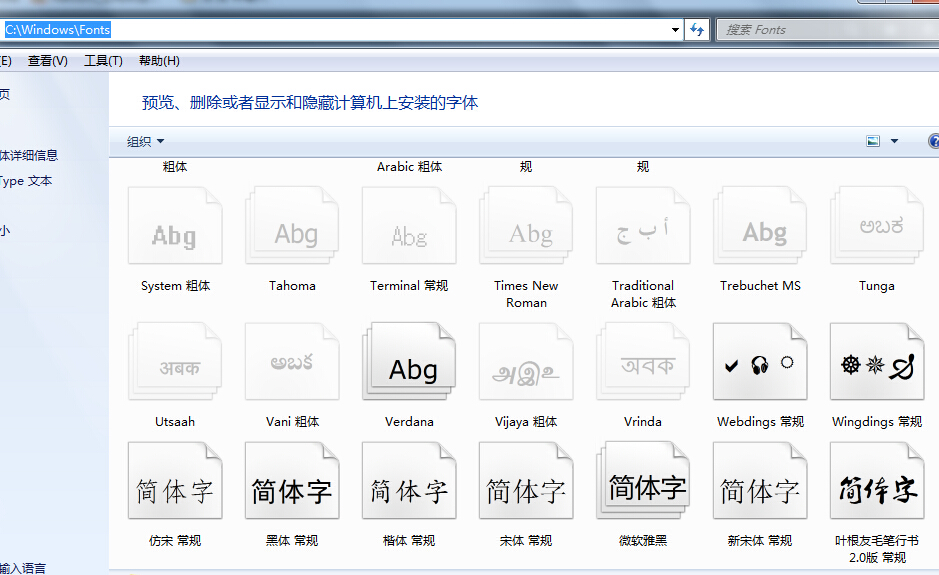
在CentOS中,字体库的存放位置正是上图中看到的fonts目录,所以我们首先要做的就是找到中文字体文件放到该目录下,而中文字体文件在我们的windows系统中就可以找到,打开c盘下的Windows/Fonts目录:
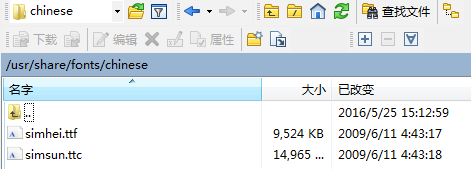
如上图,我们只需要将我们需要的字体拷贝出来并上传至linux服务器即可,在这里我选择宋体和黑体(报表中用到了这两种字体),可以看到是两个后缀名为ttf和ttc的文件: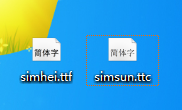
在这之前我们还需要新建目录,首先在/usr/shared/fonts目录下新建一个目录chinese:
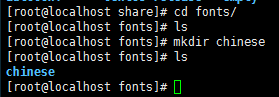
然后就是将上面的两个字体上传至/usr/shared/fonts/chinese目录下即可:
紧接着需要修改chinese目录的权限:
<code class="hljs perl has-numbering" style="display: block; padding: 0px; background: transparent; color: inherit; box-sizing: border-box; font-family: "Source Code Pro", monospace;font-size:undefined; white-space: pre; border-radius: 0px; word-wrap: normal;"><span class="hljs-keyword" style="color: rgb(0, 0, 136); box-sizing: border-box;">chmod</span> -R <span class="hljs-number" style="color: rgb(0, 102, 102); box-sizing: border-box;">755</span> /usr/share/fonts/chinese</code><ul class="pre-numbering" style="box-sizing: border-box; position: absolute; width: 50px; background-color: rgb(238, 238, 238); top: 0px; left: 0px; margin: 0px; padding: 6px 0px 40px; border-right: 1px solid rgb(221, 221, 221); list-style: none; text-align: right;"><li style="box-sizing: border-box; padding: 0px 5px;">1</li></ul><ul class="pre-numbering" style="box-sizing: border-box; position: absolute; width: 50px; background-color: rgb(238, 238, 238); top: 0px; left: 0px; margin: 0px; padding: 6px 0px 40px; border-right: 1px solid rgb(221, 221, 221); list-style: none; text-align: right;"><li style="box-sizing: border-box; padding: 0px 5px;">1</li></ul>
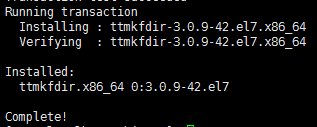
接下来需要安装ttmkfdir来搜索目录中所有的字体信息,并汇总生成fonts.scale文件,输入命令:
<code class="hljs cmake has-numbering" style="display: block; padding: 0px; background: transparent; color: inherit; box-sizing: border-box; font-family: "Source Code Pro", monospace;font-size:undefined; white-space: pre; border-radius: 0px; word-wrap: normal;">yum -y <span class="hljs-keyword" style="color: rgb(0, 0, 136); box-sizing: border-box;">install</span> ttmkfdir</code><ul class="pre-numbering" style="box-sizing: border-box; position: absolute; width: 50px; background-color: rgb(238, 238, 238); top: 0px; left: 0px; margin: 0px; padding: 6px 0px 40px; border-right: 1px solid rgb(221, 221, 221); list-style: none; text-align: right;"><li style="box-sizing: border-box; padding: 0px 5px;">1</li></ul><ul class="pre-numbering" style="box-sizing: border-box; position: absolute; width: 50px; background-color: rgb(238, 238, 238); top: 0px; left: 0px; margin: 0px; padding: 6px 0px 40px; border-right: 1px solid rgb(221, 221, 221); list-style: none; text-align: right;"><li style="box-sizing: border-box; padding: 0px 5px;">1</li></ul>
当看到下图的提示信息时说明已安装成功:
然后执行ttmkfdir命令即可:
<code class="hljs bash has-numbering" style="display: block; padding: 0px; background: transparent; color: inherit; box-sizing: border-box; font-family: "Source Code Pro", monospace;font-size:undefined; white-space: pre; border-radius: 0px; word-wrap: normal;">ttmkfdir <span class="hljs-operator" style="box-sizing: border-box;">-e</span> /usr/share/X11/fonts/encodings/encodings.dir</code><ul class="pre-numbering" style="box-sizing: border-box; position: absolute; width: 50px; background-color: rgb(238, 238, 238); top: 0px; left: 0px; margin: 0px; padding: 6px 0px 40px; border-right: 1px solid rgb(221, 221, 221); list-style: none; text-align: right;"><li style="box-sizing: border-box; padding: 0px 5px;">1</li></ul><ul class="pre-numbering" style="box-sizing: border-box; position: absolute; width: 50px; background-color: rgb(238, 238, 238); top: 0px; left: 0px; margin: 0px; padding: 6px 0px 40px; border-right: 1px solid rgb(221, 221, 221); list-style: none; text-align: right;"><li style="box-sizing: border-box; padding: 0px 5px;">1</li></ul>
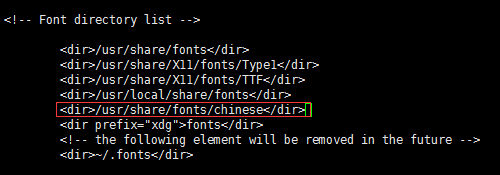
最后一步就是修改字体配置文件了,首先通过编辑器打开配置文件:
<code class="hljs avrasm has-numbering" style="display: block; padding: 0px; background: transparent; color: inherit; box-sizing: border-box; font-family: "Source Code Pro", monospace;font-size:undefined; white-space: pre; border-radius: 0px; word-wrap: normal;">vi /etc/fonts/fonts<span class="hljs-preprocessor" style="color: rgb(68, 68, 68); box-sizing: border-box;">.conf</span></code><ul class="pre-numbering" style="box-sizing: border-box; position: absolute; width: 50px; background-color: rgb(238, 238, 238); top: 0px; left: 0px; margin: 0px; padding: 6px 0px 40px; border-right: 1px solid rgb(221, 221, 221); list-style: none; text-align: right;"><li style="box-sizing: border-box; padding: 0px 5px;">1</li></ul><ul class="pre-numbering" style="box-sizing: border-box; position: absolute; width: 50px; background-color: rgb(238, 238, 238); top: 0px; left: 0px; margin: 0px; padding: 6px 0px 40px; border-right: 1px solid rgb(221, 221, 221); list-style: none; text-align: right;"><li style="box-sizing: border-box; padding: 0px 5px;">1</li></ul>
可以看到一个Font list,即字体列表,在这里需要把我们添加的中文字体位置加进去:
然后输入:wq保存退出,最后别忘了刷新内存中的字体缓存,这样就不用reboot重启了:
<code class="hljs lasso has-numbering" style="display: block; padding: 0px; background: transparent; color: inherit; box-sizing: border-box; font-family: "Source Code Pro", monospace;font-size:undefined; white-space: pre; border-radius: 0px; word-wrap: normal;">fc<span class="hljs-attribute" style="box-sizing: border-box;">-cache</span></code><ul class="pre-numbering" style="box-sizing: border-box; position: absolute; width: 50px; background-color: rgb(238, 238, 238); top: 0px; left: 0px; margin: 0px; padding: 6px 0px 40px; border-right: 1px solid rgb(221, 221, 221); list-style: none; text-align: right;"><li style="box-sizing: border-box; padding: 0px 5px;">1</li></ul><ul class="pre-numbering" style="box-sizing: border-box; position: absolute; width: 50px; background-color: rgb(238, 238, 238); top: 0px; left: 0px; margin: 0px; padding: 6px 0px 40px; border-right: 1px solid rgb(221, 221, 221); list-style: none; text-align: right;"><li style="box-sizing: border-box; padding: 0px 5px;">1</li></ul>
这样所有的步骤就算完成了,最后再次通过fc-list看一下字体列表:

可以看到已经成功安装上了中文字体,至此安装过程就全部结束,再次查看报表可以发现中文样式和内容均已可以正常显示了。
总结
简单记录一下在CentOS 7中安装字体库以及中文字体的问题,希望对遇到同样问题的同学有所帮助,The End。
蛮好用的,收自:http://blog.csdn.net/wlwlwlwl015/article/details/51482065


 1609
1609

 被折叠的 条评论
为什么被折叠?
被折叠的 条评论
为什么被折叠?
 到【灌水乐园】发言


