


Introduction
Kippo is a SSH honeypot tool writen in Python that can log brute force attacks and the shell interaction performed by the said attacker. In this tutorial, I will show you how to setup Kippo and also how to add a simple solution which can help prevent brute force attacks on your cloud server.
Some interesting features that Kippo provides:
Fake filesystem with the ability to add/remove files. A full fake filesystem resembling a Debian 5.0 installation is included
Possibility of adding fake file contents so the attacker can ‘cat’ files such as /etc/passwd. Only minimal file contents are included
Session logs stored in an UML compatible format for easy replay with original timings
Just like Kojoney, Kippo saves files downloaded with wget for later inspection
Trickery; ssh pretends to connect somewhere, exit doesn’t really exit, etc
As qoute by desaster, creater of Kippo, “By running kippo, you’re virtually mooning the attackers. Just like in real life, doing something like that, you better know really well how to defend yourself!”
If you wish to learn more about kippo, please click here.
Please note: This guide assumes you already know how to create a cloud server. If not, please follow this guide before continuing. Furthermore, this is based on a fresh installation of Ubuntu 12.10 x32 server.
Step 1: Access and Update/Upgrade Your Ubuntu Cloud Server
Log into your cloud server with SSH:
ssh root@YOUR_IP_HEREInput the following commands:
apt-get updateand
apt-get upgradeStep 2: Changing the SSH port
Kippo logs everything that has been accessed via port 2222. But most automated tools which are used by hackers, default SSH to port 22. Thus, it would be a good idea to make kippo listen to port 22 instead. To do this, we need to change the port which your server uses for SSH. It is also good practice to change your SSH port for security issues, but you have to remember this when dealing with other 3rd party programs.
From now on, I will be using vi as my text editor. If you use something else like nano, just replace vi with nano.
vi /etc/ssh/sshd_configYou should see the file below:
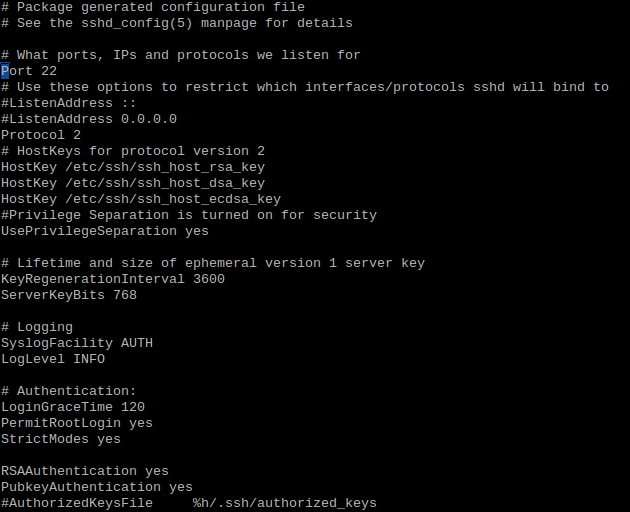
We need to change the port number to something else. In this example, it will be 8925.
# What ports, IPs and protocols we listen for

Port 8925
This should be the expected outcome. Save the file and exit into your terminal.
We need to restart SSH. Input:
reload sshStep 3: Installing Dependencies
We need to install kippo’s dependencies. Here are the following commands:
apt-get install python-dev openssl python-openssl python-pyasn1 python-twisted Now we are going to use ‘subversion’ to download kippo:
apt-get -y install git Step 4: Creating the Kippo User
We add the user, setting the home directory to /home/kippo, the default login shell to /bin/bash then create the home directory. Finally we give this user sudo privileges:
useradd -d /home/kippo -s /bin/bash -m kippo -g sudoStep 5: Change the Port Number to Port 22
On linux systems, the root user is the only user that can run ports below 1024. It’s also not a very good idea to run Kippo as root for security reasons. There has been a lot of discussion at length on this topic. But in this tutorial, we will use AuthBind for its ease of use.
(If you would like to use another method, you can do so and can skip to Step 6.)
Install AuthBind:
apt-get install authbindCreate a new file:
touch /etc/authbind/byport/22Change the ownership to our Kippo user:
chown kippo /etc/authbind/byport/22Change the permissions of the file to read, write, and execute:
$ chmod 777 /etc/authbind/byport/22Step 6: Downloading and Configuring Kippo
From now on, we will be using our kippo user. Access kippo by:
su kippoMake sure we are in our Kippo home dir:
cdDownload kippos SVN:
git clone https://github.com/desaster/kippoChange directory to the dir which was downloaded:
cd kippoWe want to change our port number, from 2222, which kippo listens to by default, to port 22. Move and rename the config file which is provided:
mv kippo.cfg.dist kippo.cfgNow we edit the file (Remember, I’m using Vi):
vi kippo.cfgThe config file should look like this:

From here, we edit this:
# Port to listen for incoming SSH connections.
#
# (default: 2222)
ssh_port = 2222
to
# Port to listen for incoming SSH connections.
#
# (default: 2222)
ssh_port = 22
Save and quit.
Step 7: Startup Script
At this point, it’s a good idea to edit kippo’s startup script to use AuthBind for our SSH solution.
Open the script:
vi start.shYou should see the following:
#!/bin/sh

echo -n "Starting kippo in background..."
twistd -y kippo.tac -l log/kippo.log --pidfile kippo.pid
We change:
twistd -y kippo.tac -l log/kippo.log --pidfile kippo.pidto
authbind --deep twistd -y kippo.tac -l log/kippo.log --pidfile kippo.pidSave and exit the file.
Now we start our script. You could automate this if your server ever restarts:
./start.shThat should be it, everything is now being logged in /home/kippo/kippo/log/
Logging with Kippo
There are a few things which are logged without any extra configuration. One of which is the logging of unauthorized access. For example, when someone tries to login to our cloud server with SSH, not knowing that we have changed the port number, they would see something like this:
access-declined
As long as our start.sh script is running, our events will be logged in /home/kippo/kippo/log/kippo.log. Lets open that file with a text editor (of your choice) and see what has been logged (I am in the directory which we said above).
vi kippo.logDoing this should display something of the lines of:
log-access-declined
Let’s break this down and get to know what is going on:
2013-05-09 00:34:55+0000 [-] Log opened.
2013-05-09 00:34:55+0000 [-] twistd 12.2.0 (/usr/bin/python 2.7.3) starting up.
2013-05-09 00:34:55+0000 [-] reactor class: twisted.internet.epollreactor.EPollReactor.
2013-05-09 00:34:55+0000 [-] HoneyPotSSHFactory starting on 22
2013-05-09 00:34:55+0000 [-] Starting factory
First of all, the log file is opened so that kippo is able to make additions. We fire up our python enviroment. From here, on the 3rd line of our log, we define our event loop (If you wish to learn what that is, click here). Our Kippo enviroment gets set to port 22 which we specified in our configuration file earlier. Finally, we initiate our factory enviroment which will do the bulk of the work of which Kippo does.
Now this is where the logging of intruders will be displayed. As you’ve seen before, we are still able to connect through the default SSH port 22. But remember that this is a dummy access point. This is what we want our intruder to believe when they’re “hacking” our cloud server. This is key because now this gives us the ability to log the users information and what is entered into the terminal window.
2013-05-09 00:35:21+0000 [kippo.core.honeypot.HoneyPotSSHFactory] New connection: 176.255.34.109:47908 (198.211.109.193:22) [session: 0]

2013-05-09 00:35:21+0000 [HoneyPotTransport,0,176.255.34.109] Remote SSH version: SSH-2.0-OpenSSH_6.1p1 Debian-4

2013-05-09 00:35:21+0000 [HoneyPotTransport,0,176.255.34.109] kex alg, key alg: diffie-hellman-group1-sha1 ssh-rsa

2013-05-09 00:35:21+0000 [HoneyPotTransport,0,176.255.34.109] outgoing: aes128-ctr hmac-md5 none

2013-05-09 00:35:21+0000 [HoneyPotTransport,0,176.255.34.109] incoming: aes128-ctr hmac-md5 none

2013-05-09 00:35:26+0000 [HoneyPotTransport,0,176.255.34.109] NEW KEYS

2013-05-09 00:35:26+0000 [HoneyPotTransport,0,176.255.34.109] starting service ssh-userauth
Now as you see, kippo has logged that there has been a connection detected when the attacker tries to into the server with SSH. As you can see, we catch their IP address and what port they’re using (note the port 22, our dummy default port). If you look back on the “hacker’s” machine, you will see the regular RSA (algorithm) fingerprint identity pop up, something that you would normally see if it was your first time logging into your cloud server.
We can see this in our logs also. Outgoing and incoming transmissions of the keypair is passed from server to client. The new key is then accepted and the service for ssh-userauth is started. At this point, they are now where we would be as if we are logging straight into the server and had the correct SSH keys setup as server and client. But of course, we’re not here. This can be seen on the next line:
2013-05-09 00:35:26+0000 [SSHService ssh-userauth on HoneyPotTransport,0,176.255.34.109] root trying auth none

2013-05-09 00:35:26+0000 [SSHService ssh-userauth on HoneyPotTransport,0,176.255.34.109] root trying auth keyboard-interactive

2013-05-09 00:35:42+0000 [SSHService ssh-userauth on HoneyPotTransport,0,176.255.34.109] login attempt [root/chccbcaqkyoz] failed

2013-05-09 00:35:42+0000 [SSHService ssh-userauth on HoneyPotTransport,0,176.255.34.109] root failed auth keyboard-interactive

2013-05-09 00:35:42+0000 [SSHService ssh-userauth on HoneyPotTransport,0,176.255.34.109] unauthorized login:

2013-05-09 00:35:42+0000 [SSHService ssh-userauth on HoneyPotTransport,0,176.255.34.109] root trying auth keyboard-interactive

2013-05-09 00:35:44+0000 [SSHService ssh-userauth on HoneyPotTransport,0,176.255.34.109] login attempt [root/chccbcaqkyoz] failed

2013-05-09 00:35:44+0000 [SSHService ssh-userauth on HoneyPotTransport,0,176.255.34.109] root failed auth keyboard-interactive

2013-05-09 00:35:44+0000 [SSHService ssh-userauth on HoneyPotTransport,0,176.255.34.109] unauthorized login:

2013-05-09 00:35:44+0000 [SSHService ssh-userauth on HoneyPotTransport,0,176.255.34.109] root trying auth keyboard-interactive

2013-05-09 00:35:45+0000 [HoneyPotTransport,0,176.255.34.109] connection lost
It instantly tries to connect us through a SSH key, but it fails. The log also detects that our “hacker” is using the keyboard in his terminal window and once an action is complete, it will log it.
Here we see that the “hacker” tries to enter a password, ‘chccbcaqkyoz’, for the root user. Of course this will fail, but we would like to see what they’ve entered. This will go on and on until the user quits, which is when the connection is lost.
Conclusion
There is a lot more to this tool and you can play some mighty tricks on people if you like. But the main thing to remember is, always be weary about what you do on your cloud server. Think security before doing anything. Doing so will help you in the long run if you need to scale, hold more sensitive data, and a whole lot more.
I would recommend you to make sure you are changing default port settings for you server on a regular basis, like we did in this tutorial for SSH access. This will go a long way, plus you can do stuff like we just did!
In addition, check out the source code of kippo. It will give a better understanding of what this tool does.
Now, go use the password ‘12345’ and find out what else is logged!


 2565
2565

 被折叠的 条评论
为什么被折叠?
被折叠的 条评论
为什么被折叠?
 到【灌水乐园】发言


