


利用springmvc+freemarker+mybatis实现数据库的操作
作者:maodoubi
昨天刚学springmvc,在网上查找资料,完成了一个springmvc+jdbcTemplate实现数据库操作的例子,同时我的页面使用的是jsp页面,页面显示数据列表使用的是jstl来显示的,当时我提到可以使用freemarker来实现页面数据的操作,所以今天就想使用springmvc+freemarker+mybatis来实现简单的数据库操作,如果想看springmvc+jdbcTemplate来操作数据库,其实也可以看我昨天的一篇文章:http://blog.csdn.net/maodoubi/article/details/48267233
可以通过上面的文章对springmvc做一个简单的了解,然后来学习springmvc+freemarker+mybatis
另外我对于springmvc还有许多不理解的地方,也算是个新手,毕竟学习没有几天,有错误的地方也希望指正,不要嘲笑写的代码过于稀烂
首先还是按照整体思路,一步一步来吧:
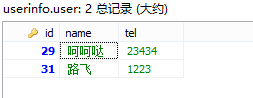
1、首先我们需要创建一个数据库,数据库名叫userinfo,表名是user,主键id是自增长的,具体内容为name和tel:
同时我们需要自己搭建一个maven项目,怎么搭可以百度,具体其实也比较简单,毕竟maven项目比一般普通的web项目还是有巨大优势的,以后工作也都会用到maven项目
那么我的项目结构是:
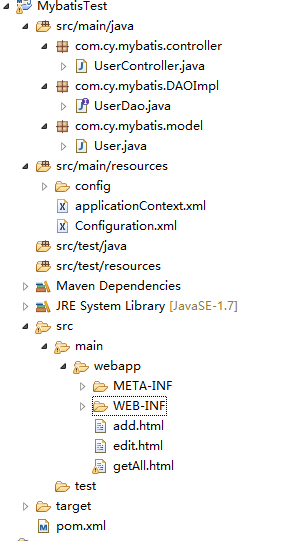
从结构上看其实比较简单,先介绍一下,UserController是控制器,userDao主要提供对数据库的操作接口,User是对应于user表的实现类,applicationContext.xml是spring配置文件,Configuration.xml是mybatis配置文件,config目录下主要是user表的映射文件User.xml,最后getAll.html获取所有用户列表,edit是编辑页面,add是添加页面
pom.xml文件中我们添加相关jar包,具体有spring-webmvc,freemarker,mybatis等包,具体代码如下:
<dependency>
  <span style="white-space:pre">	</span><groupId>org.mybatis</groupId>
  	<artifactId>mybatis</artifactId>
  	<version>3.2.6</version>
</dependency>
<dependency>
  	<groupId>mysql</groupId>
  	<artifactId>mysql-connector-java</artifactId>
  	<version>5.1.34</version>
</dependency>
<dependency>
  	<groupId>org.mybatis</groupId>
  	<artifactId>mybatis-spring</artifactId>
  	<version>1.2.2</version>
</dependency>
<dependency>
  	<groupId>javax.servlet</groupId>
  	<artifactId>javax.servlet-api</artifactId>
  	<version>3.1.0</version>
</dependency>
<dependency>
  	<groupId>org.springframework</groupId>
  	<artifactId>spring-webmvc</artifactId>
  	<version>3.0.6.RELEASE</version>
</dependency>
<dependency>
  	<groupId>org.springframework</groupId>
  	<artifactId>spring-jdbc</artifactId>
  	<version>3.0.5.RELEASE</version>
</dependency>
<dependency>
  	<groupId>org.freemarker</groupId>
  	<artifactId>freemarker</artifactId>
  	<version>2.3.20</version>
</dependency>
2、配置web.xml配置文件,映射文件User.xml,mybatis配置文件Configuration.xml,以及最为重要的spring配置文件applicationContext.xml
首先是web.xml文件,需要配置一个字符编码过滤器和一个拦截器:
<?xml version="1.0" encoding="UTF-8"?>
<web-app xmlns:xsi="http://www.w3.org/2001/XMLSchema-instance"
	xmlns="http://java.sun.com/xml/ns/javaee"
	xsi:schemaLocation="http://java.sun.com/xml/ns/javaee http://java.sun.com/xml/ns/javaee/web-app_2_5.xsd"
	id="WebApp_ID" version="2.5" >

	<filter>
		<filter-name>CharacterEncodingFilter</filter-name>
		<filter-class>
			org.springframework.web.filter.CharacterEncodingFilter
		</filter-class>
		<init-param>
			<param-name>encoding</param-name>
			<param-value>UTF-8</param-value>
		</init-param>
		<init-param>
			<param-name>forceEncoding</param-name>
			<param-value>true</param-value>
		</init-param>
	</filter>
	<filter-mapping>
		<filter-name>CharacterEncodingFilter</filter-name>
		<url-pattern>/*</url-pattern>
	</filter-mapping>

	<servlet>
		<servlet-name>mvcdispatcher</servlet-name>
		<servlet-class>org.springframework.web.servlet.DispatcherServlet</servlet-class>
		<init-param>
			<param-name>contextConfigLocation</param-name>
			<param-value>classpath*:applicationContext.xml</param-value>
		</init-param>
		<load-on-startup>1</load-on-startup>
	</servlet>
	<servlet-mapping>
		<servlet-name>mvcdispatcher</servlet-name>
		<url-pattern>/</url-pattern>
	</servlet-mapping>

</web-app>
然后我们需要配置的是对应User表的映射文件User.xml,主要目的就是对数据库的操作,并且声明了namespace为userDao的接口:
<?xml version="1.0" encoding="UTF-8"?>
<!DOCTYPE mapper PUBLIC "-//mybatis.org//DTD Mapper 3.0//EN"
"http://mybatis.org/dtd/mybatis-3-mapper.dtd">

<mapper namespace="com.cy.mybatis.DAOImpl.UserDao">
	<!-- 定义的返回结果集,如果需要返回List集合,就需要配置resultMap并且id显示
	的是返回结果集的id,这里定义为resultUserList,如果需要返回User的集合,
	就只需要在select中定义 resultMap="resultUserList"即可,注意这里不是resultType-->
	<resultMap type="User" id="resultUserList">
		<id column="id" property="id"/>
		<result column="name" property="name"/>
		<result column="tel" property="tel"/>
	</resultMap>

    <select id="getUsersByName" resultMap="resultUserList" parameterType="String">
        select * from user where name like #{name}
    </select>
    <select id="getAllUser" resultMap="resultUserList">
    	select * from user
    </select>
    <!-- userGeneratedKeys为自动生成主键 -->
    <insert id="insertUser" parameterType="User" useGeneratedKeys="true" keyProperty="id">
    	insert into user(name,tel) values(#{name},#{tel})
    </insert>

    <delete id="deleteUserById" parameterType="int">
    	delete from user where id=#{id}
    </delete>

    <update id="updateUserById" parameterType="User">
    	update user set name=#{name},tel=#{tel} where id=#{id}
    </update>

    <select id="getUserById" resultType="User" parameterType="int">
    	select * from user where id=#{id}
    </select>
</mapper>
<?xml version="1.0" encoding="UTF-8" ?>
<!DOCTYPE configuration PUBLIC "-//mybatis.org//DTD Config 3.0//EN"
"http://mybatis.org/dtd/mybatis-3-config.dtd">
<configuration>
	<typeAliases>
        <typeAlias alias="User" type="com.cy.mybatis.model.User"/>
    </typeAliases>
</configuration>
最后是applicationContext.xml文件,在applicationContext.xml文件中声明了freemarker配置,数据源,sqlSessionFactory工场等,具体可以看注释:
<?xml version="1.0" encoding="UTF-8"?>
<beans xmlns="http://www.springframework.org/schema/beans"
    xmlns:context="http://www.springframework.org/schema/context"
    xmlns:mvc="http://www.springframework.org/schema/mvc"
    xmlns:xsi="http://www.w3.org/2001/XMLSchema-instance"
    xsi:schemaLocation="
        http://www.springframework.org/schema/beans
        http://www.springframework.org/schema/beans/spring-beans-3.0.xsd
        http://www.springframework.org/schema/context
        http://www.springframework.org/schema/context/spring-context-3.0.xsd
        http://www.springframework.org/schema/mvc
        http://www.springframework.org/schema/mvc/spring-mvc-3.0.xsd">

	<!-- 扫描控制器所对应的包,此时必须声明 -->
    <context:component-scan base-package="com.cy.mybatis.controller" />
    <mvc:annotation-driven />

    <!-- 定义的如js,css等可以放在WEB-INF/static目录下 ,可以不会被mvcdispatcher拦截器拦截-->
    <mvc:resources mapping="/static/**" location="/WEB-INF/static/"/>
    <mvc:default-servlet-handler/>

    <!-- 必须添加freemarkerConfig的配置,否则不能识别 -->
    <bean id="freemarkerConfig"
      class="org.springframework.web.servlet.view.freemarker.FreeMarkerConfigurer">
    <property name="templateLoaderPath" value="/" />
    <property name="freemarkerSettings">
        <props>
            <prop key="default_encoding">UTF-8</prop> <!-- 默认编码方式 -->
            <prop key="classic_compatible">true</prop><!-- 此属性可以防止模板解析空值时的错误 -->
        </props>
    </property>
	</bean>

    <!-- 要求视图使用FreeMarker模板,指定controller层返回的页面在webapp目录下进行访问,且为html页面-->
    <bean class="org.springframework.web.servlet.view.freemarker.FreeMarkerViewResolver">
        <property name="prefix">
            <value>/</value>
        </property>
        <property name="suffix">
            <value>.html</value>
        </property>
       	<!-- 此处需要声明为utf-8编码,否则即使页面是utf-8编码,中文还是不能正常显示 -->
        <property name="contentType" value="text/html;charset=UTF-8"></property>
    </bean>

	<!-- 定义数据源dataSource -->
	<bean id="dataSource"
		class="org.springframework.jdbc.datasource.DriverManagerDataSource">
		<property name="driverClassName" value="com.mysql.jdbc.Driver"></property>
		<property name="url" value="jdbc:mysql://localhost:3306/userinfo?useUnicode=true&characterEncoding=UTF-8"></property>
		<property name="username" value="root"></property>
		<property name="password" value=""></property>
	</bean>

	<bean id="sessionFactory" class="org.mybatis.spring.SqlSessionFactoryBean">
		<!-- configLocation代表mybatis的配置文件,mapperLocation代表的是映射文件,如User.xml -->
		<property name="dataSource" ref="dataSource"></property>
		<property name="configLocation" value="classpath:Configuration.xml"></property>
		<property name="mapperLocations" value="classpath:config/*.xml"></property>
	</bean>


</beans>
public interface UserDao {
	public List<User> getUsersByName(String name);
	public List<User> getAllUser();
	public void insertUser(User user);
	public void deleteUserById(int id);
	public void updateUserById(User user);
	public User getUserById(int id);
}
然后我们最关心的就是Controller 层是怎么实现操作的了,我们知道Controller层主要的功能就是进行业务逻辑的处理,并返回对应的页面进行显示,那么我们看一下代码:
@Controller
@RequestMapping("/user")
public class UserController {
	private UserDao userDao;

	public UserDao getUserDao() {
		return userDao;
	}

	public void setUserDao(UserDao userDao) {
		this.userDao = userDao;
	}

	@RequestMapping("/getUserByName")
	public String getUserByName(HttpServletRequest request,String name){
		List<User> userlist=userDao.getUsersByName("%"+name+"%");
		request.setAttribute("userlist", userlist);
		return "getAll";
	}

	@RequestMapping("/getAllUser")
	public String getAllUser(HttpServletRequest request){
		request.setAttribute("userlist", userDao.getAllUser());
		return "getAll";
	}

	@RequestMapping("/addUser")
	public String addUser(HttpServletRequest request,String name,String tel){
		User user=new User();
		user.setName(name);
		user.setTel(tel);
		userDao.insertUser(user);
		return getAllUser(request);
	}

	@RequestMapping("/delete")
	public String deleteUserById(HttpServletRequest request,int id){
		userDao.deleteUserById(id);
		return getAllUser(request);
	}

	@RequestMapping("/update")
	public String updateUser(HttpServletRequest request,String name,String tel,int id){
		User user=userDao.getUserById(id);
		user.setName(name);
		user.setTel(tel);
		userDao.updateUserById(user);
		return getAllUser(request);
	}

	@RequestMapping("/edit")
	public String edit(HttpServletRequest request,int id){
		User user=userDao.getUserById(id);
		request.setAttribute("user", user);
		return "edit";
	}
}
4、主要的业务代码介绍完了可以看一下页面如何使用freemarker来实现,具体的代码如下:
显示所有用户列表的页面getAll.html
<!DOCTYPE>
<html>
<head>
<meta http-equiv="Content-Type" content="text/html; charset=UTF-8" />
<title>用户列表</title>
</head>
<body>
	<#if userlist?exists> 你共有${userlist?size}条记录
	<table border="1">
		<tr>
			<td>编号</td>
			<td>姓名</td>
			<td>手机号码</td>
			<td>操作</td>
		</tr>
		<#list userlist as user>
		<tr>
			<td>${user_index+1}</td>
			<td>${user.name!''}</td>
			<td>${user.tel!''}</td>
			<td>
			<a href="/user/delete?id=${user.id!''}">删除</a>
			<a href="/user/edit?id=${user.id!''}">修改</a>
			</td>
		</tr>
		</#list>
	</table>
	<input name="find" id="find" type="text">
	<input name="submit" value="查询" id="findUser" type="submit" οnclick="getUser()">
	</#if>
	<a href="/add.html">添加用户</a>
	<script type="text/javascript">
		function getUser(){
			var name=document.getElementById("find").value;
			if(name==null||name==""){
				alert("查询的名字不能是空的");
			}else{
				window.location.href="/user/getUserByName?name="+name;
			}
		}
	</script>
</body>
</html>
<!DOCTYPE html>
<html>
<head>
<meta charset="UTF-8">
<title>添加用户</title>
</head>
<body>
	<form action="/user/addUser">
		姓名:<input id="name" type="text" name="name">
		电话:<input id="tel" type="text" name="tel">
		<input id="submit" type="submit" value="添加">
	</form>
</body>
</html><!DOCTYPE html>
<html>
<head>
<meta charset="UTF-8">
<title>编辑用户</title>
</head>
<body>
<form action="/user/update">
姓名:<input id="name" type="text" name="name" value="${user.name}">
电话:<input id="tel" type="text" name="tel" value="${user.tel}">
<input id="id" name="id" type="hidden" value="${user.id}">
<input id="submit" type="submit" value="修改">
</form>
</body>
</html>
真的不会写前端页面,比较丑,请谅解:
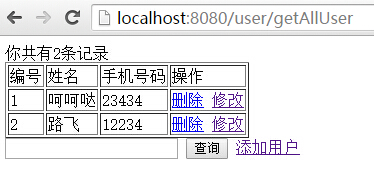
然后可以试试,所有的操作都能够显示正常,并且能够做到对数据库的增删改查的操作,以上的所有功能还是比较简单,希望对大家有所帮助


 6519
6519


 被折叠的 条评论
为什么被折叠?
被折叠的 条评论
为什么被折叠?
 到【灌水乐园】发言


