


Mapper配置的四种方式
配置方法一共有四种, 分别对应四种解析方式,从解析源码可以看出来
private void mapperElement(XNode parent) throws Exception { //添加接口映射器
    if (parent != null) {
      for (XNode child : parent.getChildren()) { //获取所有的子级元素
        if ("package".equals(child.getName())) { //如果使用包的方式进行配置
          String mapperPackage = child.getStringAttribute("name"); //获取包名
          configuration.addMappers(mapperPackage); //添加Mapper
        } else { //使用mapper 三种定位方式 resource url class
          String resource = child.getStringAttribute("resource");
          String url = child.getStringAttribute("url");
          String mapperClass = child.getStringAttribute("class");
          if (resource != null && url == null && mapperClass == null) {
            ErrorContext.instance().resource(resource); //注入日志信息
            try(InputStream inputStream = Resources.getResourceAsStream(resource)) {
              XMLMapperBuilder mapperParser = new XMLMapperBuilder(inputStream, configuration, resource, configuration.getSqlFragments());
              mapperParser.parse();
            }
          } else if (resource == null && url != null && mapperClass == null) {
            ErrorContext.instance().resource(url);
            try(InputStream inputStream = Resources.getUrlAsStream(url)){
              XMLMapperBuilder mapperParser = new XMLMapperBuilder(inputStream, configuration, url, configuration.getSqlFragments());
              mapperParser.parse();
            }
          } else if (resource == null && url == null && mapperClass != null) {
            Class<?> mapperInterface = Resources.classForName(mapperClass);
            configuration.addMapper(mapperInterface);
          } else {
            throw new BuilderException("A mapper element may only specify a url, resource or class, but not more than one.");
          }
        }
      }
    }
  }
所以我们可以这样配置
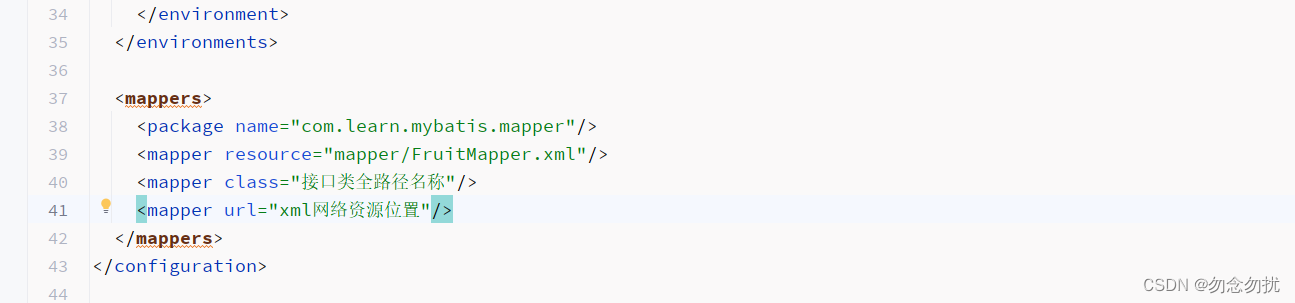
我们找一种方式进行解析分析, Mybatis原版本最先是没有接口的,都是xml配置文件, 调用sql语句的时候直接使用namespace加执行的脚本语句id, 如:

这种api 方法就是原始版本的, 后面普及了面向接口编程,所以才引入了接口调用表达式。 我所以在解析方式中,使用包路径和class类都是按照接口进行解析找到对应的xml的, 另外两种直接获取xml的输入流则是原先版本的,我们先看原先版本。
基础知识点:resource和url如何获取输入流对象,
resource可以通过类加载器进行加载获取资源, 而url 作为http网络协议地址路径, java的解析类URL则可以获取输入流,
 public static InputStream getUrlAsStream(String urlString) throws IOException {
    URL url = new URL(urlString);
    URLConnection conn = url.openConnection();
    return conn.getInputStream();
  }
通过xml文件的输入流进行mapper解析
XMLMapperBuilder 类的parse作为入口:
public void parse() {
    if (!configuration.isResourceLoaded(resource)) { //是否被解析过了
      configurationElement(parser.evalNode("/mapper"));//解析命名空间的xml文件
      configuration.addLoadedResource(resource); //该资源路径已经解析了
      bindMapperForNamespace();/*为命名空间构建mapper接口代理*/
    }
    /*继续完成之前没有完成解析*/
    parsePendingResultMaps();
    parsePendingCacheRefs();
    parsePendingStatements();
  }
所以configurationElement方法就是解析mapper.xml文件的核心方法:
configurationElement(XNode context) {
    try {
      String namespace = context.getStringAttribute("namespace"); //获取命名空间
      if (namespace == null || namespace.isEmpty()) {
        throw new BuilderException("Mapper's namespace cannot be empty");
      }
      builderAssistant.setCurrentNamespace(namespace); //设置命名空间
      cacheRefElement(context.evalNode("cache-ref")); //缓存引用, 二级缓存
      cacheElement(context.evalNode("cache"));//构建自己的二级缓存 如果存在将会替换缓存引用
      parameterMapElement(context.evalNodes("/mapper/parameterMap")); //解析参数映射
      resultMapElements(context.evalNodes("/mapper/resultMap")); //解析结果集映射
      sqlElement(context.evalNodes("/mapper/sql")); //添加sqlElement片段
      buildStatementFromContext(context.evalNodes("select|insert|update|delete"));//sql脚本
    } catch (Exception e) {
      throw new BuilderException("Error parsing Mapper XML. The XML location is '" + resource + "'. Cause: " + e, e);
    }
  }
从图中可见,我们在mapper.xml文件中配置的各种xml元素标签,在这里都要被一一解析成java各种配置对象。
cache-ref 标签元素解析
这个标签元素的作用就当前命名空间的缓存可以引用的别命名空间的缓存。
使用方法:
<cache-ref namespace="xxx"/>
指定namespace为引用缓存的命名空间
引用关系是存在Configuration配置类的:
/*
   * A map holds cache-ref relationship. The key is the namespace that
   * references a cache bound to another namespace and the value is the
   * namespace which the actual cache is bound to.
   * map持有cache-ref关系。键是引用绑定到另一个名称空间的缓存的名称空间,值是实际缓存绑定到的名称空间。
   */
  protected final Map<String, String> cacheRefMap = new HashMap<>();
解析过程:
首先要知道所有的命名空间的缓存也存在与配置类中
protected final Map<String, Cache> caches = new StrictMap<>("Caches collection"); /*二级缓存 和xml命名空间绑定的缓存*/
既然有了引用缓存的命名空间我们就可以去获取引用缓存,
private void cacheRefElement(XNode context) {
    if (context != null) {
      //缓存映射关系添加  key为当前命名空间, value为被引用缓存的命名空间
      configuration.addCacheRef(builderAssistant.getCurrentNamespace(), context.getStringAttribute("namespace"));
      CacheRefResolver cacheRefResolver = new CacheRefResolver(builderAssistant, context.getStringAttribute("namespace"));
      try {
        //从configuration的Cache缓存map中获取缓存, 当前命名空间对象的缓存执行 引用缓存。
        cacheRefResolver.resolveCacheRef();//使用缓存
      } catch (IncompleteElementException e) {
        configuration.addIncompleteCacheRef(cacheRefResolver); //添加到没有完成的缓存解析器
      }
    }
  }
需要思考的是, 如果这个时候引用缓存的命名空间的xml还没有解析的话,那么是不会获取到引用缓存的,所以要标记当前命名空间对象的缓存引用没有解决, 所以会有catch 步骤没有完成缓存引用解析的解析器。
继续找出抛出异常的代码:
public Cache useCacheRef(String namespace) {
    if (namespace == null) {
      throw new BuilderException("cache-ref element requires a namespace attribute.");
    }
    try {
      unresolvedCacheRef = true;
      Cache cache = configuration.getCache(namespace); //根据命名空间获取缓存集合
      if (cache == null) {
        throw new IncompleteElementException("No cache for namespace '" + namespace + "' could be found.");
      }
      currentCache = cache;
      unresolvedCacheRef = false;/*缓存引用标记解决*/
      return cache;
    } catch (IllegalArgumentException e) {
      throw new IncompleteElementException("No cache for namespace '" + namespace + "' could be found.", e);
    }
  }
嗯嗯, 整体流程 缓存引用标签的解析原理还是比较简单的。
cache 标签 构建自己的缓存
如果对Mybatis的缓存接口不熟悉, 请移步到这个篇博客Mybatis缓存接口, 整个缓存使用的装饰器设计模式
xml标签配置内容:
<cache type="" blocking="" eviction="" flushInterval="" readOnly="" size="">
    <property name="" value=""/>
    <property name="" value=""/>
  </cache>
如果不记得了直接看代码怎么解析的。。。。。。。。。。。
private void cacheElement(XNode context) {
    if (context != null) {
      String type = context.getStringAttribute("type", "PERPETUAL"); /*获取缓存类名*/
      Class<? extends Cache> typeClass = typeAliasRegistry.resolveAlias(type);//获取别名映对应的类
      String eviction = context.getStringAttribute("eviction", "LRU"); //缓存置换算法使用那个装饰
      Class<? extends Cache> evictionClass = typeAliasRegistry.resolveAlias(eviction); //获取别名映对应的类
      Long flushInterval = context.getLongAttribute("flushInterval"); //缓存刷新周期
      Integer size = context.getIntAttribute("size"); //缓存大小
      boolean readWrite = !context.getBooleanAttribute("readOnly", false); //读写锁
      boolean blocking = context.getBooleanAttribute("blocking", false); //阻塞
      Properties props = context.getChildrenAsProperties(); //获取所有的属性
      builderAssistant.useNewCache(typeClass, evictionClass, flushInterval, size, readWrite, blocking, props);//使用新的缓存
    }
  }
从上面代码也可以看出,如果我们只配置一个标签, 没有各种熟悉配置, 也能开启二级缓存, 代码中默认给了一个PERPETUAL别名的缓存类, 所以在之前一定会有改别名注入到别名工厂中。
typeAliasRegistry.registerAlias("PERPETUAL", PerpetualCache.class);
PerpetualCache 就是一个基本的缓存类并没有多少额外功能, 本质就是一个HashMap
别的属性就是装饰的配置
eviction 指定缓存置换算法的装饰器, 默认是使用LRU
typeAliasRegistry.registerAlias("LRU", LruCache.class);
另外的几个属性:flushInterval、size、readOnly、blocking 都有对应的装饰器, 在Mybatis缓存接口博客都有涉及。
接着进行构建缓存:
public Cache useNewCache(Class<? extends Cache> typeClass,
      Class<? extends Cache> evictionClass,
      Long flushInterval,
      Integer size,
      boolean readWrite,
      boolean blocking,
      Properties props) {
    Cache cache = new CacheBuilder(currentNamespace) //命名空间
        .implementation(valueOrDefault(typeClass, PerpetualCache.class)) //获取缓存实现类, 如果没有是用默认的持久化实现
        .addDecorator(valueOrDefault(evictionClass, LruCache.class)) //装饰器
        .clearInterval(flushInterval) //定时清理
        .size(size)
        .readWrite(readWrite)
        .blocking(blocking)
        .properties(props)
        .build();
    configuration.addCache(cache); //二级缓存添加到configuration
    currentCache = cache; //当前命名空间缓存进行指向创建的缓存
    return cache;
  }
public Cache build() {
    setDefaultImplementations(); //设置默认的
    Cache cache = newBaseCacheInstance(implementation, id); //创建基本的存储缓存
    setCacheProperties(cache); //设置值
    // issue #352, do not apply decorators to custom caches
    if (PerpetualCache.class.equals(cache.getClass())) { //是不是自己系统的持久化缓存实现
      for (Class<? extends Cache> decorator : decorators) { //遍历装饰器
        cache = newCacheDecoratorInstance(decorator, cache);
        setCacheProperties(cache);
      }
      cache = setStandardDecorators(cache);/*设置标准的装饰器*/
    } else if (!LoggingCache.class.isAssignableFrom(cache.getClass())) {
      cache = new LoggingCache(cache);
    }
    return cache;
  }
private void setDefaultImplementations() {
    //没有指定缓存type属性就使用默认的
    if (implementation == null) {
      implementation = PerpetualCache.class;
      //添加默认的置换算法缓存装饰器
      if (decorators.isEmpty()) {
        decorators.add(LruCache.class);
      }
    }
  }
从上面代码可以看出, 如果type属性 是指定得是我们自己的缓存类, 那么那些基本的属性配置是不会生效的, 应为代码判断了cache 如果默认缓存才会去调用setStandardDecorators方法,这个方法就是对那些别的属性进行解析装饰缓存的代码:
private Cache setStandardDecorators(Cache cache) {
    try {
      MetaObject metaCache = SystemMetaObject.forObject(cache);
      if (size != null && metaCache.hasSetter("size")) {/*设置缓存大小*/
        metaCache.setValue("size", size);
      }
      if (clearInterval != null) {
        cache = new ScheduledCache(cache); /*定时清理缓存*/
        ((ScheduledCache) cache).setClearInterval(clearInterval);
      }
      if (readWrite) { /*读写*/
        cache = new SerializedCache(cache);
      }
      cache = new LoggingCache(cache); /*设置日志缓存*/
      cache = new SynchronizedCache(cache); /*同步缓存*/
      if (blocking) {
        cache = new BlockingCache(cache); /*设置阻塞缓存*/
      }
      return cache;
    } catch (Exception e) {
      throw new CacheException("Error building standard cache decorators.  Cause: " + e, e);
    }
  }
等cache创建完成之后 当前命名空间的缓存引用会指向当前构建的缓存, 所以cache-ref标签的功能将被覆盖。
parameterMap 标签
用过Mybatis的都会知道参数映射, 这个标签就是指定需要怎么进行参数映射
我们配置之后的Mybatis解析配置代码如下:
private void parameterMapElement(List<XNode> list) {
    for (XNode parameterMapNode : list) { /*遍历多个参数解析*/
      String id = parameterMapNode.getStringAttribute("id");/*获取唯一id*/
      String type = parameterMapNode.getStringAttribute("type");/*获取类名称*/
      Class<?> parameterClass = resolveClass(type);/*别名解析*/
      List<XNode> parameterNodes = parameterMapNode.evalNodes("parameter");/*获取所有的属性配置*/
      List<ParameterMapping> parameterMappings = new ArrayList<>();
      for (XNode parameterNode : parameterNodes) {
        String property = parameterNode.getStringAttribute("property");/*属性*/
        String javaType = parameterNode.getStringAttribute("javaType");/*java类型*/
        String jdbcType = parameterNode.getStringAttribute("jdbcType");/*jdbc类型*/
        String resultMap = parameterNode.getStringAttribute("resultMap");/*结果映射map*/
        String mode = parameterNode.getStringAttribute("mode"); /*存储过程相关的*/
        String typeHandler = parameterNode.getStringAttribute("typeHandler");/*类型处理器*/
        Integer numericScale = parameterNode.getIntAttribute("numericScale");/*啥东西*/
        ParameterMode modeEnum = resolveParameterMode(mode);//存储过程的输入输出
        Class<?> javaTypeClass = resolveClass(javaType); //获取java类型
        JdbcType jdbcTypeEnum = resolveJdbcType(jdbcType); //获取Jdbc类型
        Class<? extends TypeHandler<?>> typeHandlerClass = resolveClass(typeHandler); //获取类型处理器
        ParameterMapping parameterMapping = builderAssistant.buildParameterMapping(parameterClass, property, javaTypeClass, jdbcTypeEnum, resultMap, modeEnum, typeHandlerClass, numericScale);
        parameterMappings.add(parameterMapping);
      }
      builderAssistant.addParameterMap(id, parameterClass, parameterMappings);
    }
  }
整体来说代码都很简单,就是把id与parameterMapping的映射关系存入configuration中。
protected final Map<String, ParameterMap> parameterMaps = new StrictMap<>("Parameter Maps collection");
resultMap 标签
字如其名, 作为结果集映射的配置标签,我们需要指定一个反参实体类对象如果接收结果集进行赋值。
resultMap 标签里面可以配置的子标签一共有:id、association、discriminator、result、collection、constructor 几种。具体怎么使用请移步到Mybatis官网, 有很好的中文翻译版本。
sql标签
sql片段
select|insert|update|delete 脚本驱动
脚本标签
里面要进行脚本解析, sql片段替换、以及selectKey 解析 sql移除等等。 具体代码慢慢研究把,很复杂。。。。,构建出MappedStatement。
总结
xml 配置的代码, 总得需要代码去解析。。。。


 4179
4179


 被折叠的 条评论
为什么被折叠?
被折叠的 条评论
为什么被折叠?
 到【灌水乐园】发言


