


 本文档详细记录了从零开始安装Manjaro Linux,配置Vim、Fish Shell和i3窗口管理器的过程,包括虚拟机安装、双系统设置、软件安装、终端美化、快捷键定制、窗口管理等。此外,还涉及了vim配置、桌面美化、文件传输、软件下载和配置等方面,旨在打造个性化的Linux工作环境。
本博客最新更新于 2021年11月18日
一、前言
笔者此前几乎没有vim使用经验,也没有安装过linux虚拟机,偶然在b站上看到TheCW的视频,遂惊异于linux和vim配合的巧妙与vim配置和fish shell等结合的惊艳。决定从零开始对其进行研究,并将学习路线和遇到的障碍及解决方式记录下来。在配置fish shell 和 i3的时候会用到一些最简单的vi语法,读者可以先在这里学习一些最简单的vi和vim操作,大概很快就能上手vim。
目录
二、虚拟机安装和系统盘双系统安装
1.安装VMware16
官网安装较慢,我是在网上某个软件园用下载器下载的,但是那个可能会有广告进电脑里面,这里还有一个网盘下载的方式[VMware 16 pro](https://pan.baidu.com/wap/init?surl=jLFy9A3zzCHM3T53W4mnag) 提取码是:knxg
- 安装好后是30天的试用期,笔者购买了激活码,也可以在淘宝上购买验证码和远程安装服务。如果是在校学生的话,可以咨询一下教网络的教授之类的。
- 在官网上下载manjaro的iso文件,笔者下载的是xfce版本官网下载链接。笔者直接用迅雷加速下载,感觉速度比较快,此外还可以用清华等的镜像进行下载。
- 安装方式笔者参考的是这篇文章:VMware虚拟机下Manjaro20.0安装教程
2.制作系统盘安装双系统
制作系统盘笔者用的是Rufus官网链接,详情可以参考如下文章和视频:
win10环境下安装manjaro kde 双系统(安装篇)
【教程】如何安装Manjaro双系统?
三、安装vim,fish和oh-my-fish
0.在安装之前一定要换源
笔者换的清华的源
首先用其自带的nano编辑pacman的配置文件`sudo nano /etc/pacman.conf
然后在最下面加上如下代码即可:
[archlinuxcn]
SigLevel = Never
Server = https://mirrors.tuna.tsinghua.edu.cn/archlinuxcn/$arch
sudo pacman-mirrors -c China
记得输入 sudo pacman -Syyu 刷新一下
笔者的配置文件:
#
# /etc/pacman.conf
#
# See the pacman.conf(5) manpage for option and repository directives

#
# GENERAL OPTIONS
#
[options]
# The following paths are commented out with their default values listed.
# If you wish to use different paths, uncomment and update the paths.
#RootDir     = /
#DBPath      = /var/lib/pacman/
#CacheDir    = /var/cache/pacman/pkg/
#LogFile     = /var/log/pacman.log
#GPGDir      = /etc/pacman.d/gnupg/
#HookDir     = /etc/pacman.d/hooks/
#HookDir     = /home/xz/.local/share/pacman.d/hooks
HoldPkg     = pacman glibc
#XferCommand = /usr/bin/curl -L -C - -f -o %o %u
#XferCommand = /usr/bin/wget --passive-ftp -c -O %o %u
#CleanMethod = KeepInstalled
CleanMethod = KeepCurrent
Architecture = auto

#IgnorePkg   =
#IgnorePkg   =
#IgnoreGroup =

#NoUpgrade   =
#NoExtract   =

# Misc options
#UseSyslog
Color
TotalDownload
CheckSpace
#VerbosePkgLists

# By default, pacman accepts packages signed by keys that its local keyring
# trusts (see pacman-key and its man page), as well as unsigned packages.
#SigLevel    = Required DatabaseOptional
SigLevel     = PackageRequired
LocalFileSigLevel = Optional
#RemoteFileSigLevel = Required

# NOTE: You must run pacman-key --init before first using pacman; the local
# keyring can then be populated with the keys of all official Arch Linux
# packagers with pacman-key --populate archlinux.

#
# REPOSITORIES
#   - can be defined here or included from another file
#   - pacman will search repositories in the order defined here
#   - local/custom mirrors can be added here or in separate files
#   - repositories listed first will take precedence when packages
#     have identical names, regardless of version number
#   - URLs will have $repo replaced by the name of the current repo
#   - URLs will have $arch replaced by the name of the architecture
#
# Repository entries are of the format:
#       [repo-name]
#       Server = ServerName
#       Include = IncludePath
#
# The header [repo-name] is crucial - it must be present and
# uncommented to enable the repo.
#

# The testing repositories are disabled by default. To enable, uncomment the
# repo name header and Include lines. You can add preferred servers immediately
# after the header, and they will be used before the default mirrors.

#[testing]
#Include = /etc/pacman.d/mirrorlist

[core]
Include = /etc/pacman.d/mirrorlist

[extra]
Include = /etc/pacman.d/mirrorlist

#[community-testing]
#Include = /etc/pacman.d/mirrorlist

[community]
Include = /etc/pacman.d/mirrorlist

# If you want to run 32 bit applications on your x86_64 system,
# enable the multilib repositories as required here.

#[multilib-testing]
#Include = /etc/pacman.d/mirrorlist

[multilib]
Include = /etc/pacman.d/mirrorlist

# An example of a custom package repository.  See the pacman manpage for
# tips on creating your own repositories.
#[custom]
#SigLevel = Optional TrustAll
#Server = file:///home/custompkgs

[archlinuxcn]
#Include = /etc/pacman.d/archlinuxcn-mirrorlist
SigLevel = Never
Server = https://mirrors.tuna.tsinghua.edu.cn/archlinuxcn/$arch
1. 安装vim
manjaro的一大优势是可以用sudo pacman -S来安装非常多的文件。
以vim为例,只需要输入
sudo pacman -S vim
2. 安装fish
#安装fish
sudo pacman -S fish
#将fish设置为默认shell
chsh -s /user/bin/fish
3. 安装oh-my-fish(并解决443错误和证书错误)
理论上讲,应该用curl -L https://get.oh-my.fish | fish
但是执行这个命令之后,笔者的manjaro报了两个错误,第一个是443错误,这个错误比较好解决,详见:使用 curl 命令出现 Failed to connect to XXX port 443: 拒绝连接
另一个错误的报错信息如下:
curl: (60) SSL certificate problem: unable to get local issuer certificate...
...
...
笔者在网络上查阅大量资料之后,按其指示的方法尝试了一天也没有解决。直到笔者跳出问题本身思考:**自己应该要解决的不是某个具体的错误,而是要安装好oh-my-fish。**基于这个重要思想,笔者放弃了原来的安装方式,直接进行离线安装:
git clone https://github.com/oh-my-fish/oh-my-fish
cd oh-my-fish
bin/install --offline
这中间又遇到一个新的问题,通过git config --global http.sslVerify "false"解决
安装完oh-my-fish后的效果展示:
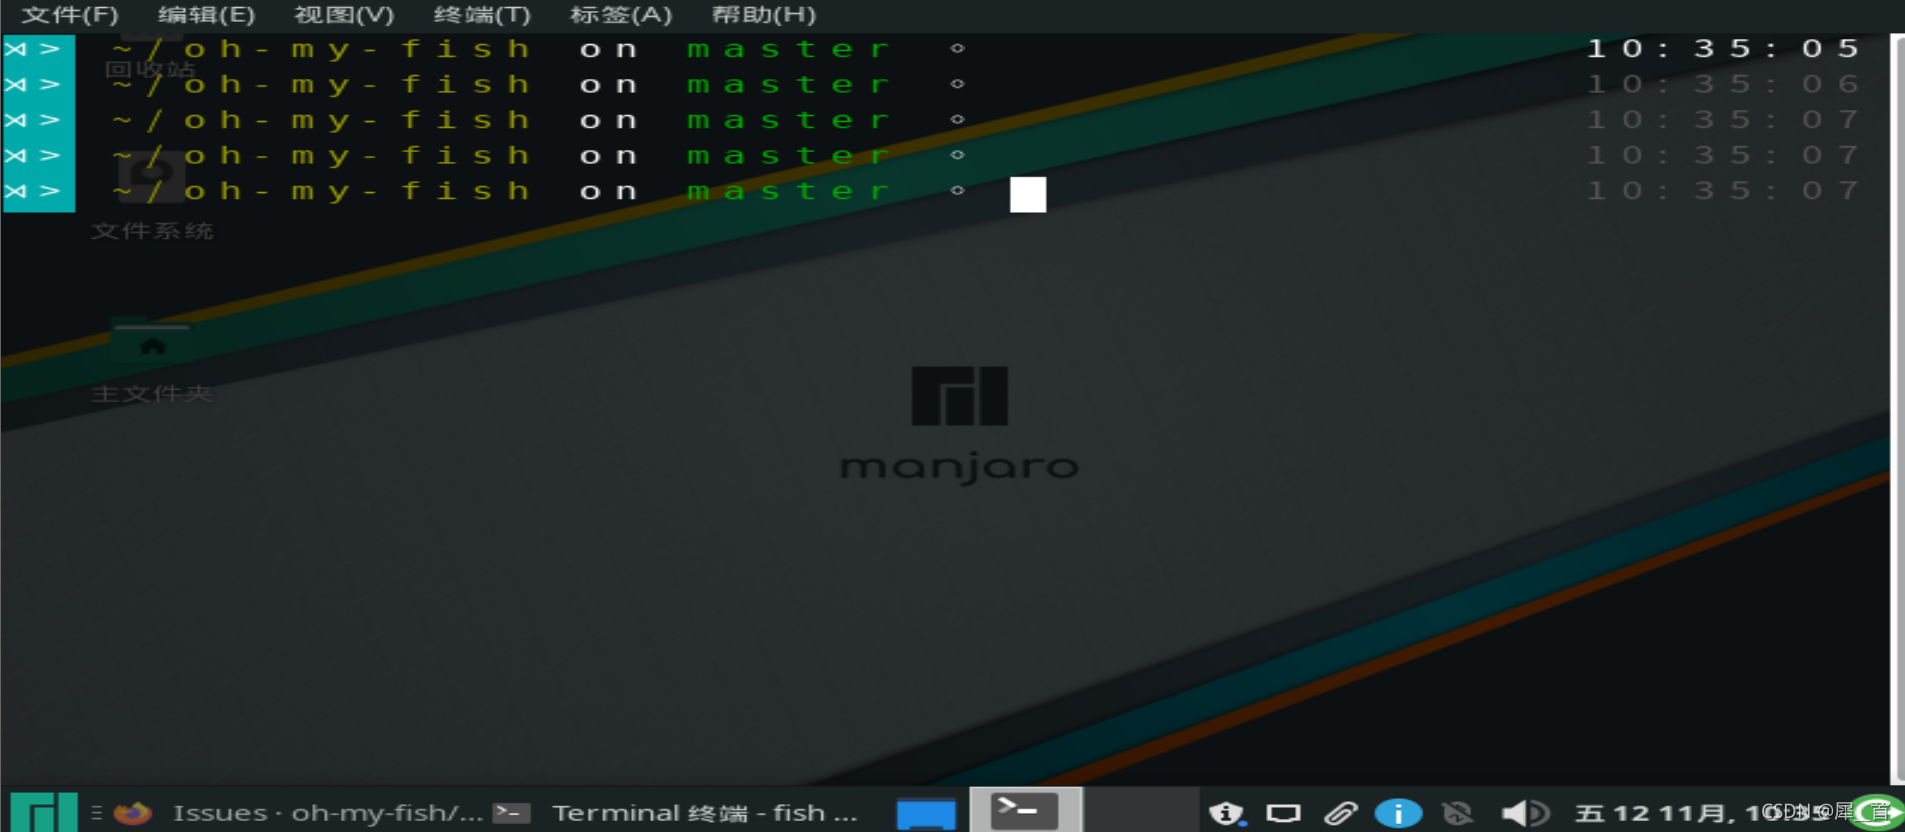
四、配置喜欢的fish样式,使shell更好看
这是让linux终端好看的一个关键之一
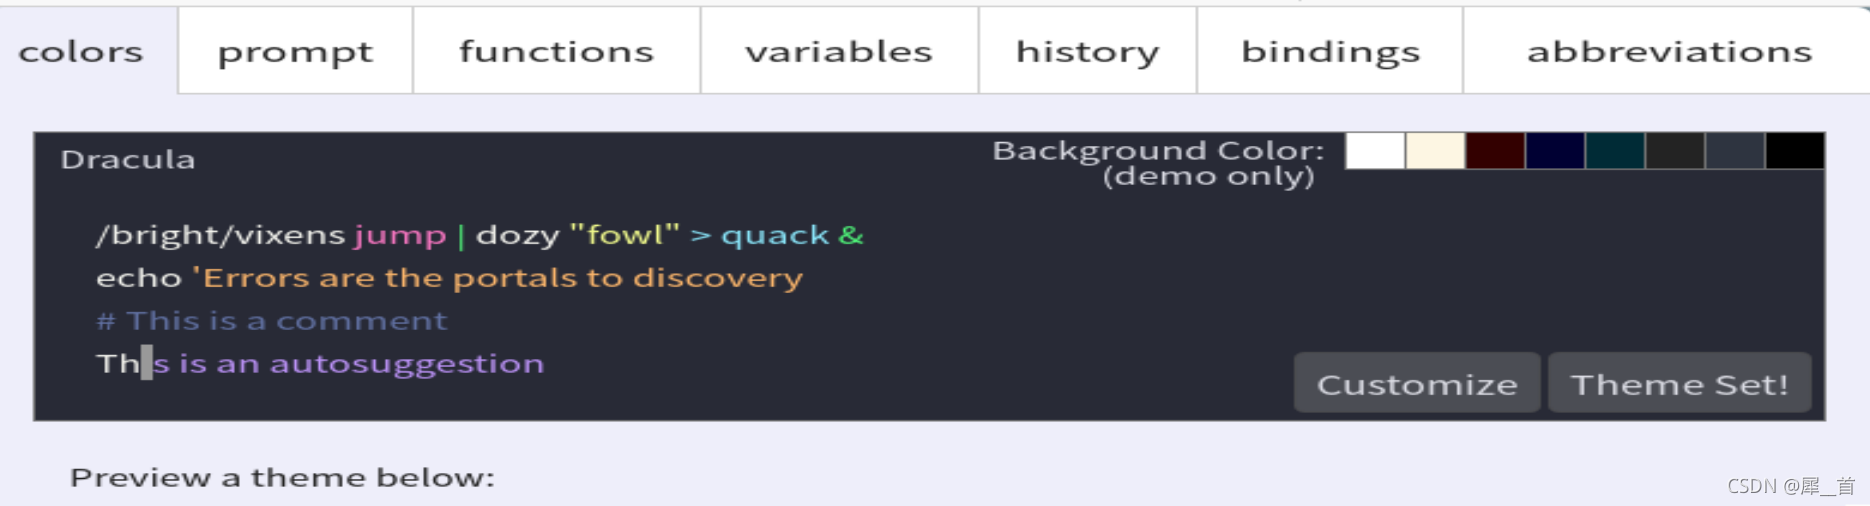
直接键入fish_config即可进入一个浏览器页面,在其中选择即可。
五、用FileZilla给虚拟机里的linux传文件
首先参考了FileZilla正确连接虚拟机方法,但是这篇文章针对的是ubuntu等linux系统,这时的另一个重要方法论就是:关注目的和结果而不是关注具体代码,比如其它很多linux查ip的方式都是ifconfig,但是ifconfig在manjaro中却是无效的。这时候应该关注我们的目标是查ip,所以应该检索如何在manjaro中查ip地址,得到应用ip addr指令,从而查到ip。同理针对ssh服务的配置也不应直接搬其它文章的代码,而是找到manjaro是如何配置ssh的,可以参考Manjaro打开ssh功能以及root ssh.
六、i3安装及一些基本配置
0.笔者的i3配置文件(更新于2121.11.17)
# This file has been auto-generated by i3-config-wizard(1).
# It will not be overwritten, so edit it as you like.
#
# Should you change your keyboard layout some time, delete
# this file and re-run i3-config-wizard(1).
#

# i3 config file (v4)
#
# Please see https://i3wm.org/docs/userguide.html for a complete reference!

set $mod Mod4

# Font for window titles. Will also be used by the bar unless a different font
# is used in the bar {} block below.
font pango:monospace 8

# This font is widely installed, provides lots of unicode glyphs, right-to-left
# text rendering and scalability on retina/hidpi displays (thanks to pango).
#font pango:DejaVu Sans Mono 8

# The combination of xss-lock, nm-applet and pactl is a popular choice, so
# they are included here as an example. Modify as you see fit.

# xss-lock grabs a logind suspend inhibit lock and will use i3lock to lock the
# screen before suspend. Use loginctl lock-session to lock your screen.
exec --no-startup-id xss-lock --transfer-sleep-lock -- i3lock --nofork

# NetworkManager is the most popular way to manage wireless networks on Linux,
# and nm-applet is a desktop environment-independent system tray GUI for it.
exec --no-startup-id nm-applet

# Use pactl to adjust volume in PulseAudio.
set $refresh_i3status killall -SIGUSR1 i3status
bindsym XF86AudioRaiseVolume exec --no-startup-id pactl set-sink-volume @DEFAULT_SINK@ +10% && $refresh_i3status
bindsym XF86AudioLowerVolume exec --no-startup-id pactl set-sink-volume @DEFAULT_SINK@ -10% && $refresh_i3status
bindsym XF86AudioMute exec --no-startup-id pactl set-sink-mute @DEFAULT_SINK@ toggle && $refresh_i3status
bindsym XF86AudioMicMute exec --no-startup-id pactl set-source-mute @DEFAULT_SOURCE@ toggle && $refresh_i3status

# Use Mouse+$mod to drag floating windows to their wanted position
floating_modifier $mod

# start a terminal
#bindsym $mod+Return exec i3-sensible-terminal
bindsym $mod+Return exec alacritty

#start firefox
bindsym $mod+c exec firefox

# kill focused window
bindsym $mod+Shift+q kill

#always starts
#exec_always variety
exec_always --no-startup-id ~/.config/polybar/forest/lauch.sh
exec_always picom
exec_always --no-startup-id feh --randomize --bg-fill ~/图片/
# start dmenu (a program launcher)
bindsym $mod+d exec --no-startup-id dmenu_run
# A more modern dmenu replacement is rofi:
# bindcode $mod+40 exec "rofi -modi drun,run -show drun"
# There also is i3-dmenu-desktop which only displays applications shipping a
# .desktop file. It is a wrapper around dmenu, so you need that installed.
# bindcode $mod+40 exec --no-startup-id i3-dmenu-desktop

# change focus
bindsym $mod+j focus left
bindsym $mod+k focus down
bindsym $mod+l focus up
bindsym $mod+semicolon focus right

# alternatively, you can use the cursor keys:
bindsym $mod+Left focus left
bindsym $mod+Down focus down
bindsym $mod+Up focus up
bindsym $mod+Right focus right

# move focused window
bindsym $mod+Shift+j move left
bindsym $mod+Shift+k move down
bindsym $mod+Shift+l move up
bindsym $mod+Shift+semicolon move right

# alternatively, you can use the cursor keys:
bindsym $mod+Shift+Left move left
bindsym $mod+Shift+Down move down
bindsym $mod+Shift+Up move up
bindsym $mod+Shift+Right move right

# split in horizontal orientation
bindsym $mod+h split h

# split in vertical orientation
bindsym $mod+v split v

# enter fullscreen mode for the focused container
bindsym $mod+f fullscreen toggle

# change container layout (stacked, tabbed, toggle split)
bindsym $mod+s layout stacking
bindsym $mod+w layout tabbed
bindsym $mod+e layout toggle split

# toggle tiling / floating
bindsym $mod+Shift+space floating toggle

# change focus between tiling / floating windows
bindsym $mod+space focus mode_toggle

# focus the parent container
bindsym $mod+a focus parent

# focus the child container
#bindsym $mod+d focus child

# Define names for default workspaces for which we configure key bindings later on.
# We use variables to avoid repeating the names in multiple places.
set $ws1 "1"
set $ws2 "2"
set $ws3 "3"
set $ws4 "4"
set $ws5 "5"
set $ws6 "6"
set $ws7 "7"
set $ws8 "8"
set $ws9 "9"
set $ws10 "10"

# switch to workspace
bindsym $mod+1 workspace number $ws1
bindsym $mod+2 workspace number $ws2
bindsym $mod+3 workspace number $ws3
bindsym $mod+4 workspace number $ws4
bindsym $mod+5 workspace number $ws5
bindsym $mod+
最低0.47元/天 解锁文章


 被折叠的 条评论
为什么被折叠?
被折叠的 条评论
为什么被折叠?
 到【灌水乐园】发言


