


volley网络请求
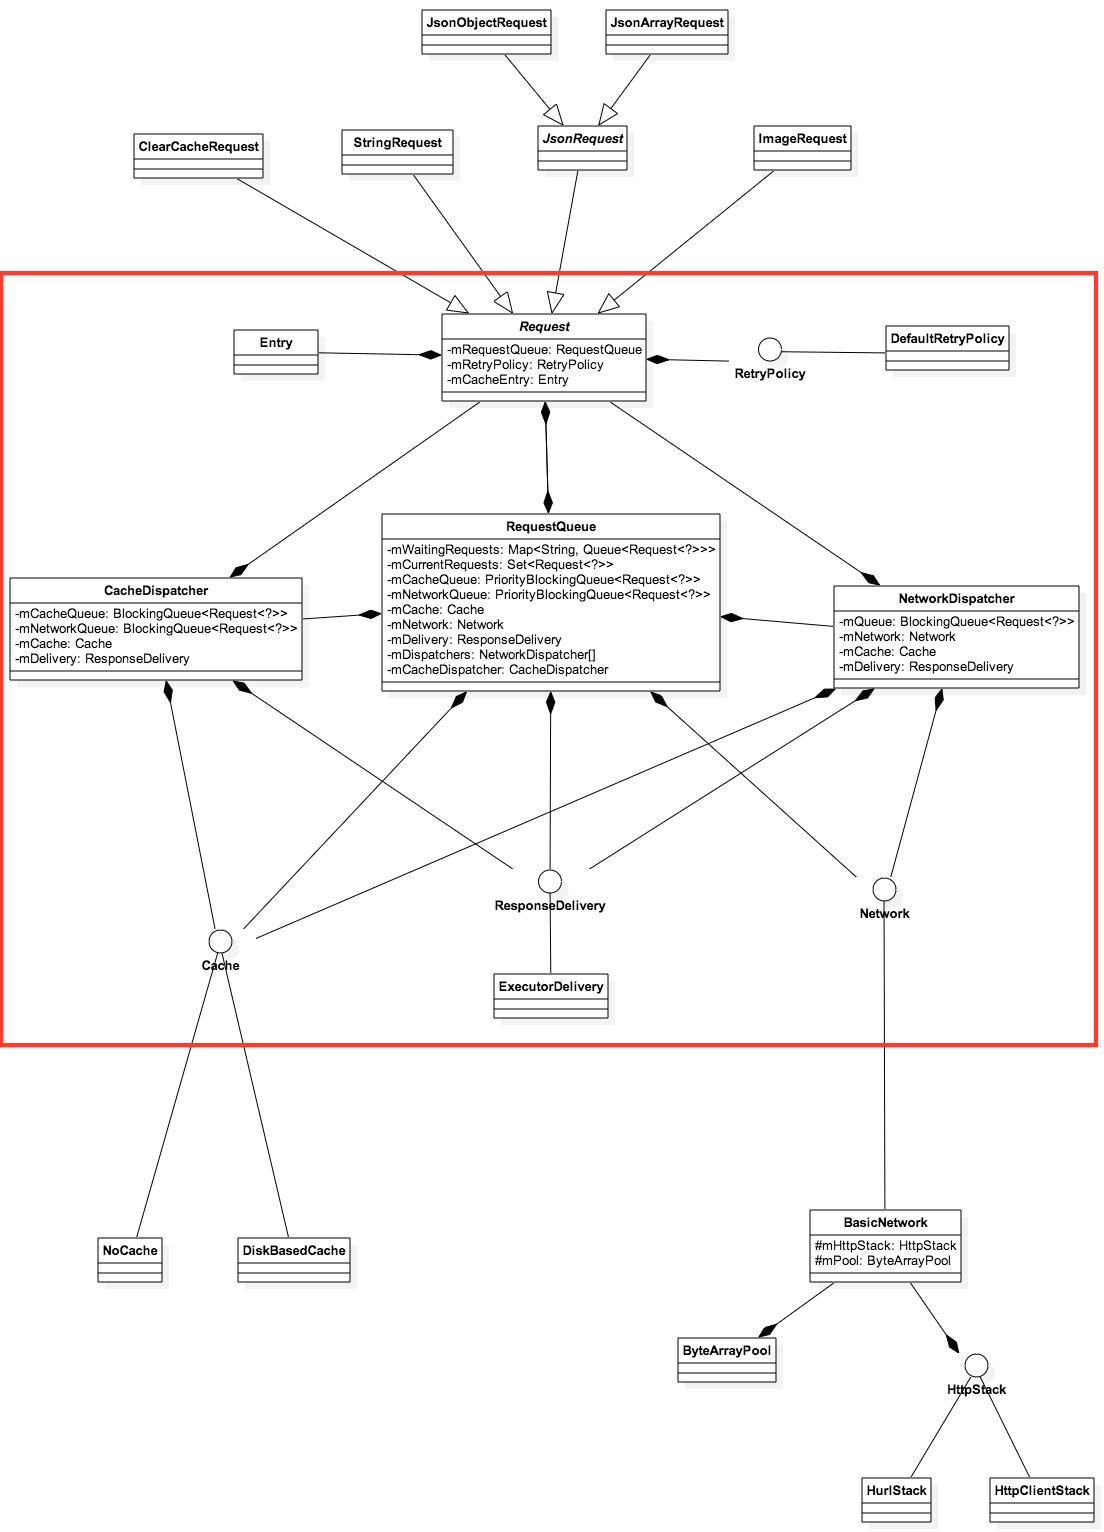
类图
1> volley 一个简单的网络请求流程
    ##Creates a default instance of the worker pool and calls {@link RequestQueue#start()} on it.

    mQueue = Volley.newRequestQueue(getApplicationContext());

    //创建请求体,并且接收回调 成功,失败/

         private JsonObjectRequest jsonRespondRequest = new JsonObjectRequest(Method.POST, url, request, new Listener<JSONObject>() {
        @Override
        public void onResponse(JSONObject response) {
            Log.e(TAG, response.toString());
        }
        }, new ErrorListener() {
        @Override
        public void onErrorResponse(VolleyError error) {
            Log.e(TAG, error.toString());
        }
        });

    //request请求添加到请求队列
     mQueue.add(jsonRespondRequest);

     //执行请求
    mQueue.start();
2> 可以看到主要的流程都在RequestQueue队列中封装处理
2.1 看请求队列是如何初始化的
     Volley.newRequestQueue(getApplicationContext())


       /**
         * Default on-disk cache directory.
         */
        private static final String DEFAULT_CACHE_DIR = "volley";

        /**
         * Creates a default instance of the worker pool and calls {@link RequestQueue#start()} on it.
         *
         * @param context A {@link Context} to use for creating the cache dir.
         * @param stack   An {@link HttpStack} to use for the network, or null for default.
         * @return A started {@link RequestQueue} instance.
         */
        public static RequestQueue newRequestQueue(Context context, HttpStack stack) {
        File cacheDir = new File(context.getCacheDir(), DEFAULT_CACHE_DIR);

        String userAgent = "volley/0";
        try {
            String packageName = context.getPackageName();
            PackageInfo info = context.getPackageManager().getPackageInfo(packageName, 0);
            userAgent = packageName + "/" + info.versionCode;
        } catch (NameNotFoundException e) {
        }

        if (stack == null) {
            if (Build.VERSION.SDK_INT >= 9) {
            stack = new HurlStack();
            } else {
            // Prior to Gingerbread, HttpUrlConnection was unreliable.
            // See: http://android-developers.blogspot.com/2011/09/androids-http-clients.html
            stack = new HttpClientStack(AndroidHttpClient.newInstance(userAgent));
            }
        }
        //泛型向上转型
        Network network = new BasicNetwork(stack);

        RequestQueue queue = new RequestQueue(new DiskBasedCache(cacheDir), network);
        queue.start();

        return queue;
        }
3>这个类主要做的事情
 a.建立缓冲文件存储的文件路径。通过 PackageInfo 获取包名和版本号拼装PackageInfo参数
 b.根据版本号选择使用的请求协议当apileavel>=9 也就是android2.2 使用HttpURLConnection 反之用 AndroidHttpClient 实现HttpClient接口。和default httpclient对应
 c.通过构造函数 初始化缓冲池 ByteArrayPool,避免重复分配堆内存,而进行的优化的
 d.通过构造函数 初始化DiskBasedCache 参数,默认缓存path和缓存的最大容量,
      /**
         * Creates the worker pool. Processing will not begin until {@link #start()} is called.
         *
         * @param cache          A Cache to use for persisting responses to disk
         * @param network        A Network interface for performing HTTP requests
         * @param threadPoolSize Number of network dispatcher threads to create
         */
        public RequestQueue(Cache cache, Network network, int threadPoolSize) {
        this(cache, network, threadPoolSize,
            new ExecutorDelivery(new Handler(Looper.getMainLooper())));
        }
并且建立请求response 回调默认处理线程为主线程,同时建立工作线程,初始化 NetworkDispatcher mDispatchers = new NetworkDispatcher[threadPoolSize];的默认大小等,
一些初始化工作。
       /**
         * Starts the dispatchers in this queue.
         */
        public void start() {
        stop();
        // Make sure any currently running dispatchers are stopped.
        // Create the cache dispatcher and start it.

        mCacheDispatcher = new CacheDispatcher(mCacheQueue, mNetworkQueue, mCache, mDelivery);
        mCacheDispatcher.start();

        // Create network dispatchers (and corresponding threads) up to the pool size.
        for (int i = 0; i < mDispatchers.length; i++) {
            NetworkDispatcher networkDispatcher = new NetworkDispatcher(mNetworkQueue, mNetwork,
                mCache, mDelivery);
            mDispatchers[i] = networkDispatcher;
            networkDispatcher.start();
        }
        }
e.最后开始线程队列的分发,循环
4> 以上是简单请求队列初始化的。 (不能只,关注设置模式,其他还有好多)
几种队列 mWaitingRequests 、mCurrentRequests、mCacheQueue、mNetworkQueue四中队列个代表什么意思?
  private final Map<String, Queue<Request<?>>> mWaitingRequests =
            new HashMap<String, Queue<Request<?>>>();

        /**
         * The set of all requests currently being processed by this RequestQueue. A Request
         * will be in this set if it is waiting in any queue or currently being processed by
         * any dispatcher.
         */
        private final Set<Request<?>> mCurrentRequests = new HashSet<Request<?>>();

        /**
         * The cache triage queue.
         */
        private final PriorityBlockingQueue<Request<?>> mCacheQueue =
            new PriorityBlockingQueue<Request<?>>();

        /**
         * The queue of requests that are actually going out to the network.
         */
        private final PriorityBlockingQueue<Request<?>> mNetworkQueue =
            new PriorityBlockingQueue<Request<?>>();
5>接下来分析sart()方法!
  /**
         * Starts the dispatchers in this queue.
         */
        public void start() {
        stop();  // Make sure any currently running dispatchers are stopped.
        // Create the cache dispatcher and start it.
        mCacheDispatcher = new CacheDispatcher(mCacheQueue, mNetworkQueue, mCache, mDelivery);
        mCacheDispatcher.start();

        // Create network dispatchers (and corresponding threads) up to the pool size.
        for (int i = 0; i < mDispatchers.length; i++) {
            NetworkDispatcher networkDispatcher = new NetworkDispatcher(mNetworkQueue, mNetwork,
                mCache, mDelivery);
            mDispatchers[i] = networkDispatcher;
            networkDispatcher.start();
        }
        }
5.1 执行逻辑
a.停止所有的 dispatchers 分发。 初始化CacheDispatcher,并传递 mCacheQueue, mNetworkQueue, mCache, mDelivery 引用。因为
  cacheDiapather 为线程衍生出来。只要分析 run()方法
b.ok这里就将volley读取缓存的逻辑贴出来进行分析
   @Override
        public void run() {
        if (DEBUG) VolleyLog.v("start new dispatcher");
        Process.setThreadPriority(Process.THREAD_PRIORITY_BACKGROUND);

          // Make a blocking call to initialize the cache. 做一个阻塞调用初始化缓存。
            mCache.initialize();

        while (true) {
            try {
            // Get a request from the cache triage queue, blocking until  得到一个请求从缓存中分类队列,阻塞直到
            // at least one is available.
            final Request<?> request = mCacheQueue.take();
            request.addMarker("cache-queue-take");

            // If the request has been canceled, don't bother dispatching it.
            if (request.isCanceled()) {
                request.finish("cache-discard-canceled");
                continue;
            }

            // Attempt to retrieve this item from cache.
            Cache.Entry entry = mCache.get(request.getCacheKey());
            if (entry == null) {
                request.addMarker("cache-miss");
                // Cache miss; send off to the network dispatcher.
                mNetworkQueue.put(request);
                continue;
            }

            // If it is completely expired, just send it to the network.
            if (entry.isExpired()) {
                request.addMarker("cache-hit-expired");
                request.setCacheEntry(entry);
                mNetworkQueue.put(request);
                continue;
            }

            // We have a cache hit; parse its data for delivery back to the request.
            request.addMarker("cache-hit");
            Response<?> response = request.parseNetworkResponse(
                new NetworkResponse(entry.data, entry.responseHeaders));
            request.addMarker("cache-hit-parsed");

            if (!entry.refreshNeeded()) {
                // Completely unexpired cache hit. Just deliver the response.
                mDelivery.postResponse(request, response);
            } else {
                // Soft-expired cache hit. We can deliver the cached response,
                // but we need to also send the request to the network for
                // refreshing.
                request.addMarker("cache-hit-refresh-needed");
                request.setCacheEntry(entry);

                // Mark the response as intermediate.
                response.intermediate = true;

                // Post the intermediate response back to the user and have
                // the delivery then forward the request along to the network.
                mDelivery.postResponse(request, response, new Runnable() {
                @Override
                public void run() {
                    try {
                    mNetworkQueue.put(request);
                    } catch (InterruptedException e) {
                    // Not much we can do about this.
                    }
                }
                });
            }

            } catch (InterruptedException e) {
            // We may have been interrupted because it was time to quit.
            if (mQuit) {
                return;
            }
            continue;
            }
        }
        }
---------------------------------------------------------------------------
// Make a blocking call to initialize the cache. 做一个阻塞调用初始化缓存。
mCache.initialize();
主要进行文件操作,缓存设置,放在下面单独进行分析
while (true) {
......
}
1.首先从mCacheQueue.take()中弹栈,添加loger ,判断 isCanceled()
Returns true if this request has been canceled. 请求是否已经取消如果取消就更新finish(),并将该请求从请求队列中
mCurrentRequests.remove(request);,并且从mWaitingRequests 队列中移除。更新 mCacheQueue.addAll(waitingRequests);然后继续弹栈
2.试图从缓存检索,如果未进行缓存,那么将该请求加入 mNetworkQueue.put(request);排队处理,并继续弹栈
    // Attempt to retrieve this item from cache.
                Cache.Entry entry = mCache.get(request.getCacheKey());
                if (entry == null) {
                    request.addMarker("cache-miss");
                    // Cache miss; send off to the network dispatcher.
                    mNetworkQueue.put(request);
                    continue;
                }
3.如果缓存中存有缓存,判断是否过期
// If it is completely expired, just send it to the network.
if (entry.isExpired()) {
request.addMarker("cache-hit-expired");
request.setCacheEntry(entry);
mNetworkQueue.put(request);
continue;
}
4.如果缓存命中并且没有过期,则直接去取缓存,进行返回
    // We have a cache hit; parse its data for delivery back to the request.
                request.addMarker("cache-hit");
                Response<?> response = request.parseNetworkResponse(
                        new NetworkResponse(entry.data, entry.responseHeaders));
                request.addMarker("cache-hit-parsed");
5.另一种缓存命中,不仅返回缓存数据,并且返回将请求放入网络进行分发
 if (!entry.refreshNeeded()) {
                    // Completely unexpired cache hit. Just deliver the response.
                    mDelivery.postResponse(request, response);
                } else {
                    // Soft-expired cache hit. We can deliver the cached response,
                    // but we need to also send the request to the network for
                    // refreshing.
                    request.addMarker("cache-hit-refresh-needed");
                    request.setCacheEntry(entry);

                    // Mark the response as intermediate.
                    response.intermediate = true;

                    // Post the intermediate response back to the user and have
                    // the delivery then forward the request along to the network.
                    mDelivery.postResponse(request, response, new Runnable() {
                        @Override
                        public void run() {
                            try {
                                mNetworkQueue.put(request);
                            } catch (InterruptedException e) {
                                // Not much we can do about this.
                            }
                        }
                    });
                }
6>接下来就要分析网络分发了,NetWorkDispatcher 。因为HurlStack 和 HttpClientStack 衍生为HttpStack 而 HttpStack 衍生NetWorkDispatcher。
首先分析NetWorkDispatcher类
很显然NetworkDispatcher 同样继承Thread类,这里只要分析Run()方法体
 @Override
    public void run() {
        Process.setThreadPriority(Process.THREAD_PRIORITY_BACKGROUND);
        while (true) {
            long startTimeMs = SystemClock.elapsedRealtime();
            Request<?> request;
            try {
                // Take a request from the queue.
                request = mQueue.take();
            } catch (InterruptedException e) {
                // We may have been interrupted because it was time to quit.
                if (mQuit) {
                    return;
                }
                continue;
            }

            try {
                request.addMarker("network-queue-take");

                // If the request was cancelled already, do not perform the
                // network request.
                if (request.isCanceled()) {
                    request.finish("network-discard-cancelled");
                    continue;
                }

                addTrafficStatsTag(request);

                // Perform the network request.
                NetworkResponse networkResponse = mNetwork.performRequest(request);
                request.addMarker("network-http-complete");

                // If the server returned 304 AND we delivered a response already,
                // we're done -- don't deliver a second identical response.
                if (networkResponse.notModified && request.hasHadResponseDelivered()) {
                    request.finish("not-modified");
                    continue;
                }

                // Parse the response here on the worker thread.
                Response<?> response = request.parseNetworkResponse(networkResponse);
                request.addMarker("network-parse-complete");

                // Write to cache if applicable.
                // TODO: Only update cache metadata instead of entire record for 304s.
                if (request.shouldCache() && response.cacheEntry != null) {
                    mCache.put(request.getCacheKey(), response.cacheEntry);
                    request.addMarker("network-cache-written");
                }

                // Post the response back.
                request.markDelivered();
                mDelivery.postResponse(request, response);
            } catch (VolleyError volleyError) {
                volleyError.setNetworkTimeMs(SystemClock.elapsedRealtime() - startTimeMs);
                parseAndDeliverNetworkError(request, volleyError);
            } catch (Exception e) {
                VolleyLog.e(e, "Unhandled exception %s", e.toString());
                VolleyError volleyError = new VolleyError(e);
                volleyError.setNetworkTimeMs(SystemClock.elapsedRealtime() - startTimeMs);
                mDelivery.postError(request, volleyError);
            }
        }
    }
a.首先设置线程的优先级,同样是一个阻塞式的循环,记录开始时间,然后从队列中取
 long startTimeMs = SystemClock.elapsedRealtime();
            Request<?> request;
            try {
                // Take a request from the queue.
                request = mQueue.take();
            } catch (InterruptedException e) {
                // We may have been interrupted because it was time to quit.
                if (mQuit) {
                    return;
                }
                continue;
            }
b.同样添加loger日志,判断请求是否已经取消过,如果已经isCanceled()则进行finished()
mRequestQueue.finish(this);
c.否则添加网络流量监控,调用相应的处理方式(这里用到了泛型 mNetwork,接收两种类型的参数 HurlStack,httpClientStack )
 addTrafficStatsTag(request);

        // Perform the network request.
        NetworkResponse networkResponse = mNetwork.performRequest(request);
        request.addMarker("network-http-complete");
d.这里只简单介绍HurlStack的处理方式,httpClientStack和HurlStack是相同的
      @Override
    public HttpResponse performRequest(Request<?> request, Map<String, String> additionalHeaders)
            throws IOException, AuthFailureError {
        String url = request.getUrl();
        HashMap<String, String> map = new HashMap<String, String>();
        map.putAll(request.getHeaders());
        map.putAll(additionalHeaders);
        if (mUrlRewriter != null) {
            String rewritten = mUrlRewriter.rewriteUrl(url);
            if (rewritten == null) {
                throw new IOException("URL blocked by rewriter: " + url);
            }
            url = rewritten;
        }
        URL parsedUrl = new URL(url);
        HttpURLConnection connection = openConnection(parsedUrl, request);
        for (String headerName : map.keySet()) {
            connection.addRequestProperty(headerName, map.get(headerName));
        }
        setConnectionParametersForRequest(connection, request);
        // Initialize HttpResponse with data from the HttpURLConnection.
        ProtocolVersion protocolVersion = new ProtocolVersion("HTTP", 1, 1);
        int responseCode = connection.getResponseCode();
        if (responseCode == -1) {
            // -1 is returned by getResponseCode() if the response code could not be retrieved.
            // Signal to the caller that something was wrong with the connection.
            throw new IOException("Could not retrieve response code from HttpUrlConnection.");
        }
        StatusLine responseStatus = new BasicStatusLine(protocolVersion,
                connection.getResponseCode(), connection.getResponseMessage());
        BasicHttpResponse response = new BasicHttpResponse(responseStatus);
        response.setEntity(entityFromConnection(connection));
        for (Entry<String, List<String>> header : connection.getHeaderFields().entrySet()) {
            if (header.getKey() != null) {
                Header h = new BasicHeader(header.getKey(), header.getValue().get(0));
                response.addHeader(h);
            }
        }
        return response;
    }
这里前面和httpURLConnection相同,后面则是将返回结果进行了一个封装。直接返回。
 StatusLine responseStatus = new BasicStatusLine(protocolVersion,
                connection.getResponseCode(), connection.getResponseMessage());
        BasicHttpResponse response = new BasicHttpResponse(responseStatus);
        response.setEntity(entityFromConnection(connection));
        for (Entry<String, List<String>> header : connection.getHeaderFields().entrySet()) {
            if (header.getKey() != null) {
                Header h = new BasicHeader(header.getKey(), header.getValue().get(0));
                response.addHeader(h);
            }
        }
        return response;
返回到NetworkDispather中进行解析处理,最后调用返回Ui线程。 这就是一个网络请求的简单流程
  NetworkResponse networkResponse = mNetwork.performRequest(request);
                request.addMarker("network-http-complete");

                // If the server returned 304 AND we delivered a response already,
                // we're done -- don't deliver a second identical response.
                if (networkResponse.notModified && request.hasHadResponseDelivered()) {
                    request.finish("not-modified");
                    continue;
                }

                // Parse the response here on the worker thread.
                Response<?> response = request.parseNetworkResponse(networkResponse);
                request.addMarker("network-parse-complete");

                // Write to cache if applicable.
                // TODO: Only update cache metadata instead of entire record for 304s.
                if (request.shouldCache() && response.cacheEntry != null) {
                    mCache.put(request.getCacheKey(), response.cacheEntry);
                    request.addMarker("network-cache-written");
                }

                // Post the response back.
                request.markDelivered();
                mDelivery.postResponse(request, response);
1.接下来会将volley单独拆分出来,分块进行详细分析。


 2万+
2万+

 被折叠的 条评论
为什么被折叠?
被折叠的 条评论
为什么被折叠?
 到【灌水乐园】发言


