


声明:本文除Demo外的部分,整理,转载自:http://blog.csdn.net/qinjuning/article/details/7247126
首先 ,我们必须明白在Android View视图是没有边界的,Canvas是没有边界的,只不过我们通过绘制特定的View时对Canvas对象进行了一定的操作,例如 : translate(平移)、clipRect(剪切)等,以便达到我们的对该Canvas对象绘制的要求 ,我们可以将这种无边界的视图称为“视图坐标”-----它不受物理屏幕限制。通常我们所理解的一个Layout布局文件只是该视图的显示区域,超过了这个显示区域将不能显示到父视图的区域中 ,对应的,我们可以将这种有边界的视图称为“布局坐标”------ 父视图给子视图分配的布局(layout)大小。而且, 一个视图的在屏幕的起始坐标位于视图坐标起始处,如下图所示。
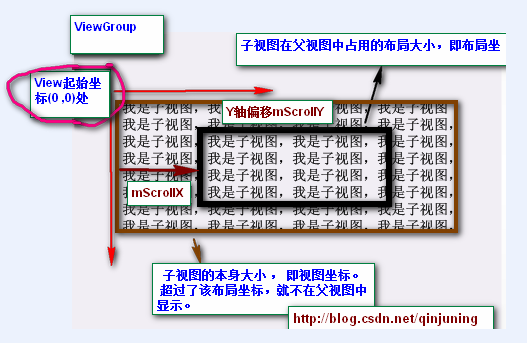
黑色框框表示该子视图的布局坐标, 褐色框框表示该子视图的视图坐标--该坐标是无限的,超过了父视图给子视图规定的区域后,不再显示该超出内容。
那么下面的问题就是:如何将我们的视图的任意坐标能显示到该视图的中心坐标上呢? 由于该布局位置是只能显示特定的一块视图内容 ,因此我们需要通过scrollTo()或者scrollBy()方法将我们期望的视图“滚动”至布局坐标上。
在View.java中提供了了如下两个变量以及相应的属性方法去读取滚动值 ,如下: View.java类中:
/**
     * The offset, in pixels, by which the content of this view is scrolled
     * horizontally.
     * {@hide}
     */
    protected int mScrollX;   //该视图内容相当于视图起始坐标的偏移量   , X轴 方向
    /**
     * The offset, in pixels, by which the content of this view is scrolled
     * vertically.
     * {@hide}
     */
    protected int mScrollY;   //该视图内容相当于视图起始坐标的偏移量   , Y轴方向

    /**
     * Return the scrolled left position of this view. This is the left edge of
     * the displayed part of your view. You do not need to draw any pixels
     * farther left, since those are outside of the frame of your view on
     * screen.
     *
     * @return The left edge of the displayed part of your view, in pixels.
     */
    public final int getScrollX() {
        return mScrollX;
    }

    /**
     * Return the scrolled top position of this view. This is the top edge of
     * the displayed part of your view. You do not need to draw any pixels above
     * it, since those are outside of the frame of your view on screen.
     *
     * @return The top edge of the displayed part of your view, in pixels.
     */
    public final int getScrollY() {
        return mScrollY;
} 具体内容实现,而不针对绘制背景图片等 。
提示:下文中提到的当前视图内容是在绘制在布局坐标处的内容。
public void scrollTo(int x, int y)
说明:在当前视图内容偏移至(x , y)坐标处,即显示(可视)区域位于(x , y)坐标处。
 * Set the scrolled position of your view. This will cause a call to
 * {@link #onScrollChanged(int, int, int, int)} and the view will be
 * invalidated.
 * @param x the x position to scroll to
 * @param y the y position to scroll to
 */
public void scrollTo(int x, int y) {
    //偏移位置发生了改变
    if (mScrollX != x || mScrollY != y) {
        int oldX = mScrollX;
        int oldY = mScrollY;
        mScrollX = x;  //赋新值,保存当前便宜量
        mScrollY = y;
        //回调onScrollChanged方法
        onScrollChanged(mScrollX, mScrollY, oldX, oldY);
        if (!awakenScrollBars()) {
            invalidate();  //一般都引起重绘
        }
    }
} 说明:在当前视图内容继续偏移(x , y)个单位,显示(可视)区域也跟着偏移(x,y)个单位。
/**
   * Move the scrolled position of your view. This will cause a call to
   * {@link #onScrollChanged(int, int, int, int)} and the view will be
   * invalidated.
   * @param x the amount of pixels to scroll by horizontally
   * @param y the amount of pixels to scroll by vertically
   */
  // 看出原因了吧 。。 mScrollX 与 mScrollY 代表我们当前偏移的位置 , 在当前位置继续偏移(x ,y)个单位
  public void scrollBy(int x, int y) {
      scrollTo(mScrollX + x, mScrollY + y);
  }
Demo代码:
public class Activity1 extends Activity {

	private Button scrollToLeft;
	private Button scrollToRight;
	private Button scrollByLeft;
	private Button scrollByRight;
	private TextView text;
	private ImageView img;

	@Override
	protected void onCreate(Bundle savedInstanceState) {
		super.onCreate(savedInstanceState);
		setContentView(R.layout.activity_activity1);

		initViews();
	}

	private void initViews() {
		scrollToLeft = (Button) findViewById(R.id.btn_scroll_left);
		scrollToRight = (Button) findViewById(R.id.btn_scroll_right);
		scrollByLeft = (Button) findViewById(R.id.btn_scrollby_left);
		scrollByRight = (Button) findViewById(R.id.btn_scrollby_right);
		text = (TextView) findViewById(R.id.text);
		img = (ImageView) findViewById(R.id.img);
		scrollToLeft.setOnClickListener(new OnClickListener() {

			@Override
			public void onClick(View v) {
				text.scrollTo(100, 0);
				img.scrollTo(100, 0);
			}
		});
		scrollToRight.setOnClickListener(new OnClickListener() {

			@Override
			public void onClick(View v) {
				text.scrollTo(-100, 0);
				img.scrollTo(-100, 0);
			}
		});
		scrollByLeft.setOnClickListener(new OnClickListener() {

			@Override
			public void onClick(View v) {
				text.scrollBy(20, 10);
				img.scrollBy(20, 10);
			}
		});
		scrollByRight.setOnClickListener(new OnClickListener() {

			@Override
			public void onClick(View v) {
				text.scrollBy(-20, -10);
				img.scrollBy(-20, -10);
			}
		});

	}
}<LinearLayout xmlns:android="http://schemas.android.com/apk/res/android"
xmlns:tools="http://schemas.android.com/tools"
android:layout_width="match_parent"
android:layout_height="match_parent"
android:orientation="vertical"
tools:context="com.example.scrollerlearn.Activity1" >
<Button
android:id="@+id/btn_scroll_left"
android:layout_width="wrap_content"
android:layout_height="wrap_content"
android:text="scrollTo left"
/>
<Button
android:id="@+id/btn_scroll_right"
android:layout_width="wrap_content"
android:layout_height="wrap_content"
android:text="scrollTo right"
/>
<Button
android:id="@+id/btn_scrollby_left"
android:layout_width="wrap_content"
android:layout_height="wrap_content"
android:text="scrollBy left"
/>
<Button
android:id="@+id/btn_scrollby_right"
android:layout_width="wrap_content"
android:layout_height="wrap_content"
android:text="scrollBy right"
/>
<TextView
android:id="@+id/text"
android:layout_width="100dp"
android:layout_height="100dp"
android:text="@string/hello_world"
android:background="@android:color/holo_green_dark"
/>
<ImageView
android:id="@+id/img"
android:layout_width="100dp"
android:layout_height="100dp"
android:src="@drawable/ic_launcher"
/>
</LinearLayout>


点击srollTo left,srollTo right,会立即将控件内容移动到指定坐标, scrollBy left,scrollBy right会在当前位置进行平移,TextView是设置了背景色的,但是只有字体会移动,而背景色不会,因为这个偏移量是针对onDraw方法的具体内容实现的,同样,ImageView的src属性的图片会移动,而背景色不会。


 536
536


 被折叠的 条评论
为什么被折叠?
被折叠的 条评论
为什么被折叠?
 到【灌水乐园】发言


