


前几篇文章分别介绍了Security的原理和源码、讲解了实现整合Security的实现思路、讲解了认证成功和失败后的处理方法。
1.已实现内容说明
1.1.自定了认证过滤器
实现UsernamePasswordAuthenticationFilter,重写了里面的认证方法、认证成功和失败的处理方法。
@Slf4j
public class CustomerAuthenticationFilter extends UsernamePasswordAuthenticationFilter {

    private final AuthenticationManager authenticationManager;
    private final JwtProperty jwtProperty;

    public CustomerAuthenticationFilter (AuthenticationManager authenticationManager, JwtProperty jwtProperty) {
        this.authenticationManager = authenticationManager;
        this.jwtProperty = jwtProperty;
    }

    /**
     * 重写用户认证入口
     *
     * @param request
     * @param response
     * @return
     * @throws AuthenticationException
     */
    @Override
    public Authentication attemptAuthentication(HttpServletRequest request,
                                                HttpServletResponse response) throws AuthenticationException {
        String contentType = request.getContentType();
        String username;
        String password;
        // json请求处理
        if ("application/json".equals(contentType)) {
            SysUser sysUser = null;
            try {
                sysUser = new ObjectMapper().readValue(request.getInputStream(), SysUser.class);
            } catch (IOException e) {
                log.error("请求数据异常,未读取到用户信息");
                return null;
            }
            username = sysUser.getUsername();
            password = sysUser.getPassword();
        } else {
            //表单数据处理
            username = this.obtainUsername(request);
            password = this.obtainPassword(request);
        }

        //如果用户没有输入用户名返回null
        if (StringUtils.isEmpty(username) || StringUtils.isEmpty(password)) {
            log.error("请求数据异常,未提交用户名或密码");
            throw new UsernameNotFoundException("请求参数异常");
        }
        return authenticationManager.authenticate(new UsernamePasswordAuthenticationToken(username, password));
    }

    /**
     * 认证成功的处理
     *
     * @param request
     * @param response
     * @param chain
     * @param authResult
     * @throws IOException
     * @throws ServletException
     */
    @Override
    public void successfulAuthentication(HttpServletRequest request,
                                         HttpServletResponse response,
                                         FilterChain chain,
                                         Authentication authResult) throws IOException, ServletException {
        SysUser user = new SysUser();
        user.setUsername(authResult.getName());
        user.setAuthoritiesFromAuthority(authResult.getAuthorities());
        String token = JwtUtils.generateExpireTokenWithSecretKey(user, jwtProperty.getBase64EncodedKey(), 24 * 60 * 60);
        response.addHeader("Authorization", "Bearer " + token);
        //登录成功时,返回json格式进行提示
        response.setContentType("application/json;charset=utf-8");
        response.setStatus(HttpServletResponse.SC_OK);
        PrintWriter out = response.getWriter();
        out.write(new ObjectMapper().writeValueAsString(R.ok(null, "登陆成功")));
        out.flush();
        out.close();
    }

    /**
     * 认证失败异常处理
     *
     * @param request
     * @param response
     * @param failed
     * @throws IOException
     * @throws ServletException
     */
    @Override
    public void unsuccessfulAuthentication(HttpServletRequest request,
                                           HttpServletResponse response,
                                           AuthenticationException failed) throws IOException, ServletException {
        SecurityContextHolder.clearContext();
        response.setContentType("application/json;charset=utf-8");
        PrintWriter writer = response.getWriter();
        R r = R.failed();
        if (failed instanceof InsufficientAuthenticationException) {
            r.setMsg("请先登录~~");
        } else if (failed instanceof BadCredentialsException) {
            r.setMsg("用户名或密码错误");
        } else if (failed instanceof UsernameNotFoundException) {
            r.setMsg(failed.getLocalizedMessage());
        } else {
            r.setMsg("用户认证失败,请检查后重试");
        }
        writer.write(new ObjectMapper().writeValueAsString(r));
        writer.flush();
        writer.close();
    }
}
1.2.自定义UserDetail对象
public class EdenUser extends User {

    private static final long serialVersionUID = SpringSecurityCoreVersion.SERIAL_VERSION_UID;

    /**
     * 用户ID
     */

    @Getter
    private String userId;

    @Getter
    private String username;

    @Getter
    private String password;

    /**
     * 拓展字段:权限
     */
    // private Set<String> perms;
    @JsonCreator
    public EdenUser(@JsonProperty("userId") String userId,
                    @JsonProperty("username") String username, @JsonProperty("password") String password,
                    @JsonProperty("enabled") boolean enabled, @JsonProperty("accountNonExpired") boolean accountNonExpired,
                    @JsonProperty("credentialsNonExpired") boolean credentialsNonExpired,
                    @JsonProperty("accountNonLocked") boolean accountNonLocked,
                    @JsonProperty("authorities") Collection<? extends GrantedAuthority> authorities) {
        super(username, password, enabled, accountNonExpired, credentialsNonExpired, accountNonLocked, authorities);
        this.userId = userId;
        this.username = username;
        this.password = password;
    }
}
1.3. 自定义loadUserByUsername方法
有了自己的从数据库获取用户信息的逻辑。
因为是分布式系统,所以这里发出了Feign调用请求,调用system服务获取用户信息(主要是用户名和密码)、权限和菜单权限。system的代码这里就不再贴了,每个人的表结构也不同。即便你是单体服务直接查库,反正只要把这些信息都拿到,满足最后封装你的UserDetail对象的条件就行了。
@Slf4j
@Service
public class EdenUserDetailServiceImpl implements UserDetailsService {

    @Autowired
    private RemoteUserFeign userFeign;

    /**
     * 自定义授权认证
     *
     * @param username 用户登录时输入的用户名
     */
    @Override
    public UserDetails loadUserByUsername(String username) throws UsernameNotFoundException {
        SysUser sysUser = userFeign.loadUserByUsername(username);

        if (sysUser == null) {
            log.error("未查询到用户:{}的账户信息", username);
            throw new UsernameNotFoundException("用户名或密码错误");
        }

        // 封裝並返回對象
        List<String> permissions = sysUser.getRoles();
        permissions.addAll(sysUser.getPerms());
        return new EdenUser(sysUser.getId(), username, sysUser.getPassword(),
                true, true, true, true, AuthorityUtils.commaSeparatedStringToAuthorityList(StringUtils.collectionToCommaDelimitedString(permissions)));
    }
}
1.4.自定义Security配置
@Configuration
@EnableWebSecurity
@EnableGlobalMethodSecurity(securedEnabled = true)
public class EdenWebSecurityConfig extends WebSecurityConfigurerAdapter {

    @Autowired
    private UserDetailsService userDetailService;

    @Autowired
    private EdenLoginSuccessHandler loginSuccessHandler;

    @Autowired
    private EdenLoginFailureHandler loginFailureHandler;

    @Autowired
    private EdenLogoutSuccessHandler logoutSuccessHandler;

    @Autowired
    private AuthProperty authProperty;

    @Autowired
    private JwtProperty jwtProperty;
    ;

    /***
     * 采用BCryptPasswordEncoder对密码进行编码
     * @return
     */
    @Bean
    public PasswordEncoder passwordEncoder() {
        return new BCryptPasswordEncoder();
    }

    /**
     * 核心过滤器配置:
     * 一般用来配置对静态资源的拦截忽略
     *
     * @param web
     * @throws Exception
     */
    @Override
    public void configure(WebSecurity web) throws Exception {
        web.ignoring()
                .antMatchers("/test/**");
    }

    /**
     * 安全过滤器链配置:
     * 用于构建一个安全过滤器链 SecurityFilterChain
     *
     * @param http
     * @throws Exception
     */
    @Override
    protected void configure(HttpSecurity http) throws Exception {

        String ignoreUrls = "";
        if (CollectionUtil.isNotEmpty(authProperty.getIgnoreUrls())) {
            ignoreUrls = String.join(StrUtil.COMMA, authProperty.getIgnoreUrls());
            http.authorizeRequests().antMatchers(ignoreUrls).permitAll();
        }
        http
                // 禁用csrf攻击防护
                .csrf().disable()
                .sessionManagement().sessionCreationPolicy(SessionCreationPolicy.STATELESS)
                .and()
                .authorizeRequests()
                //其余接口,认证通过后即可访问
                .anyRequest().authenticated()
                .and()
                //启用表单身份验证
                .formLogin()
                //设置进行登录请求处理的接口地址
                .loginProcessingUrl("/login")
                .permitAll() // 和表单登录有关的直接放行
                .and()
                .logout()
                .logoutUrl("/logout")
                .logoutSuccessHandler(logoutSuccessHandler)
                .permitAll() // 和退出登录有关的直接放行
                .and()
                .addFilter(new CustomerAuthenticationFilter(authenticationManager(), jwtProperty))
        ;
    }

    /**
     * 身份认证管理器配置:
     * 配置身份认证相关
     *
     * @param auth
     * @throws Exception
     */
    @Override
    protected void configure(AuthenticationManagerBuilder auth) throws Exception {
        auth.userDetailsService(userDetailService).passwordEncoder(passwordEncoder());
    }

    /**
     * @Author: Yan
     * @Since: 2023/2/4
     * @Description: AuthenticationManager对象在OAuth2认证服务中要使用,提取放入IOC容器中
     */
    @Bean
    @Override
    public AuthenticationManager authenticationManagerBean() throws Exception {
        return super.authenticationManagerBean();
    }
}
1.5.存入上下文
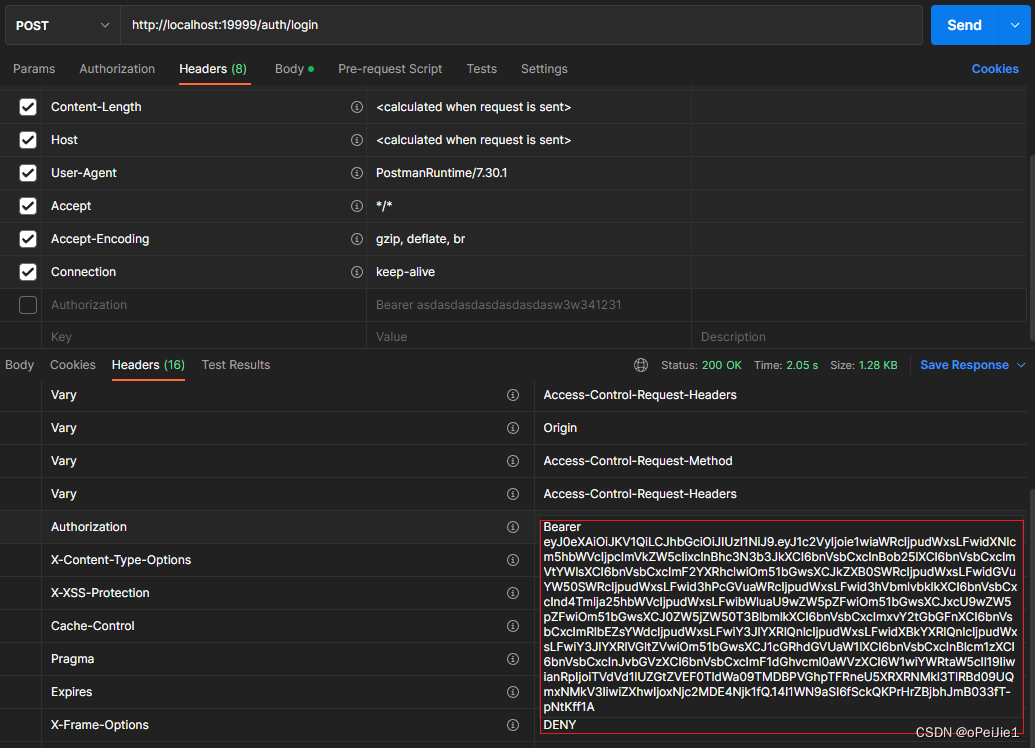
经过上面的配置,当请求登录通过了认证后,Security如约地返回了Token。Token中是自定义封装的信息,包含有用户名、密码和权限列表都作为payload放在jwt中,而且还被秘钥加了密。
1.6.网关放行
因为是分布式系统,网关(gateway)也配置了Token的验证和放行。如果你不知道我在说什么,看看之前的文章《Spring Security的实现思路》。在这一篇文章里提到了我们所使用的网关验证、资源服务解析的方式。而且网关顺利的拦截到了请求,并验证通过了Token后放行。
@Component
@AllArgsConstructor
public class AuthGlobalFilter implements GlobalFilter, Ordered {

    private final JwtProperty jwtProperty;

    private final List<String> IGNORE_URIS = CollectionUtil.newArrayList("/auth/login", "/auth/logout", "/auth/oauth/**");

    @SneakyThrows
    @Override
    public Mono<Void> filter(ServerWebExchange exchange, GatewayFilterChain chain) {
        ServerHttpRequest request = exchange.getRequest();
        //直接放行部分请求路径,如登录、退出等  需要排除的路径弄成可yaml配置的
        if (IGNORE_URIS.contains(request.getURI().getPath())) {
            return chain.filter(exchange);
        }

        //获取请求头中的令牌
        String token = request.getHeaders().getFirst(SecurityConstant.AUTHENTICATION_HEADER);
        // 其他路径,没有令牌或令牌校验失败,不允许访问
        if (StrUtil.isBlank(token) || !JwtUtils.verify(token.replace(SecurityConstant.AUTHENTICATION_PREFIX, ""),
                jwtProperty.getBase64EncodedKey())) {
            ServerHttpResponse response = exchange.getResponse();
            // 结束请求并响应信息
            response.setStatusCode(HttpStatus.UNAUTHORIZED);
            return response.writeWith(
                    Mono.just(response.bufferFactory()
                            .wrap(new ObjectMapper().writeValueAsBytes(R.failed(HttpStatusEnum.of(HttpStatus.UNAUTHORIZED.value()))))
                    )
            );
        }
        return chain.filter(exchange);
    }

    /**
     * 优先执行对权限的校验
     *
     * @return 最高执行级别
     */
    @Override
    public int getOrder() {
        return Ordered.HIGHEST_PRECEDENCE;
    }
}
上面就是我们为整合Security已经完成的工作。后面我们将请求一个自定义接口,看能够顺利进入接口拿到响应。
下面是我在认证服务中自定义的一个接口,专门用来做请求的验证。
@RestController
@RequestMapping("/oauth")
public class AuthController {
    /**
     * 登陆后,访问测试
     *
     * @return
     */
    @RequestMapping("/toLogin")
    public String toLogin() {
        return "login";
    }
}
2.问题
如果按照上面贴出的配置,我们能请求到接口嘛?答案是否定的。Token也携带了,放出请求后,网关放行了。但我还是看到了熟悉的登陆界面…

这说明我们还是被Security拦住了?why???
3.原因分析
结论是,因为Security始终没有办法从SecurityContext中获取到用户信息。
Security框架获取信息肯定是从他自己的SecurityContext上下文中取,不可能从request请求里面拿吧,即便拿了也只能拿到Jwt形式的Token而已,框架自己又不会解密。他从上下文中得不到你的用户信息认为你就是没有登录,没登录那就去登录页面呗。
我们之前说过Secuirty是通过过滤器链实现功能的。他的过滤器有15个。
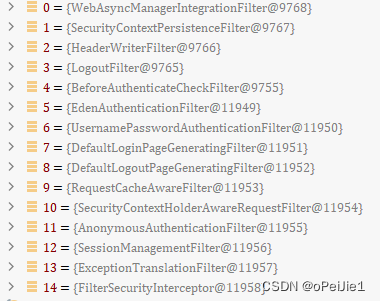
第二个过滤器的名字SecurityContextPersistenceFilter,一看就是上下文持久化有关的。
当你发出请求并没有将用户信息解析出来放在SecurityContext中的时候,这个过滤器从上下文里面也就拿不到,拿不到就没有办法做持久化,供后续使用。
4.解决方法
既然原因是没有放用户信息在SecurityContext,那就放一个呗。但,在哪放?
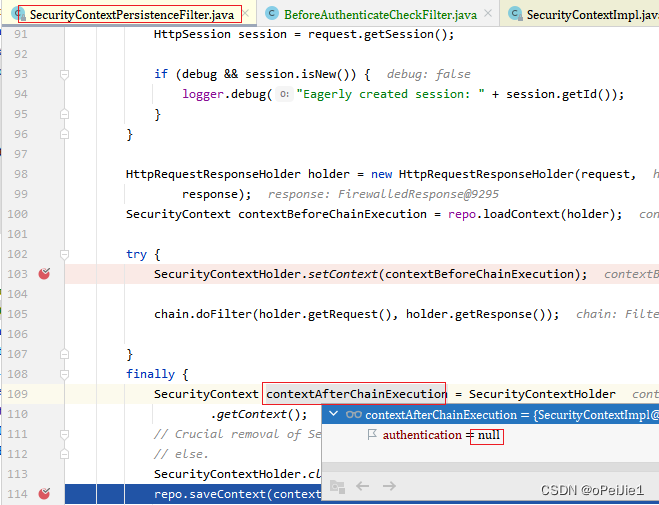
我们可以从上面的代码中看到,这个过滤器执行过程中有放行的操作chain.doFilter(holder.getRequest(), holder.getResponse());,放行就是传递给后面的过滤器链继续执行,但代码里我们看到最后会回到finally代码块里面继续执行持久化的操作。
那我们就在持久化之前保证他能从SecurityContext中获取到用户信息,能有东西做持久化不就好了?我们来说具体做法。
4.1.自定义过滤器
在这个过滤器doFilter的时候,把请求放行到你自定义的过滤器;在自定义的过滤器里往SecurityContext放入用户信息就行了。
示例如下:
public class BeforeAuthenticateCheckFilter extends OncePerRequestFilter {

    private JwtProperty jwtProperty;

    public BeforeAuthenticateCheckFilter(JwtProperty jwtProperty) {
        this.jwtProperty = jwtProperty;
    }

    @Override
    protected void doFilterInternal(HttpServletRequest request, HttpServletResponse response,
                                FilterChain filterChain) throws ServletException, IOException {
        //获取请求头中的令牌
        String token = request.getHeader(SecurityConstant.AUTHENTICATION_HEADER);
        // 其没有令牌,直接放行
        if (StrUtil.isBlank(token)) {
            filterChain.doFilter(request, response);
            return;
        }
        //解析令牌
        EdenUser user = JSONObject.parseObject(JwtUtils.parserToken2ObjectWithSecretKey(
                token.replace(SecurityConstant.AUTHENTICATION_PREFIX, ""),
                jwtProperty.getBase64EncodedKey()), EdenUser.class);
        System.out.println(user);
        if (null == user) {
            WebUtils.response(response, HttpServletResponse.SC_UNAUTHORIZED,
                    new ObjectMapper().writeValueAsString(R.failed("用户信息异常")));
            return;
        }
        //将用户信息存入上下文
        SecurityContextHolder.getContext().setAuthentication(new UsernamePasswordAuthenticationToken(
                user, user.getPassword(), user.getAuthorities()));
        filterChain.doFilter(request, response);
    }
}
特别注意:如果没有请求中没有令牌,一定要放行,让后面的过滤器处理,不要直接结束请求。
想想这个道理,后面我们需要把它放在登录认证过滤器的前面,万一人家就是要去登录呢,现在肯定是没有Token的,如果这里不放行,那岂不是永远也登陆不了了…
    // 其没有令牌,直接放行
    if (StrUtil.isBlank(token)) {
        filterChain.doFilter(request, response);
        return;
    }
4.2.配置过滤器
上面是自定义过滤器,解析出用户信息并存入上下文。还有一步那就是自定义过滤器加入到过滤器链中。
通常的做法是:自定义过滤器加在UsernamePasswordAuthenticationFilter过滤器之前。
示例如下:
 @Override
    protected void configure(HttpSecurity http) throws Exception {

        String ignoreUrls = "";
        if (CollectionUtil.isNotEmpty(authProperty.getIgnoreUrls())) {
            ignoreUrls = String.join(StrUtil.COMMA, authProperty.getIgnoreUrls());
            http.authorizeRequests().antMatchers(ignoreUrls).permitAll();
        }
        http
                // 此处省略无关配置
                .addFilterBefore(new BeforeAuthenticateCheckFilter(jwtProperty), CustomerAuthenticationFilter.class)
                .addFilter(new CustomerAuthenticationFilter(authenticationManager(), jwtProperty));
    };
CustomerAuthenticationFilter是我们自定义的UsernamePasswordAuthenticationFilter的实现类,用来处理用户信息认证逻辑的核心过滤器。我们这次自定义的过滤器就放在他前面。

5.测试
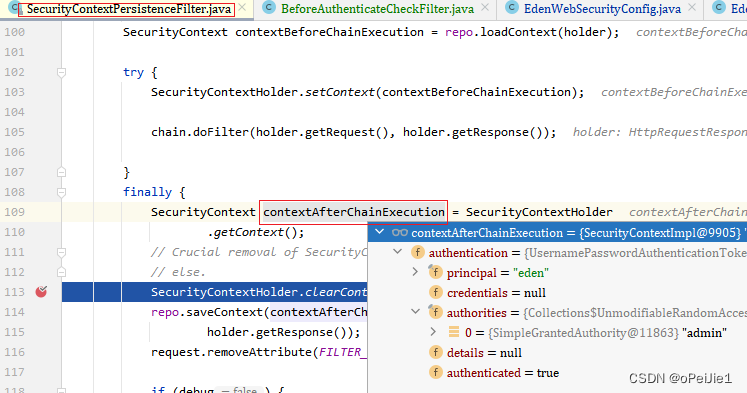
重启后再进行测试。持久化之前能取到用户信息了; 接口有响应了。

6.退出登陆

继续看图,想一个问题,如果退出登陆,继续携带者token去发出请求,难道就不能再通过认证访问接口了吗?
之前我们的逻辑是只要有token就会被网关放行,被5BeforeAuthenticateCheckFilter放入到上下文中。有认证信息那就可以继续访问,也就是说退出登录对我来说是个摆设。那如何真正的让退出登录的用户无法访问呢?
6.1.思路
- 登陆成功后,将用户信息存入Redis缓存;
- 用户请求时,不只要解析并校验token,还要从redis里获取缓存的用户信息,最后放入上下文中; 退出登录时,将redis缓存信息删除;
- 退出登陆后,如果用户再携带token请求,但是redis里面没有了用户信息,我们就认为用户已经退出登陆了,不再让它继续往目标接口走。
5.2.问题
5.2.1.重点问题1
登录成功放入缓存;正常请求时验证缓存;退出登录要删除缓存。 代码见后面部分。
5.2.2.重点问题2
从图上看,退出登录的过滤器LogoutFilter在我们放入认证信息的过滤器BeforeAuthenticateCheckFilter前面。

此时我们还没往上下文里面放用户认证信息呢,那么我们在登陆过滤器LogoutFilter里获取上下文的认证信息那就是null,拿不到用户信息也就没有办法删除Redis缓存。
如果我们发送请求的时候把用户信息带上呢?令人失望的是,源码的logout处理方法没有从请求中获取用户名的操作,而我们又不用session,所以还是拿不到用户信息。

5.3.处理方法一
5.3.1.登录成功处理
在EdenAuthenticationFilter认证处理过滤器的认证成功方法successfulAuthentication中,将用户信息放入Redis缓存。
@Override
public void successfulAuthentication(HttpServletRequest request, HttpServletResponse response,
                                     FilterChain chain,
                                     Authentication authResult) throws IOException, ServletException {
    EdenUser user = (EdenUser) authResult.getPrincipal();

    // 将用户信息放入redis
    redisCacheUtils.setCacheObject(CacheConstants.USER_DETAILS + user.getUserId(), JSON.toJSONString(user));

    String token = JwtUtils.generateExpireTokenWithSecretKey(user, jwtProperty.getBase64EncodedKey(), 24 * 60 * 60);
    response.addHeader("Authorization", "Bearer " + token);
    //登录成功时,返回json格式进行提示
    WebUtils.response(response, HttpServletResponse.SC_OK,
            new ObjectMapper().writeValueAsString(R.ok(null, "登陆成功")));
}
5.3.2.请求过程处理
在BeforeAuthenticateCheckFilter请求检查过滤器中,解析并获取token里的用户信息;对Redis缓存的信息进行检查,没有,则认为已经退出登陆了;两次检查结束,认证信息放入上下文。
‼️这里有一点需要注意,
我们不在系统的其他任何代码位置对这个缓存键值对进行增删操作,他就是一个标志位。
真正系统运行时我们需要的用户信息,我们会再其他地方进行缓存。目前这点用户认证信息就只有用户名和权限,我们系统所需要用到的用户信息远不止这点儿。
@Override
protected void doFilterInternal(HttpServletRequest request, HttpServletResponse response,
                                FilterChain filterChain) throws ServletException, IOException {
    //获取请求头中的令牌
    String token = request.getHeader(SecurityConstant.AUTHENTICATION_HEADER);
    // 其没有令牌,直接放行
    if (StrUtil.isBlank(token)) {
        filterChain.doFilter(request, response);
        return;
    }
    //解析令牌
    EdenUser user = JSONObject.parseObject(JwtUtils.parserToken2ObjectWithSecretKey(
            token.replace(SecurityConstant.AUTHENTICATION_PREFIX, ""),
            jwtProperty.getBase64EncodedKey()), EdenUser.class);
    System.out.println(user);
    if (null == user) {
        WebUtils.response(response, HttpServletResponse.SC_UNAUTHORIZED,
                new ObjectMapper().writeValueAsString(R.failed("用户信息异常")));
        return;
    }

    //从redis中获取用户信息
    if (null == redisCacheUtils.getCacheObject(CacheConstants.USER_DETAILS + user.getUserId())) {
        WebUtils.response(response, HttpServletResponse.SC_UNAUTHORIZED,
                new ObjectMapper().writeValueAsString(R.failed("请先登录~~")));
        return;
    }

    //将用户认证信息放入上下文
    SecurityContextHolder.getContext().setAuthentication(new UsernamePasswordAuthenticationToken(
            user, user.getPassword(), user.getAuthorities()));
    filterChain.doFilter(request, response);
}
5.3.3.退出登录处理
从源码里看到LogoutFilter调用了一个处理器进行退出登陆的处理,也就是上图贴出来的logout方法。
方法1
自定义一个LogoutHandler处理器,实现logout方法,从请求中获取用户信息,删除Redis缓存。
方法2
之前添加过一个自定义实现的退出登陆成功处理器EdenLogoutSuccessHandler,在onLogoutSuccess方法里获取用户信息,删除Redis缓存。
这两种方法没有什么本质区别。
另外,用户在请求退出登陆接口的时候,必须要提交用户信息。前面说过了,从上下文中是拿不到的。
方法3
前两种方法从上下文中拿不到用户认证信息。是因为自定义过滤器和退出登录过滤器在过滤器链中的顺序问题。那我们可以把BeforeAuthenticateCheckFilter放在LogoutFilter的前面是不是就能拿到用户信息了?
是的!如果你要这么做,千万别忘了,在Security的配置里改一下你的配置。大概就是这样:
		http
			.addFilterBefore(new BeforeAuthenticateCheckFilter(jwtProperty, redisCacheUtils), LogoutFilter.class)
如此一来,用户在请求退出登录时也不需要提交用户信息了,只要请求头里有Token我们就知道是谁。
5.3.4.Security配置
自定义的处理器必须要在Security的配置中注册,否则不生效。
@Override
protected void configure(HttpSecurity http) throws Exception {
    http
            // 省略无关配置
            .and()
            // 和退出登录有关的直接放行
            .logout()
            .logoutUrl(authProperty.getLogoutUrl())
            .logout()
            .addLogoutHandler(logoutHandler)
            .permitAll()
            ....;
}
或许有人会说,还有一个方法,自定义退出登录过滤器啊?!和自定义处理器没啥区别,因为退出登录过滤器里面本来就没有什么复杂逻辑。就是调用推出登录处理方法,再调用退出成功的处理方法。区别不大,自由发挥吧,别忘了在配置里面注册就行。
5.4.处理方法二
自定义controller退出登录接口,走自己的接口,直接删除缓存信息。
先要说明,用户信息存入缓存和退出登录删除缓存这个操作是必不可少的。这里不再写代码了。
特别注意
- 要在Security注册你的退出登录接口。上面的配置里就有写
.logoutUrl(“你的登录路径”).permitAll(),放行千万不要忘了。 - 这种方式,因为你对自定义的接口放行了,所以你的请求头里可以不带Token了,但是请求参数里必须要传用户信息。
- 网关也必须要放行你的自定义接口,否则没有Token,连网关都过不去。


 1万+
1万+


 被折叠的 条评论
为什么被折叠?
被折叠的 条评论
为什么被折叠?
 到【灌水乐园】发言


